Page 337 of 405

Useful information
i This Owner's Manual describes all mod-
els, series and optional equipment for your
vehicle that were available at the time of
going to press. National variations are pos-
sible. Note that your vehicle may not be
equipped with all of the functions descri-
bed. This is also the case for systems and
functions relevant to safety.
i Read the information on qualified special-
ist workshops: (Y page 24). Where will I find...?
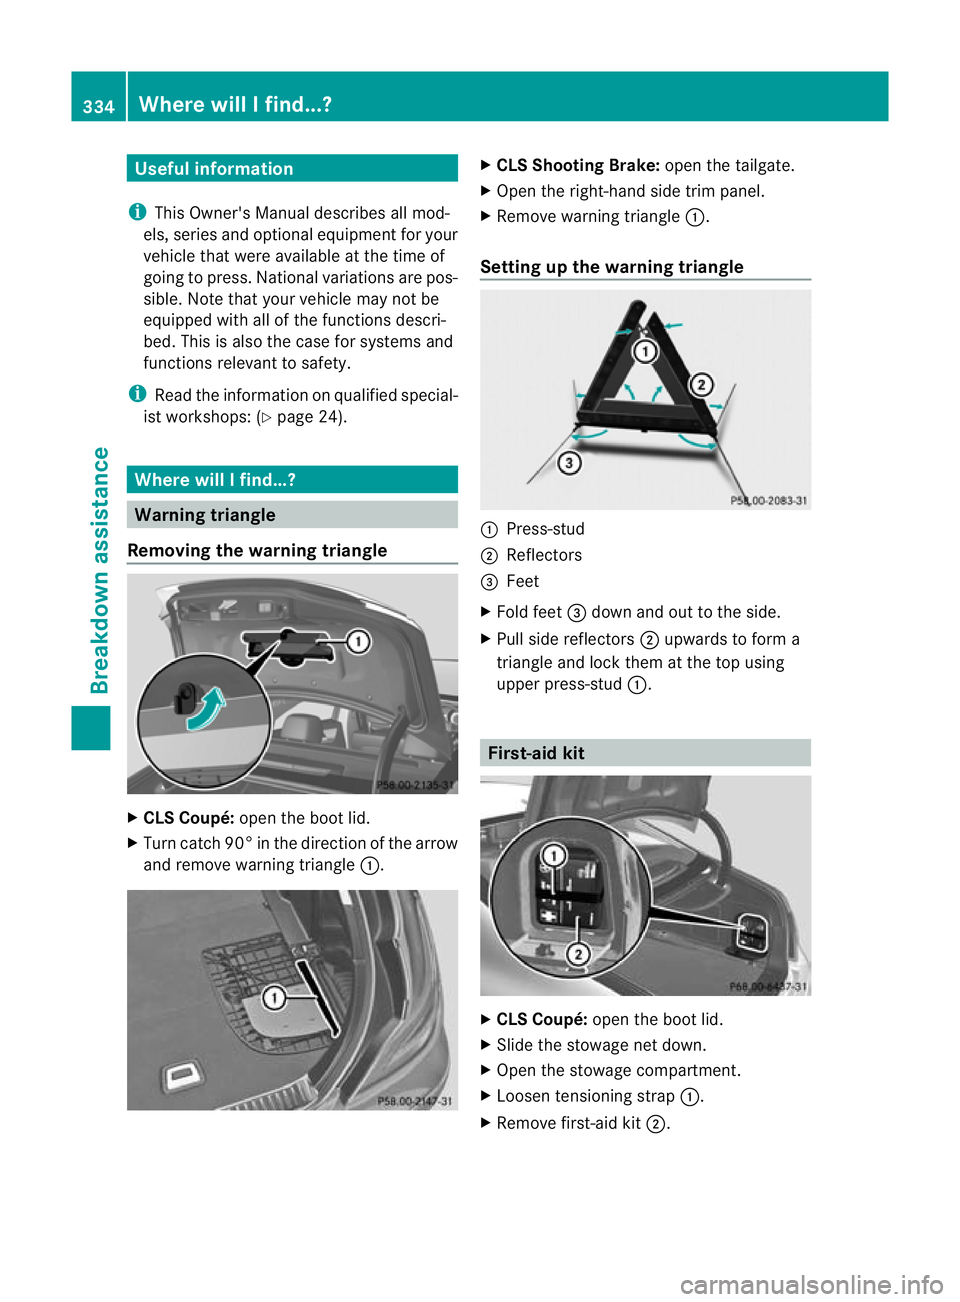
Warning triangle
Removing the warning triangle X
CLS Coupé: open the boot lid.
X Turn catc h90° in the direction of the arrow
and remove warning triangle :. X
CLS Shooting Brake: open the tailgate.
X Open the right-hand side trim panel.
X Remove warning triangle :.
Setting up the warning triangle :
Press-stud
; Reflectors
= Feet
X Fold feet =dow nand ou tto the side.
X Pull side reflectors ;upwards to form a
triangle and lock them at the top using
upper press-stud :. First-aid kit
X
CLS Coupé: open the boot lid.
X Slide the stowage net down.
X Open the stowage compartment.
X Loosen tensioning strap :.
X Remove first-aid kit ;.334
Where will I find...?Breakdown assistance
Page 339 of 405

X
Open the boot lid/tailgate.
X Swing the boot floor/luggage compart-
ment floor upwards (Y page 301) or
(Y page 302).
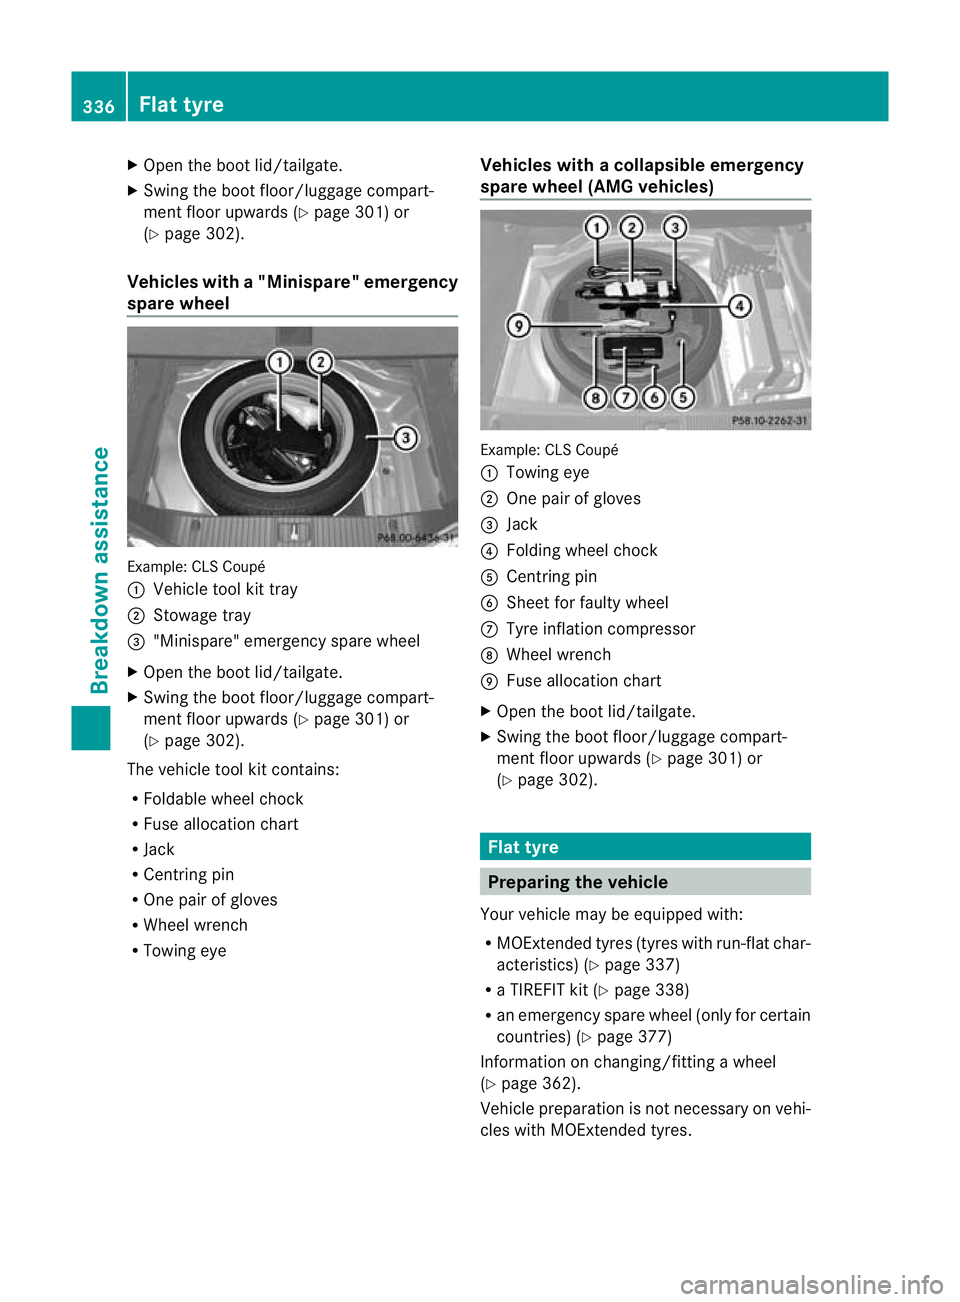
Vehicles with a"Minispare" emergency
spare wheel Example
:CLS Coupé
: Vehicle tool kit tray
; Stowage tray
= "Minispare" emergency spare wheel
X Open the boot lid/tailgate.
X Swing the boot floor/luggage compart-
ment floor upwards (Y page 301) or
(Y page 302).
The vehicle tool kit contains:
R Foldable wheel chock
R Fuse allocation chart
R Jack
R Centring pin
R One pairofg loves
R Wheel wrench
R Towing eye Vehicles with
acollapsible emergency
spare wheel (AMG vehicles) Example: CLS Coupé
:
Towing eye
; One pair of gloves
= Jack
? Folding wheel chock
A Centring pin
B Sheet for faulty wheel
C Tyre inflatio ncompressor
D Wheel wrench
E Fuse allocation chart
X Open the boot lid/tailgate.
X Swing the boot floor/luggage compart-
ment floor upwards (Y page 301) or
(Y page 302). Flat tyre
Preparing the vehicle
Your vehicle may be equipped with:
R MOExtended tyres (tyres with run-flat char-
acteristics) (Y page 337)
R a TIREFIT kit (Y page 338)
R an emergency spare wheel (only for certain
countries) (Y page 377)
Information on changing/fitting a wheel
(Y page 362).
Vehicle preparation is not necessary on vehi-
cles with MOExtended tyres. 336
Flat tyreBreakdown assistance
Page 354 of 405

X
Remove any existing moisture from the
fuse box using a dry cloth.
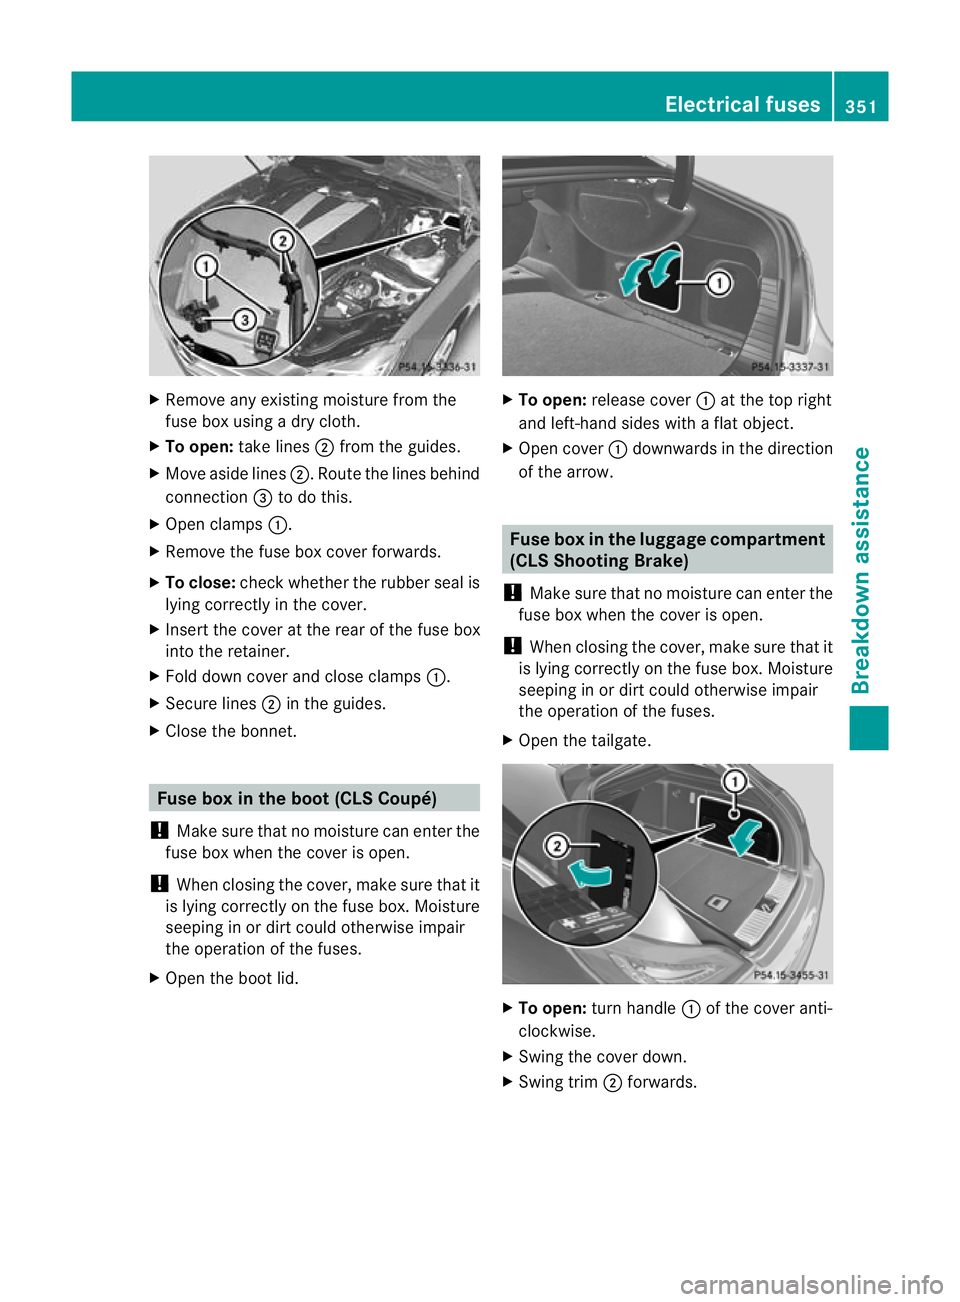
X To open: take lines ;from the guides.
X Move aside lines ;.Route the lines behind
connection =to do this.
X Open clamps :.
X Remove the fuse box cover forwards.
X To close: check whether the rubber seal is
lying correctly in the cover.
X Insert the cover at the rear of the fuse box
into the retainer.
X Fold down cover and close clamps :.
X Secure lines ;in the guides.
X Close the bonnet. Fuse box in the boot (CLS Coupé)
! Make sure that no moisture can enter the
fuse box when the cover is open.
! When closing the cover, make sure that it
is lying correctly on the fuse box. Moisture
seeping in or dirt could otherwise impair
the operation of the fuses.
X Open the boot lid. X
To open: release cover :at the top right
and left-hand sides with a flat object.
X Open cover :downwards in the direction
of the arrow. Fuse box in the luggage compartment
(CLS Shooting Brake)
! Make sure that no moisture can enter the
fuse box when the cover is open.
! When closing the cover, make sure that it
is lying correctly on the fuse box. Moisture
seeping in or dirt could otherwise impair
the operation of the fuses.
X Open the tailgate. X
To open: turn handle :of the cover anti-
clockwise.
X Swing the cover down.
X Swing trim ;forwards. Electrical fuses
351Breakdown assistance Z
Page 367 of 405

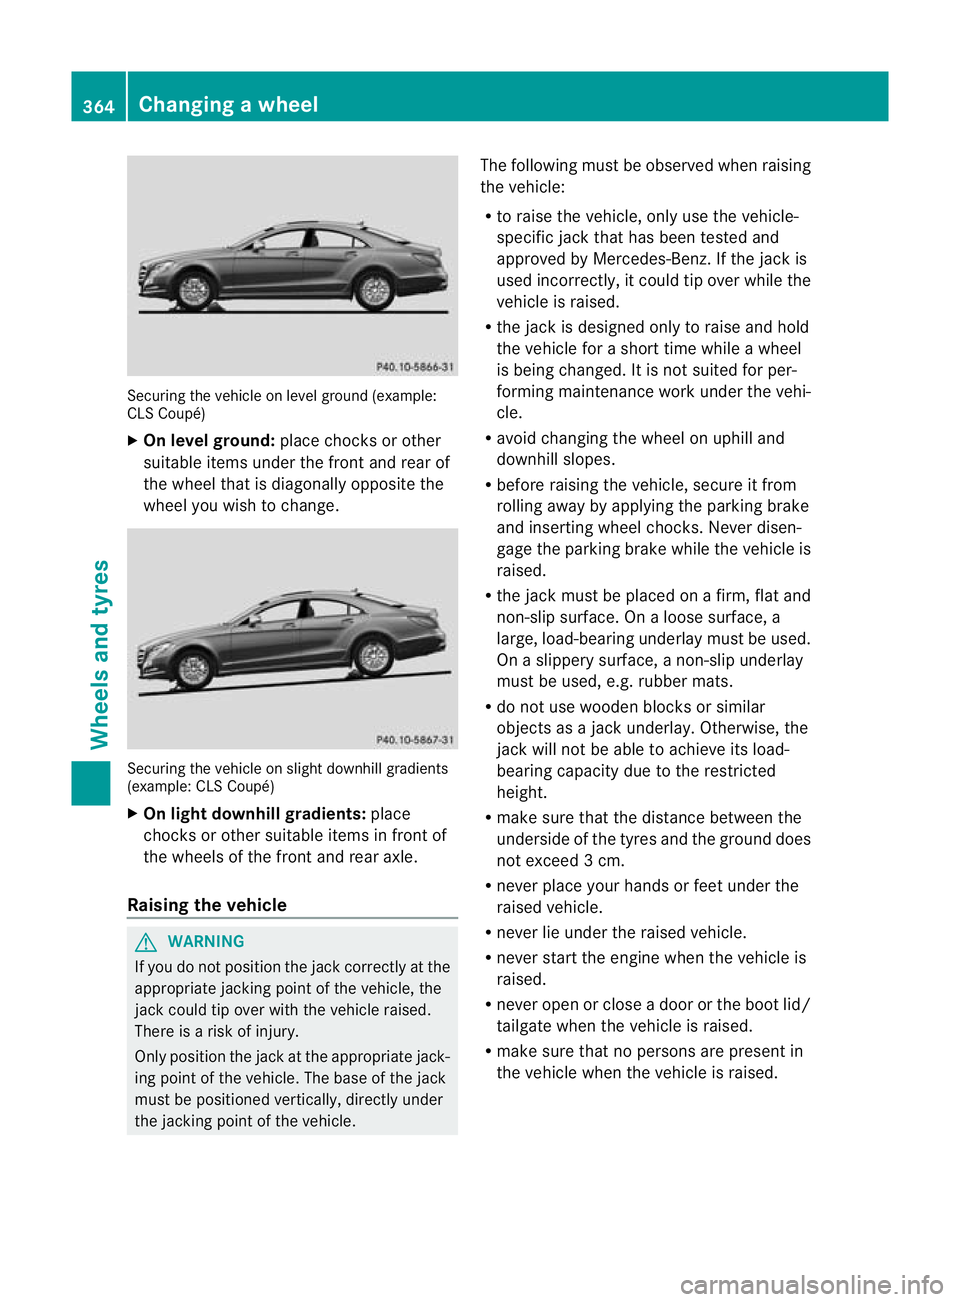
Securing the vehicle on level ground (example:
CLS Coupé)
X
On level ground: place chocks or other
suitable items under the front and rea rof
the wheel tha tis diagonally opposite the
wheel you wish to change. Securing the vehicle on slight downhill gradients
(example: CLS Coupé)
X On light downhill gradients: place
chocks or other suitable items in front of
the wheels of the front and rear axle.
Raising the vehicle G
WARNING
If you do not position the jack correctly at the
appropriate jacking point of the vehicle, the
jack could tip over with the vehicle raised.
There is a risk of injury.
Only position the jack at the appropriate jack-
ing point of the vehicle. The base of the jack
must be positioned vertically, directly under
the jacking point of the vehicle. The following must be observed when raising
the vehicle:
R
to raise the vehicle, only use the vehicle-
specific jack that has been tested and
approved by Mercedes-Benz. If the jack is
used incorrectly, it could tip over while the
vehicle is raised.
R the jack is designed only to raise and hold
the vehicle for a short time while a wheel
is being changed. It is not suited for per-
forming maintenance work under the vehi-
cle.
R avoid changing the wheel on uphill and
downhill slopes.
R before raising the vehicle, secure it from
rolling away by applying the parking brake
and inserting wheel chocks. Never disen-
gage the parking brake while the vehicle is
raised.
R the jack must be placed on a firm, flat and
non-slip surface. On a loose surface, a
large, load-bearing underlay must be used.
On a slippery surface, a non-slip underlay
must be used, e.g. rubber mats.
R do not use wooden blocks or similar
objects as a jack underlay.O therwise, the
jac kw ill not be able to achieve its load-
bearing capacity due to the restricted
height.
R make sure that the distance between the
underside of the tyres and the ground does
not exceed 3 cm.
R never place your hands or feet under the
raised vehicle.
R never lie under the raised vehicle.
R never start the engine when the vehicle is
raised.
R never open or close a door or the boot lid/
tailgate when the vehicle is raised.
R make sure that no persons are present in
the vehicle when the vehicle is raised. 364
Changing
awheelWheels and tyres