2012 MERCEDES-BENZ CLS SHOOTING BRAKE tailgate
[x] Cancel search: tailgatePage 245 of 405
Activating/deactivating the surround
lighting and exterior lightin
gdelayed
switch-off
X Press the =or; button on the steer-
ing wheel to selec tthe Settings menu.
X Press the :or9 button to select the
Light submenu.
X Press ato confirm.
X Press the :or9 button to select the
Surround lighting function.
When the Surround lighting function is
activated, the light cone and the area
around the vehicle are displayed in red in
the multifunction display.
X Press the abutton to save the setting.
Deactivating delayed switch-off of the exte-
rior lighting temporarily:
X Before leaving the vehicle, turn the key to
position 0in the ignition lock.
X Turn the key to position 2in the ignition
lock.
The exterior lighting delayed switch-off is
deactivated.
Delayed switch-off of the exterior lighting is
reactivated the next time you start the
engine.
If you have activated the Surround light‐ing function and the light switch is set to
Ã, the following functions are activated
when it is dark:
R surround lighting: the exterior lighting
remains lit for 40 seconds after unlocking
with the key. If you start the engine, the
surround lighting is switched off and auto-
matic headlamp mode is activated
(Y page 115).
R exterior lighting delayed switch-off: the
exterior lighting remains lit for
60 seconds after the engine is switched off.
If you close all the doors and the boot lid/
tailgate, the exterior lighting goes off after
5s econds.
i Depending on your vehicle's equipment,
when the surround lighting and delayed switch-off exterior lighting are on, the fol-
lowing light up:
R
side lamps
R dipped-beam headlamps
R daytime driving lights
R surround lighting in the exterior mirrors
Activating/deactivating the interior light-
ing delayed switch-off
If you activate the Lighting delayed sw.- off function, the interior lighting remains on
for 20seconds after you remove the key from
the ignition lock.
X Press the =or; button on the steer-
ing wheel to select the Settings menu.
X Press the :or9 button to select the
Light submenu.
X Press ato confirm.
X Press the :or9 button to select the
Light. delay function.
When the Lighting delayed sw.-off function is activated, the vehicle interior is
displayed in red in the multifunction dis-
play.
X Press the abutton to save the setting.
Vehicle Setting permanent SPEEDTRONIC
X
Press the =or; button on the steer-
ing wheel to select the Settings menu.
X Press the :or9 button to select the
Vehicle submenu.
X Press ato confirm.
X Press the :or9 button to select the
Limit speed (winter tyres): function.
You will see the curren tsetting.
X Press ato confirm.
X Press the :or9 button to adjust
permanent SPEEDTRONIC in increment sof
ten ( 230 km/h to
160 km/h ). The
Off set-
ting switches permanent SPEEDTRONIC
off.
X Press the abutton to store the entry. 242
Menus and submenusOn-board computer and displays
Page 276 of 405
Display messages Possible causes/consequences and
M Solutions
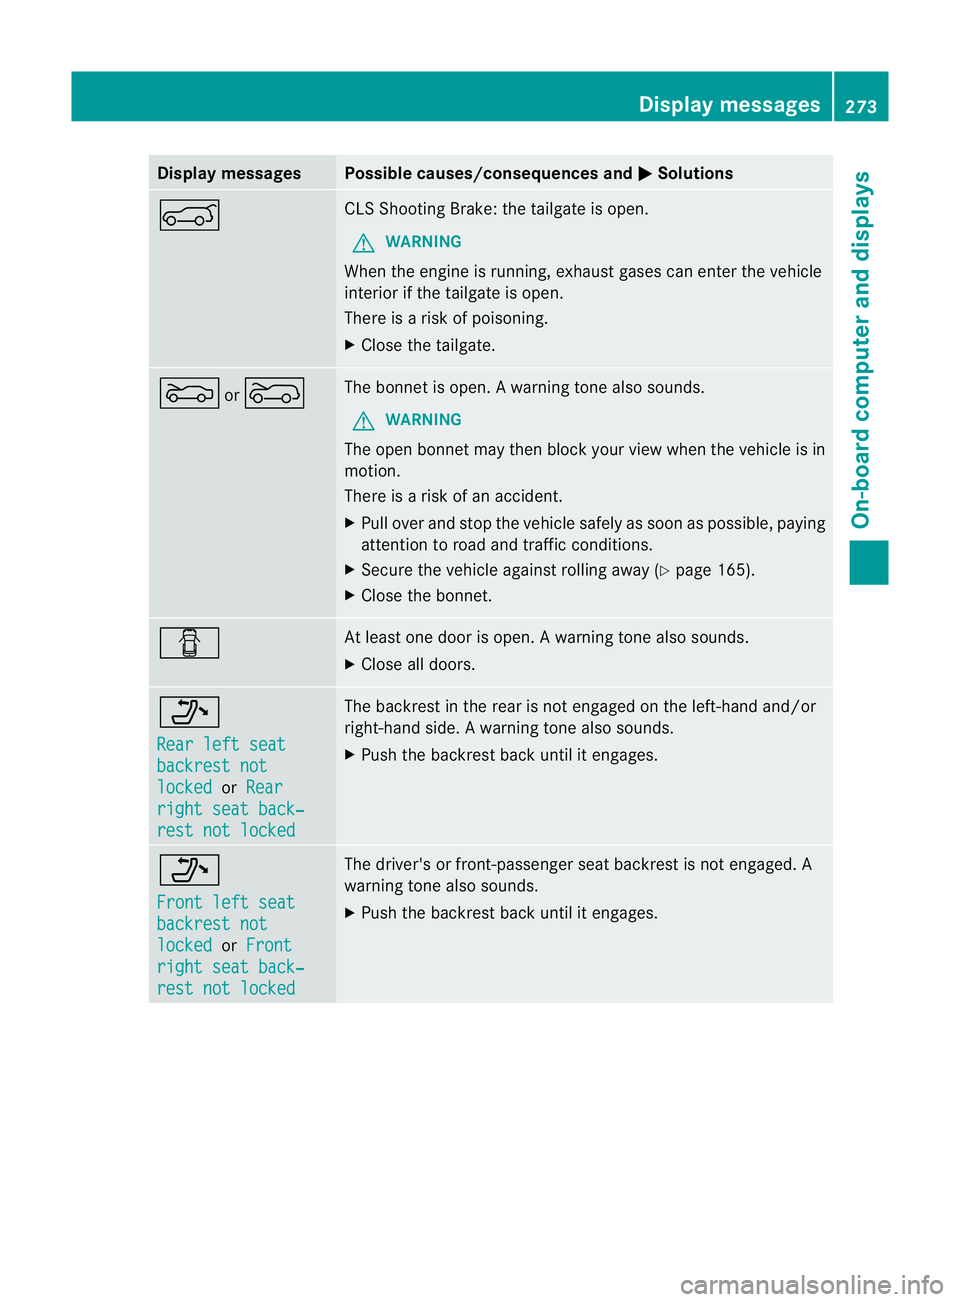
A CLS Shooting Brake
:the tailgate is open.
G WARNING
When the engine is running, exhaust gases can enter the vehicle
interior if the tailgate is open.
There is a risk of poisoning.
X Close the tailgate. M
or? The bonnet is open.
Awarning tone also sounds.
G WARNING
The open bonne tmay then bloc kyour view when the vehicle is in
motion.
There is a risk of an accident.
X Pull over and stop the vehicle safely as soon as possible, paying
attention to road and traffic conditions.
X Secure the vehicle against rolling away (Y page 165).
X Close the bonnet. C At least one door is open.
Awarning tone also sounds.
X Close all doors. _
Rear left seat
backrest not
locked or
Rear right seat back‐
rest not locked The backres
tinthe rear is not engaged on the left-hand and/or
right-hand side. Awarning tone also sounds.
X Push the backres tback until it engages. _
Front left seat
backrest not
locked or
Front right seat back‐
rest not locked The driver's or front-passenger seat backres
tis not engaged. A
warning tone also sounds.
X Push the backrest back until it engages. Display messages
273On-board computer and displays Z
Page 293 of 405
Useful information
i This Owner's Manual describes all mod-
els, series and optional equipment for your
vehicle that were available at the time of
going to press. National variations are pos-
sible. Note that your vehicle may not be
equipped with all of the functions descri-
bed. This is also the case for systems and
functions relevant to safety.
i Read the information on qualified special-
ist workshops: (Y page 24). Stowage areas
Loading guidelines
G
WARNING
Secure and position the load as described in
the loading guidelines.
Otherwise, vehicle occupants could
be injured by the load being thrown around in
the even tofsharp braking, a sudden change
in direction or an accident.
You will find further information in the "Secur-
ing a load" section.
Even if you follow all the loading guidelines,
the load will increase the risk of injury in the
event of an accident. G
WARNING
Keep the boot lid/tailgate closed while the
vehicle is in operation. Otherwise, exhaust
fumes could enter the vehicle interior and poi-
son you.
The handling characteristics of a laden vehi-
cle are dependent on the distribution of the
load within the vehicle. For this reason, you
should observe the following notes when
transporting a load:
R when transporting a load, never exceed the
maximum permissible gross vehicle weight or the permissible axle loads for the vehicle
(including occupants).
R position heavy loads as far forwards as pos-
sible and as low down in the boot/luggage
compartmenta s possible.
R the load must not protrude above the upper
edge of the seat backrests.
R always place the load against the rear or
front seat backrests. Make sure that the
seat backrests are securely locked into
place.
R always place the load behind unoccupied
seats if possible.
R secure the load with sufficiently strong and
wear-resistant lashing material. pad sharp
edges for protection.
i Load restraints are available at any quali-
fied specialist workshop, e.g. a Mercedes-
Benz Service Centre. Stowage compartments
Important safety notes G
WARNING
The stowage compartments must be closed
when items are stored in them. Luggage nets
are not designed to secure heavy items of
luggage.
You or other vehicle occupants could be
injured by objects being thrown around if you:
R brake sharply
R change direction suddenly
R are involved in an accident
Sharp-edged and fragile objects must not be
placed in the luggage net.
Do not place hard objects in the map pockets.
Objects must not protrude from the map
pockets. 290
Stowage areasStowing and features
Page 297 of 405
X
Vehicles without memory function: if nec-
essary, move the driver's or front-
passenger seat forwards.
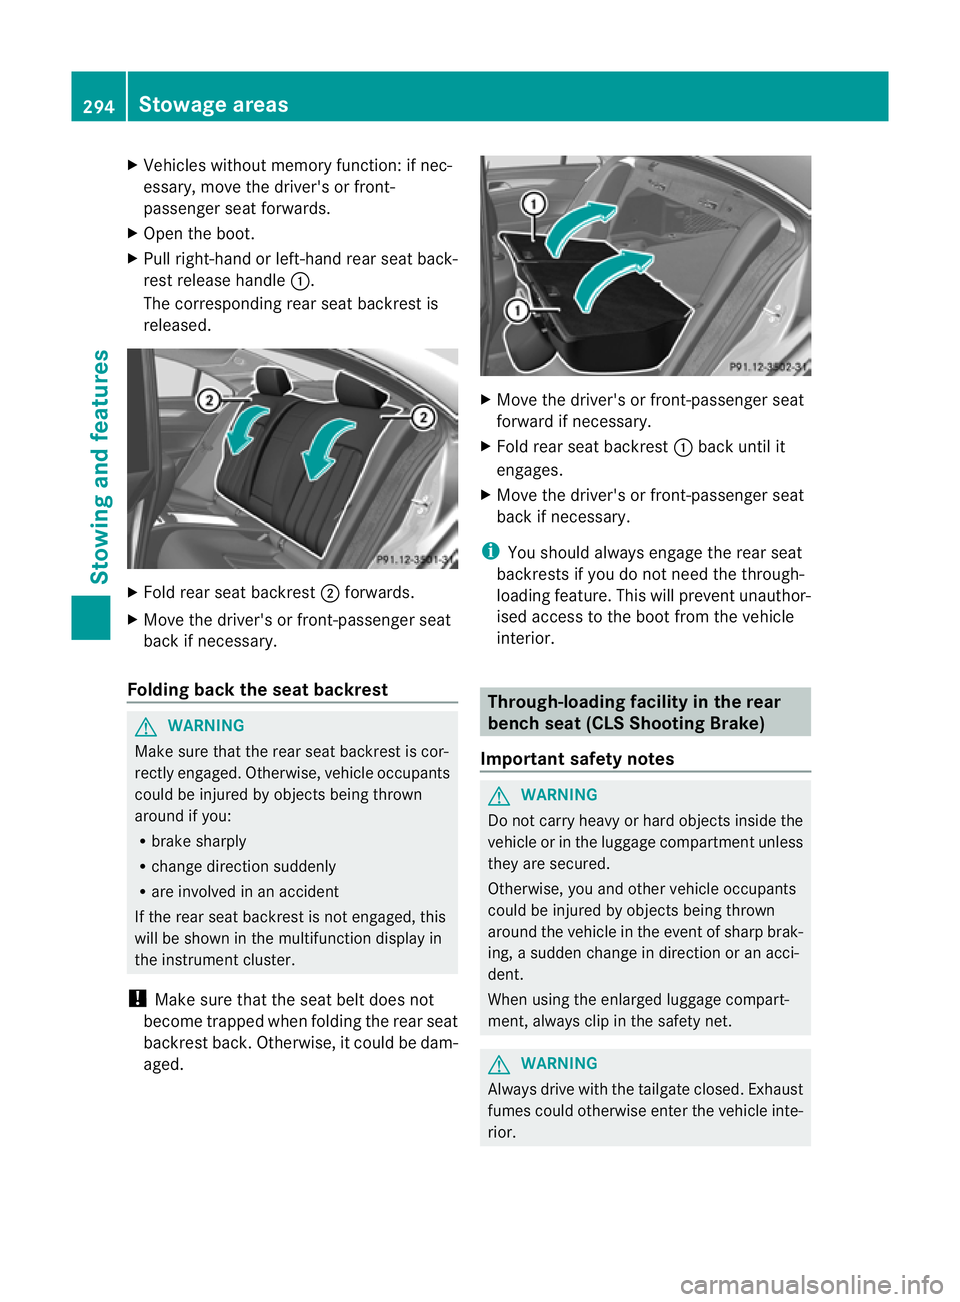
X Open the boot.
X Pull right-hand or left-hand rear seat back-
rest release handle :.
The corresponding rear seat backrest is
released. X
Fold rear seat backrest ;forwards.
X Move the driver's or front-passenger seat
back if necessary.
Folding back the seat backrest G
WARNING
Make sure that the rear seat backrest is cor-
rectly engaged. Otherwise, vehicle occupants
could be injured by objects being thrown
around if you:
R brake sharply
R change direction suddenly
R are involved in an accident
If the rear seat backrest is not engaged, this
will be shown in the multifunction display in
the instrument cluster.
! Make sure that the seat belt does not
become trapped when folding the rear seat
backrest back. Otherwise, it could be dam-
aged. X
Move the driver's or front-passenger seat
forward if necessary.
X Fold rear seat backrest :back until it
engages.
X Move the driver's or front-passenger seat
back if necessary.
i You should always engage the rear seat
backrests if you do not need the through-
loading feature. This will prevent unauthor-
ised access to the boot from the vehicle
interior. Through-loading facility in the rear
benchs
eat (CLS Shooting Brake)
Important safety notes G
WARNING
Do not carry heavy or hard objects inside the
vehicle or in the luggage compartmen tunless
they are secured.
Otherwise, you and othe rvehicle occupants
could be injured by objects being thrown
around the vehicle in the event of sharp brak-
ing, a sudden change in direction or an acci-
dent.
When using the enlarged luggage compart-
ment, always clip in the safety net. G
WARNING
Always drive with the tailgate closed. Exhaust
fumes could otherwise enter the vehicle inte-
rior. 294
Stowage areasStowing and features
Page 299 of 405
Observe the following notes on securing
loads:
R
secure the load using the lashing eyelets.
R do not use elastic straps or nets to secure
a load, as these are only intended as an
anti-slip protection for light loads.
R do not route lashing materials across sharp
edges or corners.
R pad sharp edges for protection.
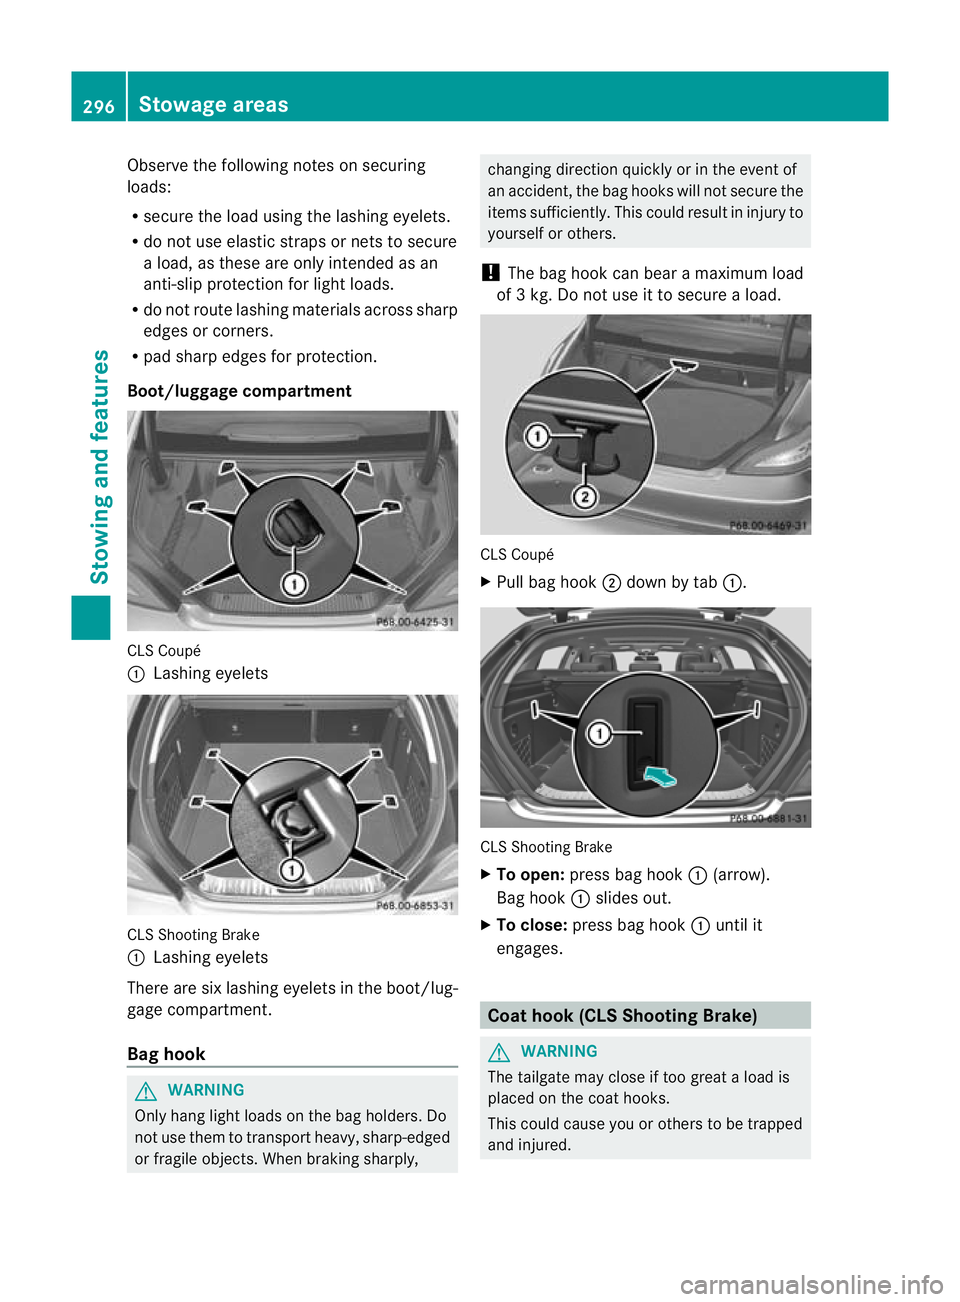
Boot/luggage compartment CLS Coupé
:
Lashing eyelets CLS Shooting Brake
:
Lashing eyelets
There are six lashing eyelets in the boot/lug-
gage compartment.
Bag hook G
WARNING
Only hang light loads on the bag holders. Do
not use them to transport heavy, sharp-edged
or fragile objects. When braking sharply, changing direction quickly or in the event of
an accident, the bag hooks will not secure the
items sufficiently. This could result in injury to
yourselforo
thers.
! The bag hoo kcan bear a maximum load
of 3 kg. Do not use it to secure a load. CLS Coupé
X
Pull bag hook ;down by tab :. CLS Shooting Brake
X To open: press bag hook :(arrow).
Bag hook :slides out.
X To close: press bag hook :until it
engages. Coat hook (CLS Shooting Brake)
G
WARNING
The tailgate may close if too great a load is
placed on the coat hooks.
This could cause you or others to be trapped
and injured. 296
Stowage areasStowing and features
Page 301 of 405
X
To fit: place luggage compartment
cover :into anchorage ;on the right or
left-hand side.
X Push in opposite end cap of luggage com-
partment cover :in the direction of the
arrow and insert luggage compartment
cover :into opposite anchorage ;.
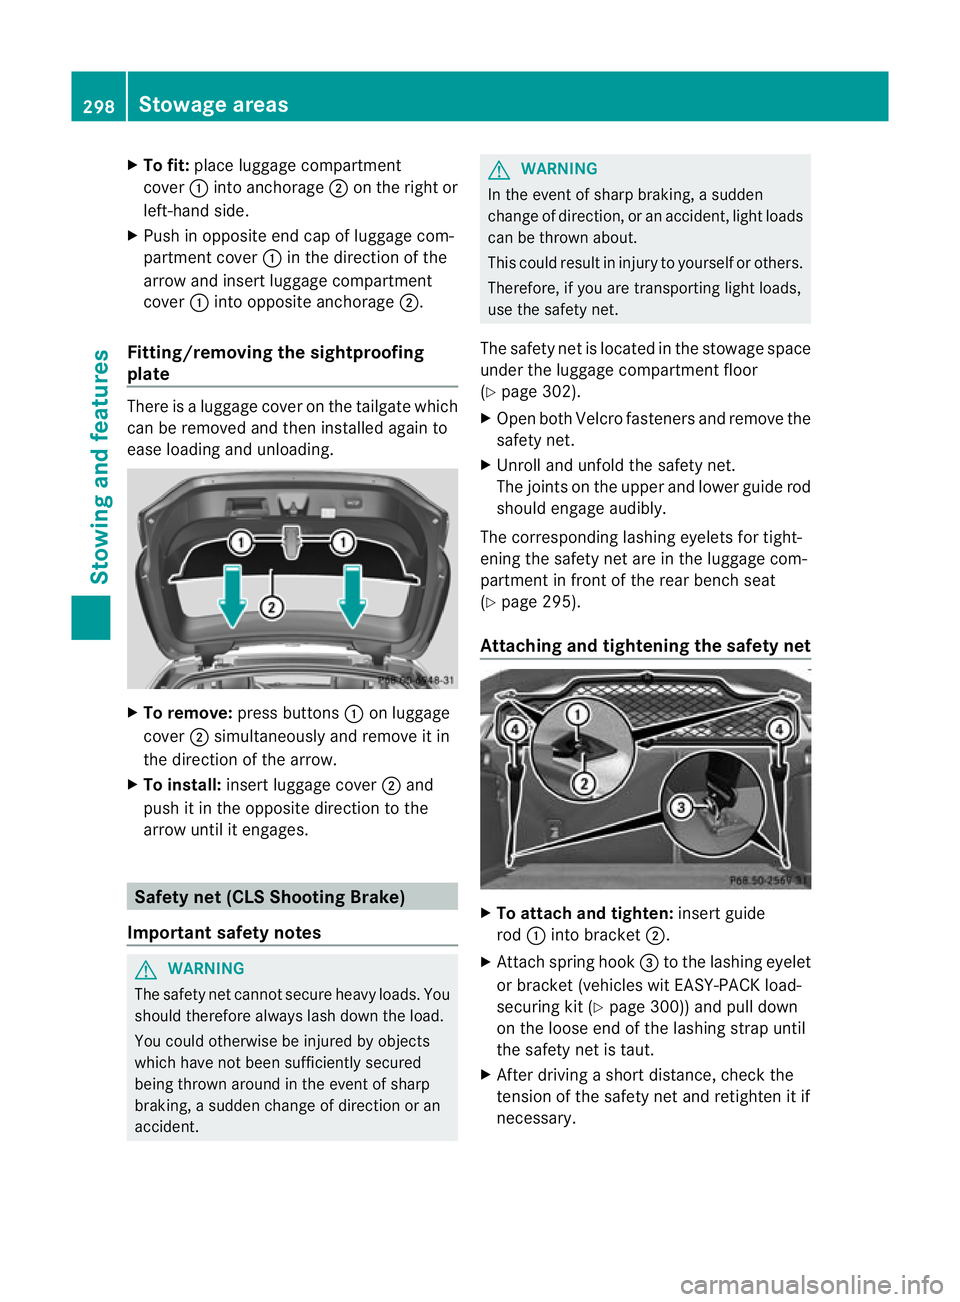
Fitting/removing the sightproofing
plate There is a luggage cove
ronthe tailgate which
can be removed and then installed again to
ease loading and unloading. X
To remove: press buttons :on luggage
cover ;simultaneously and remove it in
the direction of the arrow.
X To install: insert luggage cover ;and
push it in the opposite direction to the
arrow until it engages. Safety net (CLS Shooting Brake)
Important safety notes G
WARNING
The safety net cannot secure heavy loads. You
should therefore always lash down the load.
You could otherwise be injured by objects
which have not been sufficiently secured
being thrown around in the event of sharp
braking, a sudden change of direction or an
accident. G
WARNING
In the event of sharp braking, a sudden
change of direction, or an accident, light loads
can be thrown about.
This could result in injury to yourself or others.
Therefore, if you are transporting light loads,
use the safety net.
The safety net is located in the stowage space
under the luggage compartmentf loor
(Y page 302).
X Open both Velcro fastener sand remove the
safety net.
X Unroll and unfold the safety net.
The joints on the uppe rand lowe rguide rod
should engage audibly.
The corresponding lashing eyelet sfor tight-
ening the safety net are in the luggage com-
partment in front of the rear bench seat
(Y page 295).
Attaching and tightening the safety net X
To attach and tighten: insert guide
rod :into bracket ;.
X Attach spring hook =to the lashing eyelet
or bracket (vehicles wit EASY-PACK load-
securing kit (Y page 300)) and pull down
on the loose end of the lashing strap until
the safety net is taut.
X After driving a short distance, check the
tension of the safety net and retighten it if
necessary. 298
Stowage areasStowing and features
Page 305 of 405
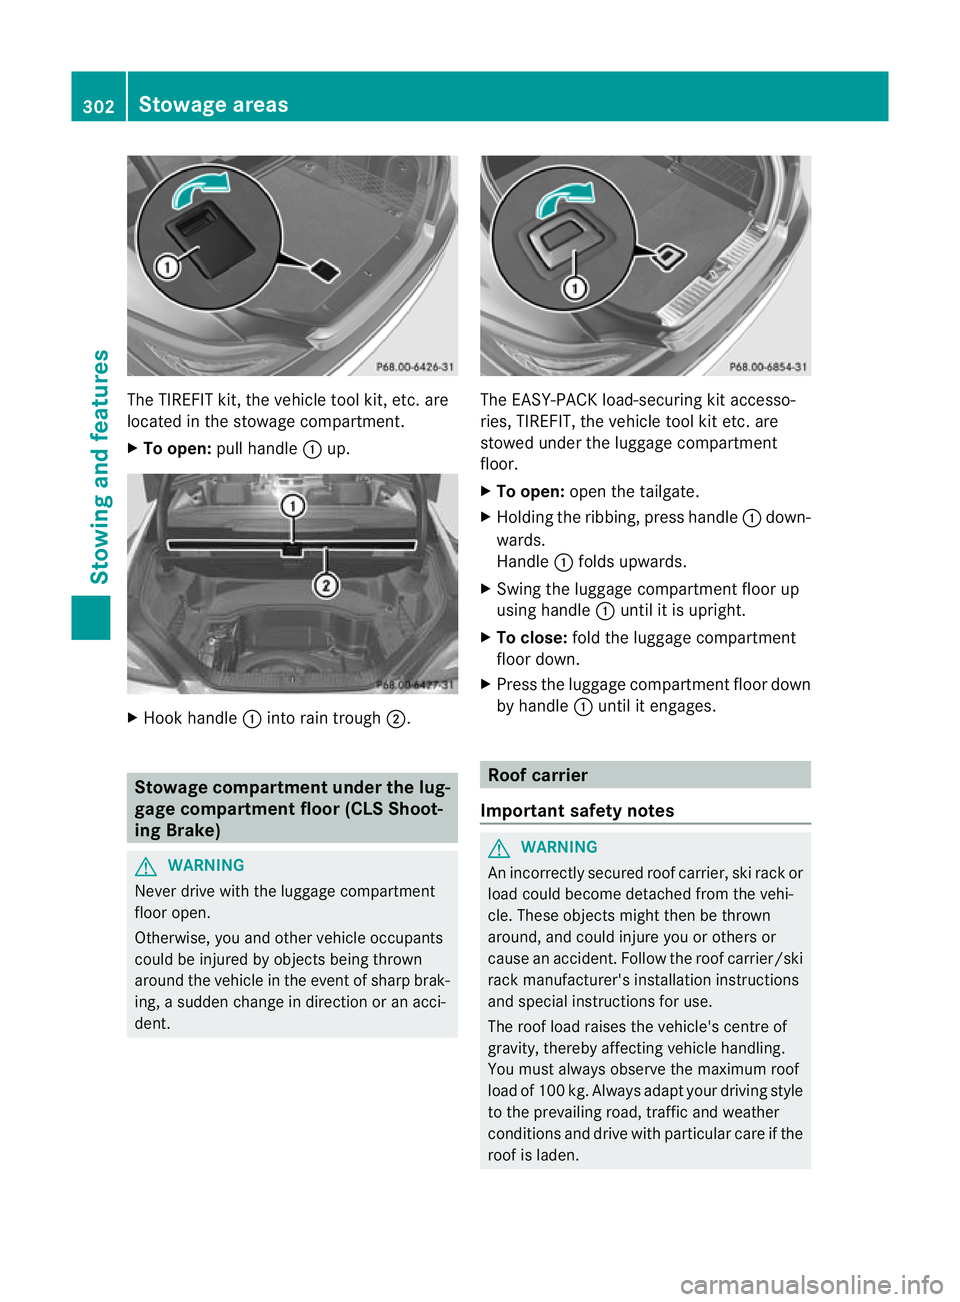
The TIREFIT kit, the vehicle tool kit, etc. are
located in the stowage compartment.
X
To open: pull handle :up. X
Hook handle :into rain trough ;. Stowage compartment under the lug-
gage compartment floor (CLS Shoot-
ing Brake)
G
WARNING
Never drive with the luggage compartment
floor open.
Otherwise, you and other vehicle occupants
could be injured by object sbeing thrown
around the vehicle in the event of sharp brak-
ing, a sudden change in direction or an acci-
dent. The EASY-PACK load-securing kit accesso-
ries, TIREFIT, the vehicle tool kit etc. are
stowed under the luggage compartment
floor.
X
To open: open the tailgate.
X Holding the ribbing, press handle :down-
wards.
Handle :folds upwards.
X Swing the luggage compartment floor up
using handle :until it is upright.
X To close: fold the luggage compartment
floor down.
X Press the luggage compartment floor down
by handle :until it engages. Roof carrier
Important safety notes G
WARNING
An incorrectly secured roof carrier, ski rack or
load could become detached from the vehi-
cle. These objects might then be thrown
around, and could injure you or others or
cause an accident. Follow the roof carrier/ski
rack manufacturer's installation instructions
and special instructions for use.
The roof load raises the vehicle's centre of
gravity, thereby affecting vehicle handling.
You must always observe the maximum roof
load of 100 kg. Always adapt your driving style
to the prevailing road, traffic and weather
conditions and drive with particular care if the
roof is laden. 302
Stowage areasStowing and features
Page 306 of 405
!
Mercedes-Benz recommends that you
only use roof carriers that have been tested
and approved for Mercedes-Benz vehicles.
This helps to prevent damage to the vehi-
cle.
Position the load on the roof carrier in such
a way that the vehicle will not sustain dam-
age even when it is in motion.
Make sure that, depending on the vehicle's
equipment, you can raise the sliding sun-
roof fully and open the boot lid or tailgate
fully when the roof carrier is fitted.
! To avoid damaging or scratching the cov-
ers, do not use metallic or hard objects to
open them.
Attaching the roof carrier X
Open covers :carefully in the direction of
the arrow.
X Only secure the roof carrier to the anchor-
age points under covers :.
X Observe the manufacturer's installation
instructions. Features
Cup holders
Important safety notes G
WARNING
Keep the cup holder closed while the vehicle
is in motion. Otherwise, vehicle occupants could be injured by objects being thrown
around if you:
R
brake sharply
R change direction suddenly
R are involved in an accident
Only use the cup holders for containers of a
suitable size and which have lids. The drinks
could otherwise spill.
Cup holders should not be used for hot drinks.
You may otherwise scald yourself.
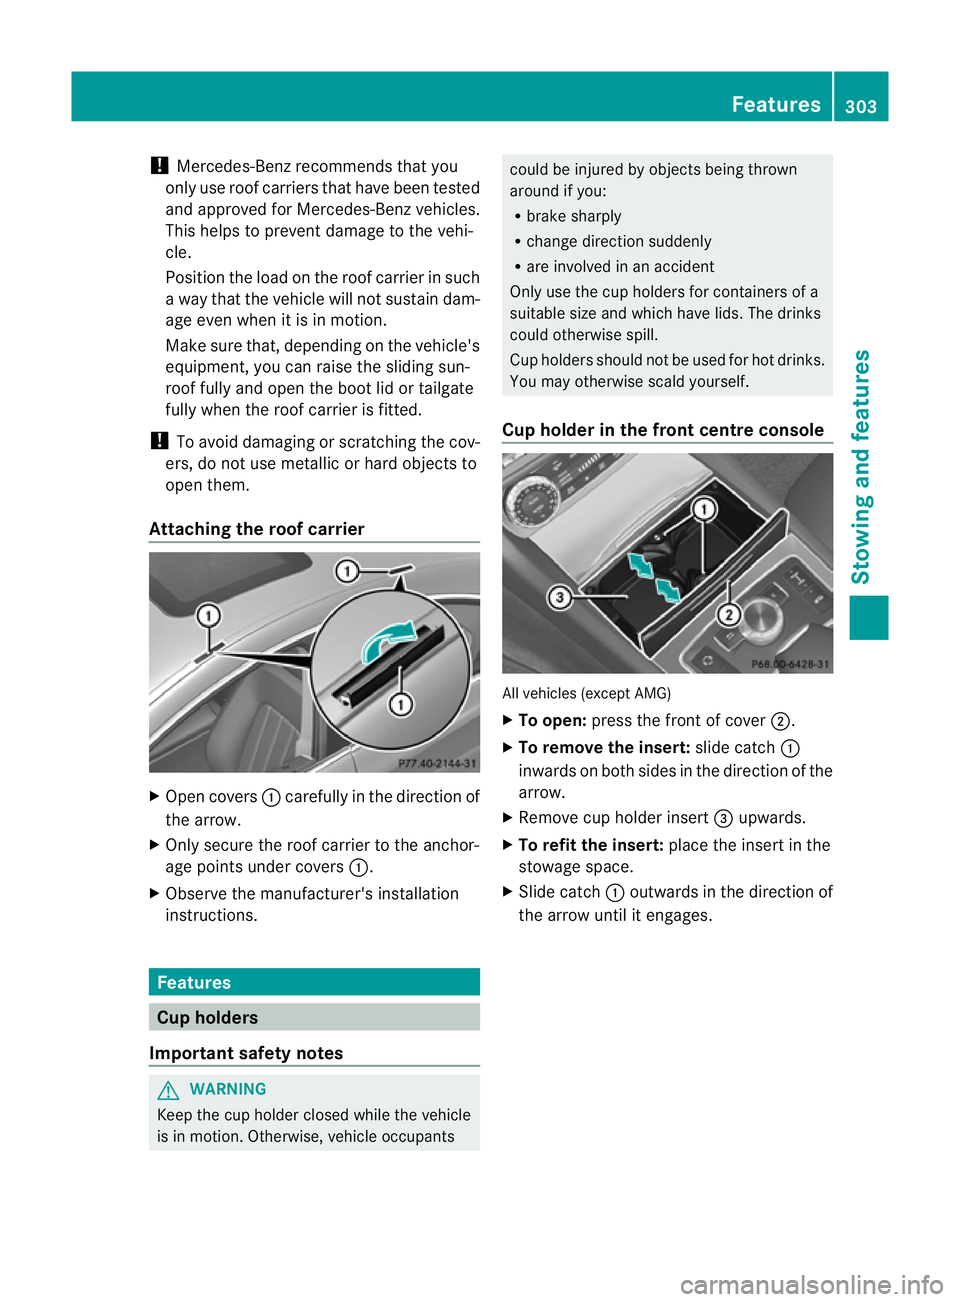
Cup holder in the front centre console All vehicles (except AMG)
X
To open: press the front of cover ;.
X To remove the insert: slide catch:
inwards on both sides in the direction of the
arrow.
X Remove cup holder insert =upwards.
X To refit the insert: place the insert in the
stowage space.
X Slide catch :outwards in the direction of
the arrow until it engages. Features
303Stowing and features Z