2012 MERCEDES-BENZ CLS SHOOTING BRAKE snow chains
[x] Cancel search: snow chainsPage 192 of 405
Select the "Normal" setting for normal road
surfaces and "Raised" for driving with snow
chains or on particularly poo rroad surfaces.
Your selection remains stored even if you
remove the key from the ignition lock.
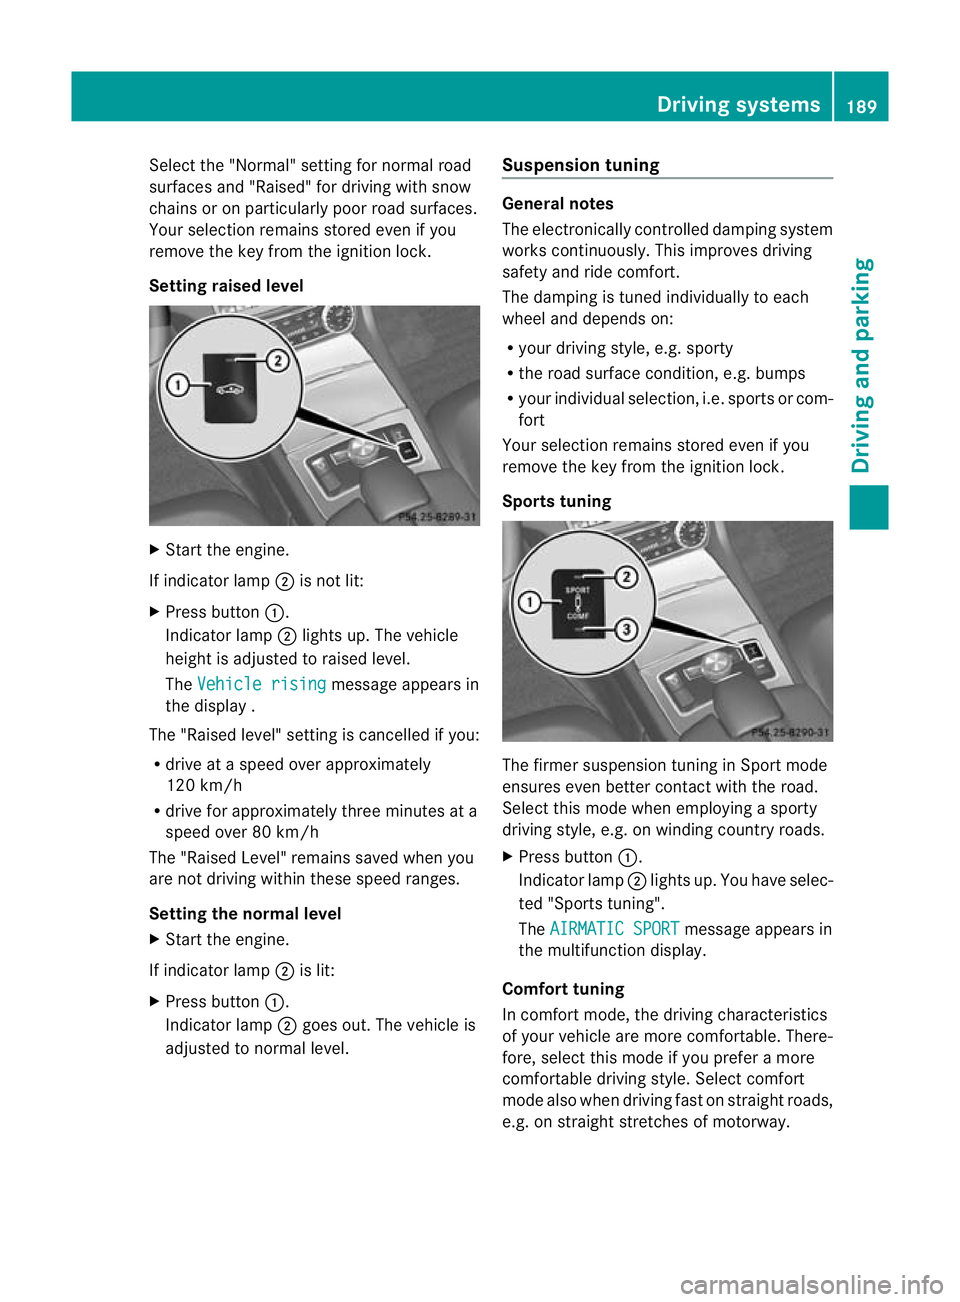
Setting raised level X
Start the engine.
If indicator lamp ;is not lit:
X Press button :.
Indicator lamp ;lights up. The vehicle
height is adjusted to raised level.
The Vehicle rising message appears in
the display .
The "Raised level" setting is cancelled if you:
R drive at a speed over approximately
120 km/h
R drive for approximately three minutes at a
speed over 80 km/h
The "Raised Level" remains saved when you
are not driving within these speed ranges.
Setting the normal level
X Start the engine.
If indicator lamp ;is lit:
X Press button :.
Indicator lamp ;goes out. The vehicle is
adjusted to normal level. Suspension tuning General notes
The electronically controlled damping system
works continuously. This improves driving
safety and ride comfort.
The damping is tuned individually to each
wheel and depends on:
R
your driving style, e.g. sporty
R the road surface condition, e.g. bumps
R your individual selection, i.e. sports or com-
fort
Your selection remains stored even if you
remove the key from the ignition lock.
Sports tuning The firmer suspension tuning in Sport mode
ensures even better contact with the road.
Select this mode when employing a sporty
driving style, e.g. on winding country roads.
X
Press button :.
Indicator lamp ;lights up. You have selec-
ted "Sports tuning".
The AIRMATIC SPORT message appears in
the multifunction display.
Comfort tuning
In comfort mode, the driving characteristics
of your vehicle are more comfortable. There-
fore, select this mode if you prefer a more
comfortable driving style. Select comfort
mode also when driving fast on straight roads,
e.g. on straight stretches of motorway. Driving systems
189Driving and parking Z
Page 194 of 405
The
AMG Ride Control SPORT + message
appears in the multifunction display.
Comfort mode
In comfort mode, the driving characteristics
of your vehicle are more comfortable. There-
fore, select this mode if you prefer a more
comfortable driving style. Select comfort
mode also when driving fast on straight roads,
e.g. on straight stretches of motorway.
X Press button :repeatedly until indicator
lamps =and ?go out.
You have selected Comfort mode.
The AMG Ride Control COMFORT mes-
sage appears in the multifunction display.
Storing and calling up settings
Once the suspension tuning and drive pro-
gram have been selected, you can store and
call up your settings using AMG button ;.
X To store: press AMG button ;until you
hear a tone.
X To call up: press AMG button ;.
The stored suspension tuning and drive
program are selected.
X To display: briefly press AMG button ;.
Your selection appears in the multifunction
display. 4MATIC (permanent all-wheel drive)
G
WARNING
4MATIC cannot reduce the risk of an accident
if you drive too fast.
If a drive wheel spins due to insufficien tgrip:
R only depress the accelerator pedal as far as
necessary when pulling away.
R accelerate less when driving.
R adapt yourd riving style to suitr oad and
traffic conditions.
! Never tow the vehicle with one axle
raised. This may damage the transfer case.
Damage of this sort is not covered by the Mercedes-Benz implied warranty. All
wheels must remain either on the ground
or be fully raised. Observe the instructions
for towing the vehicle with all wheels in full
contact with the ground.
i In wintry driving conditions, the maximum
effect of 4MATIC can only be achieved if
you use winter tyres (M+ Styres), with snow
chains if necessary.
4MATIC ensures that all four wheels are per-
manently driven. Together with ESP ®
, it
improves the traction of your vehicle when-
eve radrive wheel spins due to insufficient
grip. PARKTRONIC
Important safety notes G
WARNING
PARKTRONIC is only an aid and may not
detec tall obstacles. It is not a substitute for
attentive driving.
You are always responsible for safety and
must continue to pay attention to your imme-
diate surroundings when parking and
manoeuvring. You could otherwise endanger
yourself and others. G
WARNING
Make sure that no persons or animals are in
the manoeuvring range. Otherwise, they
could be injured.
PARKTRONIC is an electronic parking aid with
ultrasonic sensors .Itindicates visually and
audibly the distance between your vehicle
and an object.
PARKTRONIC is activated automatically if
you:
R switch on the ignition
R shift the transmission to position D,Ror N
R release the parking brake
PARKTRONIC is deactivated at speeds above
18 km/h. It is reactivated at lower speeds. Driving systems
191Driving and parking Z
Page 198 of 405
G
WARNING
The front of the vehicle will veer out in the
direction of the oncoming traffic during the
parking operation. In some cases the vehicle
will also take you onto sections of the oncom-
ing lane during the parking procedure.
You are responsible for safety at all times and
must pay attention to any road users
approaching or passing. Stop the vehicle if
necessary or cancel the Active Parking Assist
parking procedure. G
WARNING
Make sure that no persons or animals are in
the manoeuvring range. Otherwise, they
could be injured.
! If unavoidable, you should drive over
obstacles such as kerbs slowly and not at
a sharp angle .Otherwise, you may damage
the wheels or tyres.
Active Parking Assist is an electroni cparking
aid with ultrasound. Ultrasound is used to
measure the road on both sides of the vehicle.
As uitable parking space is indicated by the
parking symbol. Active steering intervention
can assis tyou during parking. You may also
use PARKTRONIC (Y page 191). When PARK-
TRONIC is switched off, Active Parking Assist
is also unavailable.
Use Active Parking Assist for parking spaces:
R that are parallel to the direction of travel
R that are on straight roads, not bends
R that are on the same level as the road, e.g.
not on the pavement
Parking tips:
R on narrow roads, drive as closely as possi-
ble past the parking space.
R parking spaces that are littered, overgrown
or partially occupied by trailer drawbars
might be identified incorrectly or not at all.
R snowfall or heavy rain may lead to a parking
space being measured inaccurately. R
pay attention to the PARKTRONIC
(Y page 193) warning messages during the
parking procedure.
R at any time, you can intervene in the steer-
ing procedure to correct it. Active Parking
Assist will then be cancelled.
R when transporting a load which protrudes
from your vehicle, you should not use
Active Parking Assist.
R when snow chains or an emergency spare
wheel are fitted, you should not use Active
Parking Assist here either.
R make sure that the tyre pressures are
always correct. This has adirec tinfluence
on the parking characteristics of the vehi-
cle.
R the way your vehicle is positioned in the
parking space after parking is dependent
on various factors .These include the posi-
tion and shape of the vehicles parked in
front and behind it and the conditions of the
location. It may be the case that Active
Parking Assist guides you too far into a
parking space, or not far enough into it. In
some cases, it may also lead you across or
onto the kerb. If necessary, you should can-
cel the parking procedure with Active Park-
ing Assist.
R you can also engage forward gear prema-
turely. The vehicle redirects and does not
drive as far into the parking space. Should
a gear be changed too early to achieve a
sensible parking position, the parking pro-
cedure will be cancelled. Driving systems
195Driving and parking Z
Page 240 of 405
X
Press the abutton.
The multifunction display shows Speed
Limit Assist.
X Press the :button.
The curren tselection is displayed.
X To activate or deactivate: pressa.
If the Speed Limit Assist message function
is activated, a detected speed limit is auto-
matically displayed for five seconds. Other
items in the multifunction display are not
shown during this time.
If Speed Limit Assist is operational and the
message function is activated, the multifunc-
tion display shows the Äsymbol when the
ignition is switched on.
Showing the distance display X
Press the =or; button on the steer-
ing wheel to select the Assist. menu.
X Press the 9or: button to select
Distance display .
X Press the abutton.
The DISTRONIC PLUS distance display
appears in the multifunction display
(Y page 183).
If the Sensors deactivated message
appears, the radar sensor system is deacti-
vated.
X Check whether or not the radar sensor sys-
tem is permitted to be activated
(Y page 398).
X Switch on the radar sensor system
(Y page 243).
Deactivating/activating ESP ®G
WARNING
If you deactivate ESP ®
, ESP ®
no longer sta-
bilises the vehicle. There is an increased risk
of skidding and an accident.
Only deactivate ESP ®
in the situations descri-
bed in the following. Activating/deactivating ESP
®
on AMG vehi-
cles (Y page 68).
For further information about ESP ®
, see
(Y page 66).
X Start the engine.
X Press the =or; button on the steer-
ing wheel to select the Assist. menu.
X Press the 9or: button to select
ESP .
X Press the abutton.
The curren tselection is displayed.
X To activate/deactivate: press thea
button again.
ESP ®
is deactivated if the åwarning lamp
in the instrument cluster lights up continu-
ously when the engine is running.
If the ÷ warning lamp and the åwarn-
ing lamp are lit continuously, ESP ®
is not
available due to a malfunction.
It may be best to deactivate ESP ®
in the fol-
lowing situations:
R when using snow chains
R in deep snow
R on sand or gravel
Observe the information on warning lamps
(Y page 281).
Observe the information on display messages
(Y page 250).
Activating/deactivating the PRE-SAFE ®
Brake PRE-SAFE
®
Brake is only available in vehicles
with DISTRONIC PLUS.
X Press the =or; button on the steer-
ing wheel to select the Assist. menu.
X Press the 9or: button to select
PRE-SAFE Brake .
X Press the abutton.
The curren tselection is displayed.
X To activate/deactivate: press thea
button again. Menus and submenus
237On-board computer and displays Z
Page 360 of 405
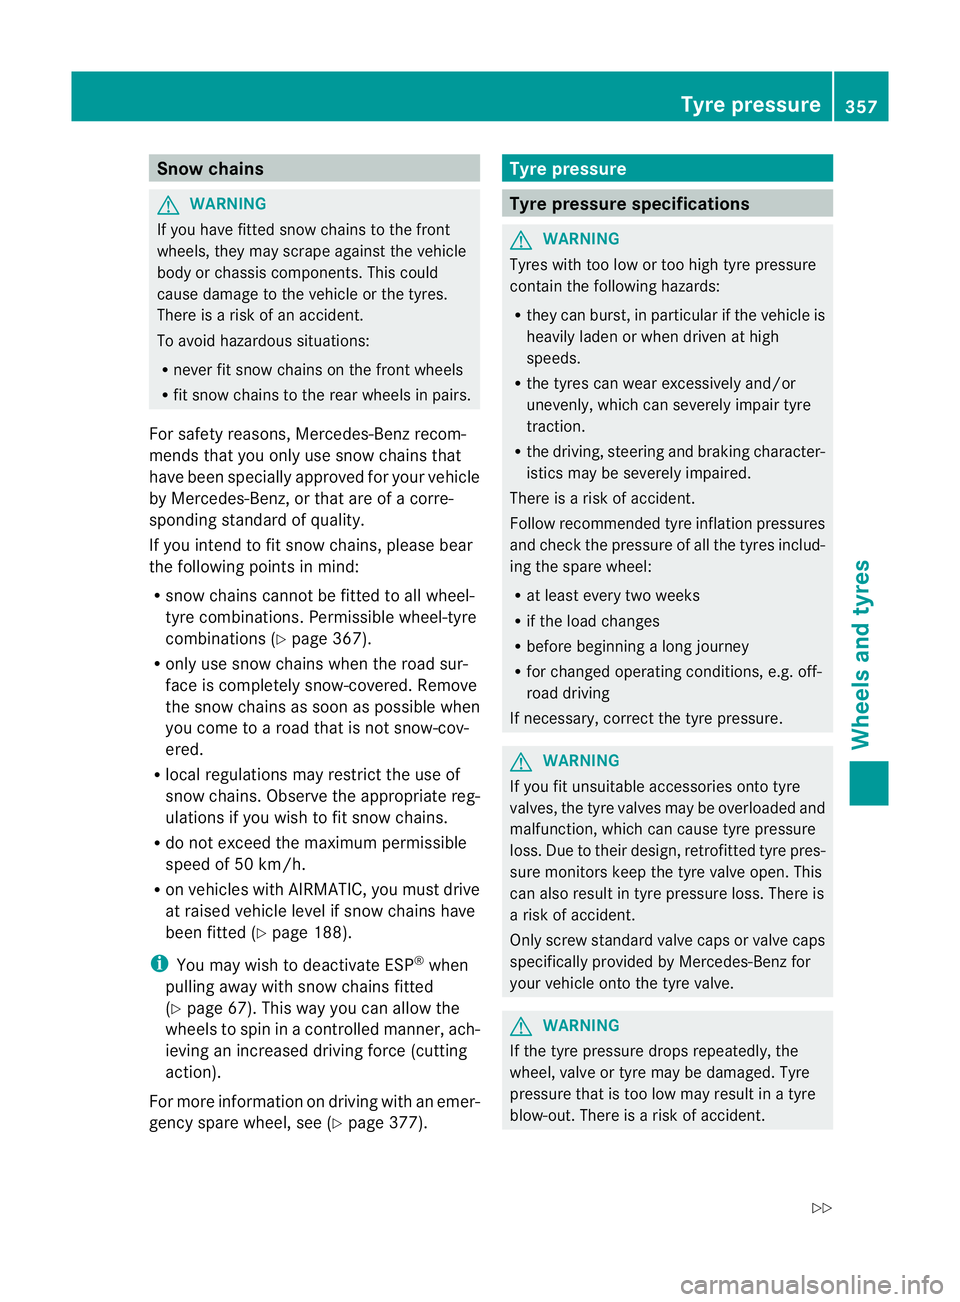
Snow chains
G
WARNING
If you have fitted snow chains to the front
wheels, they may scrape against the vehicle
body or chassis components. This could
cause damage to the vehicle or the tyres.
There is a risk of an accident.
To avoid hazardous situations:
R never fit snow chains on the front wheels
R fit snow chains to the rear wheels in pairs.
For safety reasons, Mercedes-Benz recom-
mends that you only use snow chains that
have been specially approved for your vehicle
by Mercedes-Benz, or that are of a corre-
sponding standard of quality.
If you intend to fit snow chains, please bear
the following points in mind:
R snow chains cannot be fitted to all wheel-
tyre combinations. Permissible wheel-tyre
combinations (Y page 367).
R only use snow chains when the road sur-
face is completely snow-covered. Remove
the snow chains as soon as possible when
you come to a road that is not snow-cov-
ered.
R local regulations may restrictt he use of
snow chains. Observe the appropriate reg-
ulations if you wish to fit snow chains.
R do not exceed the maximum permissible
speed of 50 km/h.
R on vehicles with AIRMATIC, you must drive
at raised vehicle level if snow chains have
been fitted (Y page 188).
i You may wish to deactivate ESP ®
when
pulling away with snow chains fitted
(Y page 67). This way you can allow the
wheels to spin in a controlled manner, ach-
ieving an increased driving force (cutting
action).
For more information on driving with an emer-
gency spare wheel, see (Y page 377). Tyre pressure
Tyre pressure specifications
G
WARNING
Tyres with too low or too high tyre pressure
contain the following hazards:
R they can burst, in particular if the vehicle is
heavily laden or when driven at high
speeds.
R the tyres can wear excessively and/or
unevenly, which can severely impair tyre
traction.
R the driving, steering and braking character-
istics may be severely impaired.
There is a risk of accident.
Follow recommended tyre inflation pressures
and check the pressure of all the tyres includ-
ing the spare wheel:
R at least every two weeks
R if the load changes
R before beginning a long journey
R for changed operating conditions, e.g. off-
road driving
If necessary, correct the tyre pressure. G
WARNING
If you fit unsuitable accessories onto tyre
valves, the tyre valves may be overloaded and
malfunction, which can cause tyre pressure
loss. Due to their design, retrofitted tyre pres-
sure monitors keep the tyre valve open. This
can also result in tyre pressure loss. There is
a risk of accident.
Only screw standard valve caps or valve caps
specifically provided by Mercedes-Ben zfor
your vehicle onto the tyre valve. G
WARNING
If the tyre pressure drops repeatedly, the
wheel, valve or tyre may be damaged. Tyre
pressure that is too low may result in a tyre
blow-out. There is a risk of accident. Tyre pressure
357Wheels and tyres
Z
Page 362 of 405
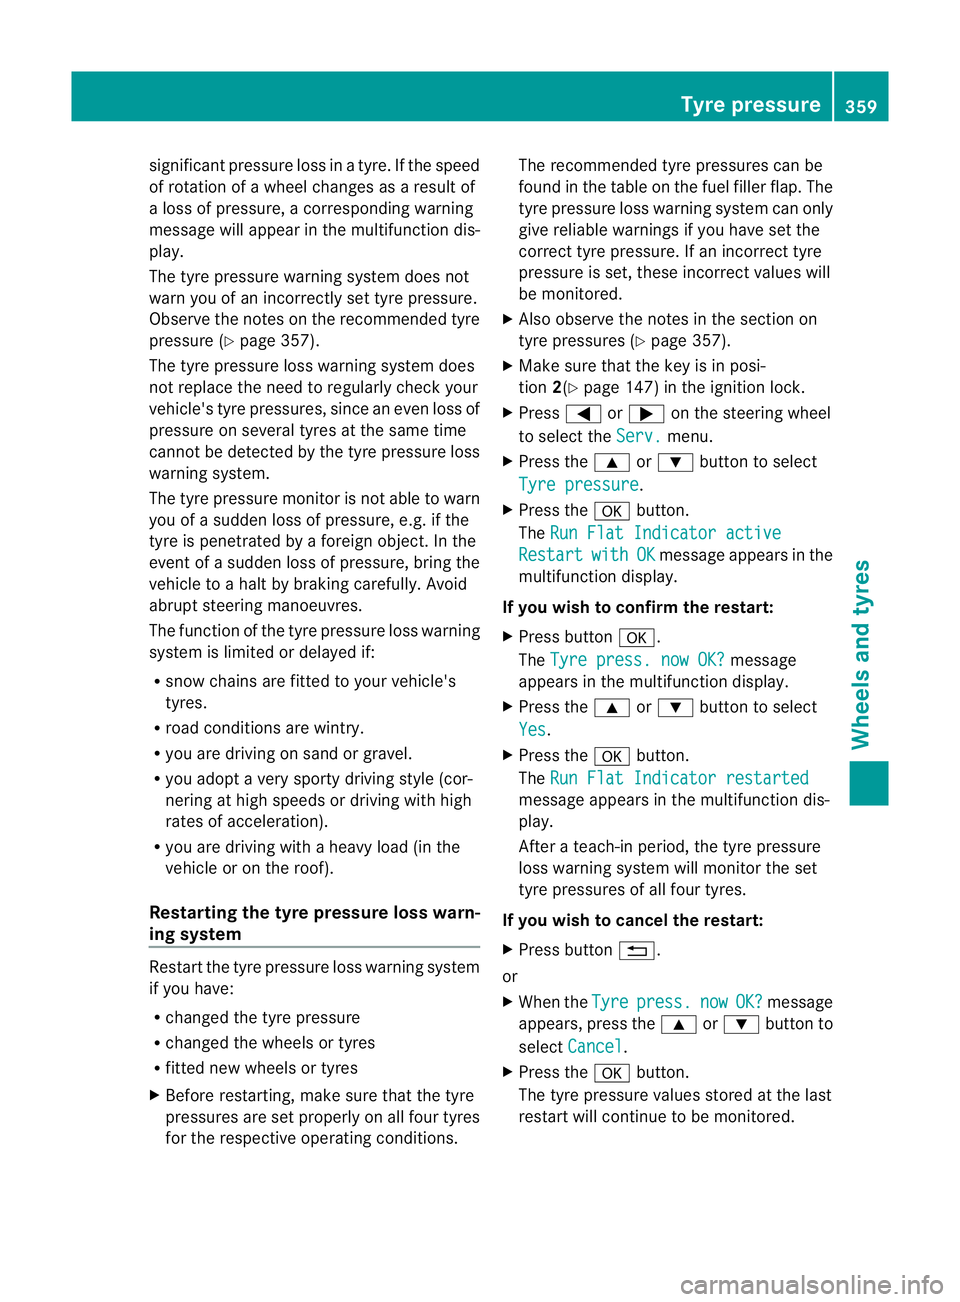
significant pressure loss in a tyre. If the speed
of rotation of a wheel changes as a result of
a loss of pressure, a corresponding warning
message will appearint he multifunction dis-
play.
The tyre pressure warning system does not
warn you of an incorrectly set tyre pressure.
Observe the notes on the recommended tyre
pressure (Y page 357).
The tyre pressure loss warning system does
not replace the need to regularly check your
vehicle's tyre pressures, since an even loss of
pressure on several tyres at the same time
cannot be detected by the tyre pressure loss
warning system.
The tyre pressure monitor is not able to warn
you of a sudden loss of pressure, e.g. if the
tyre is penetrated by a foreign object. In the
event of a sudden loss of pressure, bring the
vehicle to a halt by braking carefully. Avoid
abrupt steering manoeuvres.
The function of the tyre pressure loss warning
system is limited or delayed if:
R snow chains are fitted to your vehicle's
tyres.
R road conditions are wintry.
R you are driving on sand or gravel.
R you adopt a very sporty driving style (cor-
nering at high speeds or driving with high
rates of acceleration).
R you are driving with a heavy load (in the
vehicle or on the roof).
Restarting the tyre pressure loss warn-
ing system Restart the tyre pressure loss warning system
if you have:
R changed the tyre pressure
R changed the wheels or tyres
R fitted new wheels or tyres
X Before restarting, make sure that the tyre
pressures are set properly on all four tyres
for the respective operating conditions. The recommended tyre pressures can be
found in the table on the fuel filler flap. The
tyre pressure loss warning system can only
give reliable warnings if you have set the
correct tyre pressure. If an incorrect tyre
pressure is set, these incorrectv
alues will
be monitored.
X Also observe the notes in the sectio non
tyre pressures (Y page 357).
X Make sure tha tthe key is in posi-
tion 2(Ypage 147) in the ignition lock.
X Press =or; on the steering wheel
to select the Serv. menu.
X Press the 9or: button to select
Tyre pressure .
X Press the abutton.
The Run Flat Indicator active Restart with OK message appears in the
multifunction display.
If you wish to confirm the restart:
X Press button a.
The Tyre press. now OK? message
appears in the multifunction display.
X Press the 9or: button to select
Yes .
X Press the abutton.
The Run Flat Indicator restarted message appears in the multifunction dis-
play.
After a teach-in period, the tyre pressure
loss warning system will monitor the set
tyre pressures of all four tyres.
If you wish to cancel the restart:
X Press button %.
or
X When the Tyre press. now OK? message
appears, press the 9or: button to
select Cancel .
X Press the abutton.
The tyre pressure values stored at the last
restart will continue to be monitored. Tyre pressure
359Wheels and tyres Z
Page 372 of 405
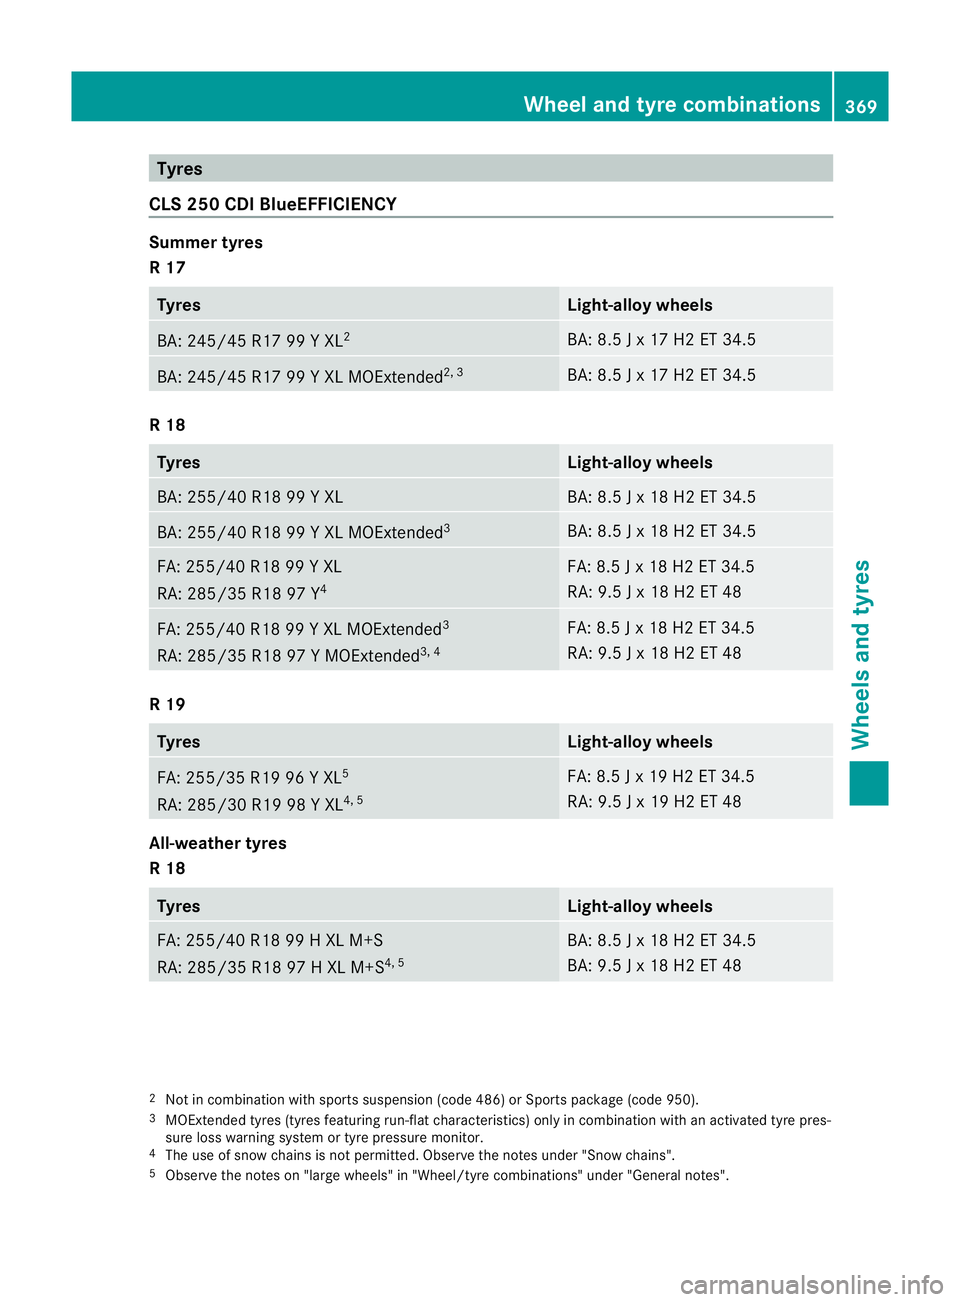
Tyres
CLS 250 CDI BlueEFFICIENCY Summer tyres
R 17
Tyres Light-alloy wheels
BA: 245/4
5 R17 99 Y XL 2 BA: 8.5 J x 17 H2 ET 34.5
BA: 245/45 R17 99 Y XL MOExtended
2, 3 BA: 8.5 J x 17 H2 ET 34.5
R 18
Tyres Light-allo
ywheels BA: 255/40 R18 99 Y XL BA: 8.5 J x 18 H2 ET 34.5
BA: 255/40 R18 99 Y XL MOExtended
3 BA: 8.5 J x 18 H2 ET 34.5
FA: 255/40 R18 99 Y XL
RA: 285/35 R18 97 Y
4 FA: 8.5 J x 18 H2 ET 34.5
RA: 9.5 J x 18 H2 ET 48
FA: 255/40 R18 99 Y XL MOExtended
3
RA: 285/35 R18 97 Y MOExtended 3, 4 FA: 8.5 J x 18 H2 ET 34.5
RA: 9.5 J x 18 H2 ET 48
R 19
Tyres Light-alloy wheels
FA: 255/35 R19 96 Y XL
5
RA: 285/30 R19 98 Y XL 4, 5 FA: 8.5 J x 19 H2 ET 34.5
RA: 9.5 J x 19 H2 ET 48
All-weather tyres
R 18
Tyres Light-alloy wheels
FA: 255/40 R18 99 H XL M+S
RA: 285/35 R18 97 H XL M+S
4, 5 BA: 8.5 J x 18 H2 ET 34.5
BA: 9.5 J x 18 H2 ET 48
2
Not in combination with sports suspension (code 486) or Sports package (code 950).
3 MOExtended tyres (tyres featuring run-fla tcharacteristics) only in combination with an activated tyre pres-
sure loss warning system or tyre pressure monitor.
4 The use of snow chains is not permitted. Observe the notes under "Snow chains".
5 Observe the notes on "large wheels" in "Wheel/tyre combinations" under "General notes". Wheel and tyre combinations
369Wheels and tyres Z
Page 373 of 405
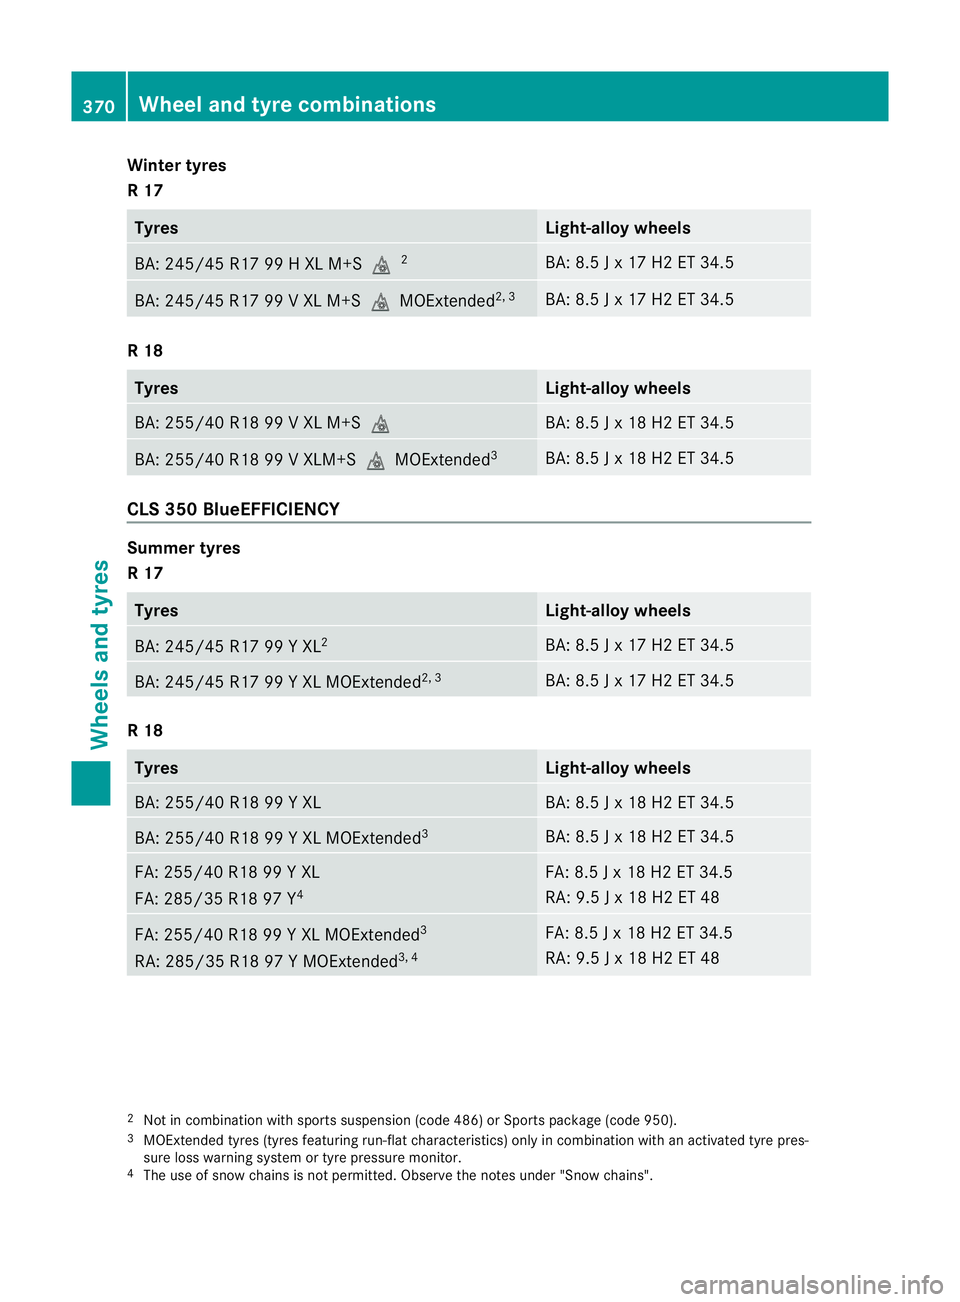
Winter tyres
R 17
Tyres Light-alloy wheels
BA: 245/45 R17 99 H XL M+S
i2 BA: 8.5 J x 17 H2 ET 34.5
BA: 245/45 R17 99 V XL M+S
iMOExtended2, 3 BA: 8.5 J x 17 H2 ET 34.5
R 18
Tyres Light-alloy wheels
BA: 255/40 R18 99 V XL M+S
i BA: 8.5 J x 18 H2 ET 34.5
BA: 255/40 R18 99 V XLM+S
iMOExtended3 BA: 8.5 J x 18 H2 ET 34.5
CLS 350 BlueEFFICIENCY
Summer tyres
R 17
Tyres Light-alloy wheels
BA: 245/45 R17 99 Y XL
2 BA: 8.5 J x 17 H2 ET 34.5
BA: 245/45 R17 99 Y XL MOExtended
2, 3 BA: 8.5 J x 17 H2 ET 34.5
R 18
Tyres Light-alloy wheels
BA: 255/40 R18 99 Y XL BA: 8.5 J x 18 H2 ET 34.5
BA: 255/40 R18 99 Y XL MOExtended
3 BA: 8.5 J x 18 H2 ET 34.5
FA: 255/40 R18 99 Y XL
FA: 285/35 R18 97 Y
4 FA: 8.5 J x 18 H2 ET 34.5
RA: 9.5 J x 18 H2 ET 48
FA: 255/40 R18 99 Y XL MOExtended
3
RA: 285/35 R18 97 Y MOExtended 3, 4 FA: 8.5 J x 18 H2 ET 34.5
RA: 9.5 J x 18 H2 ET 48
2
Not in combination with sports suspension (code 486) or Sports package (code 950).
3 MOExtended tyres (tyres featuring run-fla tcharacteristics) only in combination with an activated tyre pres-
sure loss warning system or tyre pressure monitor.
4 The use of snow chains is not permitted. Observe the notes under "Snow chains". 370
Wheel and tyre combinationsWheels and tyres