2012 MERCEDES-BENZ CLS SHOOTING BRAKE wheel
[x] Cancel search: wheelPage 223 of 405
R
Maintain a greater distance from the vehi-
cle in front than when driving without a
trailer.
R Avoid braking abruptly. If possible, brake
gently at first to allow the trailer to run on.
Then, increase the braking force rapidly.
R The values given for gradient-climbing
capabilities from a standstill refer to sea
level. When driving in mountainous areas,
note that the power output of the engine,
and consequently the vehicle's gradient-
climbing capability, decrease with increas-
ing altitude. Folding out the ball coupling
G
WARNING
If the ball coupling is not correctly engaged,
the trailer can detach. There is a risk of an
accident.
Always engage the ball coupling as described. G
WARNING
If you release the ball coupling or it does not
engage correctly when folding in, it will swing
out. Within pivoting range of the ball coupling,
there is an increased risk of an accident and
injury.
Only release the ball coupling if the pivoting
range is unobstructed. Always make sure that
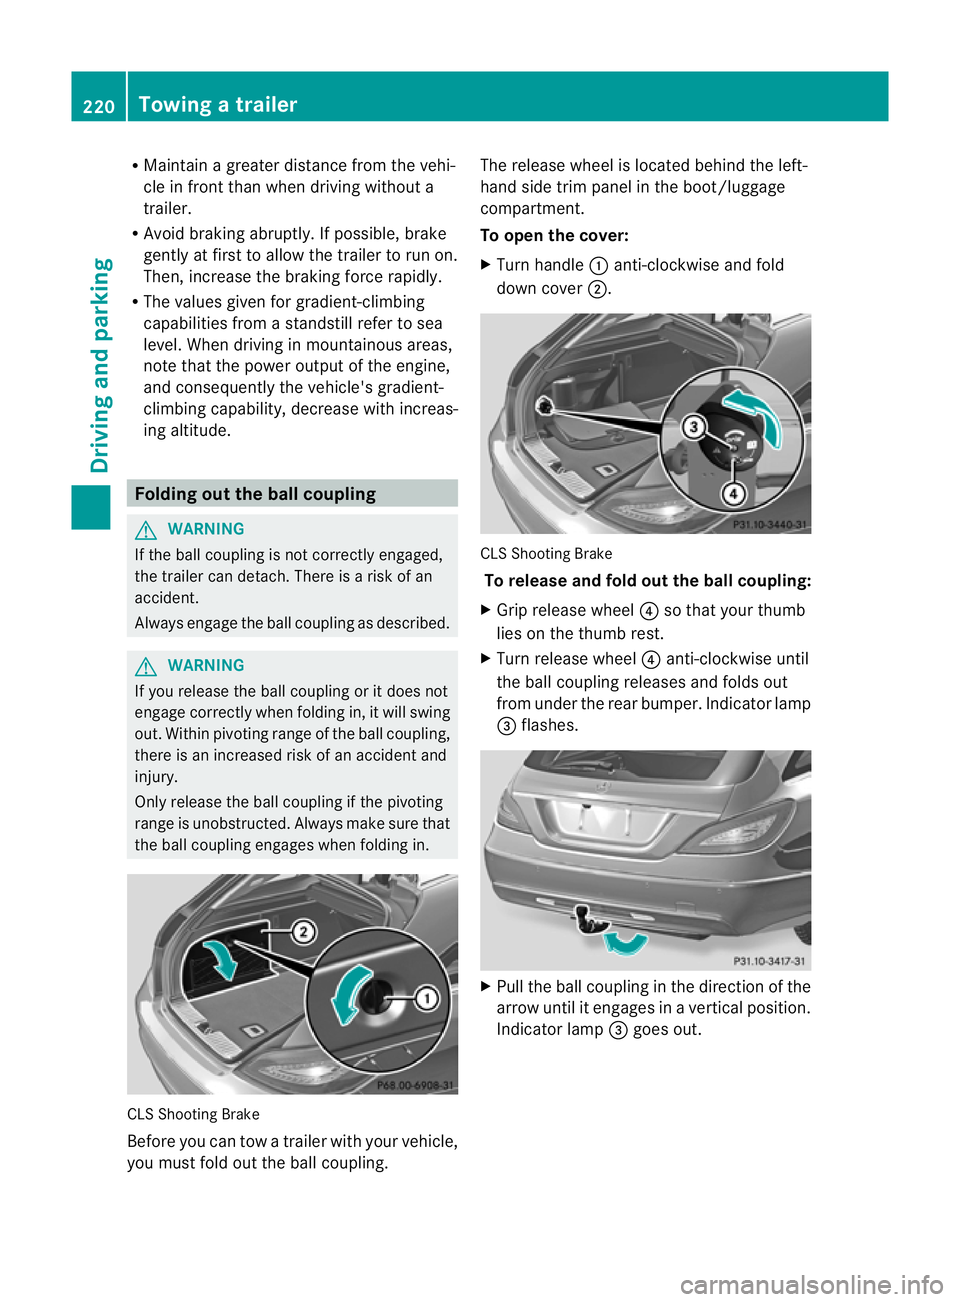
the ball coupling engages when folding in. CLS Shooting Brake
Before you can tow a trailer with your vehicle,
you must fold out the ball coupling. The release wheel is located behind the left-
hand side trim panel in the boot/luggage
compartment.
To open the cover:
X
Turn handle :anti-clockwise and fold
down cover ;. CLS Shooting Brake
To release and fold out the ball coupling:
X Grip release wheel ?so that your thumb
lies on the thumb rest.
X Turn release wheel ?anti-clockwise until
the ball coupling releases and folds out
from under the rear bumper. Indicator lamp
= flashes. X
Pull the ball coupling in the direction of the
arrow until it engages in a vertical position.
Indicator lamp =goes out. 220
Towing
atrailerDriving an d parking
Page 224 of 405
The multifunction display shows the
Check trailer hitch lock
message
until the ball coupling is engaged.
X Remove the protective covering from the
ball coupling and store it in a safe place.
X Make sure that the ball of the ball coupling
is clean and greased.
The power socket is integrated in the ball
coupling. Coupling up a trailer
G
WARNING
If you uncouple a trailer with an engaged over-
run brake, you could trap your hand between
the vehicle and the trailer drawbar. This poses
a risk of injury.
Do not uncouple a trailer with an engaged
overrun brake.
X Make sure that the transmission is in posi-
tion P.
X Apply the parking brake.
X Position the trailer level behind the vehicle.
X Couple up the trailer.
X Establish the electrical connection
between the vehicle and the trailer.
X Check that the trailer lighting system is
working. Uncoupling
atrailer G
WARNING
If you uncouple a trailer with an engaged over-
ru nb rake, you could trap yourh and between
the vehicle and the trailer drawbar .This poses
a risk of injury.
Do not uncouple a trailer with an engaged
overrun brake. G
WARNING
Vehicles with level control: If you disconnectt
he trailer cable, the vehicle
is lowered. This can cause you or others to
become trapped between the vehicle body
and tyres, or underneath the vehicle. This
poses a risk of injury.
Make sure that no-one is in the immediate
vicinity of the wheel arch or underneath the
vehicle when disconnecting the trailer cable.
! Do not disconnect a trailer with an
engaged overrun brake. Otherwise, your
vehicle could be damaged by the rebound-
ing of the overrun brake.
X Make sure that the transmission is in posi-
tion P.
X Apply the parking brake.
X Secure the trailer against rolling away.
X Remove the trailer cable and decouple the
trailer. Folding in the ball coupling
G
WARNING
If you release the ball coupling or it does not
engage correctly when folding in, it will swing
out. Within pivoting range of the ball coupling,
there is an increased risk of an accident and
injury.
Only release the ball coupling if the pivoting
range is unobstructed. Always make sure that
the ball coupling engages when folding in.
X Place the protective covering on the ball
coupling. Towing
atrailer
221Driving an d parking Z
Page 225 of 405
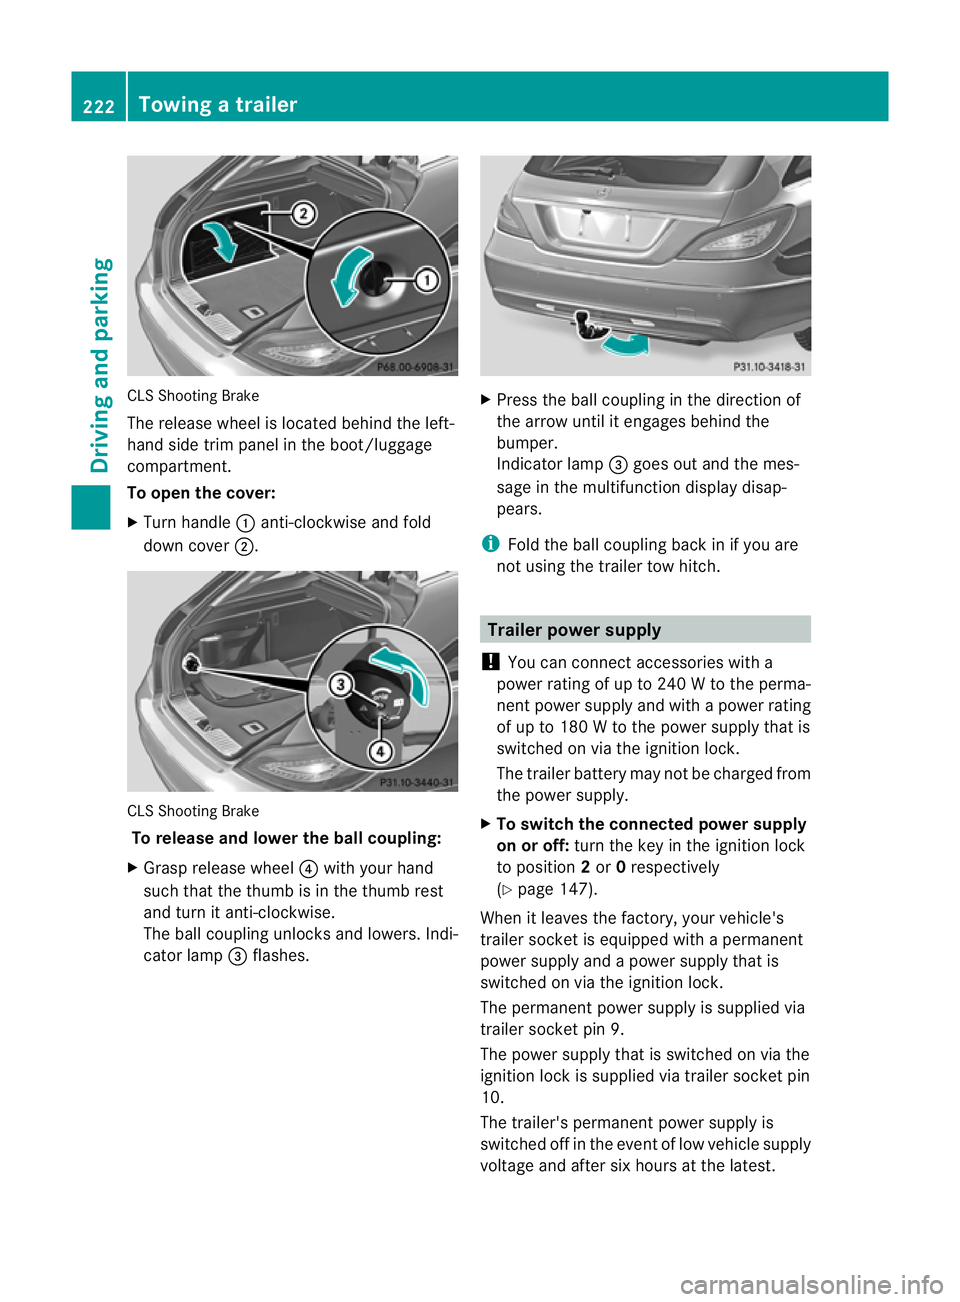
CLS Shooting Brake
The release wheel is located behind the left-
hand side trim panel in the boot/luggage
compartment.
To open the cover:
X
Turn handle :anti-clockwise and fold
down cover ;. CLS Shooting Brake
To release and lower the ball coupling:
X Grasp release wheel ?with your hand
such that the thumb is in the thumb rest
and turn it anti-clockwise.
The ball coupling unlocks and lowers. Indi-
cator lamp =flashes. X
Press the ball coupling in the direction of
the arrow until it engages behind the
bumper.
Indicator lamp =goes out and the mes-
sage in the multifunction display disap-
pears.
i Fold the ball coupling back in if you are
no tu sing the trailer tow hitch. Trailer power supply
! You can connect accessories with a
power rating of up to 240 W to the perma-
nent power supply and with a power rating
of up to 180 W to the power supply that is
switched on via the ignition lock.
The trailer battery may not be charged from
the power supply.
X To switch the connected power supply
on or off: turn the key in the ignition lock
to position 2or 0respectively
(Y page 147).
When it leaves the factory, your vehicle's
trailer socket is equipped with a permanent
power supply and a power supply that is
switched on via the ignition lock.
The permanent power supply is supplied via
trailer socket pin 9.
The power supply that is switched on via the
ignition lock is supplied via trailer socket pin
10.
The trailer's permanent power supply is
switched off in the event of low vehicle supply
voltage and after six hours at the latest. 222
Towing
atrailerDriving an d parking
Page 232 of 405
X
To activate the on-board computer: turn
the key to position 1in the ignition lock.
You can control the multifunctio ndisplay and
the settings in the on-board computer using
the buttons on the multifunction steering
wheel.
Left control panel =
; R
Calls up the menu and menu bar 9
:
Press briefly:
R
Scrolls through lists
R Selects a submenu or function
R In the Audio menu: selects a
stored station, an audio track or
a video scene
R In the Tel (telephone) menu:
switches to the phone book and
selects a name or telephone
number 9
:
Press and hold:
R
In the Audio menu: selects the
previous/next station or selects
an audio track or a video scene
using rapid scrolling
R In the Tel (Telephone) menu:
starts rapid scrolling if the phone
book is open a R
Confirms selection/display mes-
sage
R In the Tel (telephone) menu:
switches to the telephone book
and starts dialling the selected
number
R In the Audio menu: stops the
station search function at the
desired station Righ
tcontrol panel ~ R
Rejects or ends a call
R Exits telephone book/redial
memory 6 R
Makes or accepts a call
R Switches to the redial memory W
X R
Adjusts the volume 8 R
Mute Back button
%
Press briefly:
R
Back
R Switches off LINGUATRONIC;
see the separate operating
instructions
R Hides display messages/calls
up the last Trip menu function
used
R Exits the telephone book/redial
memory %
Press and hold:
R
Calls up the standard display in
the Trip menu
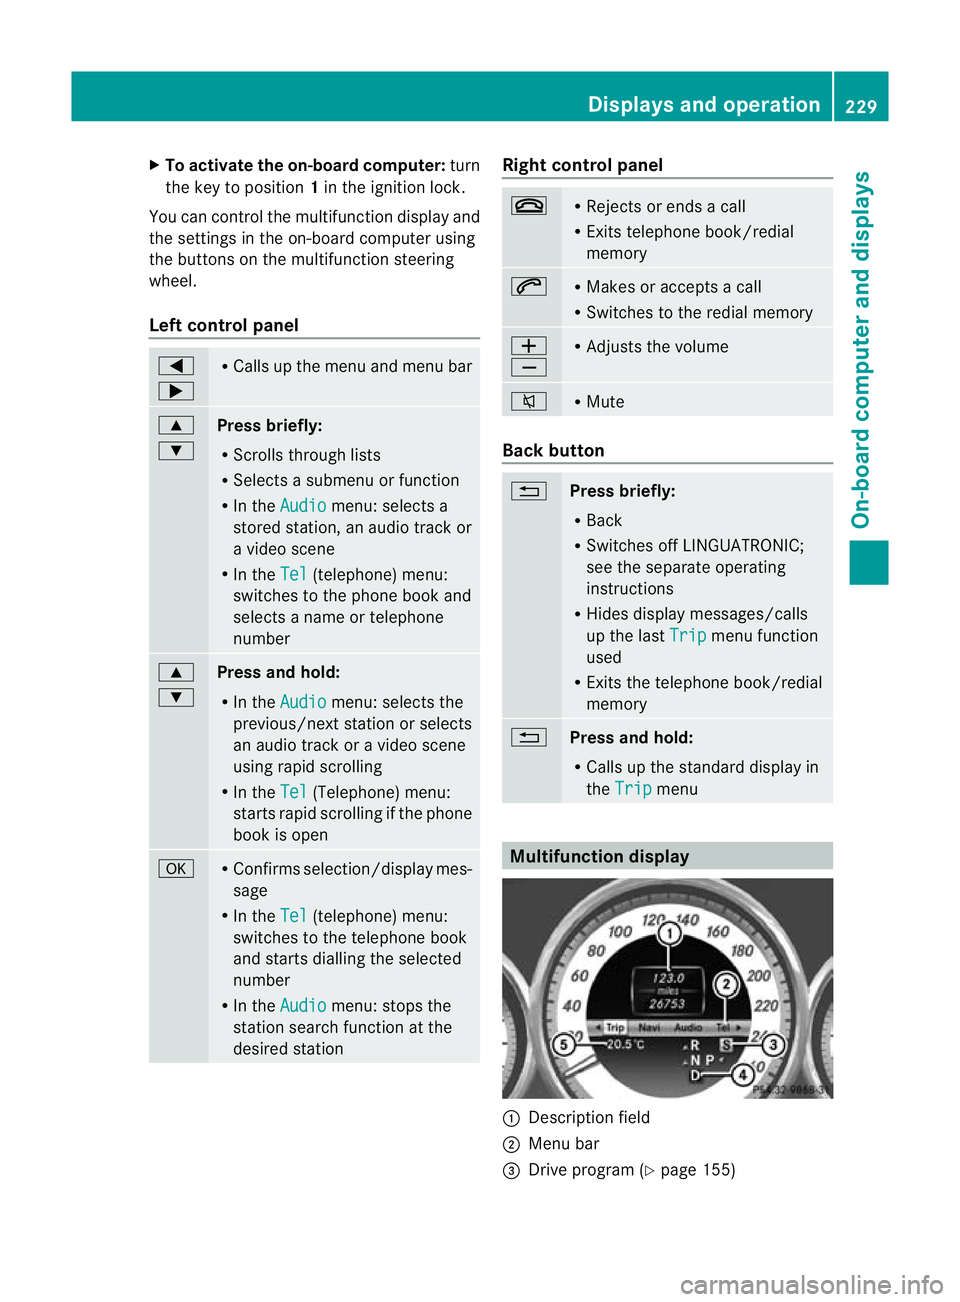
Multifunction display
:
Description field
; Menu bar
= Drive program (Y page 155) Displays and operation
229On-board computer and displays Z
Page 233 of 405
?
Transmission position (Y page 155)
A Permanen tdisplay: outside temperature
or speed (Y page 239)
X To show the menu bar ;:press the
= or; button on the steerin gwheel.
Menu bar ;disappears after a few seconds.
Text field :shows the selected menu or
submenu as well as display messages.
The following messages can appearint he
multifunction display:
XjY Active Parking Assist
(Ypage 194)
¯ Cruise control (Y page 171)
È SPEEDTRONIC (Y page 174)
_ Adaptive Highbeam Assist
(Ypage 121)
À ATTENTION ASSIST
(Ypage 202)
¤ ECO start/stop function
(Ypage 150)
Ä Speed Limit Assist
(Ypage 204)
à Lane Keeping Assist
(Ypage 210)
à Active Lane Keeping Assist
(Ypage 215)
ë HOLD function (Y page 186)
Ä PRE-SAFE®
Brake (Y page 70)
120 km/h! Maximum permissible speed
exceeded (only for certain coun-
tries)
Menus and submenus
Menu overview
Press the =or; button on the steer-
ing wheel to call up the menu bar and select
a menu.
Operating the on-board computer
(Y page 228). Depending on the equipment fitted in the
vehicle, you can call up the following menus:
R
Trip menu (Y
page 230)
R Navi menu (navigation instructions)
(Y page 232)
R Audio menu (Y
page 233)
R Tel menu (telephone) (Y
page 235)
R Assist. menu (assistance) (Y
page 236)
R Serv. menu (Y
page 239)
R Settings menu (Y
page 239)
R AMG menu in AMG vehicles (Y
page 246)
The Audio ,
Navi and
Tel menus differ slightly
in vehicles with an audio system and in vehi-
cles with COMAND Online. The examples
given in this Owner's Manual apply to vehicles
equipped with COMAND Online. Trip menu
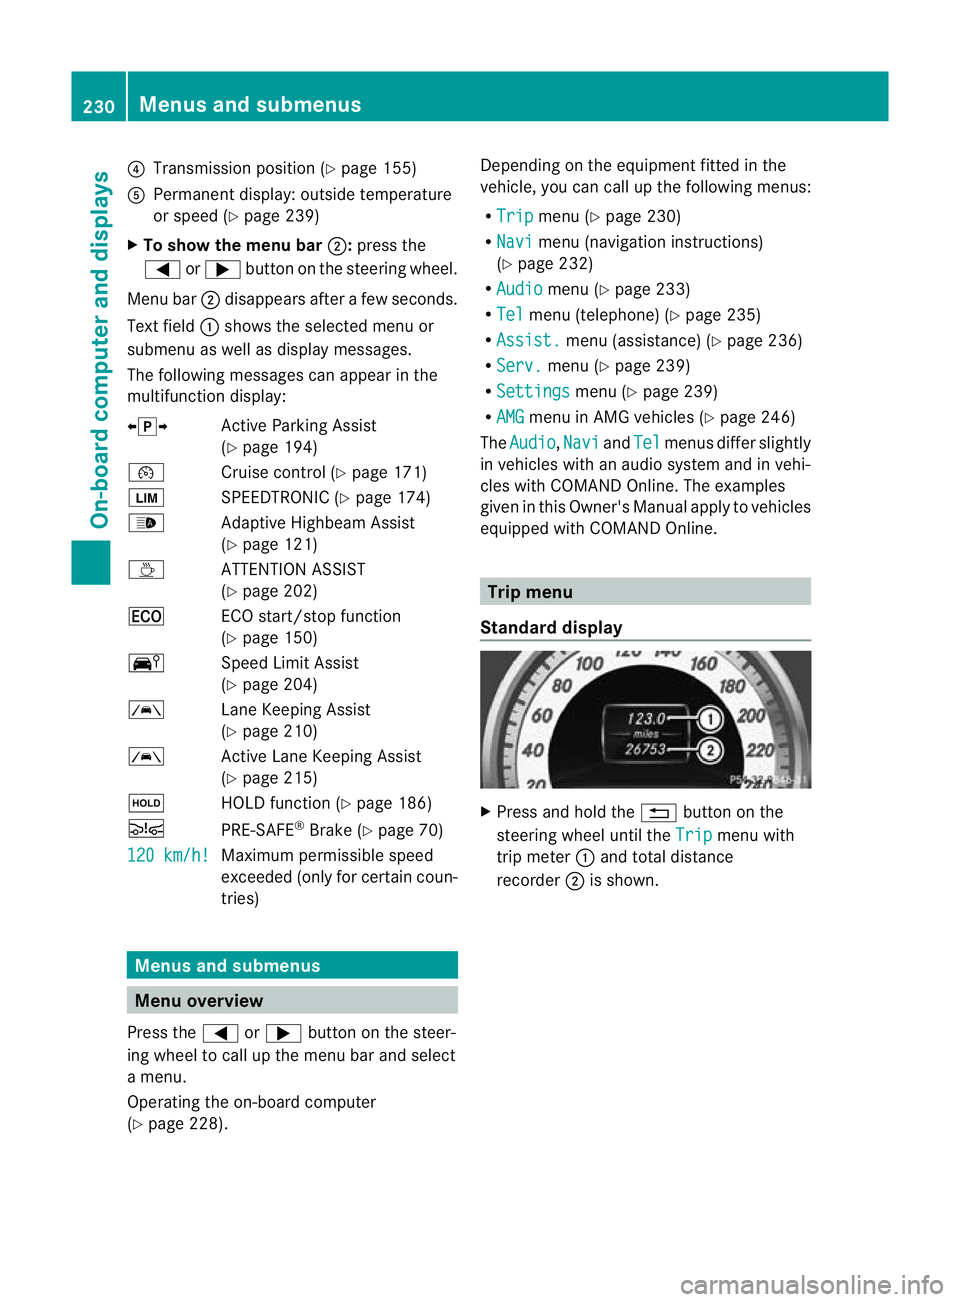
Standard display X
Press and hold the %button on the
steering wheel until the Trip menu with
trip meter :and total distance
recorder ;is shown. 230
Menus and submenusOn-board computer and displays
Page 234 of 405
Trip computer "From start" or "From
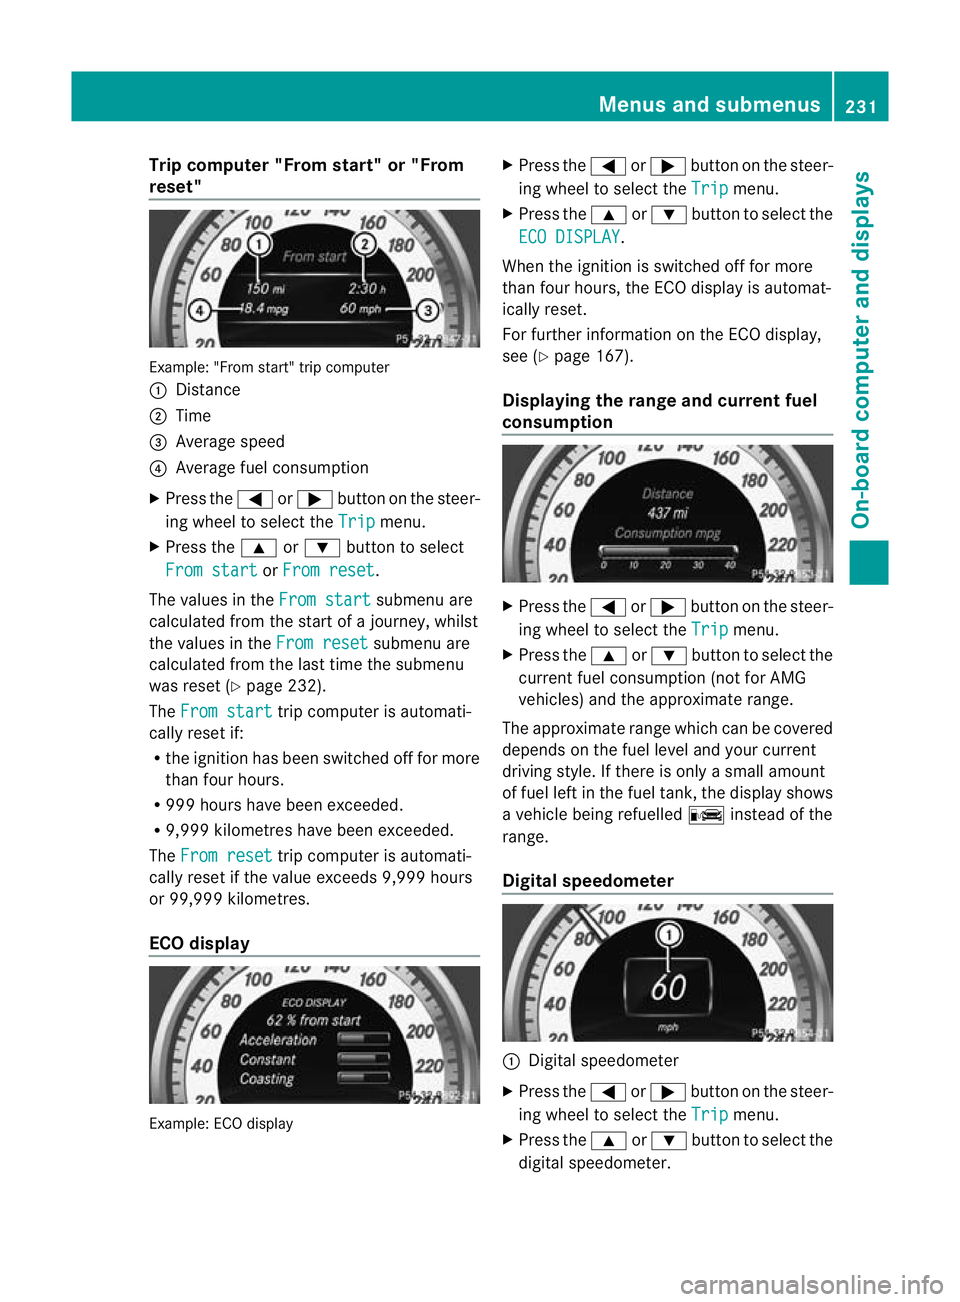
reset" Example: "From start" trip computer
:
Distance
; Time
= Average speed
? Average fuel consumption
X Press the =or; button on the steer-
ing wheel to select the Trip menu.
X Press the 9or: button to select
From start or
From reset .
The values in the From start submenu are
calculated fro mthe start of a journey, whilst
the values in the From reset submenu are
calculated from the last time the submenu
was reset (Y page 232).
The From start trip computer is automati-
cally reset if:
R the ignition has been switched off for more
than four hours.
R 999 hours have been exceeded.
R 9,999 kilometres have been exceeded.
The From reset trip computer is automati-
cally reset if the value exceeds 9,999 hours
or 99,999 kilometres.
ECO display Example: ECO display X
Press the =or; button on the steer-
ing wheel to select the Trip menu.
X Press the 9or: button to select the
ECO DISPLAY .
When the ignition is switched off for more
than four hours, the ECO display is automat-
ically reset.
For further information on the ECO display,
see (Y page 167).
Displaying the range and current fuel
consumption X
Press the =or; button on the steer-
ing wheel to select the Trip menu.
X Press the 9or: button to select the
current fuel consumption (not for AMG
vehicles) and the approximate range.
The approximate range which can be covered
depends on the fuel level and your current
driving style. If there is only a small amount
of fuel left in the fuel tank, the display shows
a vehicle being refuelled Cinstead of the
range.
Digital speedometer :
Digital speedometer
X Press the =or; button on the steer-
ing wheel to select the Trip menu.
X Press the 9or: button to select the
digital speedometer. Menus and submenus
231On-board computer and displays Z
Page 235 of 405
Resetting values
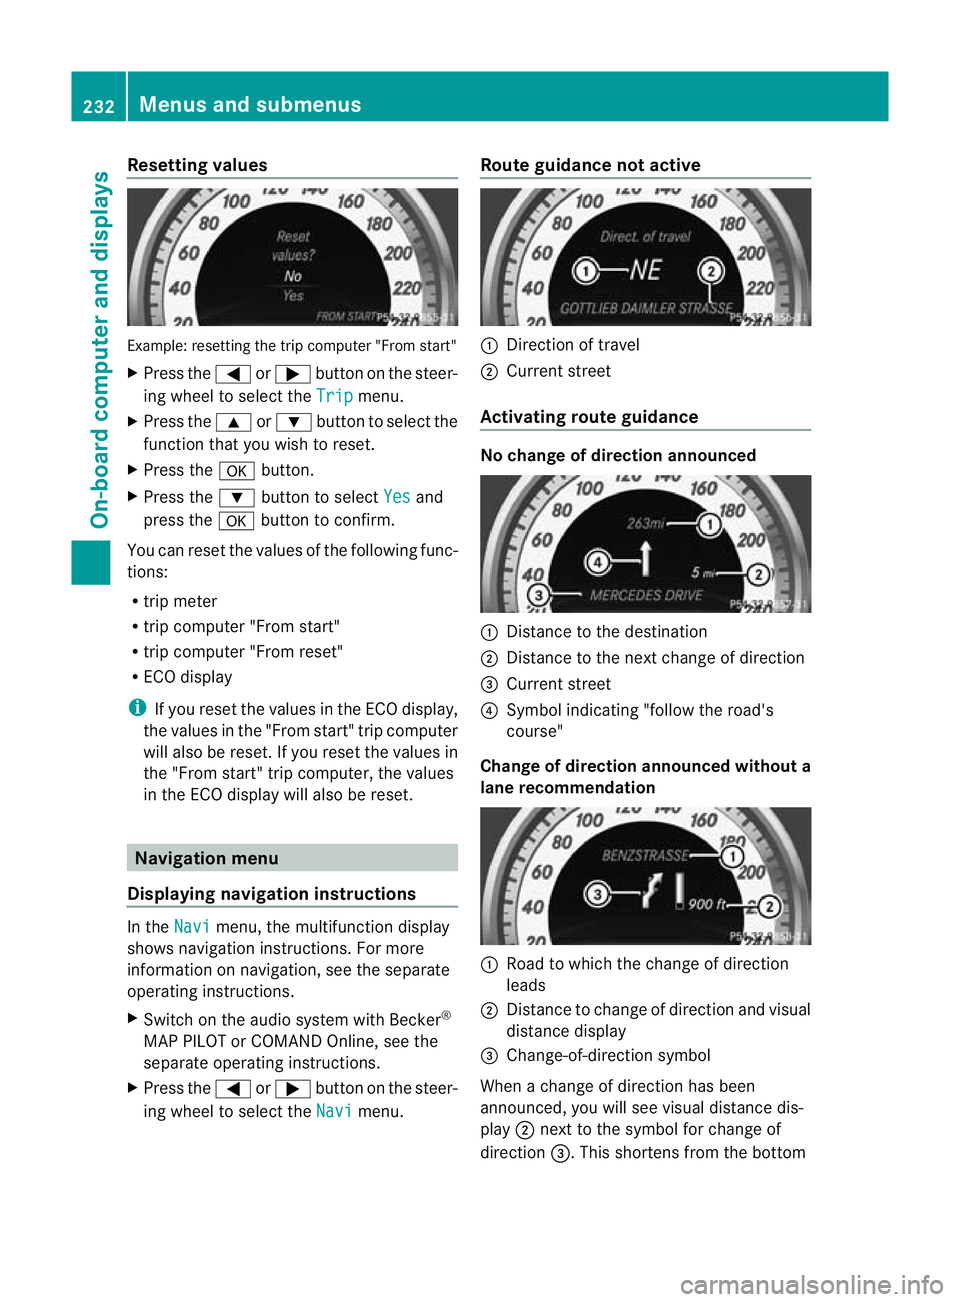
Example: resetting the trip computer "From start"
X
Press the =or; button on the steer-
ing wheel to select the Trip menu.
X Press the 9or: button to select the
function that you wish to reset.
X Press the abutton.
X Press the :button to select Yes and
press the abutton to confirm.
You can reset the values of the following func-
tions:
R trip meter
R trip computer "From start"
R trip computer "From reset"
R ECO display
i If you reset the value sinthe ECO display,
the values in the "From start" trip computer
will also be reset. If you reset the values in
the "From start" trip computer, the values
in the ECO display will also be reset. Navigation menu
Displaying navigation instructions In the
Navi menu, the multifunction display
shows navigation instructions. For more
information on navigation, see the separate
operating instructions.
X Switch on the audio system with Becker ®
MAP PILOT or COMAND Online, see the
separate operating instructions.
X Press the =or; button on the steer-
ing wheel to select the Navi menu.Route guidance not active :
Direction of travel
; Current street
Activating route guidance No change of direction announced
:
Distance to the destination
; Distance to the next change of direction
= Current street
? Symbol indicating "follow the road's
course"
Change of direction announced without a
lane recommendation :
Road to which the change of direction
leads
; Distance to change of direction and visual
distance display
= Change-of-direction symbol
When a change of direction has been
announced, you will see visual distance dis-
play ;next to the symbol for change of
direction =.This shortens from the bottom 232
Menus and submenusOn-board computer and displays
Page 236 of 405
to the top of the display as you approach the
point of the announced change of direction.
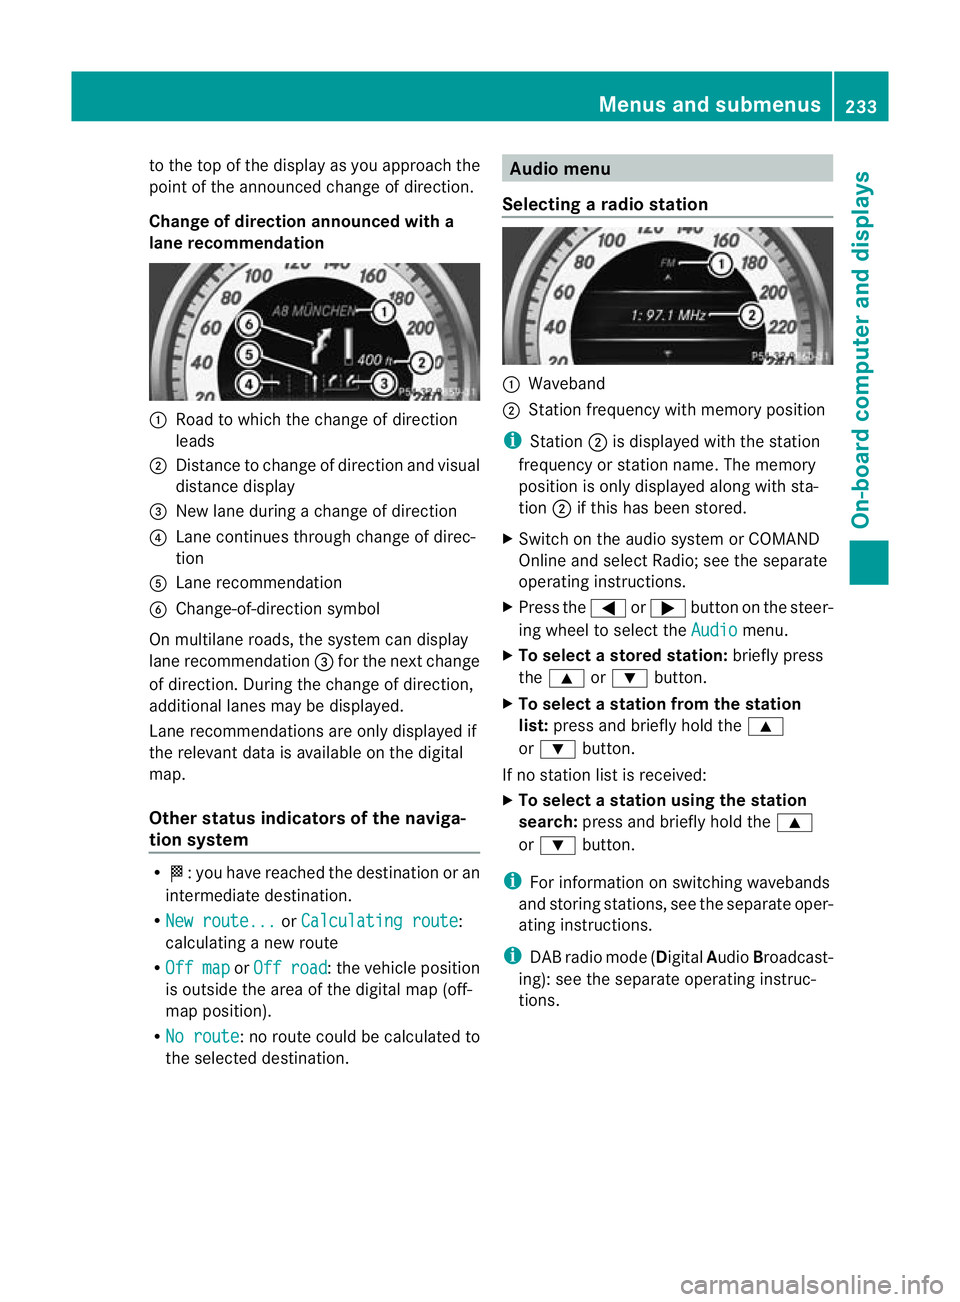
Change of direction announced with a
lane recommendation :
Road to which the change of direction
leads
; Distance to change of directio nand visual
distance display
= New lane during a change of direction
? Lane continues through change of direc-
tion
A Lane recommendation
B Change-of-direction symbol
On multilane roads, the system can display
lane recommendation =for the next change
of direction. During the change of direction,
additional lanes may be displayed.
Lane recommendations are only displayed if
the relevant data is availabl eonthe digital
map.
Other status indicators of the naviga-
tion system R
O:y ou have reached the destination or an
intermediate destination.
R New route... or
Calculating route :
calculating a new route
R Off map or
Off road :t
he vehicle position
is outside the area of the digital map (off-
map position).
R No route :n
o route could be calculated to
the selected destination. Audio menu
Selecting aradio station :
Waveband
; Station frequency with memory position
i Station ;is displayed with the station
frequency or station name. The memory
position is only displayed along with sta-
tion ;if this has bee nstored.
X Switch on the audio syste morCOMAND
Online and select Radio; see the separate
operating instructions.
X Press the =or; button on the steer-
ing wheel to select the Audio menu.
X To select astore dstation: briefly press
the 9 or: button.
X To select a station from the station
list: press and briefly hold the 9
or : button.
If no statio nlist is received:
X To select astation using the station
search: press and briefly hold the 9
or : button.
i For informatio nonswitching wavebands
and storing stations, see the separate oper-
ating instructions.
i DABradio mode ( DigitalAudioBroadcast-
ing): see the separate operating instruc-
tions. Menus and submenus
233On-board computer and displays Z