2012 MERCEDES-BENZ CLS COUPE transmission
[x] Cancel search: transmissionPage 291 of 373
X
Press and hold button Bon remot econtrol
A until indicator lamp :lights up green.
If indicator lamp :lights up green or
flashes, then programming has been suc-
cessful.
X Release button Bof garage door drive
remote control A.
X If indicator lamp :lights up red: repeat
the programming procedure for the corre-
sponding button on the rear-view mirror.
When doing so, vary the distance between
remote control Aand the rear-view mirror.
i If the indicator lamp flashes green after
successful programming, the garage door
system is using arolling code. After pro-
gramming, you must synchronise the
garage door opener integrated in the rear-
view mirror with the receiver of the garage
door system.
Synchronising the rolling code
Your vehicle must be within range of the
garage door or exterior gate drive. Make sure
that neither your vehicle nor any persons/
object sare present within the sweep of the
door or gate.
Observe the safety notes when performing
the rolling code synchronisation.
X Turn the key to position 2in the ignition
lock.
X Press the programming button of the door
or gate drive (see the door or gate drive
operating instructions, e.g. under "Pro-
gramming of additional remote controls").
i Usually ,you now have 30seconds to ini-
tiate the next step.
X Press previously programmed button ;,
= or? of the integrated garage door
opener until the door closes.
The rolling code synchronisation is then
complete. Problems when programming
If you have problems when programming the
integrated garage door opener, please note
the following:
R
Check the transmitter frequency of garage
door drive remote control A.This can usu-
ally be found on the back of the remote
control.
R Replace the batteries in garage door
remote control A.This increases the like-
lihood that garage door remote control A
will transmit astronga nd precise signal to
the integrated garage door opener in the
rear-view mirror.
R When programming, hold remote control
A at varying distances and angles from the
button which you are programming. Try var-
ious angles at adistance between 5and
30 cm or at the same angle but at varying
distances.
R If there is another remote control for the
same garage door drive, perform the pro-
gramming steps again using this remote
control. Before performing these steps,
make sure that new batteries have been
fitted in garage door drive remote control
A.
R Note that some remote controls transmit
only for alimited period (the indicator lamp
on the remote control goes out). Press but-
ton Bon remote control Aagain before
transmission ends.
R Align the aerial cable of the garage door
opener unit. This can improve signal recep-
tion/transmission.
Opening or closing the garage door Once programmed, the integrated garage
door opener will assume the function of the
garage door system's remote control. Please
also read the operating instructions for the
garage door system.288
FeaturesStowing and features
Page 304 of 373
Special service requirements
Arduous operating condition
sorincreased
loads on the vehicle will require some service
work to be performed more often than for a
vehicle in normal use. Such arduousc ondi-
tions include regular city driving with frequent
intermediate stops and use in mountainous
terrain or on poor road surfaces.
For example, if the vehicle is used under ardu-
ous operating conditions, have air filters,
engine oil and oil filters changed frequently
and check the wheels often.F urther informa-
tion can be obtaine dataqualified specialist
workshop, e.g. aMercedes-Ben zService
Centre.
Driving abroad
An extensive Mercedes-BenzS ervice network
is also available in other countries. The
Service Hotline's curren ttelephone numbers
for use when you are abroad are to be found
in the "Mercedes-Benz Service24h" section
of the Service Booklet. Care
General notes
H
Environmental note
Dispose of empty packagin gand cleaning
cloth sinane nvironmentally responsible man-
ner.
! For cleanin gyour vehicle, do not use any
of the following:
R dry, rough or hard cloths
R abrasive cleanin gagents
R solvents
R cleanin gagents containin gsolvents
Do not scrub.
Do not touch the surfaces or protective
films with hard objects, e.g. aring or ice
scraper. You could otherwise scratch or
damage the surfaces and protective film. !
Do not park up the vehicle for an extended
period straight after cleanin git, particularly
after having cleaned the wheels with wheel
cleaner. Wheel cleaners could cause
increased corrosion of the brake discs and
brake pads/linings. For this reason, you
should drive for afew minutes after clean-
ing. Braking heats the brake discs and the
brake pads/linings, thus drying them. The
vehicle can then be parked up.
Regular care of your vehicle is acondition for
retaining the quality in the long term.
Use care product sand cleanin gagents rec-
ommended and approved by Mercedes-Benz. Washing the vehicle and cleaning the
paintwork
Automatic car wash G
WARNING
Braking efficiency is reduced after washing
the vehicle. This could cause an accident. For
this reason, following acar wash, drive with
particular care until the brakes are dry. G
WARNING
The vehicle is braked when the HOLD function
or DISTRONIC PLUS is activated. Therefore,
deactivat ethe HOLD function and DISTRONIC
PLUS before the vehicle is washed in an auto-
matic car wash.
! Make sure that:
R the side windows and sliding sunroof are
closed completely.
R the blower for the ventilation/heating is
switched off (OFF button is depressed).
R the windscreen wiper switch is at posi-
tion 0.
The vehicle could otherwise be damaged.
! In car washes with atowing mechanism,
make sure that the automatic transmission
is in transmission position N,otherwise the
vehicle could be damaged. Care
301Maintenance and care Z
Page 305 of 373
R
Vehicles with akey:
do not remove the key from the ignition
lock. Do not open the driver's door or
front-passenger door when the engine is
switched off. Otherwise, the automatic
transmission selects park position P
automatically and locks the wheels. You
can prevent this by shifting the auto-
matic transmission to Nbeforehand.
R Vehicles with KEYLESS-GO:
do not open the driver's door or front-
passenger door when the engine is
switched off. Otherwise, the automatic
transmission selects park position P
automatically and locks the wheels.
Observe the following to make sure that the
automatic transmission stays in position N:
X Make sure the vehicle is stationary and the
ignition is switched off.
X Turn the key to position 2(Ypage 141) in
the ignition lock.
Use the key instead of the Start/Stop but-
ton on vehicles with KEYLESS-GO.
X Depress and hold the brake pedal.
X Shift the automatic transmission to posi-
tion N.
X Release the brake pedal.
X Release the electric parking brake.
X Switch off the ignition and leave the key in
the ignition lock.
You can wash the vehicle in an automatic car
wash from the very start.
Wash off excess dirt before cleaning the vehi-
cle in an automatic car wash.
After using an automatic car wash, wipe off
wax from the windscreen and the wiper
blades. This will prevent smears and reduce
wiping noises caused by residueont he wind-
screen.
Washing by hand In some countries, washing by hand is only
allowed at specially equipped washing bays. Observe the legal requirements for each indi-
vidual country.
X Do not use hot water and do not wash the
vehicle in direct sunlight.
X Use asoft sponge to clean.
X Use amild cleaning agent, such as acar
shampoo approved by Mercedes-Benz.
X Thoroughly hose down the vehicle with a
gentle jet of water.
X Do not point the water jet directly towards
the air inlet.
X Use plenty of water and rinse out the
sponge frequently.
X Rinse the vehicle with clean water and dry
thoroughly with achamois.
X Do not let the cleaning agent dry on the
paintwork.
When using the vehicle in winter, remove all
traces of road salt deposits carefully and as
soon as possible.
High-pressure cleaninge quipment G
WARNING
Do not use high-pressure cleaners with circu-
lar-jet nozzles (dirt grinders) to clean your
vehicle, in particular the tyres. You could oth-
erwise damage the tyres and cause an acci-
dent.
! Always maintain adistance of at least
30 cm between the vehicle and the high-
pressure cleaner nozzle. Information about
the correct distance is available from the
equipment manufacturer.
Move the high-pressure cleaner nozzle
around when cleaning your vehicle.
Do not aim directly at any of the following:
R tyres
R door gaps, roof gaps, jointse tc.
R electrical components
R battery
R connectors
R lights 302
CareMaintenance and care
Page 315 of 373
The vehicle tool kit contains:
R
Foldable wheel chock
R Fuse allocation chart
R Jack
R Centrin gpin
R One pair of gloves
R Wheel wrench
R Towing eye
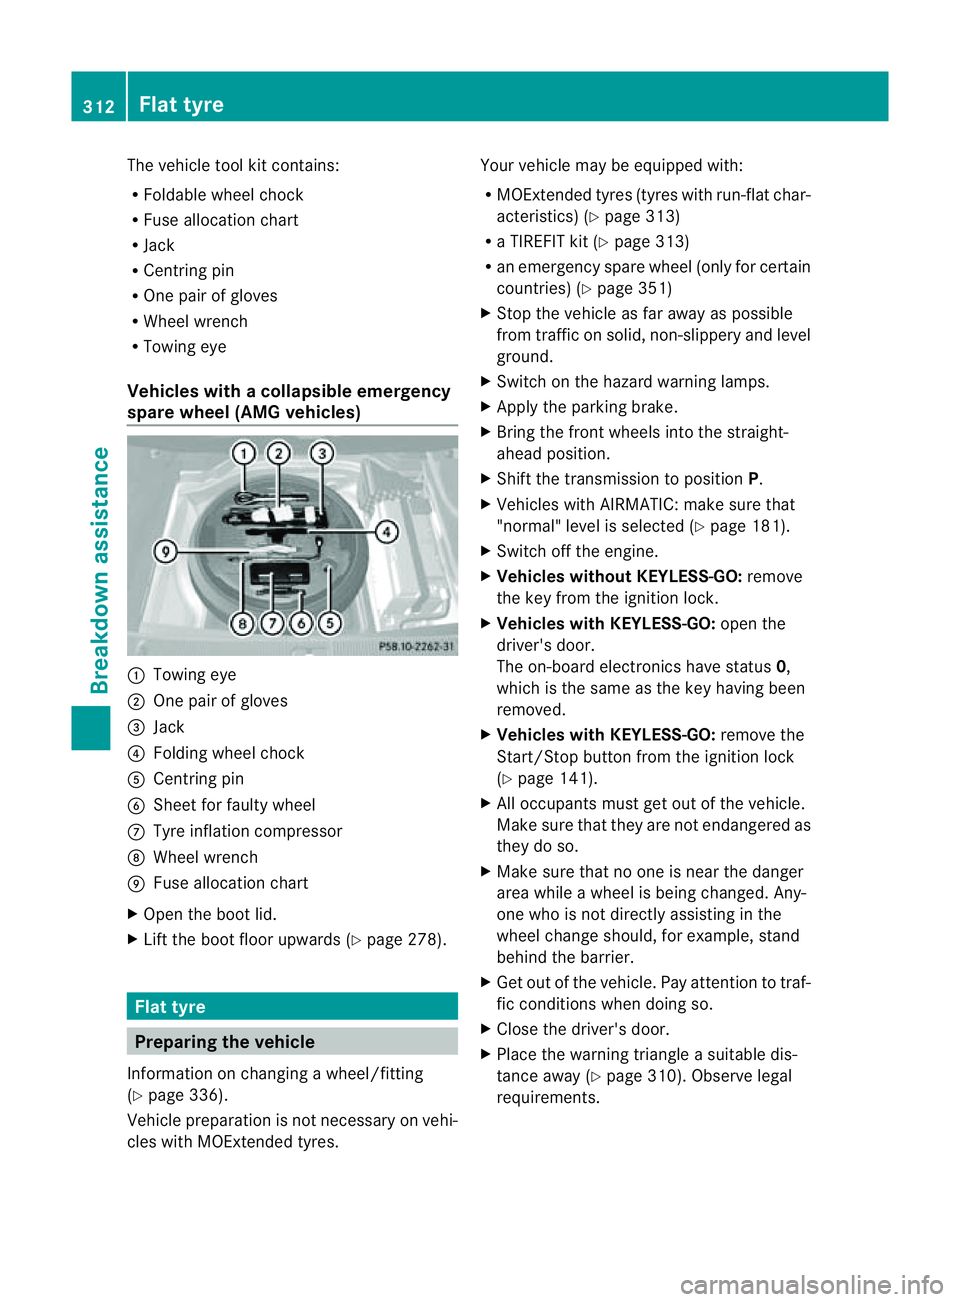
Vehicles with acollapsible emergency
spare wheel (AMG vehicles) :
Towin geye
; Onep air of gloves
= Jack
? Folding wheel chock
A Centrin gpin
B Sheet for fault ywheel
C Tyre inflatio ncompressor
D Wheel wrench
E Fuse allocation chart
X Open the boot lid.
X Lift the boot floor upwards (Y page 278).Flat tyre
Preparing the vehicle
Information on changing awheel/fitting
(Y page 336).
Vehicle preparation is not necessary on vehi-
cles with MOExtended tyres. Your vehicle may be equipped with:
R
MOExtended tyres (tyres with run-flat char-
acteristics) (Y page 313)
R aT IREFIT kit (Y page 313)
R an emergenc yspare wheel (only for certain
countries) (Y page 351)
X Stop the vehicle as far away as possible
from traffic on solid, non-slippery and level
ground.
X Switch on the hazard warning lamps.
X Apply the parking brake.
X Bring the front wheels into the straight-
ahead position.
X Shift the transmission to position P.
X Vehicles with AIRMATIC: make sure that
"normal" level is selected (Y page 181).
X Switch off the engine.
X Vehicles without KEYLESS-GO: remove
the key from the ignition lock.
X Vehicles with KEYLESS-GO: open the
driver's door.
The on-board electronics have status 0,
which is the same as the key having been
removed.
X Vehicles with KEYLESS-GO: remove the
Start/Stop button from the ignition lock
(Y page 141).
X All occupant smust get out of the vehicle.
Make sure that they are not endangered as
they do so.
X Make sure that no one is near the danger
area while awheel is being changed. Any-
one who is not directly assisting in the
wheel change should, for example, stand
behind the barrier.
X Get out of the vehicle. Pay attention to traf-
fic conditions when doing so.
X Close the driver's door.
X Place the warning triangle asuitable dis-
tancea way (Y page 310). Observe legal
requirements. 312
Flat tyreBreakdown assistance
Page 321 of 373
Otherwise, the vehicle's electronic sys-
tem may be damaged.
R in vehicles with automatic transmission,
the transmission is locked in position P
after disconnecting the battery. The vehi-
cle is secured against rolling away. You
can then no longer move the vehicle.
The battery and the cover of the positive
terminal clamp must be fitted securely dur-
ing operation.
In order for the battery to achieve the maxi-
mum possibles ervice life, it must always be
sufficiently charged.
The vehicle battery, like other batteries, can
discharge over time if you do not use the
vehicle. In such cases, have the battery dis-
connected at aqualified specialist workshop.
You can also charge the battery with a
charger recommended by Mercedes-Benz.
For more information, please contact aquali-
fied specialist workshop.
Have the battery charge checked more fre-
quently if you use the vehicle mainly for short
trips or if you leave it standing idle for a
lengthy period. Consult aqualified specialist
workshop if you wish to leave your vehicle
parked up for along period of time.
i When you park the vehicle, remove the
key if you do not require any electrical con-
sumers. The vehicle will then use very little
energy, thus conserving battery power.
i After an interruption of the power supply,
e.g. the battery was discharged, you have
to:
R set the clock. Information on setting the
clock can be found in the separate oper-
ating instructions.
On vehicles with COMAND Online and a
navigation system, the clock is set auto-
matically.
R reset the function for folding the exterior
mirrors in/out automatically, by folding
the mirrors out once (Y page 106). Charging the battery
G
WARNING
Only charge the battery in awell-ventilated
area. As the battery is being charged, gases
can escape and generate minor explosions.
This could injure you and other persons or
cause damage to the paintwork or acid cor-
rosion on the vehicle.
You can obtain information on battery charg-
ers which allow the battery to be charged
while still installed from aqualified specialist
workshop. G
WARNING
There is arisk of acid burns during the charg-
ing process due to the gases which escape
from the battery. Do not lean over the battery
during the charging process. G
WARNING
Battery acid is caustic. Avoid contact with the
skin, eyes or clothing.
! Only charge the installed battery with a
battery charger which has been tested and
approved by Mercedes-Benz.T hese battery
chargers allow the battery to be charged
while still installed in the vehicle.
! Only use battery chargers with amaxi-
mum charging voltage of 14.8 V.
! Only charge the battery using the jump-
start connection point.
The jump-starting connection point is in the
engine compartment( Ypage 319).
Read the battery charger's operating instruc-
tions before charging the battery.
X Open the bonnet (Y page 296).
X Connect the battery charger to the positive
terminal and earth point in the same order
as when connecting the donor battery in
the jump-starting procedure
(Y page 319). 318
Battery (vehicle)Breakdown assistance
Page 322 of 373
Jump-starting
G
WARNING
There is arisk of acid burns when jump-starting avehicle due to the gases which escape from
the battery. Do not lean over the battery while the engine is being jump-started. G
WARNING
Gases escaping from the battery during jump-starting may cause minor explosions. Avoid cre-
ating sparks. Keep naked flames away from the battery, and do not smoke.
Comply with the important safety precautions when handling batteries. You will find these under
"Battery (vehicle) -important safety notes" in the index. G
WARNING
Non-combusted fuel can collect in the exhaust system and ignite. There is arisk of fire. Avoid
repeated and lengthy starting attempts.
! Vehicles with apetrol engine: avoid repeated and length ystarting attempts. Otherwise,
th en on-combusted fuel may damage th ecatalytic converter.
Do not use arapid chargin gdevic etos tart th evehicle. If your vehicle's batter yisdischarged,
the engin ecan be jump-started from another vehicle or from asecon dbatter yusing jump
leads. Observe the following points:
R The batter yisnot accessible in all vehicles. If the other vehicle's batter yisnot accessible,
jump-start the vehicle using asecond battery or ajump-starting device.
R vehicles with apetrol engine: onlyjump-star tthe vehicle when the engine and exhaust
system are cold.
R do not start the engine if the battery is frozen.L et the battery thaw first.
R jump-starting may only be performed from batteries with anominal voltage of 12 V.
R only use jump leads that have asufficient cross-section and insulated terminal clamps.
R if the battery is fully discharged, leave the battery that is being used to jump-start connected
for afew minutes before attempting to start. This charges the empty battery alittle.
R make sure that the two vehicles do not touch.
Make sure that:
R The jump leads are not damaged.
R Non-insulated parts of the terminal clamps do not come into contact with other metal parts
while the jump leads are connected to the battery.
R the jump leads cannot come into contact with parts such as the V-belt pulleyort he fan.
These parts move when the engine is started and while it is running.
X Firmly depress the parking brake.
X Shift the transmission to position P.
X Switch off all electrical consumers (e.g. radio, blower, etc.).
X Open the bonnet (Y page 296).
Position number Bidentifies the charged battery of the other vehicle or an equivalent jump-
startingd evice. Jump-starting
319Breakdown assistance Z
Page 324 of 373
Befor
etowing away ,make sur ethat the steer-
ing can be move dand is not locked.
If yo utow or tow-start another vehicle, its
weigh tmustn ot excee dthe maximum per-
missible gros svehicle weigh tofyour vehicle. G
WARNING
The vehicle is braked when the HOLD function
or DISTRONIC PLUS is activated. Therefore,
deactivate HOLD and DISTRONIC PLUS if the
vehicle is to be towed.
! Only secure the tow rope or towing bar to
the towing eyes. The vehicle may otherwise
be damaged.
! Observe the following points when towing
with atow rope:
R secure the tow rope on the same side on
both vehicles.
R the tow rope must not be longer than is
legally permitted. It should be marked in
the middle, e.g. with awhite cloth
(30 x30c m) so thatothe rroad users are
aware that avehicle is being towed.
R the tow rope may only be attached to the
towing eyes.
R observe the brake lamps of the towing
vehicle while driving. Always maintain a
distance so that the tow rope does not
sag.
R do not use steel cables or chains to tow
your vehicle. The vehicle could be dam-
aged.
! Do not use the towing eye for recovery,
this could damage the vehicle. If in doubt,
recover the vehicle with acrane.
! When towing, pulla wayslowly and
smoothly .Ifthe tractive power is too high,
the vehicles could be damaged.
! To tow vehicles with KEYLESS-GO, use
the key instead of the Start/Stop button.
The automatic transmission may otherwise
switch to position Pwhen you open the driver's or front-passenger door which
could damage the transmission.
! You may tow the vehicle for amaximum
of 50km.At owing speed of 50 km/h must
not be exceeded.
For towing distances over 50 km, the entire
vehicle must be lifted up and transported.
! If you tow or tow-start another vehicle, its
weight must not exceed the maximum per-
missible gross vehicle weight of your vehi-
cle.
Information on your vehicle's gross vehicle
weight rating can be found on the vehicle
identification plate (Y page 359).
Observe the legal requirements for the rele-
vant countries when towing.
It is better to have the vehicle transported
than to have it towed.
If the vehicle has suffered transmission dam-
age, have it transported on atransporter or
trailer.
The automatic transmission must be in posi-
tion Nwhen the vehicle is being towed.
The battery must be connected and charged.
Otherwise, you:
R cannot turn the key in the ignition lock to
position 2
R cannot shift the automatic transmission to
position N
i Deactivate the automatic locking feature
(Y page 84). You could otherwise be locked
out when pushing or towing the vehicle.
Deactivate tow-away protection
(Y page 71) before the vehicle is towed. Fitting/removing the towing eye
Fitting the towing eye G
WARNING
The exhaust tail pipe may be hot. You could
burn yourself if you touch the tail pipe. Be Towing and tow-starting
321Breakdown assistance
Z
Page 326 of 373
much more effort to brake and steer the vehi-
cle. Adapt yours tyleofd rivingaccordingly.
It is important tha tyou observe the safety
instructions when towing away your vehicle
(Y page 320).
The automatic transmission automatically
shifts to position Pwhen you open the driver's
or front-passenger door or when you remove
the key from the ignition lock. In order to
ensure that the automatic transmission stays
in position Nwhen towing the vehicle, you
must observe the following points:
X Make sure that the vehicle is stationary and
that the key is in position 0in the ignition
lock.
X Turn the key to position 2in the ignition
lock.
On vehicles with KEYLESS-GO, use the key
instead of the Start/Stop button
(Y page 141).
X Depress and hold the brake pedal.
X Shift the automatic transmission to posi-
tion N.
X Release the brake pedal.
X Release the parking brake.
X Switch on the hazard warning lamps
(Y page 114).
X Leave the key in position 2in the ignition
lock.
i When towing with the hazard warning
lamps switched on, use the combination
switch as usual to signal achange of direc-
tion. In this case, only the turn signals for
the desired direction flash. When the com-
bination switch is reset, the hazard warning
lamps start flashing again. Transporting the vehicle
! Only lash the vehicle down by the wheels
or wheel rims, not by parts of the vehicle
such as axle or steering components. Oth-
erwise, the vehicle could be damaged. The towing eye can be used to pull the vehicle
onto atrailer or transporter for transporting
purposes.
X Turn the key to position 2in the ignition
lock.
X Shift the automatic transmission to posi-
tion N.
As soon as the vehicle is loaded:
X Prevent the vehicle from rolling away by
applying the parking brake.
X Shift the automatic transmission to posi-
tion P.
X Turn the key in the ignition lock to position
0and remove the key from the ignition
lock.
X Secure the vehicle. Notes for 4MATIC vehicles
! Vehicles with 4MATIC must not be towed
with the front or rear axle raised; otherwise,
the transmission may be damaged.
If the vehicle has transmission damage or
damage to the front or rear axle, have it trans-
ported on atransporter or trailer.
In the event of damage to the electrical
system
If the battery is defective, the automatic
transmission will be locked in position P.To
shift the automatic transmission to position
N,y ou must provide power to the vehicle's
electrical system in the same way as when
jump-starting (Y page 319).
Have the vehicle transported on atransporter
or trailer. Tow-starting (emergency engine
starting)
! Vehicles with automatic transmission
must not be tow-started. The transmission
may otherwise be damaged. Towing and tow-starting
323Breakdown assistance Z