2012 MERCEDES-BENZ CLS COUPE phone
[x] Cancel search: phonePage 287 of 373
ensures that ther
eissufficien tpower to
start the engine.
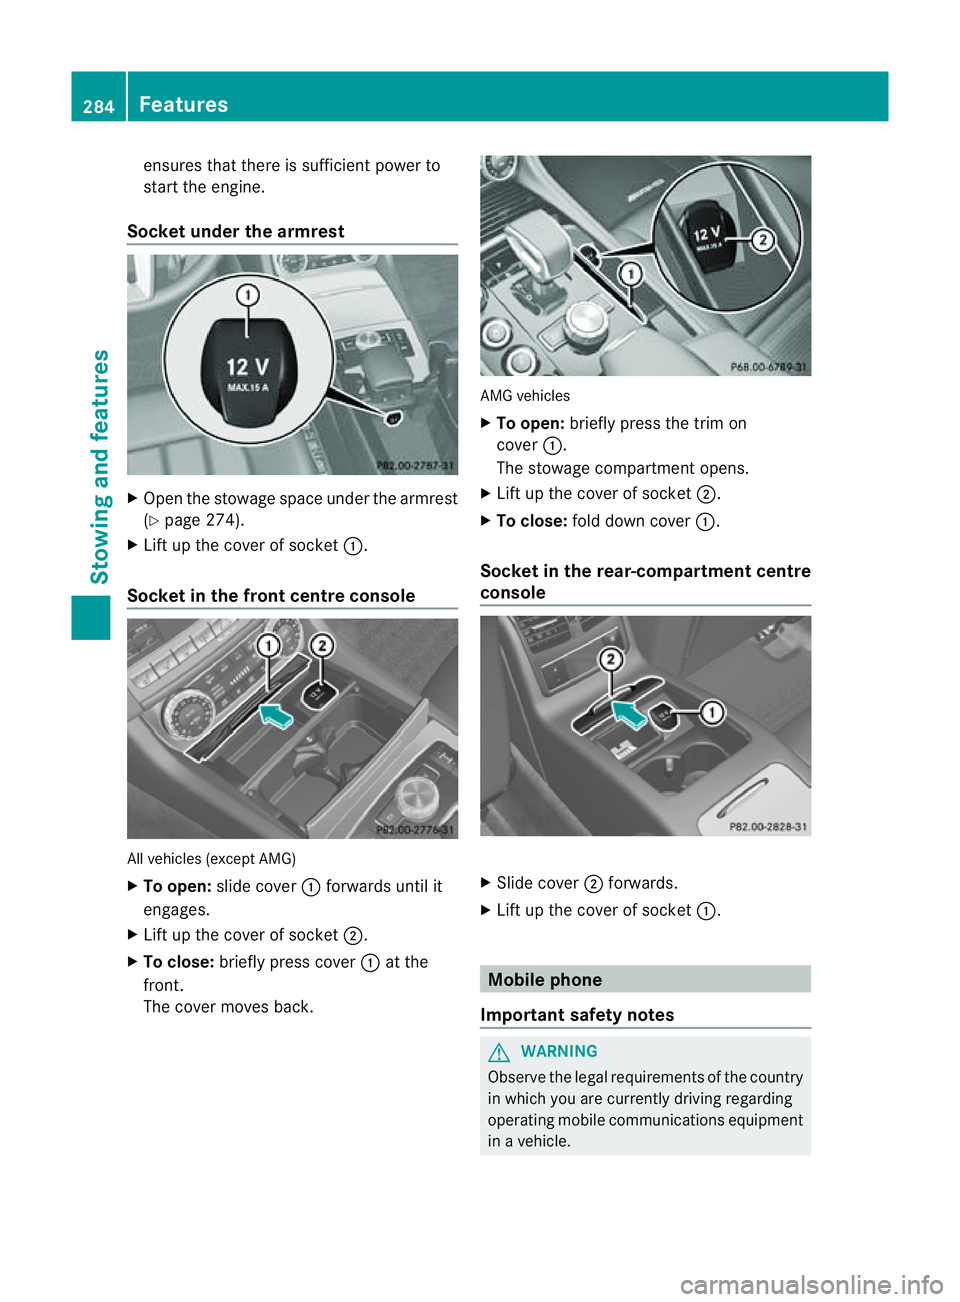
Socket under the armrest X
Open the stowage space under the armrest
(Y page 274).
X Lift up the cover of socket :.
Socket in the front centre console All vehicles (except AMG)
X
To open: slide cover :forwards until it
engages.
X Lift up the cover of socket ;.
X To close: briefly press cover :at the
front.
The cover moves back. AMG vehicles
X
To open: briefly press the trim on
cover :.
The stowage compartment opens.
X Lift up the cover of socket ;.
X To close: fold down cover :.
Socket in the rear-compartment centre
console X
Slide cover ;forwards.
X Lift up the cover of socket :. Mobile phone
Important safety notes G
WARNING
Observe the legal requirements of the country
in which you are currently driving regarding
operating mobile communications equipment
in av ehicle. 284
FeaturesStowing and features
Page 288 of 373
If it is permitted by law to operate communi-
cations equipment whilet
he vehicle is in
motion, you must only do so if the traffic sit-
uationp ermits.Otherwise, yo ucould be dis-
tracted fro mthe traffi cconditions ,cause an
accident and injure yourself and others.
Two-way radios and fa xequipment used with-
out low-reflection exterior aerials can inter-
fere with the vehicle's electronic sand thereby
jeopardise the operatin gsafety of the vehicle
and your safety. Therefore, you must only use
this equipment if it is correctly connected to
as eparate reflection-free exterior aerial. G
WARNING
Excessiv elevels of electromagnetic radiation
may cause damage to your health and the
health of others. Using an exterior aerial takes
int oa ccoun tcurren tscientific discussions
relatin gtothe possible health risk posed by
electromagnetic fields.
Mercedes-Benz recommends the use of an
approved exterior aerial. This ensures:
R optimal mobile phone reception quality in
the vehicle
R mutual influences between the vehicle
electronic sand mobile phones are mini-
mised
An exterior aerial has the following advan-
tages:
R it conducts the electromagnetic fields gen-
erated by awireless device to the exterior.
R the field strengt hinthe vehicle interior is
lower than in avehicle that does not have
an exterior aerial.
i There are various mobile phone brackets
that may be fitted in your vehicle; in some
cases, these are country-specific.
i You can connec taBluetooth ®
-capable
mobile phone with Audio 20, Audio 50 or
COMAND Onlin evia the Bluetooth ®
inter-
face. This also applies if your vehicle is
equipped with convenience telephony. More information on suitable mobile phones,
mobile phone brackets and on connecting
Bluetooth
®
-capable mobile phones with
Audio 20, Audio 50 or COMAND Onlin ecan
be obtained:
R at your Mercedes-Benz Service Centre
R on the Internet at http://www.mercedes-
benz.com/connect
i The function sand services available when
you use the phone depend on your mobile
phone model and servic eprovider.
Using amobile phone If th
emobile phon eisinserted in th emobile
phon ebracket ,you can speak to th eperson
you are callin gusingthe hands-free system.
X Open th etelephone compartment
(Y page 274).
X If required by th edesig noft he mobile
phone bracket, install the sliding adapter
(Y page 286).
X Insert the mobile phone into the mobile
phone bracket (see the separate installa-
tion instructions for the mobile phone fit-
ting).
i On some mobile phone brackets, you first
have to connect the mobile phone via Blue-
tooth ®
to the mobile phone bracket (see
the separate operating instructions for the
mobile phone bracket).
If this is the case, the mobile phone does
not have to be inserted into the bracket for
you to be able to use the telephone func-
tions. However, the charging function and
aerial function are not available.
Operating the mobile phone You can operate the telephone using the
6
and~ buttons on the multifunction
steering wheel. You can operate other mobile
phone functions via the on-board computer
(Y page 217).
When you remove the key from the ignition
lock, the mobile phone stays switched on. Features
285Stowing and features Z
Page 289 of 373
However, yo
ucan no longer use the hands-
free system.
If yo uhaveana ctivecalla nd would like to
take the key ou tofthe ignition lock, first
remove the mobile phone from the bracket.
i Whe nusing abracket connected to the
mobile phone via Bluetooth ®
and yo uwish
to proceed with acall:
Switch to private mode before removing
the key from the ignition lock. Otherwise ,it
may take up to 20 seconds, before the
mobile phone separates from the system.
Only then can the telephone cal lcontinue.
Information on the necessary steps for set-
ting up "private mode "can be found in the
separate mobile phone operating instruc-
tions.
i Not al lmobile phones support "private
mode".
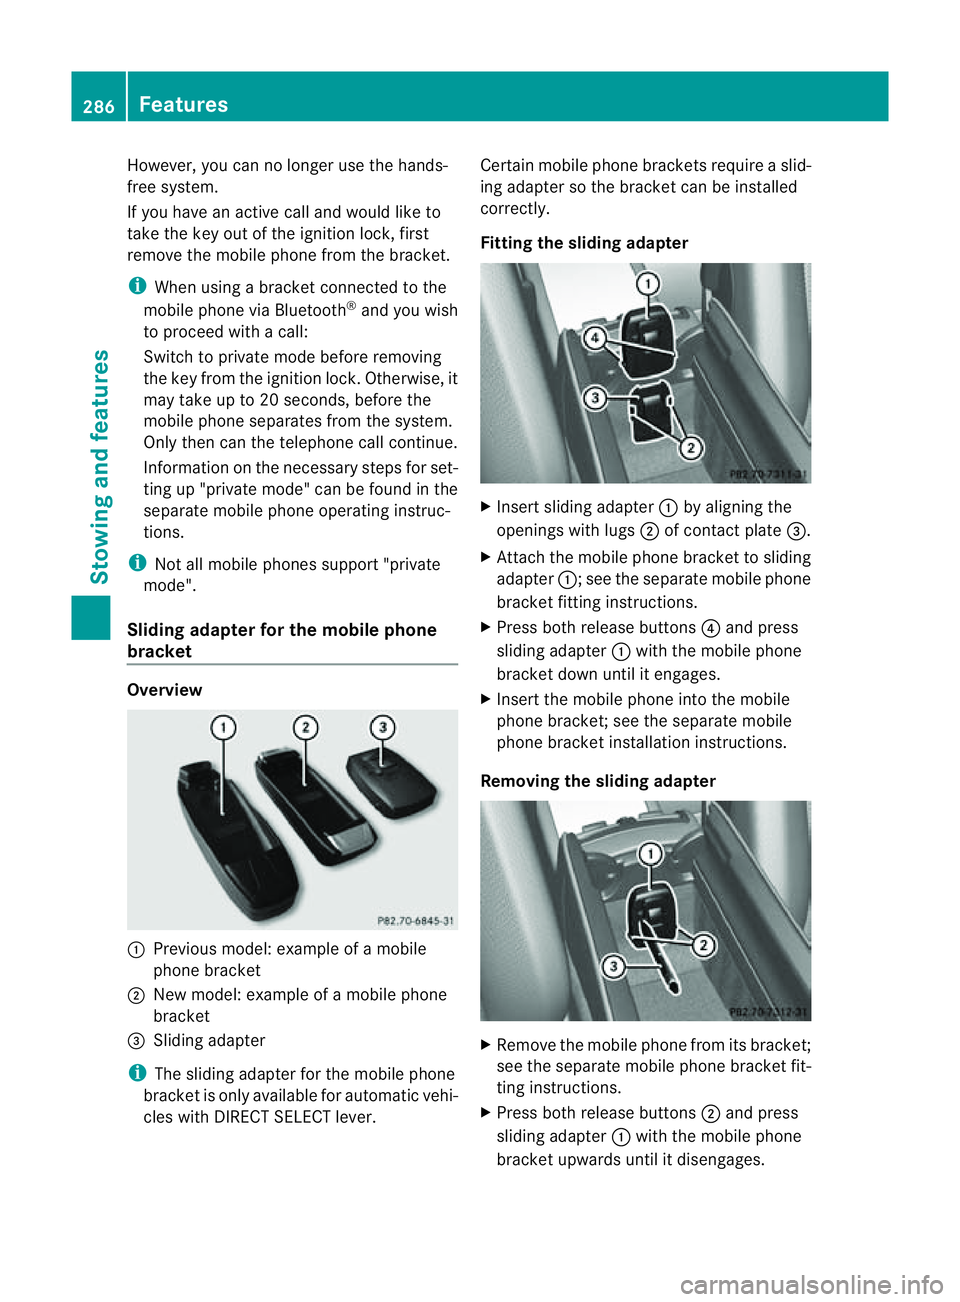
Sliding adapter for the mobile phone
bracket Overview
:
Previou smodel: example of amobile
phone bracket
; New model: example of amobile phone
bracket
= Sliding adapter
i The sliding adapter for the mobile phone
bracket is only available for automati cvehi-
cles with DIRECT SELECT lever. Certain mobile phone brackets require
aslid-
ing adapter so the bracket can be installed
correctly.
Fitting the sliding adapter X
Inser tsliding adapter :by alignin gthe
openings with lugs ;of contac tplate =.
X Attac hthe mobile phon ebracket to sliding
adapter :;see the separat emobile phone
bracket fittin ginstructions.
X Press bot hrelease buttons ?and press
slidin gadapter :with the mobile phone
bracket down until it engages.
X Insert the mobile phon eintot he mobile
phon ebracket ;see the separat emobile
phon ebracket installation instructions.
Removing th eslidin gadapt er X
Remove the mobile phon efromi ts bracket;
se et he separate mobil ephone bracket fit-
ting instructions.
X Press both release buttons ;and press
sliding adapter :with the mobil ephone
bracket upwards unti litdisengages. 286
FeaturesSto
wing an dfeatures
Page 290 of 373
X
Remove th emobile phone bracke tfrom
sliding adapter :;see the separate mobile
phone bracket fitting instructions.
X Detach sliding adapter :using suitable
tool =and remove. Garage door opener
Important safety notes The HomeLink
®
garage door opener integra-
ted in the rear-view mirror allows you to oper-
ate up to three different door and gate sys-
tems.
i The garage door opener is only available
for certain countries. Observe the legal
requirements for each individualc ountry.
The HomeLink ®
garage door opener is
compatible with most European garage and
gate opener drives. More information on
HomeLink ®
and/or compatible products is
available from:
R at aq ualified specialised workshop
R the HomeLink ®
hotline
(0) 08000 466 354 65 (free of charge )or
+49 (0) 6838 907 277 (charges apply)
R on the Internet at:
http://www.homelink.com
Programming Programming buttons
G
WARNING
Only press the button on the integrated
garage door opene rifthere are no persons or
objects present within the sweep of the
garage door. Persons could otherwise be
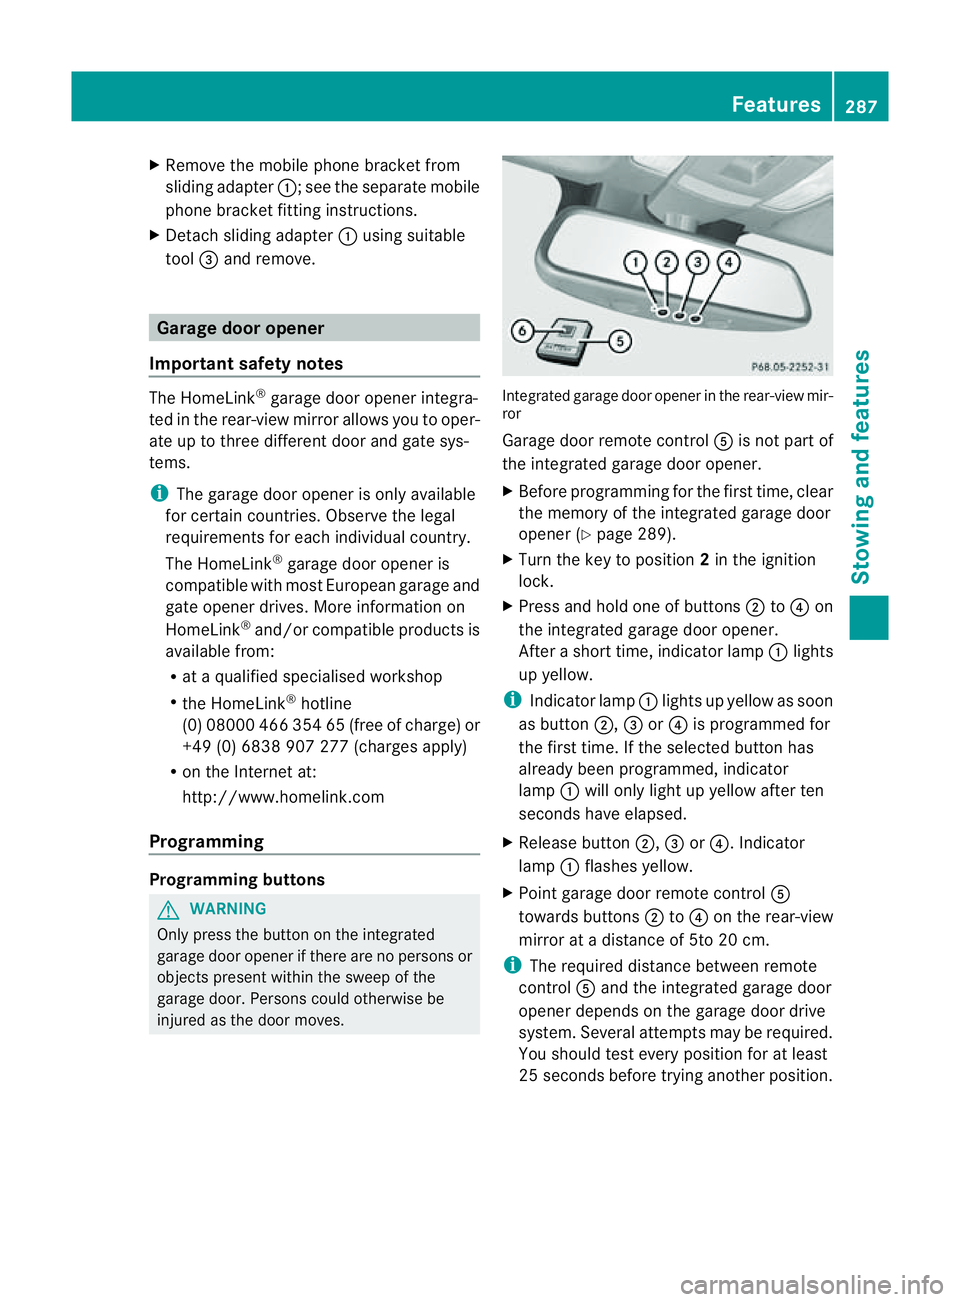
injured as the door moves. Integrated garage door opener in the rear-view mir-
ror
Garage door remote control Ais not part of
the integrated garage door opener.
X Before programming for the first time, clear
the memory of the integrated garage door
opener (Y page 289).
X Turn the key to position 2in the ignition
lock.
X Press and hold one of buttons ;to? on
the integrated garage door opener.
After ashort time, indicator lamp :lights
up yellow.
i Indicator lamp :lights up yellow as soon
as button ;,=or? is programmed for
the first time. If the selected button has
alreadyb een programmed, indicator
lamp :will only light up yellow after ten
seconds have elapsed.
X Release button ;,=or?.I ndicator
lamp :flashes yellow.
X Point garage door remote control A
towards buttons ;to? on the rear-view
mirror at adistance of 5to 20 cm.
i The required distance between remote
control Aand the integrated garage door
opener depends on the garage door drive
system. Several attemptsm ay be required.
You should test every positio nfor at least
25 seconds before trying another position. Features
287Stowing and features Z
Page 296 of 373
Retrofitte
danti-glare film
Retrofitted anti-glare fil monthe inside of the
windows can interferew ith radio/mobile
telephone reception. This is particularly the
case for conductive or metallic-coated films.
You can obtain information about anti-glare
film from aqualified specialist workshop. Features
293Stowing and features Z
Page 301 of 373
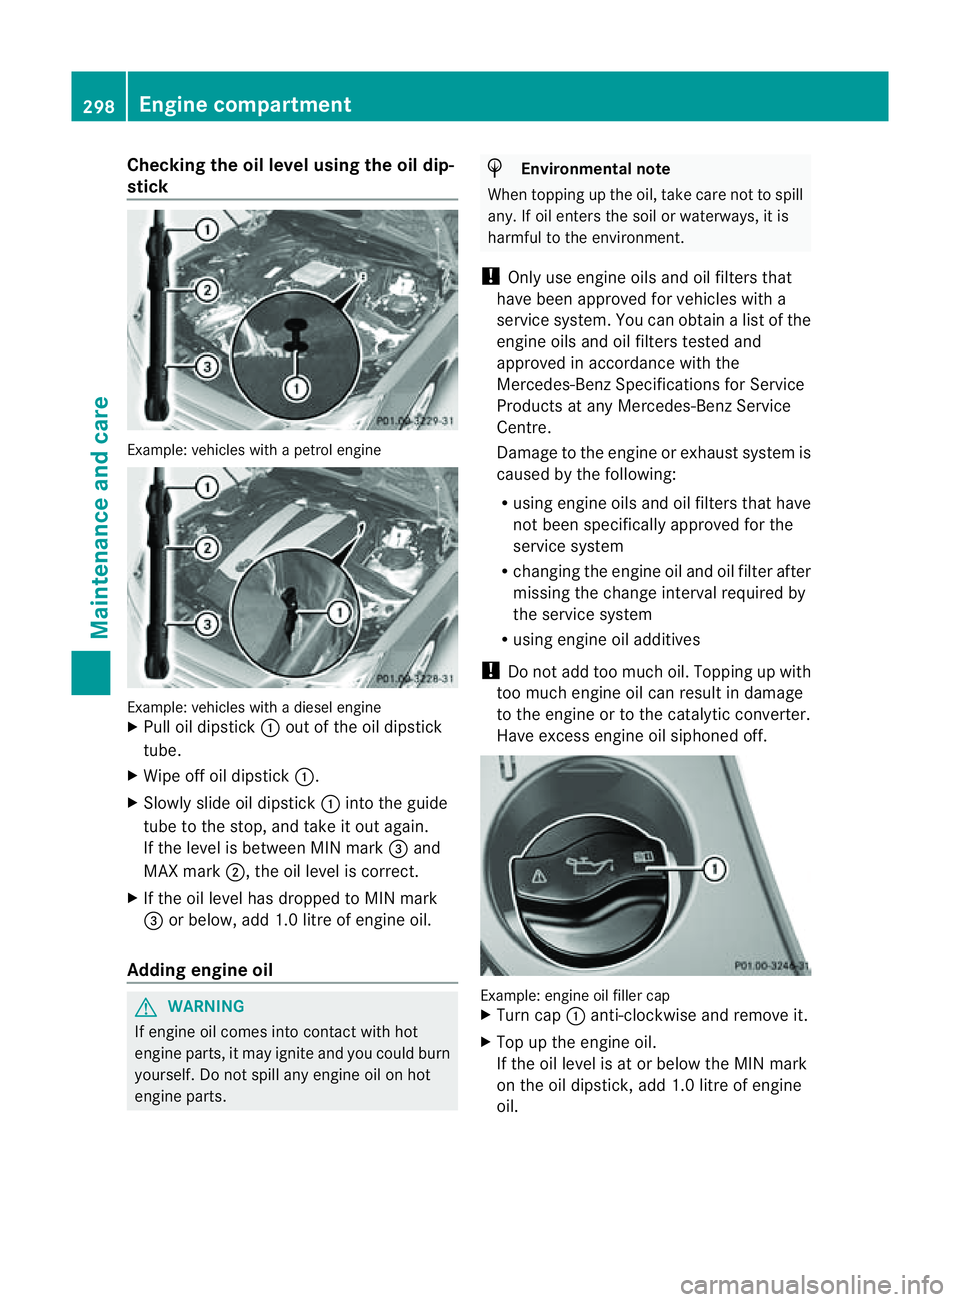
Checking th
eoil level usin gthe oil dip-
stick Example
:vehicles with apetrol engine Example: vehicles with
adiesel engine
X Pull oil dipstick :out of the oil dipstick
tube.
X Wipe off oil dipstick :.
X Slowly slide oil dipstick :into the guide
tube to the stop, and take it out again.
If the level is between MIN mark =and
MAX mark ;,the oil level is correct.
X If the oil level has dropped to MIN mark
= or below, add 1.0 litre of engine oil.
Adding engine oil G
WARNING
If engine oil comes into contact with hot
engine parts, it may ignite and you could burn
yourself. Do not spill any engine oil on hot
engine parts. H
Environmental note
When topping up the oil, take care not to spill
any. If oil enters the soil or waterways, it is
harmful to the environment.
! Only use engine oils and oil filters that
have been approved for vehicles with a
service system. You can obtain alist of the
engine oils and oil filters tested and
approved in accordance with the
Mercedes-Benz Specification sfor Service
Product satany Mercedes-Benz Service
Centre.
Damage to the engine or exhaust system is
caused by the following:
R using engine oils and oil filters that have
not been specifically approved for the
service system
R changin gthe engine oil and oil filter after
missing the change interval required by
the service system
R using engine oil additives
! Do not add too much oil. Topping up with
too much engine oil can result in damage
to the engine or to the catalytic converter.
Have exces sengine oil siphoned off. Example: engine oil filler cap
X
Turn cap :anti-clockwise and remove it.
X Top up the engine oil.
If the oil level is at or below the MIN mark
on the oil dipstick ,add 1.0 litre of engine
oil. 298
Engine compartmentMaintenance and care
Page 304 of 373
Special service requirements
Arduous operating condition
sorincreased
loads on the vehicle will require some service
work to be performed more often than for a
vehicle in normal use. Such arduousc ondi-
tions include regular city driving with frequent
intermediate stops and use in mountainous
terrain or on poor road surfaces.
For example, if the vehicle is used under ardu-
ous operating conditions, have air filters,
engine oil and oil filters changed frequently
and check the wheels often.F urther informa-
tion can be obtaine dataqualified specialist
workshop, e.g. aMercedes-Ben zService
Centre.
Driving abroad
An extensive Mercedes-BenzS ervice network
is also available in other countries. The
Service Hotline's curren ttelephone numbers
for use when you are abroad are to be found
in the "Mercedes-Benz Service24h" section
of the Service Booklet. Care
General notes
H
Environmental note
Dispose of empty packagin gand cleaning
cloth sinane nvironmentally responsible man-
ner.
! For cleanin gyour vehicle, do not use any
of the following:
R dry, rough or hard cloths
R abrasive cleanin gagents
R solvents
R cleanin gagents containin gsolvents
Do not scrub.
Do not touch the surfaces or protective
films with hard objects, e.g. aring or ice
scraper. You could otherwise scratch or
damage the surfaces and protective film. !
Do not park up the vehicle for an extended
period straight after cleanin git, particularly
after having cleaned the wheels with wheel
cleaner. Wheel cleaners could cause
increased corrosion of the brake discs and
brake pads/linings. For this reason, you
should drive for afew minutes after clean-
ing. Braking heats the brake discs and the
brake pads/linings, thus drying them. The
vehicle can then be parked up.
Regular care of your vehicle is acondition for
retaining the quality in the long term.
Use care product sand cleanin gagents rec-
ommended and approved by Mercedes-Benz. Washing the vehicle and cleaning the
paintwork
Automatic car wash G
WARNING
Braking efficiency is reduced after washing
the vehicle. This could cause an accident. For
this reason, following acar wash, drive with
particular care until the brakes are dry. G
WARNING
The vehicle is braked when the HOLD function
or DISTRONIC PLUS is activated. Therefore,
deactivat ethe HOLD function and DISTRONIC
PLUS before the vehicle is washed in an auto-
matic car wash.
! Make sure that:
R the side windows and sliding sunroof are
closed completely.
R the blower for the ventilation/heating is
switched off (OFF button is depressed).
R the windscreen wiper switch is at posi-
tion 0.
The vehicle could otherwise be damaged.
! In car washes with atowing mechanism,
make sure that the automatic transmission
is in transmission position N,otherwise the
vehicle could be damaged. Care
301Maintenance and care Z
Page 319 of 373
icantly impair the vehicle's braking and driv-
ing characteristics. There is
arisk of accident.
Do not continue driving. Contact aqualified
specialist workshop.
X Correc tthe tyre pressure if it is still at least
130 kPa (1.3 bar/19 psi) (see the fuel filler
flap for values).
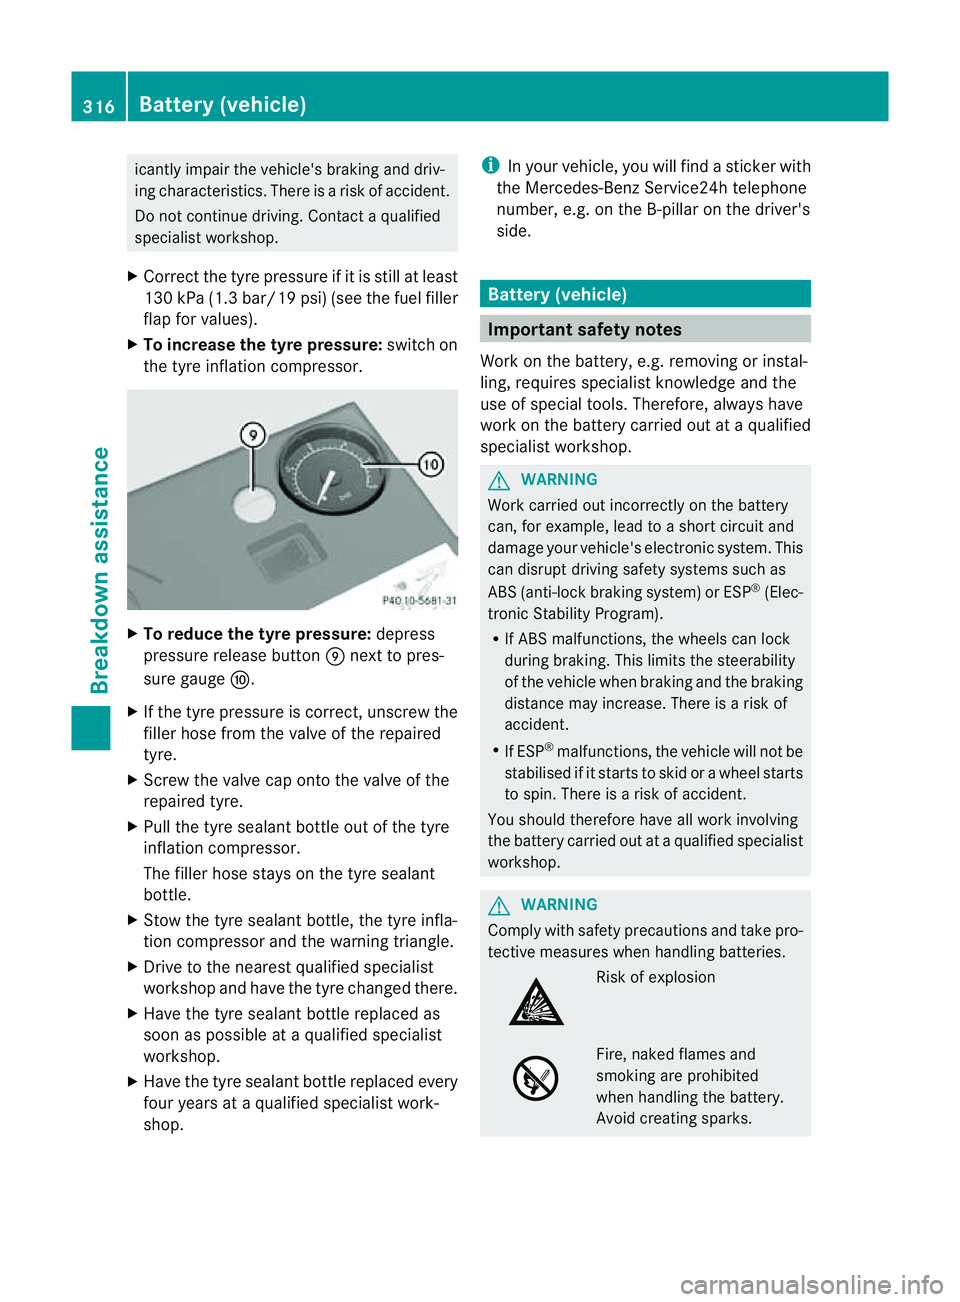
X To increase the tyre pressure: switch on
the tyre inflation compressor. X
To reduce the tyre pressure: depress
pressure release button Enext to pres-
sure gauge F.
X If the tyre pressure is correct,u nscrew the
filler hose from the valve of the repaired
tyre.
X Screw the valve cap onto the valve of the
repaired tyre.
X Pull the tyre sealant bottle out of the tyre
inflation compressor.
The filler hose stays on the tyre sealant
bottle.
X Stow the tyre sealant bottle, the tyre infla-
tion compressor and the warning triangle.
X Drive to the nearest qualified specialist
workshop and have the tyre changed there.
X Have the tyre sealant bottle replaced as
soon as possible at aqualified specialist
workshop.
X Have the tyre sealant bottle replaced every
four years at aqualified specialist work-
shop. i
In your vehicle, you will find asticker with
the Mercedes-Ben zService24h telephone
number, e.g. on the B-pillar on the driver's
side. Battery (vehicle)
Important safet
ynotes
Work on the battery, e.g. removin gorinstal-
ling, requires specialist knowledge and the
use of special tools. Therefore, alway shave
work on the batter ycarried out at aqualified
specialist workshop. G
WARNING
Work carried out incorrectly on the battery
can, for example, lead to ashort circuit and
damage your vehicle's electronic system. This
can disrupt driving safety systems such as
ABS (anti-lock brakin gsystem) or ESP ®
(Elec-
tronic Stabilit yProgram).
R If AB Smalfunctions, th ewheels can lock
during braking. This limits th esteerability
of th evehicl ewhen brakin gand th ebraking
distanc emay increase .There is arisk of
accident.
R If ESP ®
malfunctions, the vehicle will not be
stabilised if it starts to skid or awheel starts
to spin. There is arisk of accident.
You should therefore have all work involving
the battery carried out at aqualified specialist
workshop. G
WARNING
Comply with safety precautions and take pro-
tective measures when handling batteries. Risk of explosion
Fire, naked flames and
smoking are prohibited
when handling the battery.
Avoid creating sparks.316
Battery (vehicle)Breakdown assistance