2012 MERCEDES-BENZ CLS COUPE steering wheel
[x] Cancel search: steering wheelPage 36 of 373
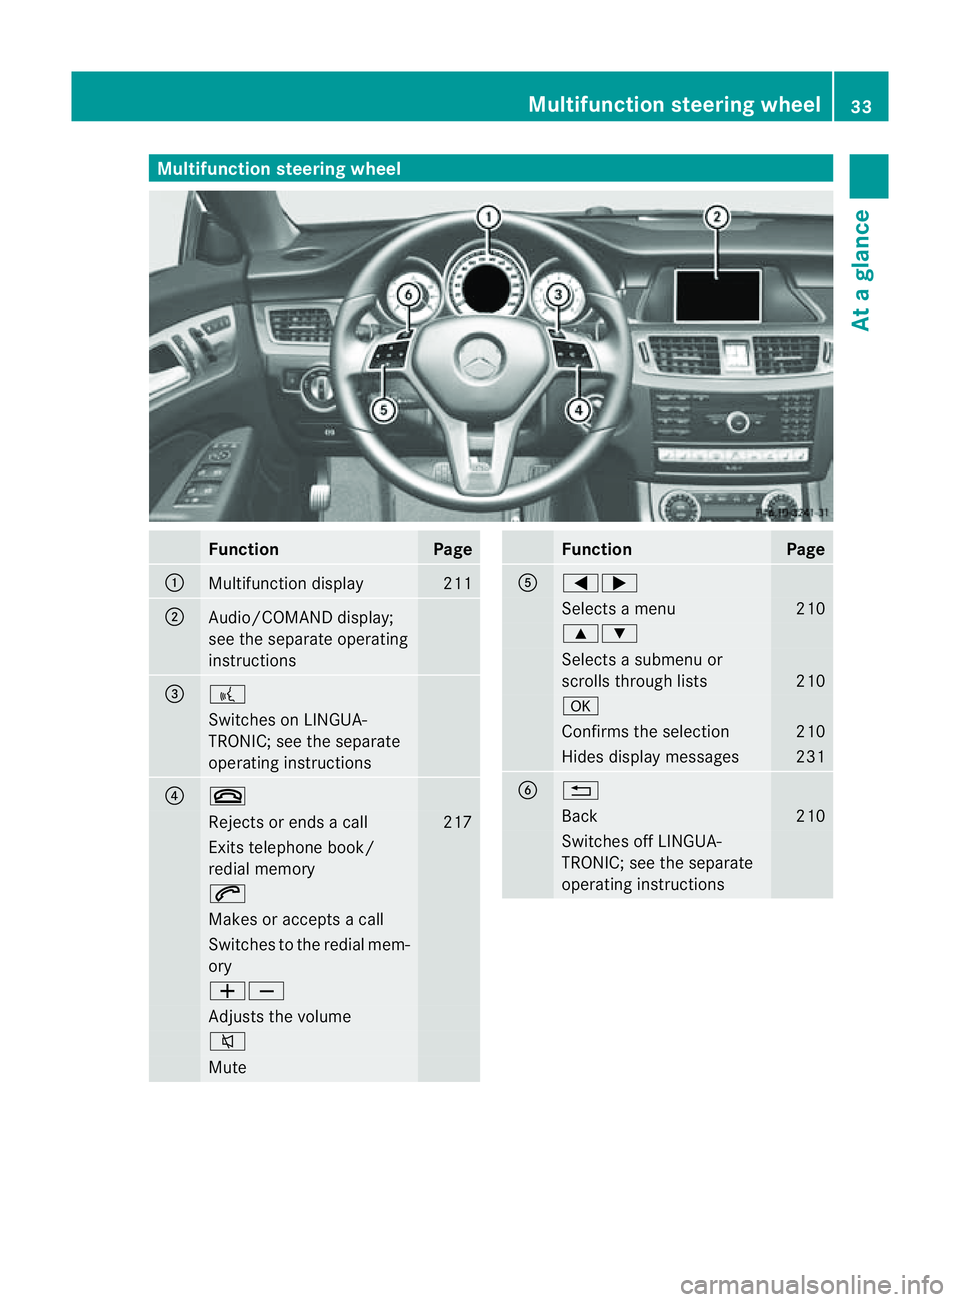
Multifunction steering wheel
Function Page
:
Multifunction display 211
;
Audio/COMAND display;
see the separate operating
instructions
=
?
Switches on LINGUA-
TRONIC; see the separate
operating instructions
?
~
Rejects or ends
acall 217
Exits telephone book/
redial memory
6
Makes or accepts
acall Switches to the redial mem-
ory
WX
Adjusts the volume
8
Mute Function Page
A
=;
Selects
amenu 210
9:
Selects
asubmenu or
scroll sthrough lists 210
a
Confirm
sthe selection 210
Hides display messages 231
B
%
Back 210
Switches off LINGUA-
TRONIC; see the separate
operating instructionsMultifunction steering wheel
33Atag lance
Page 66 of 373
neither reduce the ris
kofaccident nor over-
rid ethe laws of physics .Driving safety sys-
tems are merel yaidsd esigned to assist driv-
ing. You are responsible for the distance to
the vehicl einfront, for vehicl espee dand for
braking in good time. Always adapt yourd riv-
ing style to suitt he prevailing road and
weather conditionsa nd maintainasafe dis-
tance from the vehicle in front.D rive care-
fully.
i The driving safety systems described only
work as effectively as possible when there
is adequate contact between the tyres and
the road surface. Please pay special atten-
tion to the notes on tyres, recommended
minimum tyre tread depths, etc.
(Y page 328).
In wintry driving conditions, always use
winter tyres (M+S tyres) and, if necessary,
snow chains. Only in this way will the driv-
ing safety systems described in this section
work as effectively as possible. ABS (Anti-lockB
raking System)
Important safety notes i
Observe the "Important safety notes" sec-
tio n(Ypage 62). G
WARNING
If ABS is faulty, the wheels could lock when
braking .The steerability and braking charac-
teristics may be severely impaired. Addition-
ally,f urther driving safety systems are deac-
tivated. There is an increased danger of skid-
ding and accidents.
Drive on carefully. Have ABS checked imme-
diately at aqualified specialist workshop.
When ABS is malfunctioning, other systems,
including driving safety systems, will also
become inoperative. Observe the information
on the ABS warning lamp (Y page 261) and
displaym essages which may be shown in the
instrumentc luster (Ypage 232). ABS regulates brake pressure in such
away
that the wheels do not lock when you brake.
This allowsy ou to continue steering the vehi-
cle when braking.
ABS works from aspeed of about 8km/h
upwards, regardless of road-surface condi-
tions. ABS works on slippery surfaces, even
when you only brake gently.
The yellow !ABS warning lamp in the
instrumentc lusterlight supw hen the ignition
is switched on. It goes out when the engine is
running.
Brakes X
If ABS intervenes: continue to depressthe
brak epedal with force until the braking sit-
uation is over.
X To make afull brake application:
depres sthe brak epedal with full force.
If AB Sintervene swhenb raking ,you will feel
ap ulsi ng in the brake pedal.
The pulsating brake peda lcan be an indica-
tio nofh azardous road condition sand func-
tions as areminder to tak eextra carew hile
driving. BAS (Brak
eAssist System)
i Observ ethe "Important safety notes" sec-
tio n(Ypage 62). G
WARNING
If BA Sism alfunctioning, the braking distance
in an emergency braking situation is
increased. There is arisk of accident.
In an emergency braking situation, depress
the brake pedal with full force. ABS prevents
the wheels from locking.
BAS operates in emergency braking situa-
tions. If you depress the brake pedal quickly,
BAS automaticallyb oosts the braking force,
thus shortening the stopping distance.
The brakes will function as usualo nce you
release the brake pedal.B AS is deactivated. Dr
ivin gsafety systems
63Safety Z
Page 79 of 373
Useful information
i This Owner's Manual describes all mod-
els, series and optional equipment for your
vehicle that were available at the time of
going to press. National variation sare pos-
sible. Not ethat your vehicle may not be
equipped with all of the function sdescri-
bed. This is also the case for system sand
function srelevan ttosafety.
i Read the information on qualified special-
ist workshops: (Y page 23). Key
Important safet
ynotes G
WARNING
Only for the United Kingdom: if the vehicle
has been locked with the key or with KEY-
LESS-GO, the double lock function is activa-
ted as standard. It is then not possible to open
the doors from inside the vehicle.
Therefore, do not leave any people behind in
the vehicle, particularly children ,elderly peo-
ple or people requiring special assistance. As
ar esult, they may not be able to free them-
selves in the even tofanemergency. They
could be seriously or even fatally injured by
prolonged exposur etoextremely high or low
temperatures, for example. In this case, res-
cuing people from outside the vehicle is diffi-
cult.
Deactivate the interior motion senso rbefore
you lock the vehicle. The doors can then be
opened from the inside after the vehicle has
been locked from the outside. G
WARNING
If children are left unsupervised in the vehicle,
they could: R
open adoor from inside the vehicle at any
time, even if it has been locked
R start the vehicle using akey which has been
left in the vehicle
R release the parking brake
They could thereby endanger themselves and
others. Never leave children unsupervised in
the vehicle. Always take the key with you
when leaving the vehicle, even if you are only
leaving it for ashort time. G
WARNING
If ak ey ring is too heavy or too large, the
weight actin gonthe key could cause it to turn
in the ignition lock or catc honthe steering
wheel. This could cause the engine to be
switched off suddenly. You may lose control
of the vehicle and cause an accident. Do not
attac hany heavy or large key rings to the key
that is inserted in the ignition.
R Do not keep the key:
- with electronic devices, e.g. amobile
phone or another key
- with metallic objects, e.g. coins or metal
foil
- inside metallic objects, e.g. ametal case
This can affect the key's functionality.
Keep the key away from strong magnetic
fields. Otherwise, the remot econtrol function
could be affected. 76
KeyOpening and closing
Page 98 of 373
Useful information
..............................96
Correct driver's seat position ............96
Seats .................................................... 97
Steering wheel .................................. 102
Mirrors ............................................... 105
Memor yfunction .............................. 107 95Seats, steering wheel and mirrors
Page 99 of 373
Useful information
i This Owner's Manual describes all mod-
els, series and optional equipment for your
vehicle that were available at the time of
going to press. National variation sare pos-
sible. Not ethat your vehicle may not be
equipped with all of the function sdescri-
bed. This is also the case for system sand
function srelevan ttosafety.
i Read the information on qualified special-
ist workshops: (Y page 23). Correct driver's seat position
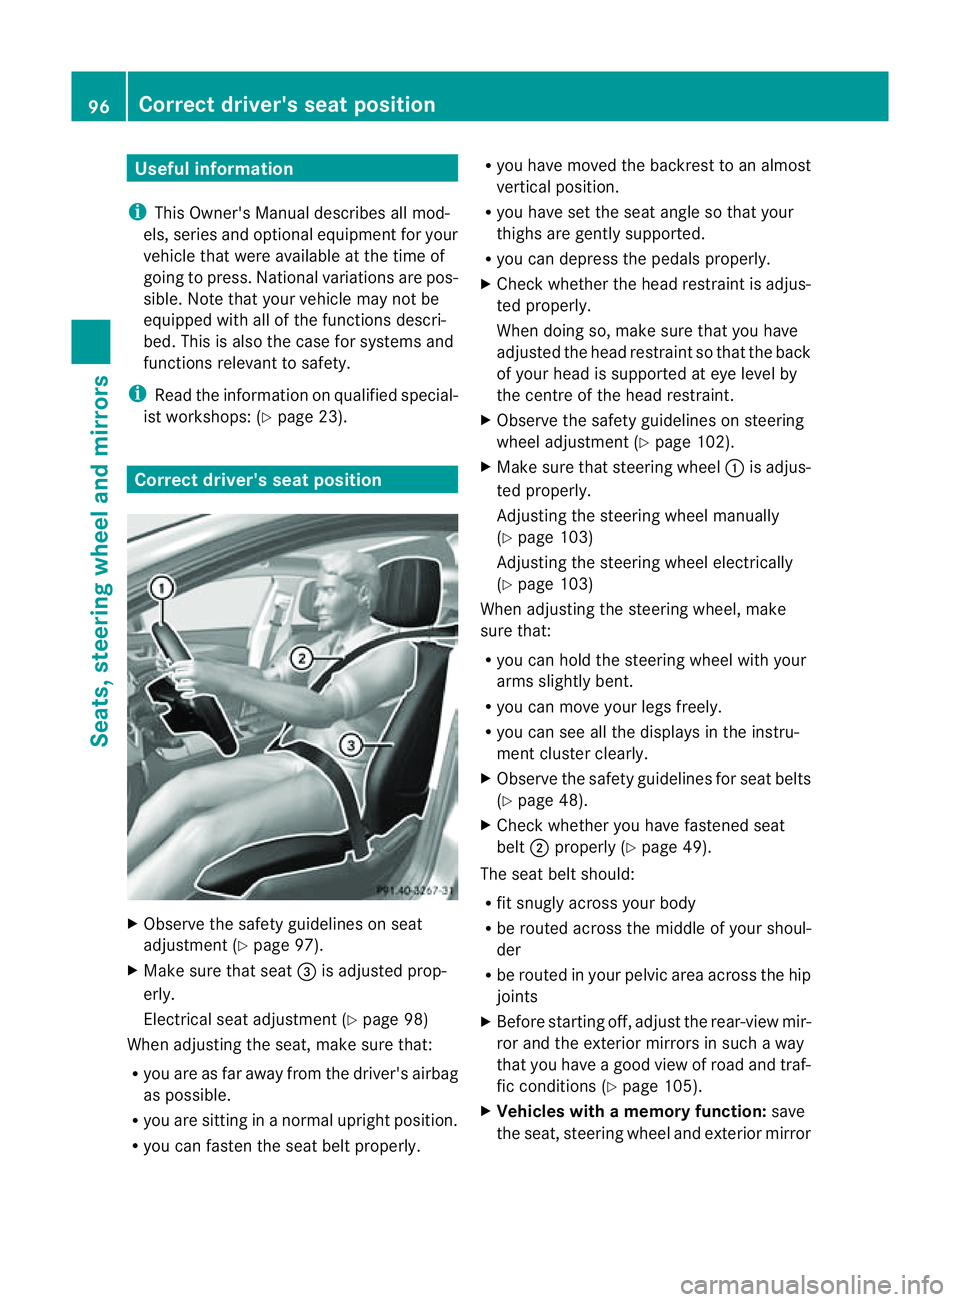
X
Observ ethe safet yguidelines on seat
adjustment (Y page 97).
X Make sure that seat =is adjusted prop-
erly.
Electrical seat adjustment (Y page 98)
When adjusting the seat, make sure that:
R you are as far away from the driver' sairbag
as possible.
R you are sitting in anormal upright position.
R you can faste nthe seat belt properly. R
you have moved the backrest to an almost
vertical position.
R you have set the seat angle so that your
thighs are gently supported.
R you can depress the pedals properly.
X Check whether the head restraint is adjus-
ted properly.
When doing so, make sure that you have
adjusted the head restraint so that the back
of your head is supported at eye level by
the centre of the head restraint.
X Observe the safety guidelines on steering
wheel adjustment (Y page 102).
X Make sure that steering wheel :is adjus-
ted properly.
Adjustingt he steering wheel manually
(Y page 103)
Adjustingt he steering wheel electrically
(Y page 103)
When adjusting the steering wheel, make
sure that:
R you can hold the steering wheel with your
arms slightly bent.
R you can move your legs freely.
R you can see all the displays in the instru-
ment cluster clearly.
X Observe the safety guidelines for seat belts
(Y page 48).
X Check whether you have fastened seat
belt ;properly (Y page 49).
The seat belt should:
R fit snugly across your body
R be routed across the middle of your shoul-
der
R be routed in your pelvic area across the hip
joints
X Before startingo ff, adjust the rear-view mir-
ror and the exterior mirrors in such away
that you have agood view of road and traf-
fic conditions( Ypage 105).
X Vehicles with amemory function: save
the seat, steering wheel and exterior mirror 96
Correct driver's seat positionSeats, steering wheela
nd mirrors
Page 100 of 373
settings with the memory function
(Y
page 107). Seats
Important safety notes
G
WARNING
The seats can still be adjusted when there is
no key in the ignition lock. For this reason,
children should never be left unsupervised in
the vehicle. They could adjust the seats and
become trapped. G
WARNING
Only adjust the driver's seat when the vehicle
is stationary. You will otherwise be distracted
from the road and traffic conditions and you
could lose control of the vehicle as aresult of
the seat moving. This could cause an acci-
dent. G
WARNING
If you adjust the seat height carelessly,y ou or
others could be trapped and thereby injured.
Children in particular could unintentionally
press the buttons to electrically adjust the
seats and become trapped.
Take care that:
R while moving the seats, your hands do not
get under the lever assembly of the seat
adjustment system.
R children in the vehicle do not slide their
hands under the levers. G
WARNING
Make sure that nobody can become trapped
when adjusting the seats.
Observe the notes on airbags.
Secure children as recommended; see the
"Children in the vehicle" section. G
WARNING
Make sure that the back of your head is sup-
ported at eye level by the central area of the head restraint. If your head is not supported
correctly by the head restraint, you could suf-
fer asevere neck injury in the event of an
accident. Never drive if the head restraints are
not engaged and set correctly. G
WARNING
As eat belt can only offer its intended degree
of protection when the backrest is almost ver-
tical and the occupant is sitting upright. Avoid
seat position sthat do not allow the seat belt
to be routed correctly. Adjust the backrest so
that it is as upright as possible. Never travel
with the backrest reclined too far backwards.
You could otherwise be seriously or even
fatally injured in the event of an acciden tor
sudden braking.
! To avoid damage to the seats and the seat
heating, observe the following information:
R do not spill any liquids on the seats. If
liquid is spilled on the seats, dry them as
soon as possible.
R if the seat cover sare damp or wet, do not
switch on the seat heating. The seat
heating should also not be used to dry
the seats.
R clean the seat cover sasrecommended;
see the "Interior care" section.
R do not transport heavy loads on the
seats. Do not place sharp objects on the
seat cushions ,e.g. knives, nails or tools.
The seats should only be occupied by
passengers, if possible.
R when the seat heating is in operation ,do
not cover the seats with insulating mate-
rials, e.g. blankets, coats, bags, seat cov-
ers, child seats or booster seats.
! To avoid damage to the seats and the seat
heating, observe the following information:
R do not spill any liquids on the seats. If
liquid is spilled on the seats, dry them as
soon as possible.
R if the seat cover sare damp or wet, do not
switch on the seat heating. The seat Seats
97Seats, steering wheel and mirrors Z
Page 101 of 373
heating should also not be used to dry
the seats.
R clean the seat covers as recommended;
see "Interior care".
R do not transport heavy loads on the
seats. Do not place sharp objectsont he
seat cushions, e.g. knives, nails or tools.
The seats should only be occupied by
passengers, if possible.
R when the seat heating is in operation, do
not cover the seats with insulating mate-
rials, e.g. blankets, coats, bags, seat cov-
ers, child seats or booster seats.
! Make sure that there are no objectsint he
footwell or behind the seats when moving
the seat back. There is arisk that the seats
and/or the objectsc ould be damaged.
i The head restraintsint he front seats are
fitted with the NECK-PRO system
(Y page 46). For this reason, it is not pos-
sible to remove the head restraintsf rom
the front seats.
For more information ,contact aqualified
specialist workshop.
i Further related subjects:
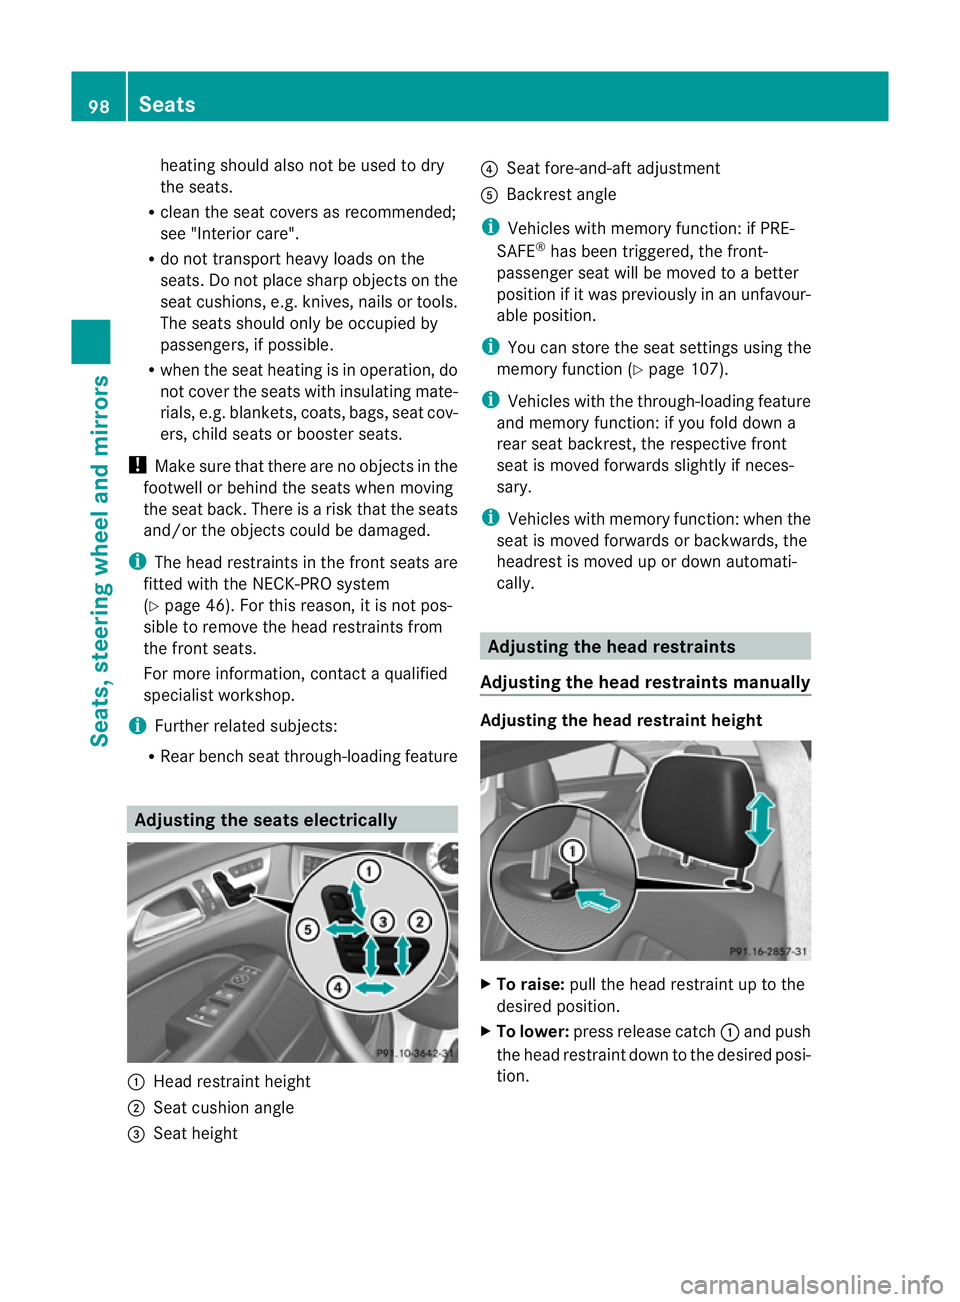
R Rear bench seat through-loading feature Adjusting the seats electrically
:
Head restraint height
; Seat cushion angle
= Seat height ?
Seat fore-and-aft adjustment
A Backrest angle
i Vehicles with memory function: if PRE-
SAFE ®
has been triggered, the front-
passenger seat will be moved to abetter
position if it was previously in an unfavour-
able position.
i You can store the seat settings using the
memory function (Y page 107).
i Vehicles with the through-loading feature
and memory function: if you fold down a
rear seat backrest, the respective front
seat is moved forwards slightly if neces-
sary.
i Vehicles with memory function: when the
seat is moved forwards or backwards, the
headrest is moved up or down automati-
cally. Adjusting the head restraints
Adjusting the head restraints manually Adjusting the head restraint height
X
To raise: pull the head restraint up to the
desired position.
X To lower: press release catch :and push
the head restraint down to the desired posi-
tion. 98
SeatsSeats, steering wheela
nd mirrors
Page 102 of 373
Adjusting th
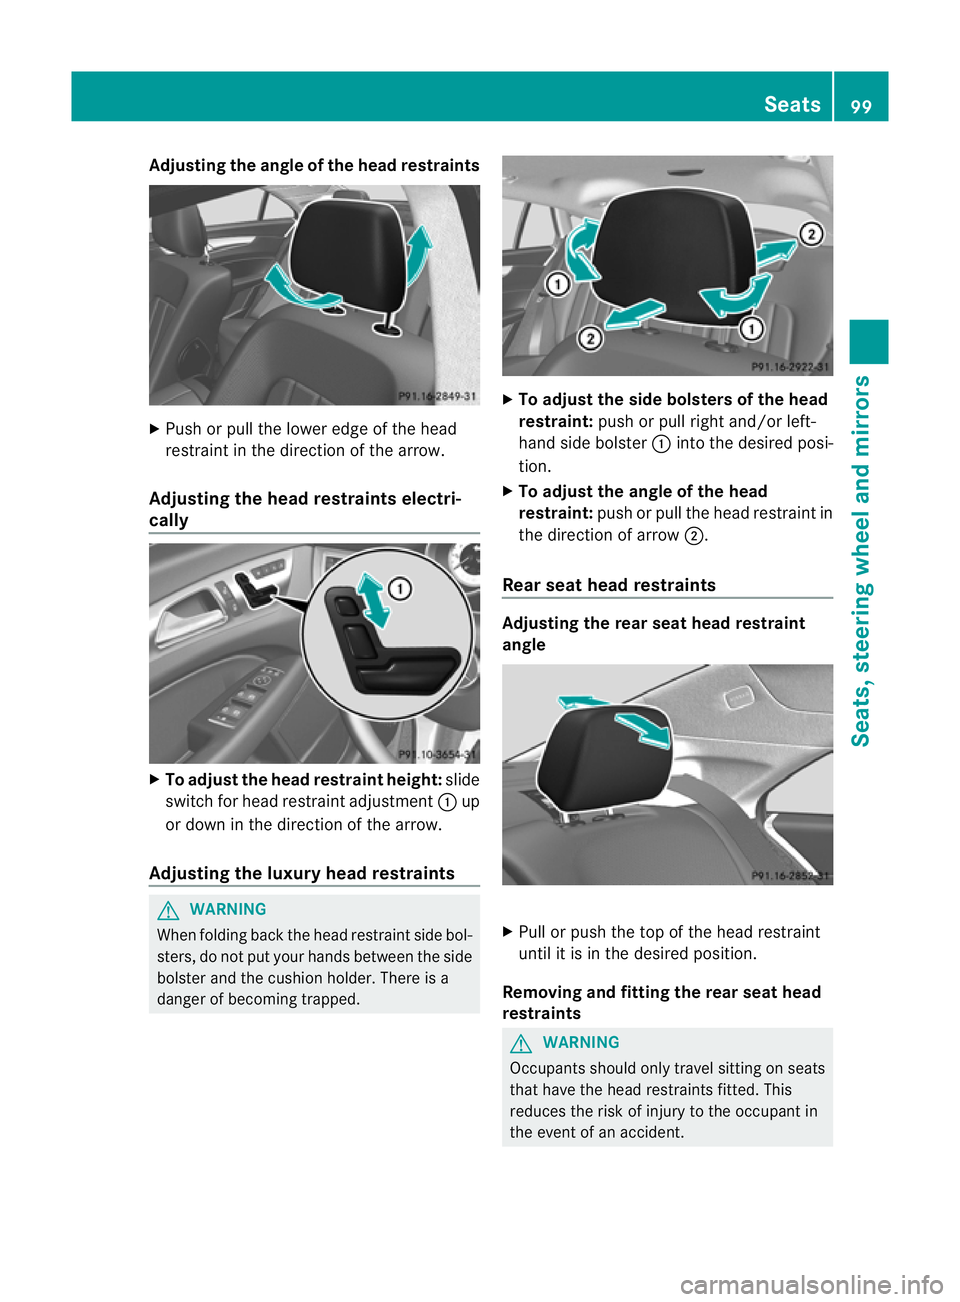
eangle of the head restraints X
Push or pull the lower edge of the head
restraint in the direction of the arrow.
Adjusting the head restraints electri-
cally X
To adjust the head restraint height: slide
switch for head restraint adjustment :up
or down in the direction of the arrow.
Adjusting the luxur yhead restraints G
WARNING
When folding back the head restraint side bol-
sters ,don ot put your hands between the side
bolster and the cushion holder. There is a
danger of becomin gtrapped. X
To adjust the side bolsters of the head
restraint: push or pull right and/or left-
hand side bolster :into the desired posi-
tion.
X To adjust the angle of the head
restraint: push or pull the head restraint in
the direction of arrow ;.
Rear seat head restraints Adjusting the rear seat head restraint
angle
X
Pull or push the top of the head restraint
until it is in the desired position.
Removing and fitting the rear seat head
restraints G
WARNING
Occupants should only travel sitting on seats
that have the head restraints fitted. This
reduces the risk of injury to the occupant in
the event of an accident. Seats
99Seats, steering wheel and mirrors Z