2012 MERCEDES-BENZ CLS COUPE check engine
[x] Cancel search: check enginePage 71 of 373
driver who is able to cope with these critical
drivin
gconditions.
X To activate: briefly press button :.
The å ESP®
OFF warning lamp in the
instrument cluster goes out. The ÷ON message appears in the multifunction dis-
play.
ESP ®
is activated automatically when the
engin eisstarted.
If ESP ®
is deactivated and one or more wheels
start to spin, the ÷ESP®
warning lamp in
the instrument cluster does not flash. In such
situations, ESP ®
will not stabilise the vehicle.
It may be best to deactivate ESP ®
in the fol-
lowing situations:
R when using snow chains
R in deep snow
R on sand or gravel
If you deactivate ESP ®
:
R ESP ®
no longer improves drivin gstability.
R traction contro lisstill activated.
R PRE-SAFE ®
is no longer available; nor is it
activated if you brake firmly and ESP ®
inter-
venes.
R PRE-SAFE ®
Brak eisnol onger available; it
is also not activated if you brake firmly and
ESP ®
intervenes.
R ABSs tillp rovide ssuppo rt when yo ubrake.
R engine torque is no longe rlimited and the
drive wheels are able to spin .The spinning
of the wheels results in acuttin gaction for
better traction.
Vehicles with ECO start/stop function: the
ECO start/stop function switches the engine
off automatically when the vehicle comes to
as top. When pulling away again, the engine
starts automatically .ESP ®
remains in its pre-
viously selected status. Example :ifESP®
was
deactivate dbefore the engine wa sswitched
off, ESP ®
remains deactivate dwhent he
engine is switche donagain. EBD (electroni
cbrake forc edistribu-
tion)
i Observe the "Importan tsafet ynotes "sec-
tio n(Ypage 62). G
WARNING
If EB Dhas malfunctioned ,the rear wheels can
still lock, e.g .unde rfull braking .This increa-
ses the risk of skidding and an accident.
You should therefore adapt your driving style
to the different handling characteristics. Have
the brake system checked at aqualified spe-
cialist workshop.
Observe information regarding indicator and
warning lamps (Y page 261) as well as dis-
play messages (Y page 234).
EBD monitors and controls the brake pres-
sure on the rear wheels to improve driving
stability while braking. ADAPTIVE BRAKE
ADAPTIVE BRAKE enhances braking safety
and offers increased braking comfort.Ina ddi-
tion to the brakin gfunction ,ADAPTIVE BRAKE
also ha sthe HOLD functio n(Ypage 179 )and
hill start assist (Y page 144). PRE-SAFE
®
Brake
i Observ ethe "Important safety notes "sec-
tio n(Ypage 62).
PRE-SAFE ®
Brake is onl yavailable in vehicles
with DISTRONI CPLUS.
PRE-SAFE ®
Brake can hel pyou to minimise
the ris kofacollision with avehicle ahea dor
reduce the effects of such acollision. If PRE-
SAFE ®
Brake detects ariskofc ollision, you
will be warned visually and acoustically as
well as by automatic braking. PRE-SAFE ®
Brake cannot prevent acollision without your
intervention. 68
Driving safety systemsSafety
Page 80 of 373
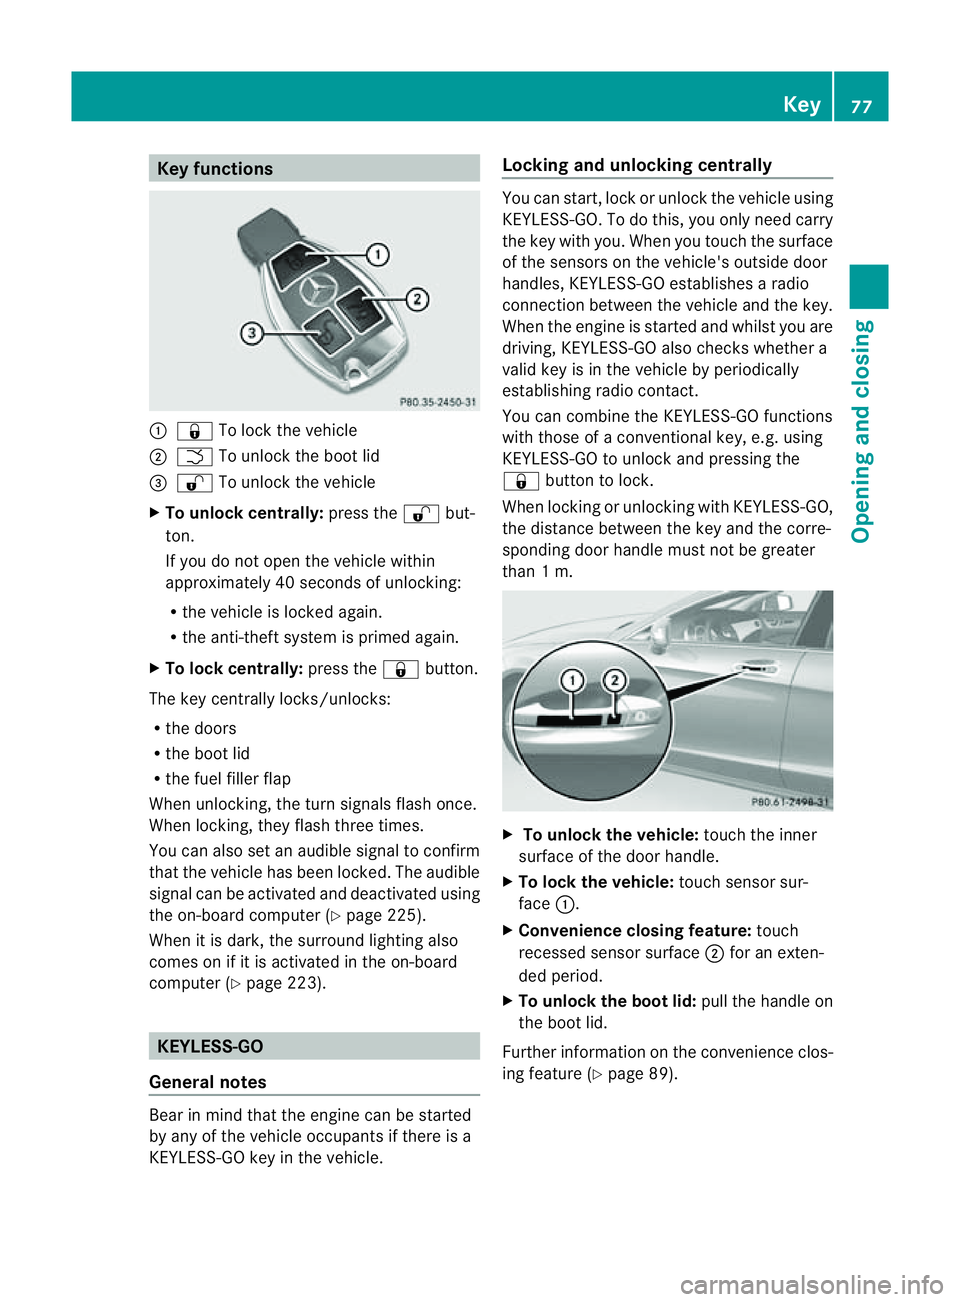
Key functions
:
& To loc kthe vehicle
; F To unlock the boot lid
= % To unlock the vehicle
X To unlock centrally: press the%but-
ton.
If you do not open the vehicle within
approximately 40 seconds of unlocking:
R the vehicle is locked again.
R the anti-theft system is primed again.
X To lock centrally: press the&button.
The key centrally locks/unlocks:
R the doors
R the boot lid
R the fuel filler flap
When unlocking, the turn signals flash once.
When locking, they flash three times.
You can also set an audible signal to confirm
that the vehicle has been locked. The audible
signal can be activated and deactivated using
the on-board computer (Y page 225).
When it is dark, the surround lighting also
comes on if it is activated in the on-board
computer (Y page 223). KEYLESS-GO
General notes Bear in mind that the engine can be started
by any of the vehicle occupants if there is a
KEYLESS-GO key in the vehicle. Locking and unlocking centrally You can start, lock or unlock the vehicle using
KEYLESS-GO. To do this, you only need carry
the key with you. When you touch the surface
of the sensors on the vehicle's outside door
handles, KEYLESS-GO establishes
aradio
connection between the vehicle and the key.
When the engine is started and whilst you are
driving, KEYLESS-GO also checksw hether a
valid key is in the vehicle by periodically
establishing radio contact.
You can combine the KEYLESS-GO functions
with those of aconventional key, e.g. using
KEYLESS-GO to unlock and pressing the
& button to lock.
When locking or unlocking with KEYLESS-GO,
the distance between the key and the corre-
sponding door handle must not be greater
than 1m. X
To unlock the vehicle: touch the inner
surface of the door handle.
X To lock the vehicle: touch sensor sur-
face :.
X Convenience closing feature: touch
recessed sensor surface ;for an exten-
ded period.
X To unlock the boot lid: pull the handle on
the boot lid.
Further information on the convenience clos-
ing feature (Y page 89). Key
77Opening and closing Z
Page 85 of 373
Problem Possible causes/consequences and
M Solutions
The engine cannot be
started using the key. the on-board voltage is too low.
X
Switch off non-essential consumers, e.g. seat heating or interior
lighting, and try to start the engine again.
If this does not work:
X Check the starter battery and charge it if necessary
(Y page 318).
or
X Jump-start the vehicle (Y page 319).
or
X Consult aqualified specialist workshop. The engine cannot be
started using KEYLESS-
GO. The key is in the
vehicle. Ad
oor is open. Therefore, the key cannot be detected as easily.
X Close the door and try to start the vehicle again. There is interferenc
efrom apowerful source of radio waves.
X Start your vehicle with the key in the ignition lock. Doors
Important safety notes
G
WARNING
Only for the United Kingdom: if the vehicle
has been locked with the key or with KEY-
LESS-GO, the double lock function is activa-
ted as standard. It is then not possible to open
the doors from inside the vehicle.
Therefore, do not leave any people behind in
the vehicle, particularly children, elderly peo-
ple or people requiring special assistance. As
ar esult, they may not be able to free them-
selves in the event of an emergency. They
could be seriously or even fatally injured by
prolonged exposure to extremely high or low
temperatures, for example. In this case, res-
cuing people from outside the vehicle is diffi-
cult.
Deactivate the interior motion sensor before
you lock the vehicle. The doors can then be
opened from the inside after the vehicle has
been locked from the outside. G
WARNING
If children are left unsupervised in the vehicle,
they could:
R open adoor from inside the vehicle at any
time, even if it has been locked
R start the vehicle using akey which has been
left in the vehicle
R release the parking brake
They could thereby endanger themselves and
others. Never leave children unsupervised in
the vehicle. Always take the key with you
when leaving the vehicle, even if you are only
leaving it for ashort time. Unlocking and opening the doors
from the inside
For all countries except the United King-
dom: you can open adoor from inside the
vehicle even if it has been locked. If the vehi-
cle has previously been locked with the key
or with KEYLESS-GO, opening adoor from the
inside will trigger the anti-theft alarm system.
Switch off the alarm (Y page 71).82
DoorsOpening and closing
Page 125 of 373
!
Never open the bonnet if awindscreen
wiper arm has been folded awayf rom the
windscreen.
Never fold awindscreen wiper arm without
aw iper bladeb ack onto the windscreen.
Hold the windscreen wiper arm firmly when
you change the wiper blade. If you release
the windscreen wiper arm without awiper
bladea nd it falls onto the windscreen, the
windscreen may be damagedbyt he force
of the impact.
Mercedes-Benz recommends that you have
the wiper blades changed at aqualified
specialist workshop.
! To avoi ddamaging th ewindscree nwiper
blades, mak esure that you touc honly the
wiper arm of the windscreen wiper.
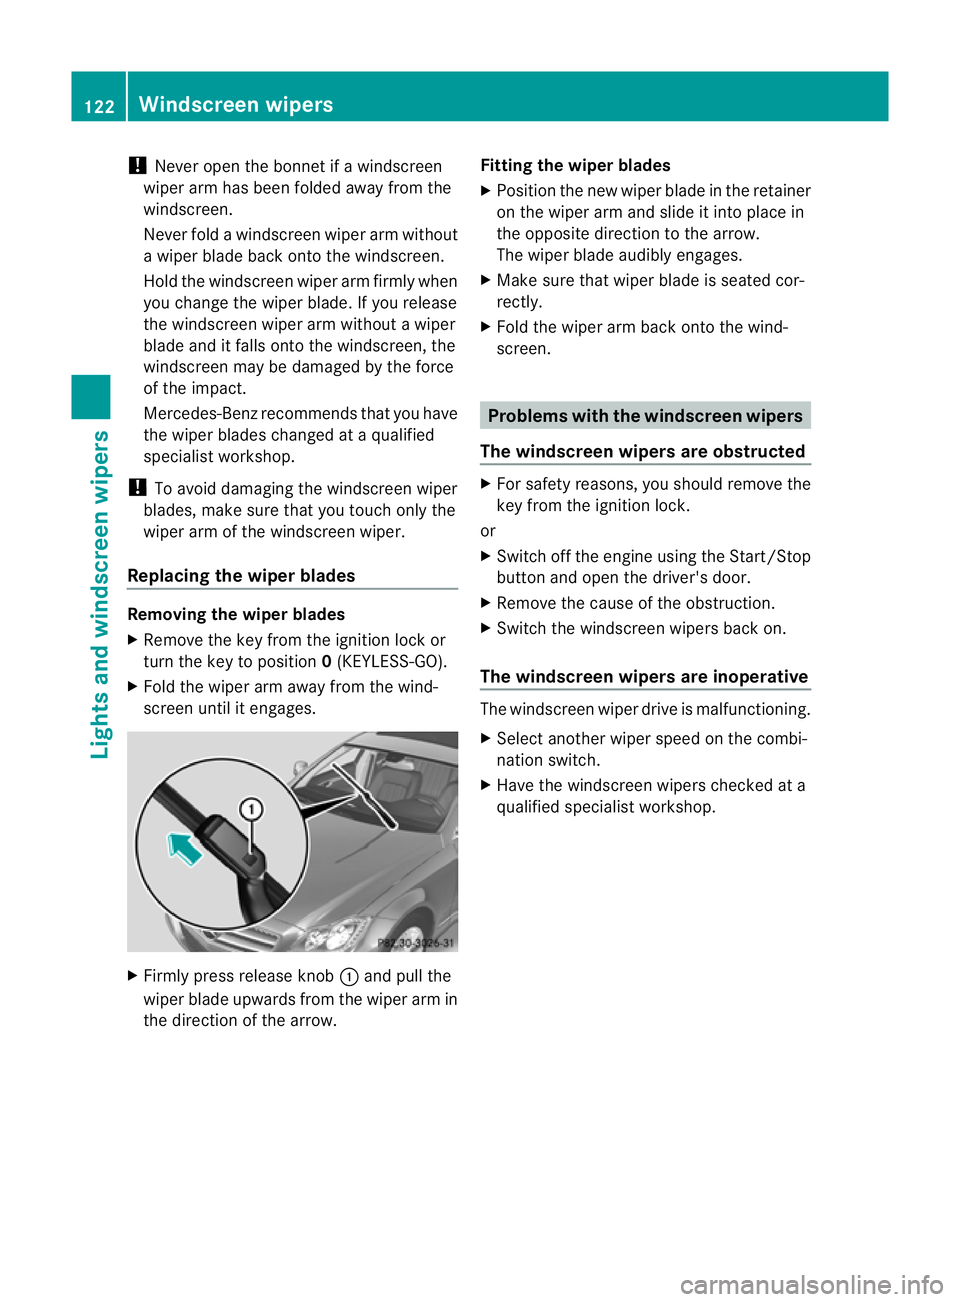
Replacing th ewiper blades Removing th
ewiper blades
X Remove the key fro mthe ignition lock or
tur nthe key to position 0(KEYLESS-GO).
X Fold the wiper arm away from the wind-
screen until it engages. X
Firmly press release knob :and pull the
wiper blade upwards from the wiper arm in
the direction of the arrow. Fitting the wiper blades
X
Position the new wiper blade in the retainer
on the wiper arm and slide it into place in
the opposite direction to the arrow.
The wiper blade audibly engages.
X Make sure that wiper blade is seated cor-
rectly.
X Fold the wiper arm back onto the wind-
screen. Problems with the windscreen wipers
The windscreen wipers are obstructed X
For safety reasons, you should remove the
key from the ignition lock.
or
X Switch off the engine using the Start/Stop
button and open the driver's door.
X Remove the cause of the obstruction.
X Switch the windscreen wipers back on.
The windscreen wipers are inoperative The windscreen wiper drive is malfunctioning.
X
Select another wiper speed on the combi-
nation switch.
X Have the windscreen wipers checked at a
qualified specialist workshop. 122
Windscreen wipersLights and windscreen wipers
Page 151 of 373

Problem Possible causes/consequences and
M Solutions
Vehicles with
apetrol
engine:
The engine is not run-
ning smoothly and is
misfiring. There is
amalfunction in the engine electronics or in amechanical
componentoft he engine management system.
X Only depress the accelerator pedal slightly.
Otherwise, non-combusted fuel may get into the catalytic con-
verter and damage it.
X Have the cause rectified immediately at aqualified specialist
workshop. The coolant tempera-
ture display is showing
more than 120 †. The
coolant warning lamp
may also be lit and a
warning tone may
sound. The coolant level is too low. The coolant is too hot and the engine
is no longer being cooled sufficiently.
X
Stop as soon as possible and allow the engine and the coolant
to cool down.
X Check the coolant level (Y page 299). Observe the warning
notes as you do so and top up the coolant if necessary. If the coolant level is correct, the engine radiator fan may be faulty.
The coolant is too hot and the engine is no longer being cooled
sufficiently.
X
If the coolant temperature is below 120 †, you can continue
driving to the nearest qualified specialist workshop.
X Avoid heavy loads on the engine as you do so, e.g. driving in
mountainous terrain and stop-start traffic. Automatic transmission
Important safety notes
G
WARNING
If the engine speed is above the idling speed
and you engage transmission position Dor
R,t he vehicle could pull away suddenly. There
is ar isk of an accident.
When engaging transmission position Dor R,
always firmly depress the brake pedal and do
not simultaneously accelerate. Selector lever
Overview of transmission positions Selector lever in AMG vehicles with
Pbutton
j Park position with parking lock
k Reverse gear
i Neutral
h Drive 148
Automatic transmissionDriving and parking
Page 152 of 373
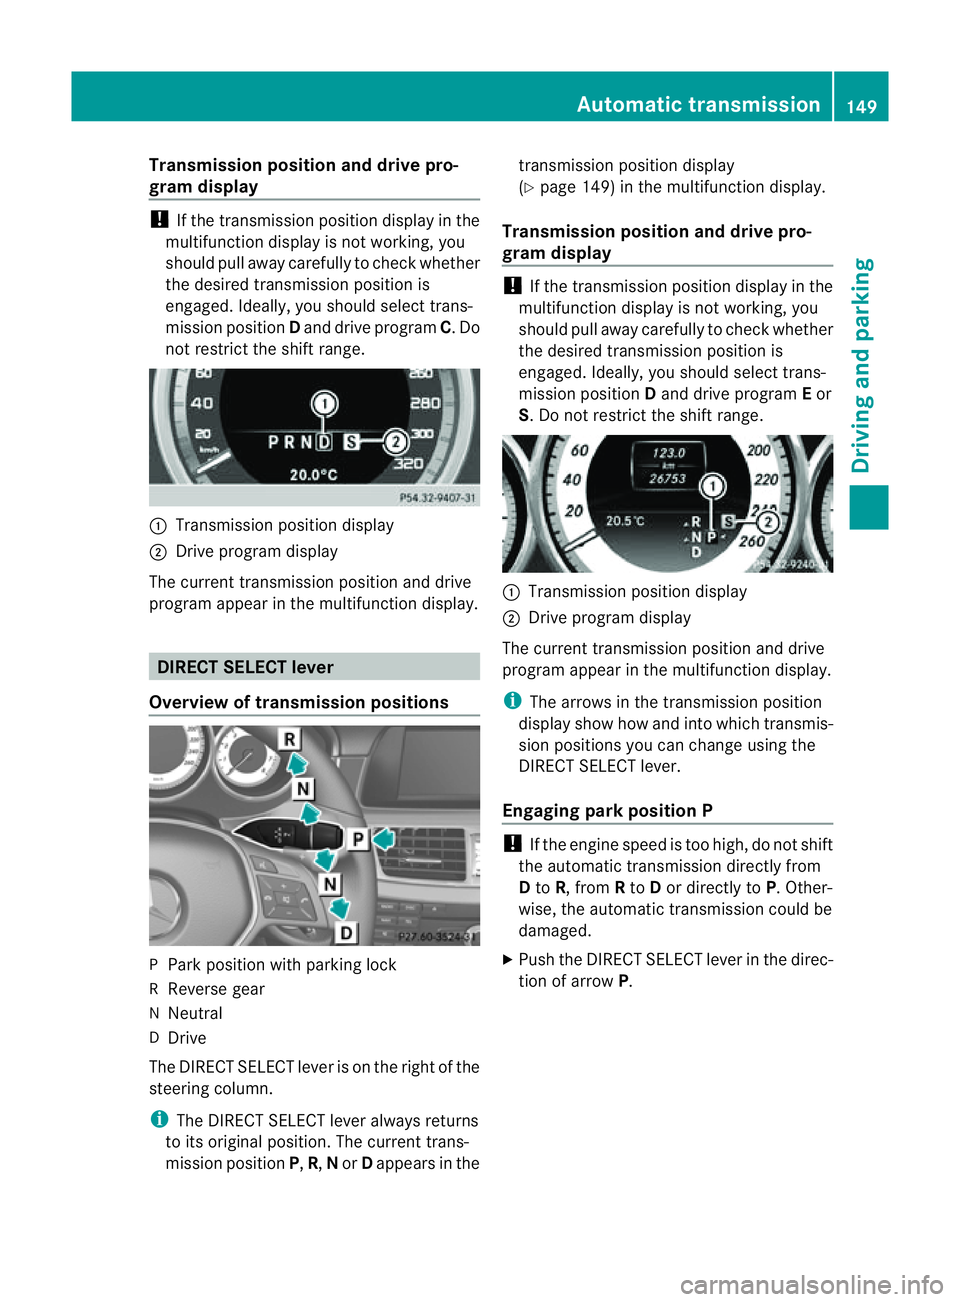
Transmission position and driv
epro-
gram display !
If the transmission positio ndisplay in the
multifunction display is not working, you
should pull away carefully to chec kwhether
the desired transmission position is
engaged. Ideally,y ou should select trans-
mission position Dand drive program C.Do
not restrict the shift range. :
Transmission position display
; Drive program display
The current transmission position and drive
program appearint he multifunction display. DIRECTS
ELECT lever
Overview of transmission positions P
Park position with parking lock
R Reverse gear
N Neutral
D Drive
The DIRECT SELECT leve risonthe right of the
steering column.
i The DIRECT SELECT lever always returns
to its original position. The current trans-
mission position P,R, Nor Dappears in the transmission position display
(Y
page 149) in the multifunction display.
Transmission position and drive pro-
gram display !
If the transmission position displayint he
multifunction displayisn ot working, you
should pull awayc arefully to check whether
the desired transmission position is
engaged. Ideally, you should select trans-
mission position Dand drive program Eor
S.Don ot restrict the shift range. :
Transmission position display
; Drive program display
The current transmission position and drive
program appearint he multifunction display.
i The arrows in the transmission position
displays how how and into which transmis-
sion positions you can change using the
DIRECT SELECT lever.
Engaging parkp osition P !
If th eengine speed is to ohigh, do no tshift
the automatic transmission directly from
D to R,f rom Rto Dor directly to P.Other-
wise, the automatic transmission could be
damaged.
X Push the DIRECT SELECT lever in the direc-
tion of arrow P. Automatic transmission
149Driving and parking Z
Page 159 of 373
Problems with the transmission
Problem Possible causes/consequences and
M Solutions
The transmission has
problems shifting gear. The transmission is losing oil.
X
Have the transmission checked at aqualified specialist work-
shop immediately. The acceleration ability
is deteriorating.
The transmission no
longer changes gear. The transmission is in emergency mode.
It is only possible to shift into
secondgear and reverse gear.
X Stop.
X Shift the transmission to position P.
X Switch off the engine.
X Wait at least ten seconds before restarting the engine.
X Shift the transmission to position Dor R.
If D is selected, the transmission shifts into secondgear; ifRis
selected, the transmission shifts into reverse gear.
X Have the transmission checked at aqualified specialist work-
shop immediately. Refuelling
Important safety notes
G
WARNING
Fuel is highly flammable. Fire, naked flames
and smoking are therefore prohibited when
handling fuels.
Switch off the engine and the auxiliary heating
before refuelling. G
WARNING
Avoid contact with fuels.
It is hazardous to your health if your skin
comes into direct contact with fuels or you
breathe in fuel vapours. G
WARNING
Do not use petrol to refuel adiesel tank.N ever
mix diesel with petrol. Doin gsocould damage
the fuel system and the engine. The vehicle
could also catc hfire.
! Do not use petrol to refuel vehicles with a
diesel engine. Do not use diesel to refuel vehicles with
apetrol engine. Even small
amounts of the wrong fuel result in damage
to the fuel system and the engine.
! Do not switch on the ignition if you acci-
dentally refuel with the wrong fuel. Other-
wise, the fuel will enter the fuel lines. Notify
aq ualified specialist workshop and have
the fuel tank and fuel lines drained com-
pletely.
! Overfilling the fuel tank could damage the
fuel system.
! Take care not to spill any fuel on painted
surfaces. You could otherwise damage the
paintwork.
! Use afilter when adding fuel from afuel
can. The fuel lines and/or the diesel injec-
tion system could otherwise be blocked by
particles from the fuel can.
Further information on fuel and on fuel grades
can be found in the "Fuel" section
(Y page 360). 156
RefuellingDriving and parking
Page 167 of 373
The wear of individual componentsoft
he
brake system, such as the brake pads/linings
or brake discs, depends on the individual driv-
ing style and operating conditions.
For this reason, it is impossible to state a
mileage lifetime that will be valid under all
circumstances. An aggressive driving style
will lead to high wear. You can obtain further
information about this from your Mercedes-
Benz Servic eCentre.
New and replaced brake pads and discs only
reach their optimum braking effect after sev-
eral hundred kilometres of driving. Compen-
sate for this by applying greater force to the
brake pedal. Do not forget this, and adapt
your driving and braking accordingly during
this run-in period.
Excessively heavy braking results in corre-
spondingly high brake wear. Observe the
brake system warning lamp in the instrument
cluster and notea ny brake status messages
in the multifunction display .For high-per-
formanc edriving in particular, it is important
to maintain and have the brake system
checked regularly. Driving on wet roads
Aquaplaning If water has accumulated to
acertain depth
on the road surface, there is adanger of aqua-
planing occurring, even if:
R you are driving at low speeds.
R the tyres have adequate tread depth.
For this reason, do not drive in tyre ruts and
brake carefully.
Driving on flooded roads !
Bear in mind that vehicles travelling in
front or in the opposite direction create
waves. This may cause the maximum per-
missible water depth to be exceeded.
These notes must be observed under all
circumstances. You could otherwise dam- age the engine, the electronics or the trans-
mission.
If you have to drive on stretches of road on
which water has collected, please bear in
mind that:
R the maximum permissible still water depth
is 25 cm.
R you should drive no faster than at walking
pace. Winter driving
Important safety notes G
WARNING
If you shift down on aslippery road surface in
an attempt to increase the engine's braking
effect ,the drive wheels could lose their grip.
This increases the risk of skidding and having
an accident.
Do not shift down for additional engine brak-
ing on aslippery road surface. G
DANGER
If the exhaust pipe is blocked or adequate
ventilation is not possible, poisonous gases
such as carbon monoxide (CO) may enter the
vehicle. This is the case, e.g. if the vehicle
becomes trapped in snow. There is arisk of
fatal injury.
If you leave the engine or the auxiliary heating
running, make sure the exhaust pipe and area
around the vehicle are clear of snow. To
ensure an adequate supply of fresh air, open
aw indow on the side of the vehicle that is not
facing into the wind.
Have your vehicle winterproofed at aqualified
specialist workshop at the onset of winter.
Observe the notes in the "Winter operation"
section (Y page 330).
Driving with summer tyres Observe the notes in the "Winter operation"
section (Y
page 330). 164
Driving tipsDriving and parking