Page 107 of 407
105
3. MEMORY POINTS
3
NAVIGATION SYSTEM
ISF_IS_ISC_Navi_EE
1Press the “NAV” button, and touch
“Menu” if the map screen is dis-
played.
2Touch “Memory point” on the
“Menu” screen.
3Touch “Home” on the “Memory
point” screen.
4Touch “Edit”.
5Touch the screen button to be edited.
6Touch “OK”.
EDITING HOME
No.FunctionPage
Touch to change the icon
to be displayed on the
map.111
Touch to edit the home
name. The name can be
displayed on the map.
112
Touch to illuminate the
indicator. When the indi-
cator is illuminated, the
registered name is dis-
played on the upper part
of the map screen.
113
Touch to edit location in-
formation.113
Touch to edit the tele-
phone number.113
Page 110 of 407
108
3. MEMORY POINTS
ISF_IS_ISC_Navi_EE
1Press the “NAV” button, and touch
“Menu” if the map screen is dis-
played.
2Touch “Memory point” on the
“Menu” screen.
3Touch “Quick access” on the “Mem-
ory point” screen.
4Touch “Edit”.
5Touch the screen button of the de-
sired quick access.
6Touch the screen button to be edited.
7Touch “OK”.
EDITING QUICK ACCESS
No.FunctionPage
Touch to change the icon
to be displayed on the
map.111
Touch to edit the quick
access name. The name
can be displayed on the
map.
112
Touch to illuminate the
indicator. When the indi-
cator is illuminated, the
registered name is dis-
played on the upper part
of the map screen.
113
Touch to edit location in-
formation.113
Touch to edit the tele-
phone number.113
Page 112 of 407

110
3. MEMORY POINTS
ISF_IS_ISC_Navi_EE
1Press the “NAV” button, and touch
“Menu” if the map screen is dis-
played.
2Touch “Memory point” on the
“Menu” screen.
3Touch “Memory points” on the
“Memory point” screen.
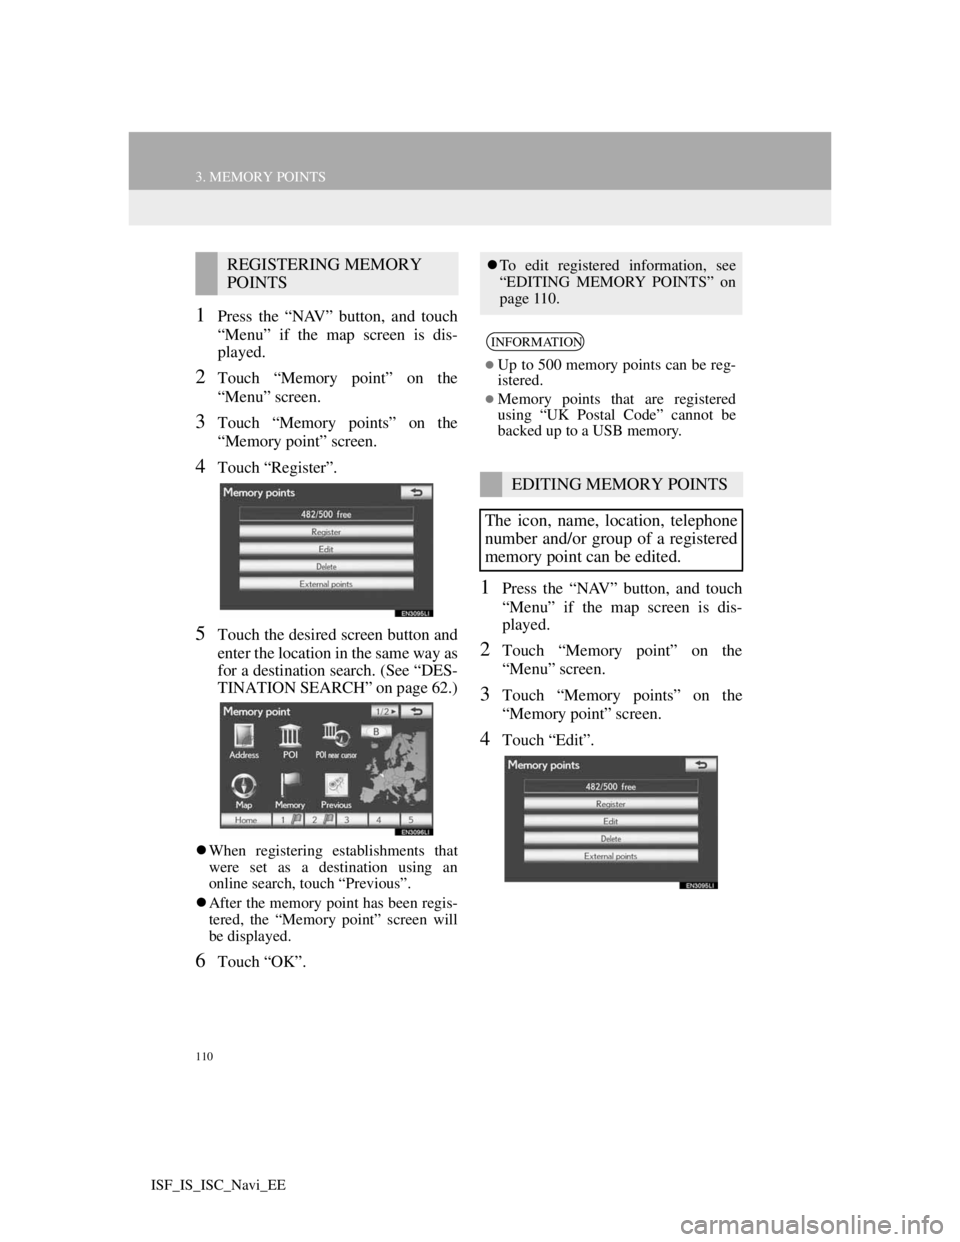
4Touch “Register”.
5Touch the desired screen button and
enter the location in the same way as
for a destination search. (See “DES-
TINATION SEARCH” on page 62.)
When registering establishments that
were set as a destination using an
online search, touch “Previous”.
After the memory point has been regis-
tered, the “Memory point” screen will
be displayed.
6Touch “OK”.
1Press the “NAV” button, and touch
“Menu” if the map screen is dis-
played.
2Touch “Memory point” on the
“Menu” screen.
3Touch “Memory points” on the
“Memory point” screen.
4Touch “Edit”.
REGISTERING MEMORY
POINTSTo edit registered information, see
“EDITING MEMORY POINTS” on
page 110.
INFORMATION
Up to 500 memory points can be reg-
istered.
Memory points that are registered
using “UK Postal Code” cannot be
backed up to a USB memory.
EDITING MEMORY POINTS
The icon, name, location, telephone
number and/or group of a registered
memory point can be edited.
Page 113 of 407
111
3. MEMORY POINTS
3
NAVIGATION SYSTEM
ISF_IS_ISC_Navi_EE
5Touch the screen button of the de-
sired memory point.
6Touch the screen button to be edited.
7Touch “OK”.
TO CHANGE “Mark”
1Touch “Mark”.
2Touch the desired icon.
Change pages by touching the “Page
1”, “Page 2” or “With sound” tab.No.FunctionPage
Touch to change the icon
to be displayed on the
map.111
Touch to edit the memo-
ry point name. The name
can be displayed on the
map.
112
Touch to illuminate the
indicator. When the indi-
cator is illuminated, the
registered name is dis-
played on the upper part
of the map screen.
113
Touch to edit location in-
formation.113
Touch to edit the tele-
phone number.113
Touch to register group.114
Page 115 of 407
113
3. MEMORY POINTS
3
NAVIGATION SYSTEM
ISF_IS_ISC_Navi_EE
DISPLAYING MEMORY POINT
NAMES
1To display a memory point name,
touch “Show name”. The indicator
will illuminate. To hide memory
point names, touch “Show name”
again. The indicator will turn off.
TO CHANGE “Location”
1Touch “Location”.
2Touch one of the 8 directional screen
buttons to move the cursor to the
desired point on the map.
3Touch “OK”.
The previous screen will be displayed.
TO CHANGE “Tel. no.” (TELE-
PHONE NUMBER)
1Touch “Tel. no.”.
2Enter the number using the number
keys.
3Touch “OK”.
The previous screen will be displayed.
The name of a memory point can be
set to be displayed on the map.
Page 136 of 407
133
4. SETUP
3
NAVIGATION SYSTEM
ISF_IS_ISC_Navi_EE
1Press the “SETUP” button.
2Touch “Vehicle” on the “Setup”
screen.
3Touch “Maintenance” on the “Vehi-
cle settings” screen.
4Touch “Set dealer”.
5If the dealer has not been registered,
enter the location of the dealer in the
same way as for a destination search.
(See “DESTINATION SEARCH”
on page 62.)
When “Set dealer” registration is fin-
ished, the “Set dealer” screen will be
displayed.
6Touch the screen button to be edited.DEALER SETTING
Dealer information can be registered
in the system. With dealer informa-
tion registered, route guidance to the
dealer is available.
No.FunctionPage
Touch to enter the name
of a dealer.134
Touch to enter the name
of a dealer member.134
Touch to set the location.134
Touch to set the tele-
phone number.135
Touch to delete the deal-
er information displayed
on the screen.-
Touch to set the dis-
played dealer as a desti-
nation.
81
Page 138 of 407
135
4. SETUP
3
NAVIGATION SYSTEM
ISF_IS_ISC_Navi_EE
TO EDIT “Tel. no.” (TELEPHONE
NUMBER)
1Touch “Tel. no.”.
2Enter the number using number
keys.
3Touch “OK”.
The previous screen will be displayed.
Page 144 of 407

4
139
1
3
5
6
7
8
9
10
4
2
ISF_IS_ISC_Navi_EE1. QUICK REFERENCE .................... 140
2. TELEPHONE (HANDS-FREE
SYSTEM FOR
CELLULAR PHONE).................. 142
USING THE TELEPHONE SWITCH .. 143
USING THE STEERING SWITCHES . 145
ABOUT THE PHONEBOOK
IN THIS SYSTEM .............................. 145
WHEN SELLING OR DISPOSING
OF THE VEHICLE ............................. 146
3. REGISTER A Bluetooth® PHONE 147
CONNECTING A Bluetooth® PHONE 149
RECONNECTING
THE Bluetooth
® PHONE .................... 151
4. CALL ON THE
Bluetooth® PHONE...................... 152
BY DIAL ................................................ 152
BY PHONEBOOK................................. 152
BY SPEED DIAL .................................. 154
BY CALL HISTORY ............................ 154
BY VOICE RECOGNITION................. 155
CALLING USING AN SMS/MMS
MESSAGE .......................................... 157
BY POI* CALL ..................................... 157
5. RECEIVE ON THE
Bluetooth® PHONE ..................... 158
6. TALK ON THE
Bluetooth
® PHONE ..................... 159
WHEN YOU SELECT “0-9” ................. 159
INCOMING CALL WAITING .............. 161
7. Bluetooth® PHONE MESSAGE
FUNCTION.................................. 162
CHECKING MESSAGES ...................... 162
REPLYING (QUICK REPLY)............... 163
NEW MESSAGE NOTIFICATION ...... 164
1. TELEPHONE SETTINGS ............. 165
TELEPHONE SOUND SETTINGS....... 165
PHONEBOOK ........................................ 167
MESSAGE SETTINGS .......................... 180
TELEPHONE DISPLAY SETTINGS.... 184
2. Bluetooth® SETTINGS .................. 187
REGISTERED DEVICES ...................... 187
SELECTING A Bluetooth® PHONE ..... 191
SELECTING PORTABLE PLAYER .... 193
DETAILED Bluetooth
® SETTINGS...... 194
1TELEPHONE OPERATION
2SETUP
TELEPHONE
For vehicles sold outside Europe, some of the functions cannot be operated while driving.
*: Point of Interest