Page 76 of 413

NAVIGATION SYSTEM: DESTINATION SEARCH
75
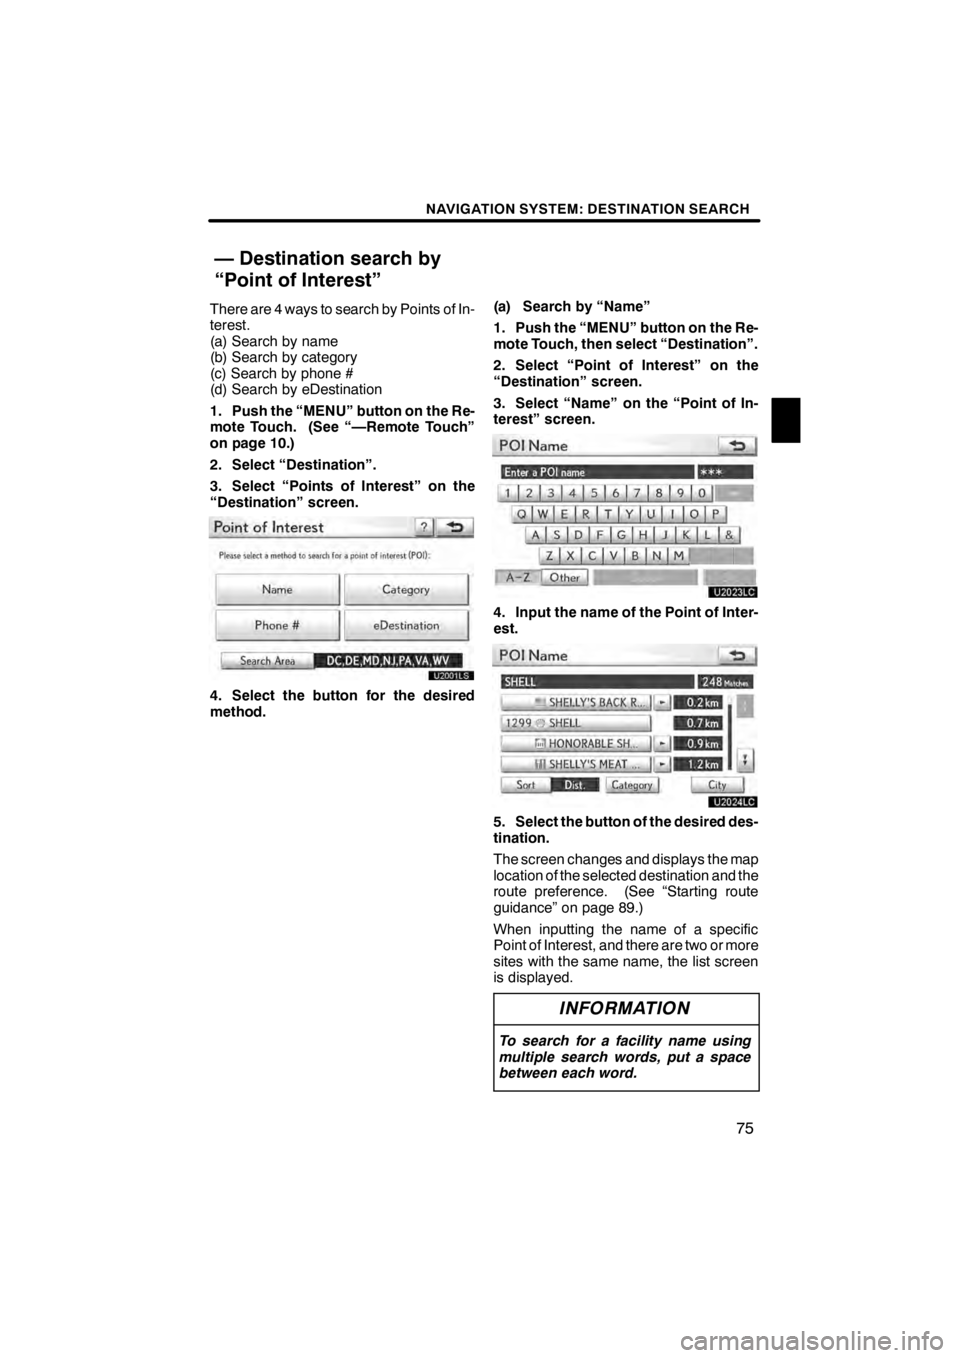
There are 4 ways to search by Points of In-
terest.
(a) Search by name
(b) Search by category
(c) Search by phone #
(d) Search by eDestination
1. Push the “MENU” button on the Re-
mote Touch. (See “—Remote Touch”
on page 10.)
2. Select “Destination”.
3. Select “Points of Interest” on the
“Destination” screen.
4. Select the button for the desired
method.(a) Search by “Name”
1. Push the “MENU” button on the Re-
mote Touch, then select “Destination”.
2. Select “Point of Interest” on the
“Destination” screen.
3. Select “Name” on the “Point of In-
terest” screen.
U2023LC
4. Input the name of the Point of Inter-
est.
U2024LC
5. Select the button of the desired des-
tination.
The screen changes and displays the map
location of the selected destination and the
route preference. (See “Starting route
guidance” on page 89.)
When inputting the name of a specific
Point of Interest, and there are two or more
sites with the same name, the list screen
is displayed.
INFORMATION
To search for a facility name using
multiple search words, put a space
between each word.
11 08.03HS250h_NAVI_U
75051U
— Destination search by
“Point of Interest”
2
Page 81 of 413

NAVIGATION SYSTEM: DESTINATION SEARCH
80
D
To search POIs near the search
point
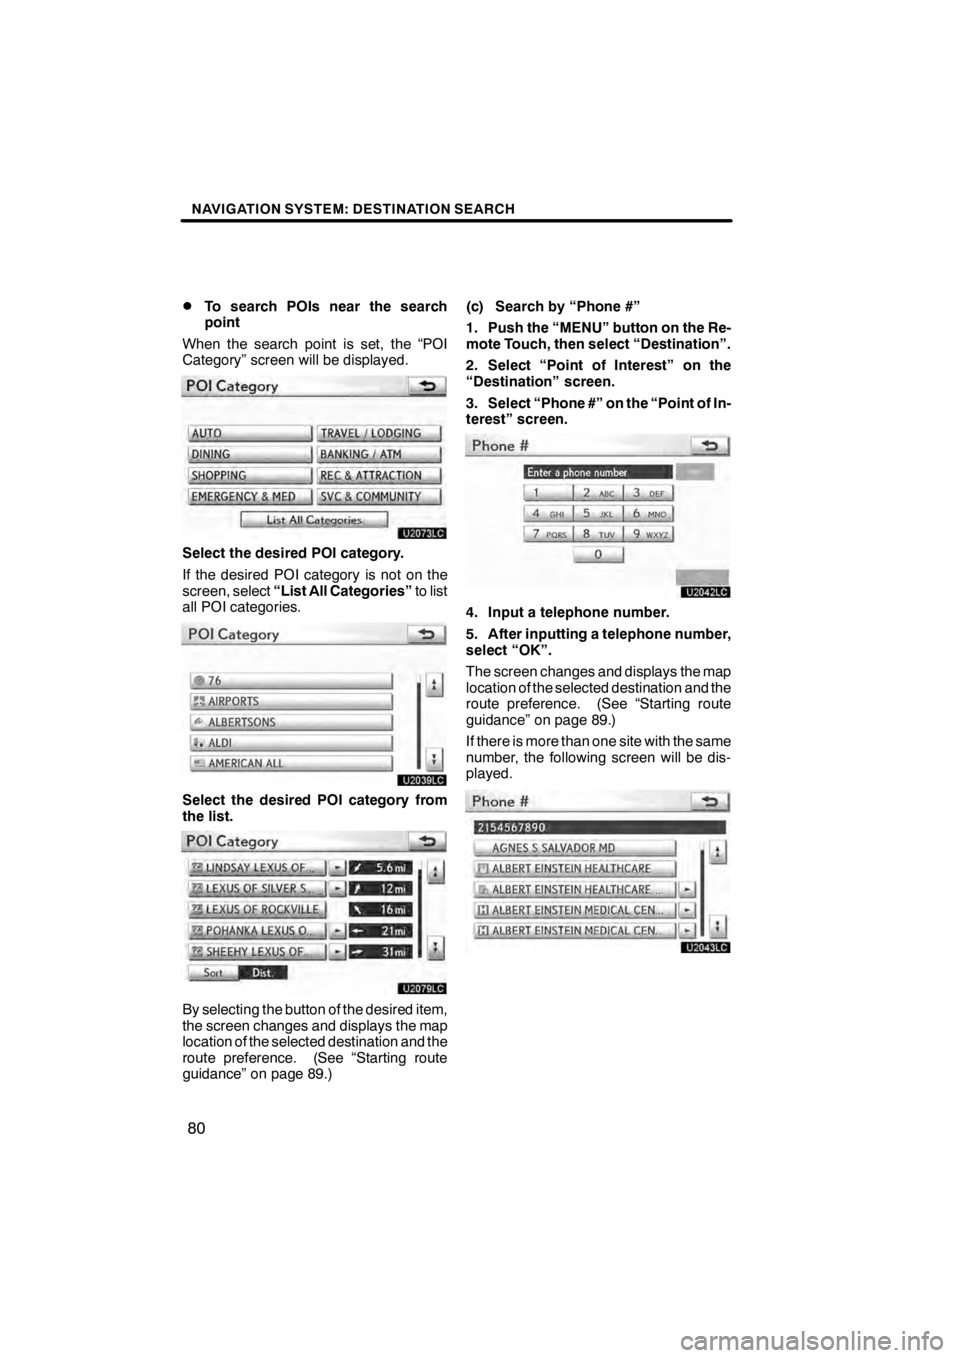
When the search point is set, the “POI
Category” screen will be displayed.
U2073LC
Select the desired POI category.
If the desired POI category is not on the
screen, select “List All Categories” to list
all POI categories.
U2039LC
Select the desired POI category from
the list.
U2079LC
By selecting the button of the desired item,
the screen changes and displays the map
location of the selected destination and the
route preference. (See “Starting route
guidance” on page 89.) (c) Search by “Phone #”
1. Push the “MENU” button on the Re-
mote Touch, then select “Destination”.
2. Select “Point of Interest” on the
“Destination” screen.
3. Select “Phone #” on the “Point of In-
terest” screen.
U2042LC
4. Input a telephone number.
5. After inputting a telephone number,
select “OK”.
The screen changes and displays the map
location of the selected destination and the
route preference. (See “Starting route
guidance” on page 89.)
If there is more than one site with the same
number, the following screen will be dis-
played.
U2043LC
11 08.03HS250h_NAVI_U
75051U
Page 82 of 413
NAVIGATION SYSTEM: DESTINATION SEARCH
81
INFORMATION
DIf there is no match for the tele-
phone number inputted, a list of
identical numbers with different
area codes will be displayed.
D To set an address book entry as a
destination using the phone num-
ber, the number must already be
registered. (See page 127.)
(d) Search by “eDestination”
1. Push the “MENU” button on the Re-
mote Touch, then select “Destination”.
2. Select “Point of Interest” on the
“Destination” screen.
3. Select “eDestination” on the “Point
of Interest” screen.
U2002LS
With the eDestination feature, you can go
online, via the Lexus.com owner’s Web
site, to select and organize destinations of
your choice and then wirelessly send them
to your vehicle’s navigation system. You
can store up to 200 locations online to ac-
cess and update at any time. Your loca-
tions can be organized into up to 20 fold-
ers. (See “eDestination” on page 164.)
11 08.03HS250h_NAVI_U
75051U
2
Page 90 of 413

NAVIGATION SYSTEM: DESTINATION SEARCH
89
The system searches for the guidance
route again, and displays the entire route.
INFORMATION
Set destinations can also be deleted
by selecting “Route”. (See “ — Delet-
ing destinations” on page 101.)
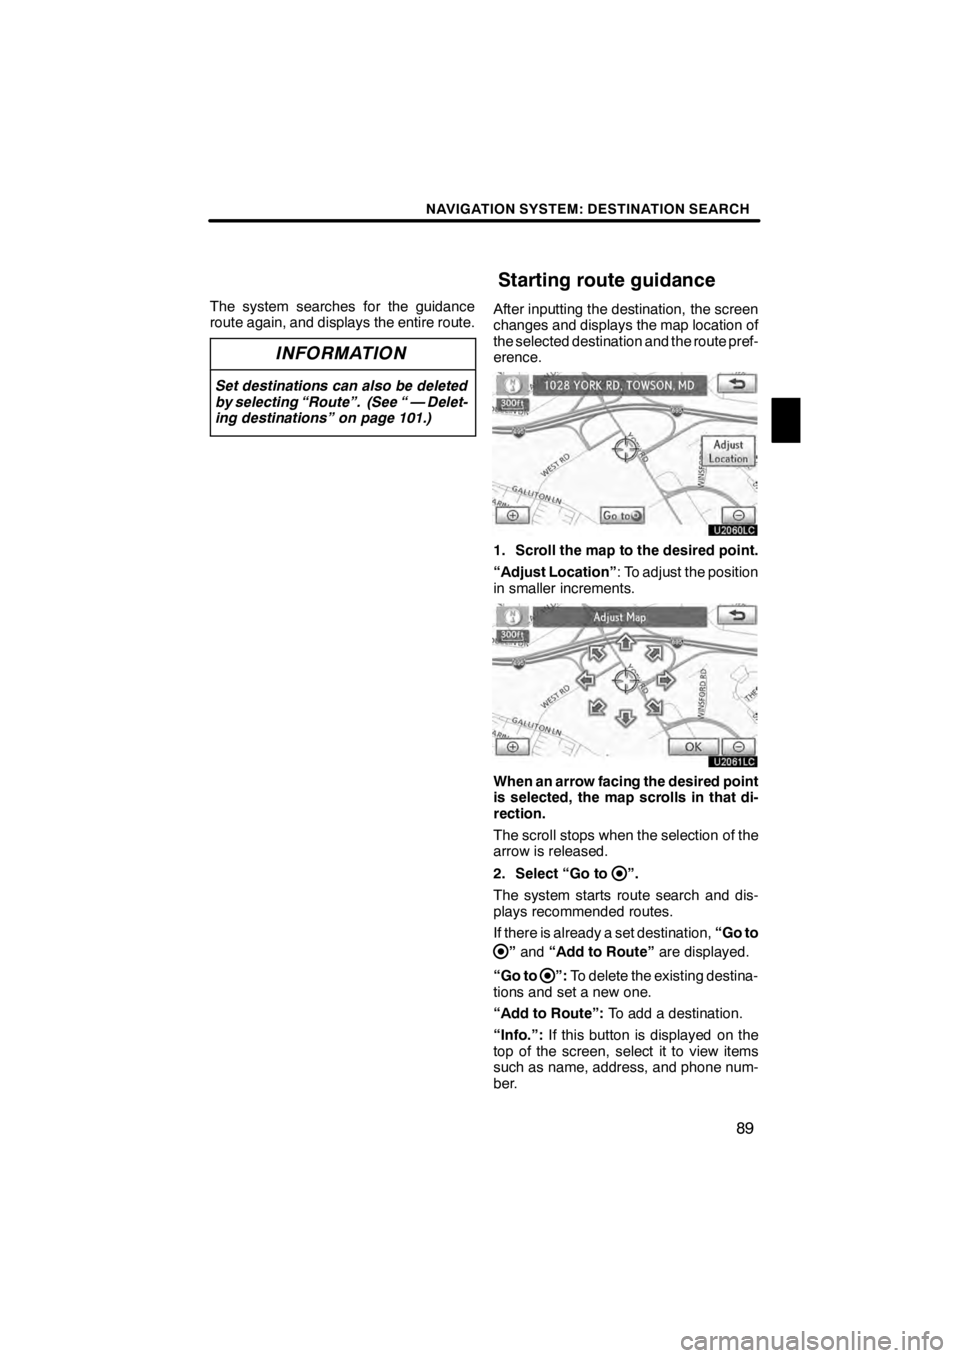
After inputting the destination, the screen
changes and displays the map location of
the selected destination and the route pref-
erence.
U2060LC
1. Scroll the map to the desired point.
“Adjust Location”: To adjust the position
in smaller increments.
U2061LC
When an arrow facing the desired point
is selected, the map scrolls in that di-
rection.
The scroll stops when the selection of the
arrow is released.
2. Select “Go to
”.
The system starts route search and dis-
plays recommended routes.
If there is already a set destination, “Go to
”and “Add to Route” are displayed.
“Go to
”: To delete the existing destina-
tions and set a new one.
“Add to Route”: To add a destination.
“Info.”: If this button is displayed on the
top of the screen, select it to view items
such as name, address, and phone num-
ber.
11 08.03HS250h_NAVI_U
75051U
Starting route guidance
2
Page 119 of 413
NAVIGATION SYSTEM: MEMORY POINTS
11 8
When registration of home is completed,
the “Edit Home” screen will be displayed.
U4007LC
6. Select “OK”.
To edit registered information, see “(b)
Editing home” on page 118.(b) Editing home
1. Push the “MENU” button on the Re-
mote Touch, then select “Setup”.
2. Select “Navi.” on the “Setup”
screen.
3. Select “Home” on the “Navigation
Settings” screen.U4008LC
4. Select “Edit”.
U4009LC
5. Select “Edit” for the item you want to
change.
“Name”: To edit home name. The names
can be displayed on the map. (See page
126.)
“Location”: To edit location information.
(See page 127.)
“Phone #”: To edit telephone numbers.
(See page 127.)
“Icon”: To select icons to be displayed on
the map. (See page 125.)
6. Select “OK”.
11 08.03HS250h_NAVI_U
75051U
Page 122 of 413
NAVIGATION SYSTEM: MEMORY POINTS
121
(b) Editing preset destinations
1. Push the “MENU” button on the Re-
mote Touch, then select “Setup”.
2. Select “Navi.” on the “Setup”
screen.
3. Select “Preset Destinations” on the
“Navigation Settings” screen.
U4018LC
4. Select “Edit”.
U4019LC
5. Select the button of the desired pre-
set destination.
U4017LC
6. Select “Edit” for the item you want to
change.
“Name”: To edit preset destination names.
The names can be displayed on the map.(See page 126.)
“Location”: To edit location information.
(See page 127.)
“Phone #”: To edit telephone numbers.
(See page 127.)
“Icon”: To select icons to be displayed on
the map. (See page 125.)
7. Select “OK”.
11 08.03HS250h_NAVI_U
75051U
4
Page 125 of 413
NAVIGATION SYSTEM: MEMORY POINTS
124
(b) Editing address book entries
The icon, name, location and/or telephone
number of a registered address book entry
can be edited.
1. Push the “MENU” button on the Re-
mote Touch, then select “Setup”.
2. Select “Navi.” on the “Setup”
screen.
3. Select “Address Book” on the “Nav-
igation Settings” screen.
U4026LC
4. Select “Edit”.
U4027LC
5. Select the button of the desired ad-
dress book entry.
U4028LC
6. Select “Edit” for the item you want to
change.
“Name”: To edit address book entry
names. The names can be displayed on
the map. (See page 126.)
“Location”: To edit location information.
(See page 127.)
“Phone #”: To edit telephone numbers.
(See page 127.)
“Icon”: To select icons to be displayed on
the map. (See page 125.)
7. Select “OK”.
11 08.03HS250h_NAVI_U
75051U
Page 128 of 413
NAVIGATION SYSTEM: MEMORY POINTS
127
D
To change “Location”
U4036LC
1. Select “Edit” of “Location”.
U4037LC
2. Select one of the 8 directional but-
tons to move the cursorto the de-
sired point on the map.
3. Select “OK”.
The previous screen will be displayed.
DTo change “Phone #” (telephone
number)
U4038LC
1. Select “Edit” of “Phone #”.
U4039LC
2. Enter the number using number
keys.
3. Select “OK”.
The previous screen will be displayed.
11 08.03HS250h_NAVI_U
75051U
4