2012 Lexus CT200h USB
[x] Cancel search: USBPage 9 of 436

1
2
3
4
5
6
7
9
CT200h_Navi_OM76078E_(EE)
14.02.06 12:29
8
9
10
1. TELEPHONE OPERATION ............. 170
QUICK REFERENCE ......................... 170
TELEPHONE (HANDS-FREE SYSTEM
FOR CELLULAR PHONE) ............. 172
REGISTER A Bluetooth
® PHONE ..... 176
CALL ON THE Bluetooth® PHONE .. 181
RECEIVE ON THE Bluetooth®
PHONE ............................................. 188
TALK ON THE Bluetooth
® PHONE.. 189
Bluetooth® PHONE MESSAGE
FUNCTION....................................... 192
2. SETUP ............................................... 195
TELEPHONE SETTINGS .................. 195
Bluetooth® SETTINGS ....................... 218
1. AUDIO/VIDEO SYSTEM
OPERATION ................................... 232
QUICK REFERENCE ......................... 232
SOME BASICS ................................... 234
RADIO OPERATION ......................... 240
DVD PLAYER OPERATION ............ 246
USB MEMORY OPERATION ........... 268
iPod OPERATION .............................. 274
Bluetooth
® AUDIO OPERATION...... 279
AUDIO/VIDEO REMOTE
CONTROLS
(STEERING SWITCHES) ................ 288
AUDIO/VIDEO SYSTEM
OPERATING HINTS ....................... 290
2. SETUP ............................................... 299
AUDIO SETTINGS ............................ 299
1. AIR CONDITIONING SYSTEM
OPERATION .................................. 306
QUICK REFERENCE .........................306
SOME BASICS ...................................308
AUTOMATIC AIR CONDITIONING
SYSTEM ...........................................309
1. SPEECH COMMAND SYSTEM
OPERATION .................................. 322
SPEECH COMMAND SYSTEM........322
COMMAND LIST ...............................328
1. INFORMATION DISPLAY ............. 332
TRAFFIC .............................................332
2. SETUP ............................................... 338
TRAFFIC AND PARKING
SETTINGS ........................................338
1. CONNECTED SERVICES ............... 344
CONNECTED SERVICES
OVERVIEW......................................344
SETTINGS REQUIRED FOR USING
THE SERVICE..................................347
USING CONNECTED SERVICES ....353
2. SETUP ............................................... 363
ONLINE SEARCH SETTINGS ..........363
4TELEPHONE
5AUDIO/VIDEO SYSTEM
6AIR CONDITIONING
7SPEECH COMMAND
8INFORMATION
9CONNECTED SERVICES
Page 66 of 436

66
2. SETUP
CT200h_Navi_OM76078E_(EE)
14.02.06 12:29
1Press the “MENU” button on the
Remote Touch, then select “Setup”.
2Select “General” on the “Setup”
screen.
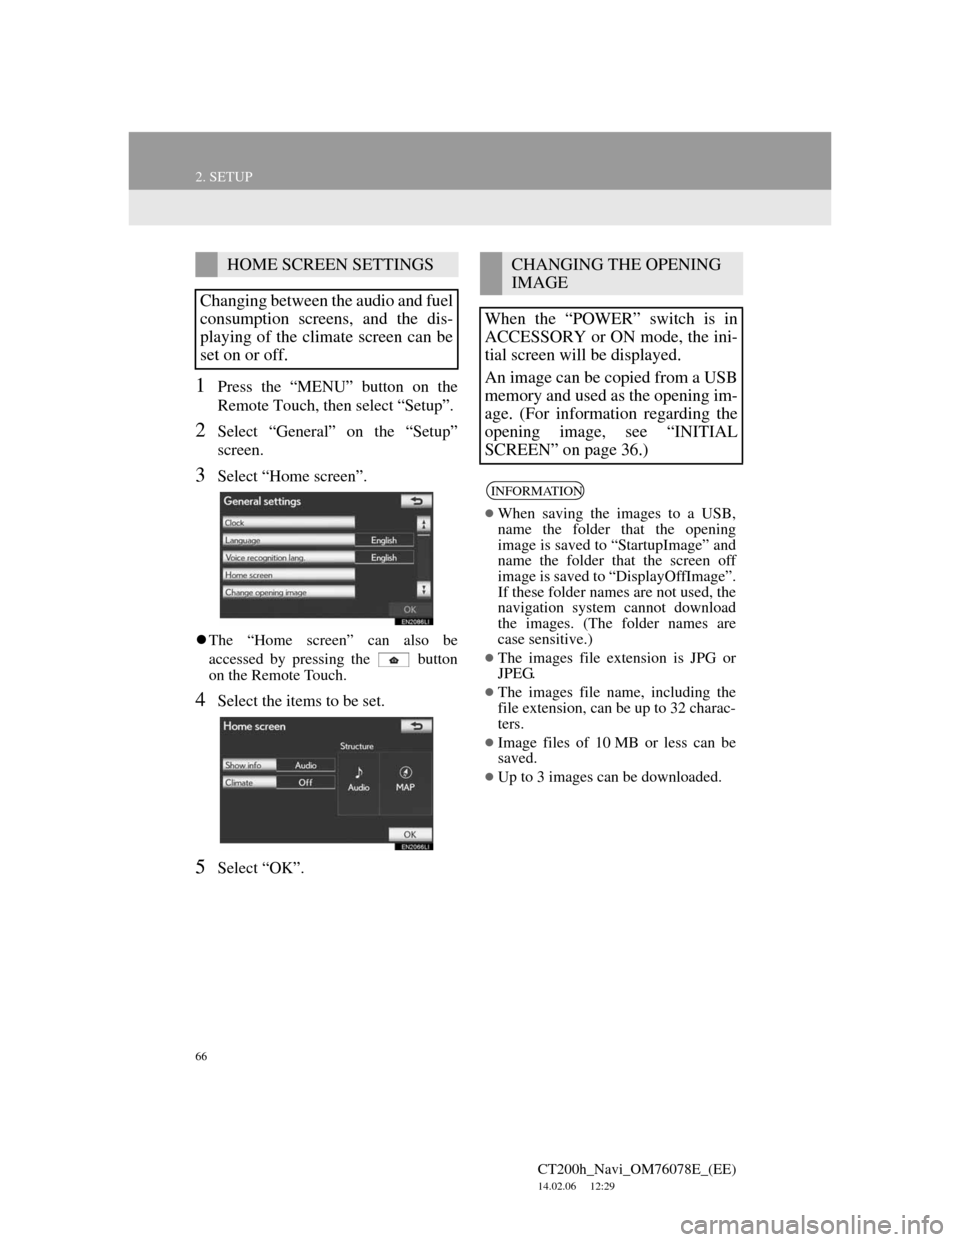
3Select “Home screen”.
The “Home screen” can also be
accessed by pressing the button
on the Remote Touch.
4Select the items to be set.
5Select “OK”.
HOME SCREEN SETTINGS
Changing between the audio and fuel
consumption screens, and the dis-
playing of the climate screen can be
set on or off.CHANGING THE OPENING
IMAGE
When the “POWER” switch is in
ACCESSORY or ON mode, the ini-
tial screen will be displayed.
An image can be copied from a USB
memory and used as the opening im-
age. (For information regarding the
opening image, see “INITIAL
SCREEN” on page 36.)
INFORMATION
When saving the images to a USB,
name the folder that the opening
image is saved to “StartupImage” and
name the folder that the screen off
image is saved to “DisplayOffImage”.
If these folder names are not used, the
navigation system cannot download
the images. (The folder names are
case sensitive.)
The images file extension is JPG or
JPEG.
The images file name, including the
file extension, can be up to 32 charac-
ters.
Image files of 10 MB or less can be
saved.
Up to 3 images can be downloaded.
Page 67 of 436

67
2. SETUP
CT200h_Navi_OM76078E_(EE)
14.02.06 12:29
2
BASIC FUNCTION
TRANSFERRING DATA
1Press the lid, open the cover and con-
nect a USB memory.
Turn on the power of the USB memory
if it is not turned on.
2Press the “MENU” button on the
Remote Touch, then select “Setup”.
3Select “General” on the “Setup”
screen.
4Select “Change opening image”.
5Select “Transfer”.
6Select “Yes”.
SETTING THE OPENING IM-
AGE
1Press the “MENU” button on the
Remote Touch, then select “Setup”.
2Select “General” on the “Setup”
screen.
3Select “Change opening image” on
the “General settings” screen.
4Select the desired image.
5Select “OK”.
DELETING TRANSFERRED IM-
AGES
1Press the “MENU” button on the
Remote Touch, then select “Setup”.
2Select “General” on the “Setup”
screen.
3Select “Change opening image” on
the “General settings” screen.
Page 68 of 436

68
2. SETUP
CT200h_Navi_OM76078E_(EE)
14.02.06 12:29
4Select “Delete all”.
5Select “Yes”.
TRANSFERRING DATA
1Press the lid, open the cover and con-
nect a USB memory.
Turn on the power of the USB memory
if it is not turned on.
2Press the “MENU” button on the
Remote Touch, then select “Setup”.
3Select “General” on the “Setup”
screen.
4Select “Change screen off image”.
5Select “Transfer”.
6Select “Yes”.
CHANGING THE SCREEN
OFF IMAGE
Select “Screen off” to turn off the
screen. An image can be copied from
a USB memory and can be set to dis-
play when “Screen off” is selected.
(For more information on “Screen
off”, see “SCREEN ADJUST-
MENT” on page 45.)
Page 77 of 436

3
77
1
2
3
4
5
6
7
CT200h_Navi_OM76078E_(EE)
14.02.06 12:29
8
9
10
1. ROUTE GUIDANCE SCREEN ...... 105
2. TYPICAL VOICE GUIDANCE
PROMPTS ..................................... 109
3. DISTANCE AND TIME TO
DESTINATION............................. 112
4. SUSPENDING AND RESUMING
GUIDANCE .................................. 113
SUSPENDING GUIDANCE ................. 113
RESUMING GUIDANCE ..................... 113
5. SETTING ROUTE........................... 114
ADDING DESTINATIONS .................. 115
REORDERING DESTINATIONS ........ 115
DELETING DESTINATIONS .............. 116
SEARCH CONDITION ......................... 117
DETOUR SETTING .............................. 118
ROAD PREFERENCE .......................... 119
ROUTE OVERVIEW ............................ 119
ROUTE TRACE .................................... 121
6. DISPLAY POI* ICONS .................. 122
SELECTING POI* ICONS TO BE
DISPLAYED ....................................... 122
1. MEMORY POINT SETTINGS ...... 125
SETTING UP THE “Home”................... 126
SETTING UP THE “Quick access” ....... 129
SETTING UP THE “Memory points” .... 133
SETTING UP THE “Area to avoid”....... 141
DELETING PREVIOUS
DESTINATIONS ................................. 146
BACKUP TO A USB MEMORY .......... 147
COPYING FROM A USB MEMORY... 149
1. NAVIGATION SETTINGS ............ 151
SCREENS FOR NAVIGATION
SETTINGS ........................................... 151
2. VEHICLE SETTINGS .................... 157
MAINTENANCE ................................... 157
VEHICLE CUSTOMIZATION ............. 162
1. LIMITATIONS OF THE
NAVIGATION SYSTEM............. 163
2. MAP DATABASE VERSION AND
COVERED AREA ........................ 166
MAP INFORMATION ........................... 166
2ROUTE GUIDANCE3MEMORY POINTS
4SETUP
5GPS (GLOBAL POSITIONING
SYSTEM)
NAVIGATION SYSTEM
For vehicles sold outside Europe, some of the functions cannot be operated while
driving.
Page 126 of 436

126
3. MEMORY POINTS
CT200h_Navi_OM76078E_(EE)
14.02.06 12:29
4Select the desired items to be set.
On this screen, the following operations
can be performed:1Press the “MENU” button on the
Remote Touch. (See “Remote
Touch” on page 12.)
2Select “Navi”, and select “Menu” if
the map screen is displayed.
3Select “Memory point” on the navi-
gation menu screen.
4Select “Home”.
No.FunctionPage
Select to set home.126
Select to set the memory
points.133
Select to set quick ac-
cess.129
Select to set areas to
avoid.141
Select to delete previous
destinations.146
Select to copy from a
USB memory.149
Select to backup to a
USB memory.147
SETTING UP THE “Home”
If home has been registered, that in-
formation can be recalled by select-
ing “Home” on the “Destination”
screen. (See “DESTINATION
SEARCH BY HOME” on page 84.)
Page 134 of 436

134
3. MEMORY POINTS
CT200h_Navi_OM76078E_(EE)
14.02.06 12:29
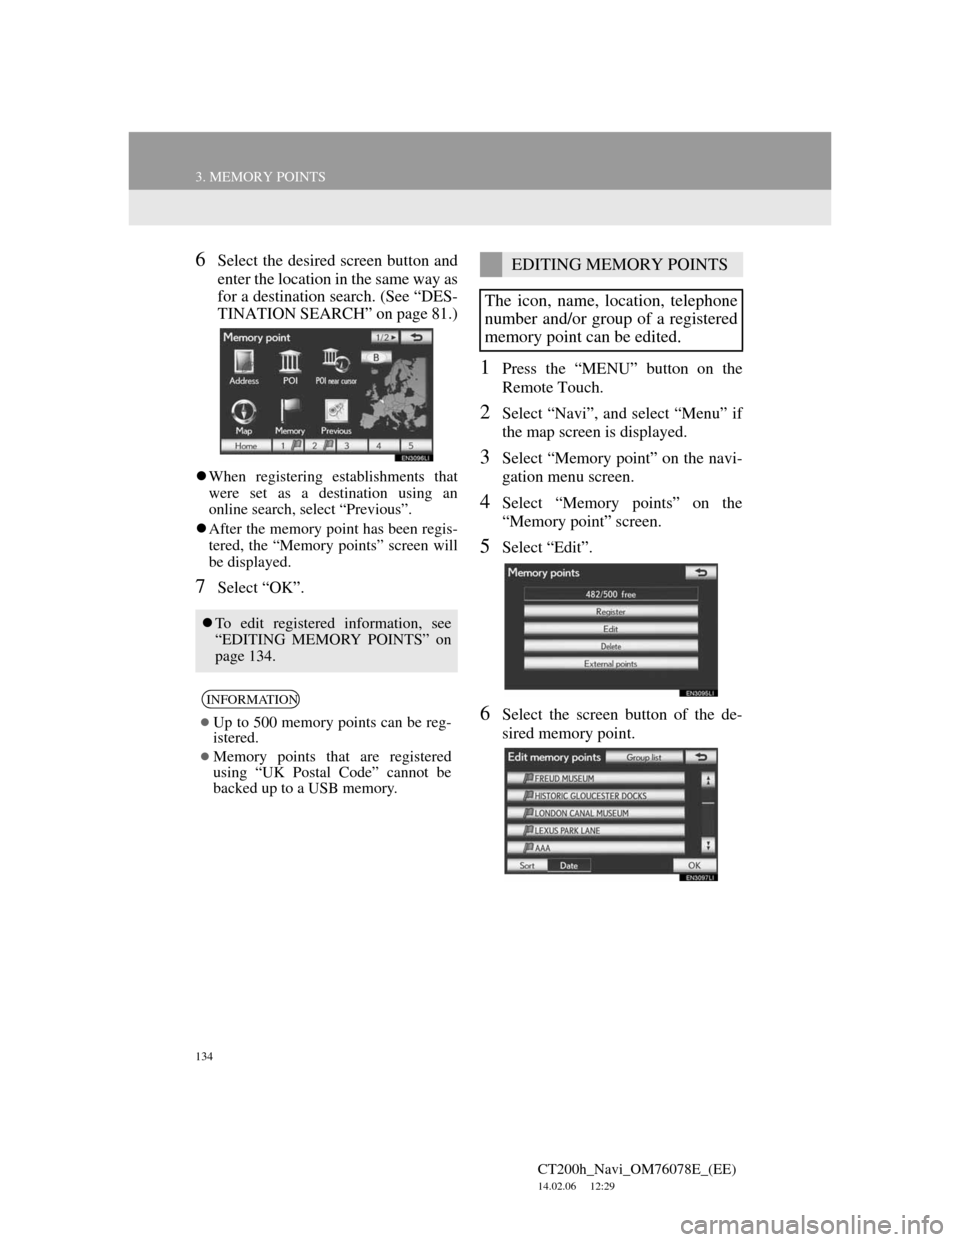
6Select the desired screen button and
enter the location in the same way as
for a destination search. (See “DES-
TINATION SEARCH” on page 81.)
When registering establishments that
were set as a destination using an
online search, select “Previous”.
After the memory point has been regis-
tered, the “Memory points” screen will
be displayed.
7Select “OK”.
1Press the “MENU” button on the
Remote Touch.
2Select “Navi”, and select “Menu” if
the map screen is displayed.
3Select “Memory point” on the navi-
gation menu screen.
4Select “Memory points” on the
“Memory point” screen.
5Select “Edit”.
6Select the screen button of the de-
sired memory point.
To edit registered information, see
“EDITING MEMORY POINTS” on
page 134.
INFORMATION
Up to 500 memory points can be reg-
istered.
Memory points that are registered
using “UK Postal Code” cannot be
backed up to a USB memory.
EDITING MEMORY POINTS
The icon, name, location, telephone
number and/or group of a registered
memory point can be edited.
Page 147 of 436

147
3. MEMORY POINTS
CT200h_Navi_OM76078E_(EE)
14.02.06 12:29
3
NAVIGATION SYSTEM
1Press the lid, open the cover and con-
nect a USB memory.
Turn on the power of the USB memory
if it is not turned on.
2Press the “MENU” button on the
Remote Touch.
3Select “Navi”, and select “Menu” if
the map screen is displayed.
4Select “Memory point” on the navi-
gation menu screen.
5Select “Backup to USB”.
6Select “Start backup”.
7Enter the password and select “OK”.
BACKUP TO A USB
MEMORY
Memory points registered in the nav-
igation system can be copied to a
USB memory.
A password must first be set in order
to back up data. (For instructions on
setting a password, see page 148.)
Exporting memory point data is for
your back-up use only and distribu-
tion or usage in other system is
strictly prohibited.