Page 358 of 436

358
1. CONNECTED SERVICES
CT200h_Navi_OM76078E_(EE)
14.02.06 12:30
DELETING PREVIOUS SEARCH
POINTS
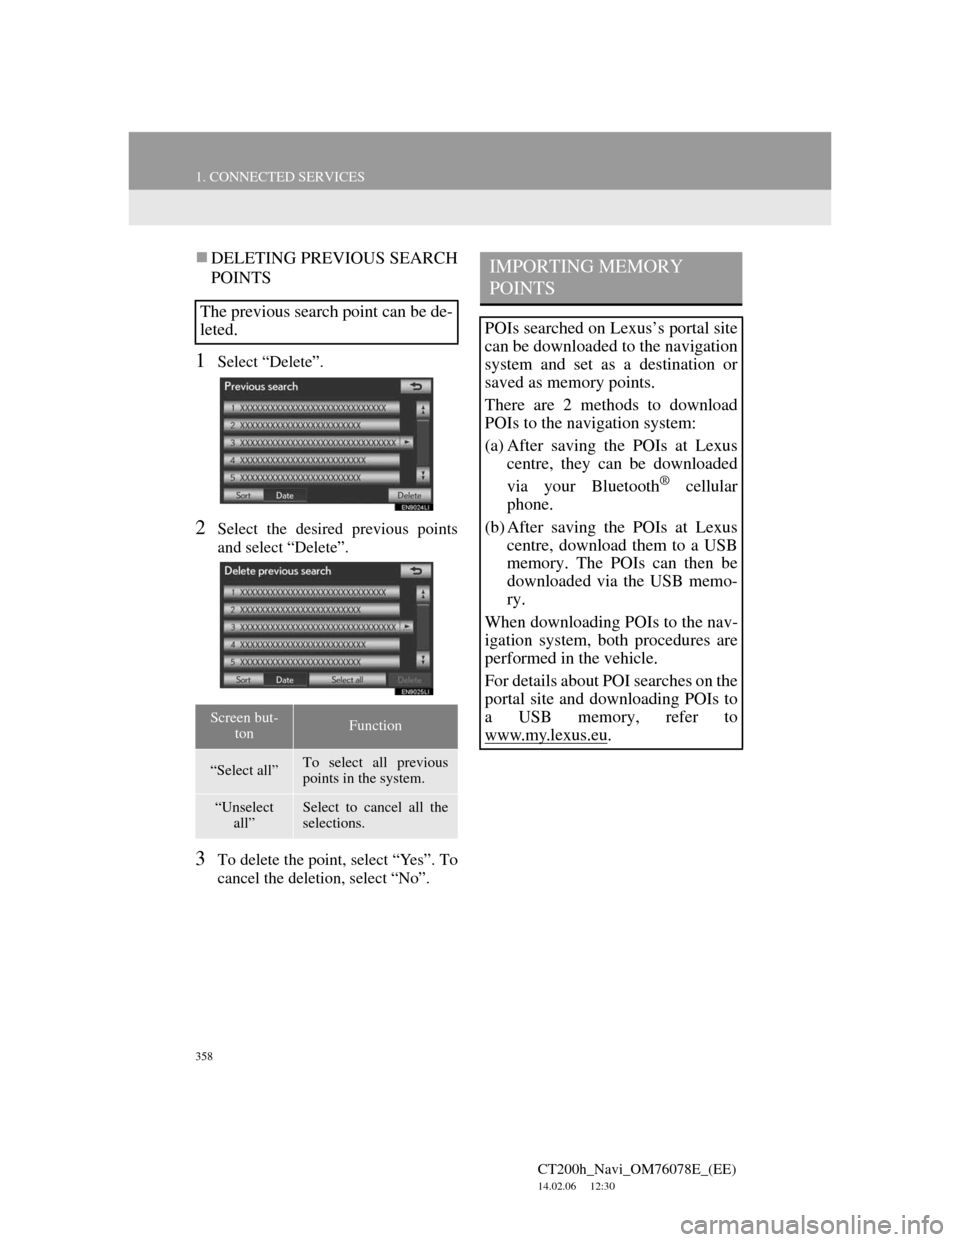
1Select “Delete”.
2Select the desired previous points
and select “Delete”.
3To delete the point, select “Yes”. To
cancel the deletion, select “No”.
The previous search point can be de-
leted.
Screen but-
tonFunction
“Select all”To select all previous
points in the system.
“Unselect
all”Select to cancel all the
selections.
IMPORTING MEMORY
POINTS
POIs searched on Lexus’s portal site
can be downloaded to the navigation
system and set as a destination or
saved as memory points.
There are 2 methods to download
POIs to the navigation system:
(a) After saving the POIs at Lexus
centre, they can be downloaded
via your Bluetooth
® cellular
phone.
(b) After saving the POIs at Lexus
centre, download them to a USB
memory. The POIs can then be
downloaded via the USB memo-
ry.
When downloading POIs to the nav-
igation system, both procedures are
performed in the vehicle.
For details about POI searches on the
portal site and downloading POIs to
a USB memory, refer to
www.my.lex
us.eu.
Page 375 of 436

375
1. LEXUS PARKING ASSIST MONITOR
CT200h_Navi_OM76078E_(EE)
14.02.06 12:30
10
PERIPHERAL MONITORING SYSTEM
2. PERPENDICULAR PARKING (ESTIMATED COURSE LINE DISPLAY MODE)
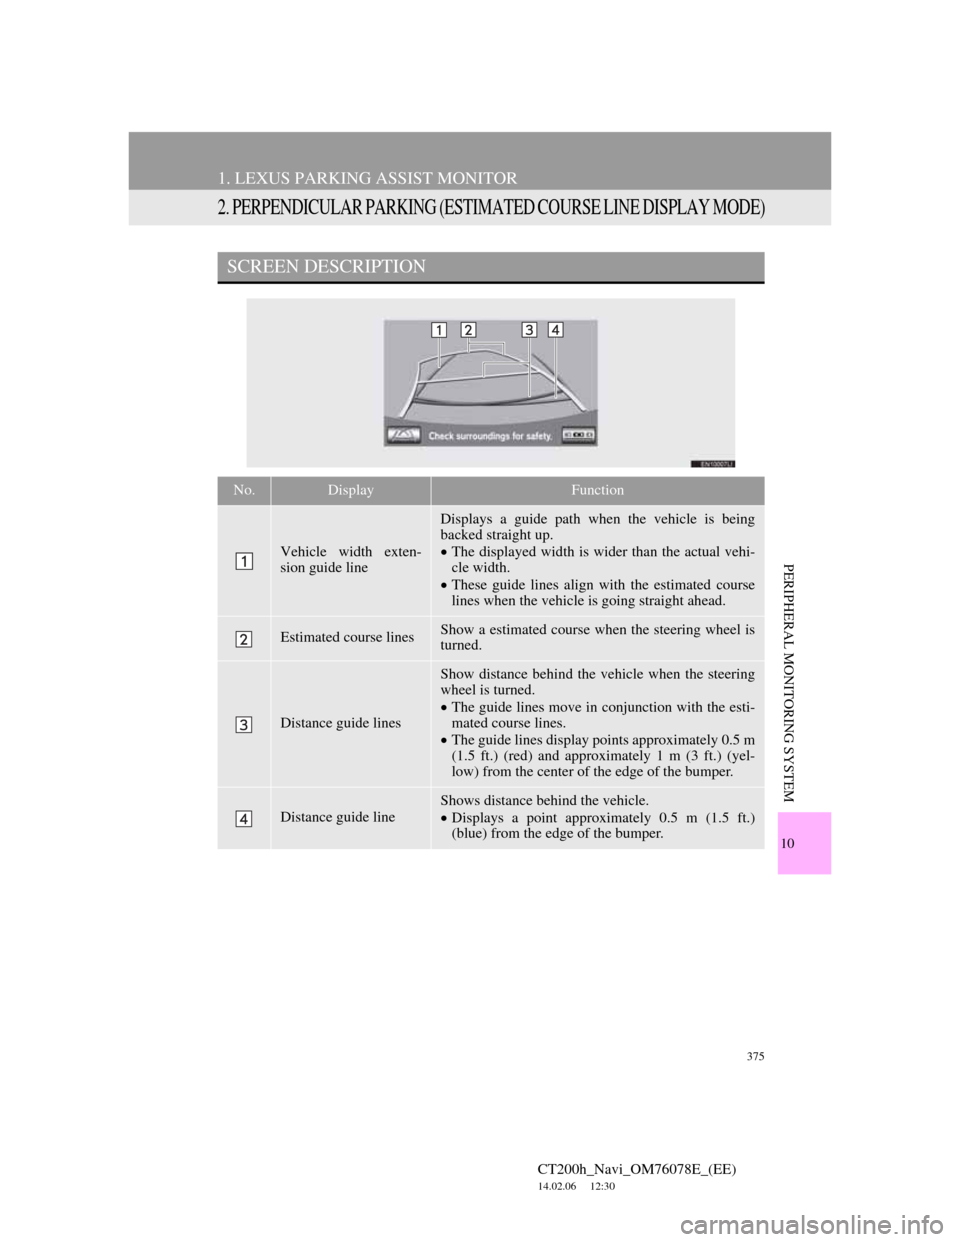
SCREEN DESCRIPTION
No.DisplayFunction
Vehicle width exten-
sion guide line
Displays a guide path when the vehicle is being
backed straight up.
The displayed width is wider than the actual vehi-
cle width.
These guide lines align with the estimated course
lines when the vehicle is going straight ahead.
Estimated course linesShow a estimated course when the steering wheel is
turned.
Distance guide lines
Show distance behind the vehicle when the steering
wheel is turned.
The guide lines move in conjunction with the esti-
mated course lines.
The guide lines display points approximately 0.5 m
(1.5 ft.) (red) and approximately 1 m (3 ft.) (yel-
low) from the center of the edge of the bumper.
Distance guide line
Shows distance behind the vehicle.
Displays a point approximately 0.5 m (1.5 ft.)
(blue) from the edge of the bumper.
Page 380 of 436

380
1. LEXUS PARKING ASSIST MONITOR
CT200h_Navi_OM76078E_(EE)
14.02.06 12:30
4. PARALLEL PARKING
VEHICLE MOVEMENT PROCEDURE
Keeping parallel with the road, stop the vehicle
leaving a gap of approximately 1 m (3 ft.) be-
tween your vehicle and the parked vehicle.
[PARKING] : STEP 1
Back up until the black and yellow vertical pole
just overlaps the rear end of the parked vehicle.
Then stop the vehicle. [PARKING] : STEP 4
Leaving the vehicle stopped, move the steering
wheel until the blue outline meets the desired
parking space, and back up while keeping the
steering wheel in that position. [PARKING] :
STEP 5
A curved blue line is displayed. Keep the steer-
ing wheel in the same position and back up until
the curved blue line meets the right corner of the
parking space. [PARKING] : STEP 7
When it meets the right corner of the parking
space, turn the steering wheel in the opposite di-
rection as far as it will go. [PARKING] : STEP 8
Keeping the steering wheel in that position,
check your surroundings visually and using mir-
rors, and back up using the distance guide lines
etc. as a reference. [PARKING] : STEP 9
When the vehicle is approximately in the de-
sired parking location, parallel parking assist is
complete. [PARKING] : STEP 10
Approx. 1 m (3 ft.)
Page 382 of 436
382
1. LEXUS PARKING ASSIST MONITOR
CT200h_Navi_OM76078E_(EE)
14.02.06 12:30
4With the steering wheel straight,
back up slowly to a position at which
the black and yellow vertical pole
just overlaps the rear end of the
parked vehicle. Then stop the vehi-
cle.
Black and yellow vertical pole
Back the vehicle up to here
5Turn the steering wheel with the ve-
hicle stopped until the blue outline
meets the desired parking space.
If the extended line from the blue out-
line is displayed, the parallel parking
assist is operational.
Blue outline
Black and yellow vertical pole
Extended line
Page 383 of 436
383
1. LEXUS PARKING ASSIST MONITOR
CT200h_Navi_OM76078E_(EE)
14.02.06 12:30
10
PERIPHERAL MONITORING SYSTEM
Turn the steering wheel right
Black and yellow vertical pole
Blue outline
CAUTION
Be sure to check that there are no
obstacles inside the blue outline.
If there are any obstacles inside the
blue outline, do not use the parallel
parking assist.
When positioning the blue outline
over the parking space, be sure to
position it so that the extended blue
line may not cross the tyre of the
vehicle parked in front of the empty
space.
If the extended line of the blue outline
may be crossing the parked vehicle,
your vehicle is too close. Check that
there is a gap of approximately 1 m (3
ft.) between your vehicle and the
parked vehicle.
Extended line overlapping wheel
Page 384 of 436
384
1. LEXUS PARKING ASSIST MONITOR
CT200h_Navi_OM76078E_(EE)
14.02.06 12:30
6Keep the steering wheel in its current
position and backing up.
The parallel parking assist will be can-
celled if the steering wheel is moved
while backing up. Shift the shift lever
out of the “R” position, and restart from
the procedure “1”.
7A curved blue line will appear on the
screen. Keep the steering wheel in its
current position and back up slowly.
Stop when the curved blue line
meets the corner of the desired park-
ing space.
Curved blue line
CAUTION
When backing up, be careful not to
hit any obstacles with your vehicle.
Back the vehicle up slowly.
Page 385 of 436

385
1. LEXUS PARKING ASSIST MONITOR
CT200h_Navi_OM76078E_(EE)
14.02.06 12:30
10
PERIPHERAL MONITORING SYSTEM
Back up keeping the steering wheel in
its current position
Curved blue line
Curved blue line meets the corner here
If you back up too quickly, you may
lose synchronization with the parallel
parking assist.
8Leaving the vehicle stopped, turn the
steering wheel all the way to the left.
Be sure to turn the steering wheel only
when the vehicle is stopped.
9When the screen changes, keep the
steering wheel in its current position
and back up.
10When the vehicle is parallel with the
road or the shoulder, straighten the
steering wheel.
Check your surroundings visually
and with the mirrors, then back up
using the distance guide lines as a
reference, and stop.
When the vehicle is approximately in
the desired parking location, the paral-
lel parking assist is complete.
CAUTION
When backing up, be careful not to
hit any obstacles with your vehicle.
Back the vehicle up slowly.
INFORMATION
There is a possibility that parallel
parking guidance may not be given
when backing up at a very slow
speed.
If the back door is opened, the paral-
lel parking assist will be discontinued
halfway.
Page 398 of 436

398
ALPHABETICAL INDEX
CT200h_Navi_OM76078E_(EE)
14.02.06 12:30
Symbols
“ ” button.......................................... 12
“
·” button ........................................... 12
A
Air conditioning ..................................... 306
Air conditioning system operating
hints................................................. 316
Automatic air conditioning system..... 309
Climate control ................................... 308
Using the automatic air conditioning
system ............................................. 309
AM ......................................................... 240
Audio settings ........................................ 299
iPod settings ....................................... 303
Radio settings ..................................... 302
Sound settings..................................... 300
Audio system operating hints
Caring for your DVD player
and disc ........................................... 292
CD-R and CD-RW discs .................... 297
iPod..................................................... 291
MP3/WMA files ................................. 295
Radio reception................................... 290
Terms .................................................. 297
USB memory ...................................... 292
Audio/video remote controls
(Steering switches) ............................. 288
Audio/video system ............................... 231
Audio/video system operating hints....... 290
Automatic sound leveliser (ASL) .......... 300
AUX port ............................................... 238
B
Basic function .......................................... 35
Basic information before operation ......... 36
Bluetooth
®..................................... 170, 279
Bluetooth® audio operation ................... 279
Connecting a Bluetooth® audio
player .............................................. 281
Playing Bluetooth
® audio .................. 283
Bluetooth® phone message function ..... 192
Checking messages ............................ 192
New message notification .................. 194
Replying (Quick reply) ...................... 193
Bluetooth
® settings................................ 218
Detailed Bluetooth® settings.............. 226
Registered devices ............................. 219
Selecting a Bluetooth
® phone ............ 223
Selecting portable player.................... 224
Brightness ........................................ 46, 259
ALPHABETICAL INDEX