2012 Hyundai Elantra remote control
[x] Cancel search: remote controlPage 65 of 384

349
Safety features of your vehicle
The curtain air bags are designed to
deploy only during certain side impact
collisions, depending on the crash sever-
ity, angle, speed and impact. The curtain
air bags are not designed to deploy in all
side impact situations, collisions from the
front or rear of the vehicle or in most
rollover situations.Important safety notes for curtainairbag systems
Following is a number of safety points
concerning this system which should
always be observed to ensure risk of
injury is reduced in an accident.
WARNING
Before installing child restraints, always refer to "Child Restraint System" to ensure correct instal-
lation and occupant protection ismaximised.
Make sure that the occupant does not have any body parts
(head, arms & legs) protruding
outside the restraining system. If
an inflating airbag was to strike
an infant child on the head, it may
cause serious injury.
Ensure the opening for the Curtain Airbag System remains
unobstructed at all times, so that
the airbags can inflate properly ifneeded.
(Continued)
(Continued)
The built in coat hooks shouldonly be used for light weight
clothing, ensure that pockets are
free of any heavy or sharp
objects. When using coat hooks,
do not hang clothes on coat
hangers.
The space between the occupant and the curtain airbag must never
be occupied by children, passen-
gers or pets. Occupants should
never lean out or have any parts
of their body protruding from the
window whilst the engine is run-ning.
Do not move the sun visor out to cover the side window if there is
an item attached to it such as
garage door remote control,
pens, air fresheners or the like.
These objects may cause injury if
the Curtain Airbag is deployed.
(Continued)
Page 75 of 384

4
Keys / 4-2
Smart key / 4-5
Remote keyless entry / 4-11
Theft-alarm system / 4-13
Door locks / 4-16
Boot / 4-20
Windows / 4-22
Bonnet / 4-27
Fuel filler lid / 4-29
Sunroof / 4-32
Steering wheel / 4-36
Mirrors / 4-38
Instrument cluster / 4-42
Rear parking assist system / 4-65
Rearview camera / 4-68
Hazard warning flasher / 4-69
Lighting / 4-70
Wipers and washers / 4-75
Interior light / 4-78
Defroster / 4-80
Manual climate control system / 4-81
Automatic climate control system / 4-90
Windscreen defrosting and defogging / 4-98
Storage compartment / 4-102
Interior features / 4-104
Audio system / 4-111
Features of your vehicle
Page 113 of 384

439
Features of your vehicle
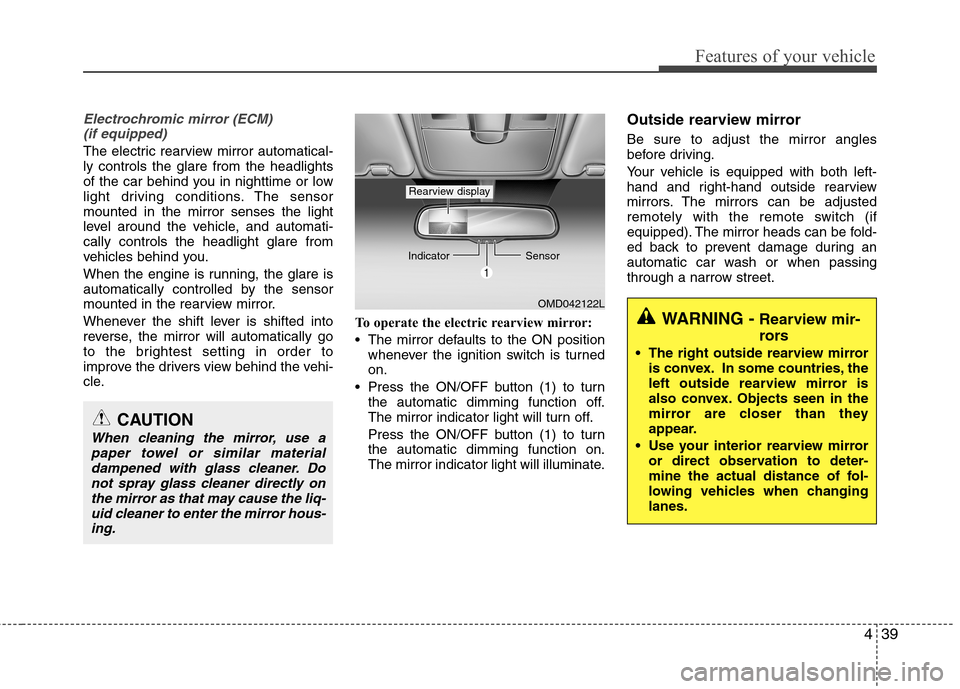
Electrochromic mirror (ECM) (if equipped)
The electric rearview mirror automatical- ly controls the glare from the headlights
of the car behind you in nighttime or low
light driving conditions. The sensormounted in the mirror senses the light
level around the vehicle, and automati-cally controls the headlight glare from
vehicles behind you.
When the engine is running, the glare is
automatically controlled by the sensor
mounted in the rearview mirror.
Whenever the shift lever is shifted into
reverse, the mirror will automatically go
to the brightest setting in order to
improve the drivers view behind the vehi-
cle. To operate the electric rearview mirror:
The mirror defaults to the ON position
whenever the ignition switch is turned on.
Press the ON/OFF button (1) to turn the automatic dimming function off.
The mirror indicator light will turn off.
Press the ON/OFF button (1) to turn the automatic dimming function on.
The mirror indicator light will illuminate. Outside rearview mirror Be sure to adjust the mirror angles
before driving.
Your vehicle is equipped with both left-
hand and right-hand outside rearview
mirrors. The mirrors can be adjusted
remotely with the remote switch (if
equipped). The mirror heads can be fold-
ed back to prevent damage during an
automatic car wash or when passing
through a narrow street.
CAUTION
When cleaning the mirror, use a
paper towel or similar materialdampened with glass cleaner. Do
not spray glass cleaner directly onthe mirror as that may cause the liq-uid cleaner to enter the mirror hous- ing.
OMD042122L
Indicator
Sensor
Rearview display
WARNING - Rearview mir-
rors
The right outside rearview mirror is convex. In some countries, the
left outside rearview mirror is
also convex. Objects seen in the
mirror are closer than they
appear.
Use your interior rearview mirror or direct observation to deter-
mine the actual distance of fol-
lowing vehicles when changinglanes.
Page 114 of 384

Features of your vehicle
40
4
Remote control
Manual type (if equipped)
To adjust an outside mirror, move the
control lever. Electric type (if equipped)
The electric remote control mirror switch
allows you to adjust the position of the
left and right outside rearview mirrors. To
adjust the position of either mirror, move
the lever (1) to R (Right) or L (Left) to
select the right side mirror or the left side
mirror, then press a corresponding pointon the mirror adjustment control to posi-
tion the selected mirror up, down, left or
right.
After adjustment, put the lever into neu-
tral (centre) position to prevent inadver-tent adjustment.
CAUTION
Do not scrape ice off the mirror
face; this may damage the surface
of the glass. If ice should restrictmovement of the mirror, do notforce the mirror for adjustment. To remove ice, use a deicer spray.
CAUTION
If the mirror is jammed with ice, do
not adjust the mirror by force. Usean approved spray de-icer (not radi- ator antifreeze) to release thefrozen mechanism or move the
vehicle to a warm place and allowthe ice to melt.
WARNING
Do not adjust or fold the outside
rearview mirrors whilst the vehicle
is moving. This could result in loss
of control, and an accident which
could cause death, serious injury
or property damage.
OMD041035RB510A01E/H
Page 186 of 384

Steering wheel audio control (if equipped)
The steering wheel audio control button
is installed to promote safe driving.
VOLUME (VOL +/-) (1)
Press the up button (+) to increase vol-ume.
Press the down button (-) to decrease volume.
SEEK/PRESET ( / ) (2)
If the SEEK/PRESET button is pressed
for 0.8 second or more, it will work as fol-
lows in each mode.
RADIO mode
It will function as the AUTO SEEK select
button. It will SEEK until you release the
button.
CDP mode
It will function as the FF/REW button.
If the SEEK/PRESET button is pressed
for less than 0.8 second, it will work as
follows in each mode. RADIO mode
It will function as the PRESET STATION
select buttons.
CDP mode
It will function as the TRACK UP/DOWN
button.
MODE (3)
Press the MODE button to select Radio,
CD (Compact Disc) or AUX (Auxiliary, ifequipped).
MUTE (4, if equipped)
Press the button to mute the sound.
Press the button to turn off the micro-
phone during a telephone call.
Detailed information for audio control
buttons is included in the following pagesin this section.
CAUTION
Do not operate audio remote con- trol buttons simultaneously.
OMD040139N
OMD040139
■ Type A
■Type B
4112
Features of your vehicle
Page 205 of 384

4131
Features of your vehicle
BLUETOOTH®
PHONE OPERA-
TION (if equipped)
1. button : Raises or lowers speaker volume.
2. button : Mute the microphone during a call.
3. button : Places or transfers a call.
4. button : Rejects or ends a call. ■
What is Bluetooth ®
?
Bluetooth ®
is a wireless technology that
allows multiple devices to be connected
in a short range, low-powered devices
like hands-free, stereo headset, wireless
remote control, etc. For more informa-tion, visit the Bluetooth ®
website at
www.Bluetooth.com ■ General Features
®
hands-free and stereo-headset fea-
tures.
- HANDS-FREE feature: Making or receiving calls wirelessly.
- STEREO-HEADSET feature: Playing music from mobile phones (that sup-
ports A2DP feature) wirelessly.
✽✽ NOTICE
The phone must be paired to the sys- tem before using Bluetooth
®features.
Only one selected (connected) mobile phone can be used with the system at
a time.
Some phones are not fully compatible
with this system.
■ Phone Setup
All Bluetooth ®
-related operations can be
performed in PHONE menu.
1) Push the button to enter SETUP mode.
2) Rotate the knob to move the cursor between items push the
button to select “Phone”
3) Rotate the knob to move the cursor between items and push the button to select a desired
item.
ENTER
VOL
ENTER
VOL
SETUP
MUTE
VOLUME
3
4
1
2
Page 208 of 384

Features of your vehicle
134
4
✽✽
NOTICE
In the following situations, you or the
other party may have difficulty hearing
each other:
1. Speaking at the same time, your voice
may not reach each other parties.
(This is not a malfunction.) Speak
alternately with the other party on the
phone.
2. Keep the Bluetooth® volume to a low level. High-level volume may result in
distortion and echo.
3. When driving on a rough road.
4. When driving at high speeds.
5. When the window is open.
6. When the air conditioning vents are facing the microphone.
7. When the sound of the air condition- ing fan is loud.■Bluetooth ®
Audio Music
Streaming
This audio system supports A2DP (Audio
Advanced Distribution Profile) and
AVRCP(Audio Video Remote ControlProfile).
Both profiles are available for listening to
the MP3 music via Bluetooth mobile
phone supporting above Bluetooth pro-
files.
To play MP3 music from the Bluetooth
mobile phone, press the button
until “MP3 Play” is displayed on the LCD.
Then try playing music by phone.
When playing music from the Bluetooth
mobile phone, the head unit displaysMP3 MODE. NOTE:
all the sounds that the phone supports can be
heard by the audio system.
feature A2DP and AVRCP functions.
mobile phones may not play music
through the head unit on first try.
Please try the below;
i.e : Menu ➟
Filemanager ➟Music ➟
Option ➟Play via Bluetooth
phone for more.
To stop music, try stop playing
music from the phone then change
the audio mode to other than “MP3
Play” mode (e.g. FM, AM, CD, etc.)
AUX