Page 12 of 384

15
Introduction
INDICATOR SYMBOLS ON THE INSTRUMENT CLUSTER
Seat belt warning light
High beam indicator
Turn signal indicator
Anti-lock brake system (ABS)
warning light*
Parking brake & Brake fluid
warning light
Malfunction indicator
Immobiliser indicator*
Boot open warning light*
Charging system warning light
Door ajar warning light*
ESP (ESC*
1
) indicator*
ESP (ESC* 1
) OFF indicator*
Front fog light indicator*
Engine oil pressure warning lightElectric power steering (EPS)
system warning light
Air bag warning light*
Rear fog light indicator*
Cruise control SET indicator*
Cruise control indicator*
Light on indicator
Automatic transaxle shift posi-
tion indicator (Automatic
transaxle only)
Manual transaxle shift indicator
(Manual transaxle only)
Low fuel level warning light
❈ For more detailed explanations, refer to “Instrument cluster” in section 4. ECO indicator*ECO
Overspeed warning light*120km/h
* if equipped *
1
Some countries use the term ESC (Electronic stability control) instead of
ESP. Please refer to the term your
country uses.
Page 14 of 384
Your vehicle at a glance
2
2
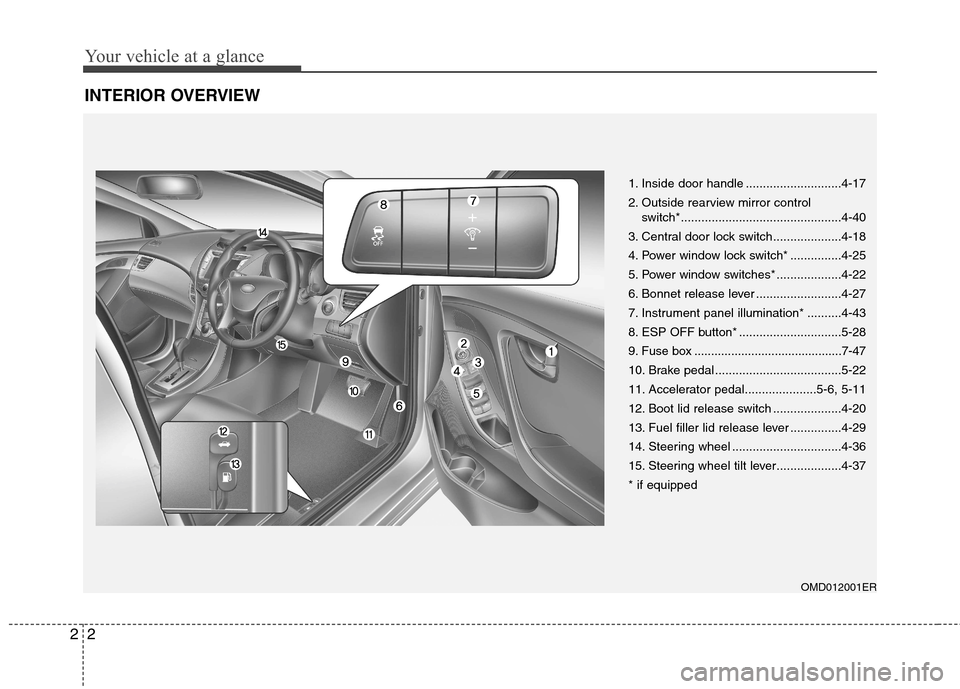
INTERIOR OVERVIEW
OMD012001ER
1. Inside door handle ............................4-17
2. Outside rearview mirror control
switch*...............................................4-40
3. Central door lock switch....................4-18
4. Power window lock switch* ...............4-25
5. Power window switches* ...................4-22
6. Bonnet release lever .........................4-27
7. Instrument panel illumination* ..........4-43
8. ESP OFF button* ..............................5-28
9. Fuse box ............................................7-47
10. Brake pedal .....................................5-22
11. Accelerator pedal.....................5-6, 5-11
12. Boot lid release switch ....................4-20
13. Fuel filler lid release lever ...............4-29
14. Steering wheel ................................4-36
15. Steering wheel tilt lever...................4-37* if equipped
Page 36 of 384

Safety features of your vehicle
20
3
Lap/shoulder belt
To fasten your seat belt:
To fasten your seat belt, pull it out of the
retractor and insert the metal tab (1) into
the buckle (2). There will be an audible
"click" when the tab locks into the buckle. The seat belt automatically adjusts to the proper length only after the lap belt por-
tion is adjusted manually so that it fits
snugly around your hips. If you lean for-
ward in a slow, easy motion, the belt will
extend and let you move around. If there
is a sudden stop or impact, however, the
belt will lock into position. It will also lock
if you try to lean forward too quickly.
✽✽
NOTICE
If you are not able to pull out the safety
belt from the retractor, firmly pull the
belt out and release it. After release, you
will be able to pull the belt out smoothly.
Height adjustment (Front seat)
You can adjust the height of the shoulder
belt anchor to one of 4 positions for max-
imum comfort and safety. The height of the adjusting seat belt
should not be too close to your neck. You
will not be getting the most effective pro-
tection. The shoulder portion should be
adjusted so that it lies across your chest
and midway over your shoulder near the
door and not your neck.
To adjust the height of the seat belt
anchor, lower or raise the height adjuster
into an appropriate position.
To raise the height adjuster, pull it up (1).
To lower it, push it down (3) whilst press-
ing the height adjuster button (2).
OHD036019
Front seat
B180A01NF/H
1
2
Page 37 of 384

321
Safety features of your vehicle
Release the button to lock the anchor
into position. Try sliding the height
adjuster to make sure that it has lockedinto position.When using the rear centre seat belt, the
buckle with the “CENTER” mark must beused.
WARNING
Verify the shoulder belt anchor is locked into position at the appro-
priate height. Never position the
shoulder belt across your neck or
face. Improperly positioned seatbelts can cause serious injuriesin an accident.
Failure to replace seat belts after an accident could leave you with
damaged seat belts that will not
provide protection in the event ofanother collision leading to per-
sonal injury or death. Replace
your seat belts after being in an
accident as soon as possible.
B200A02NF/H
WARNING
You should place the lap belt por-
tion as low as possible and snugly
across your hips, not on your waist.If the lap belt is located too high on
your waist, it may increase the
chance of injury in the event of a
collision. Both arms should not be
under or over the belt. Rather, one
should be over and the other under,
as shown in the illustration.
Never wear the seat belt under the
arm nearest the door.
OMD030018N
Page 57 of 384

341
Safety features of your vehicle
Air bag warning and indicator
Air bag warning light
The purpose of the air bag warning light
in your instrument panel is to alert you of
a potential problem with your air bag -
Supplemental Restraint System (SRS).
When the ignition switch is turned ON,
the warning light should illuminate for
approximately 6 seconds, then go off.
Have the system checked if:
The light does not turn on briefly whenyou turn the ignition ON.
The light stays on after illuminating for approximately 6 seconds.
The light comes on whilst the vehicle is in motion.
The light blinks when the ignition switch is in ON position.WARNING
Extreme Hazard! Do not use a rearward facing child restraint on
a seat protected by an air bag in
front of it!
Never put a child restraint in the front passenger’s seat. If the front
passenger air bag inflates, it
would cause serious or fatalinjuries.
(Continued)
(Continued)
When children are seated in therear outboard seats of vehicle
equipped with side and/or curtain
air bags, be sure to install the
child restraint system as far away
from the door side as possible,
and securely lock the childrestraint system in position.
Inflation of side and/or curtain air
bags could cause serious injury
or death to an infant or child.
W7-147R5LDA004
Page 66 of 384

Safety features of your vehicle
50
3
WARNING
In order for side impact and cur- tain air bags to provide the best
protection, both front seat occu-
pants and both outboard rearoccupants should sit in anupright position with the seat
belts properly fastened.
Importantly, children should sit in
a proper child restraint system inthe rear seat.
When children are seated in the rear outboard seats, they must be
seated in the proper child
restraint system. Make sure to
put the child restraint system as
far away from the door side as
possible, and secure the child
restraint system in a locked posi-tion.
(Continued)(Continued)
Do not allow the passengers tolean their heads or bodies onto
doors, put their arms on the
doors, stretch their arms out of
the window, or place objects
between the doors and passen-
gers when they are seated onseats equipped with side and/or
curtain air bags.
Never try to open or repair any components of the side curtain
air bag system. This should only
be done by an authorised
HYUNDAI dealer.
Failure to follow the above men-tioned instructions can result in
injury or death to the vehicle occu-pants in an accident.(Continued)
Where sun blinds are fitted to the rear doors, these must not
obstruct or impair the airbag in
any way.
Do not install any accessories or children’s toys in the Curtain
Airbag deployment zones, as this
may impair the operation of the
system or throw parts of them
into the vehicle cabin causing
injury to occupants if the system
is deployed.
To maintain the integrity of the Curtain Airbag system, any work,
removal or installation of the
airbag and associated compo-
nents (such as roof lining and
side trims) should always be per-
formed by a qualified vehicle
repairer.
Page 75 of 384
4
Keys / 4-2
Smart key / 4-5
Remote keyless entry / 4-11
Theft-alarm system / 4-13
Door locks / 4-16
Boot / 4-20
Windows / 4-22
Bonnet / 4-27
Fuel filler lid / 4-29
Sunroof / 4-32
Steering wheel / 4-36
Mirrors / 4-38
Instrument cluster / 4-42
Rear parking assist system / 4-65
Rearview camera / 4-68
Hazard warning flasher / 4-69
Lighting / 4-70
Wipers and washers / 4-75
Interior light / 4-78
Defroster / 4-80
Manual climate control system / 4-81
Automatic climate control system / 4-90
Windscreen defrosting and defogging / 4-98
Storage compartment / 4-102
Interior features / 4-104
Audio system / 4-111
Features of your vehicle
Page 76 of 384
Features of your vehicle
2
4
KEYS
Record your key number The key code number is stamped on the barcode tag attached to the
key set. Should you
lose your keys, this
number will enable an authorised
HYUNDAI dealer to duplicate the keys
easily. Remove the bar code tag and
store it in a safe place. Also, record the
code number and keep it in a safe place
(not in the vehicle). Key operations
• Used to start the engine.
Used to lock and unlock the doors.
Type C
To unfold the key, press the release but-
ton then the key will unfold automatically.
To fold the key, fold the key manually
whilst pressing the release button.
OMD041003L
OMD041004L
OMG040005-1
■
Type B
■
Type A
■ Type CCAUTION
Do not fold the key without press-
ing the release button. This may damage the key.