Page 135 of 429
�µ
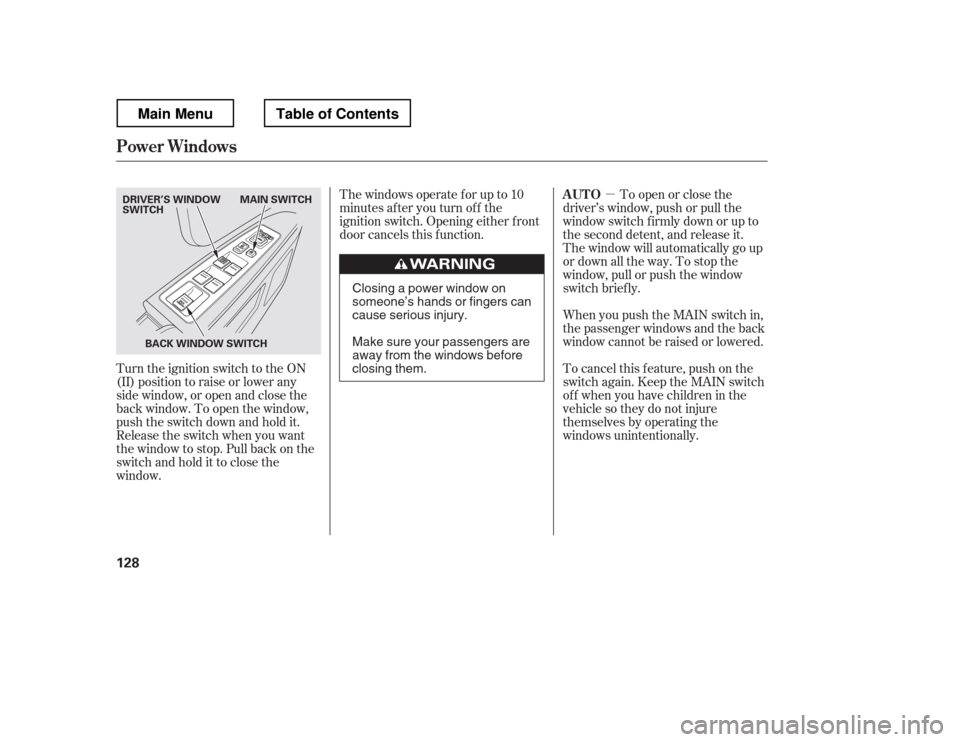
Turn the ignition switch to the ON
(II) position to raise or lower any
side window, or open and close the
back window. To open the window,
push the switch down and hold it.
Release the switch when you want
the window to stop. Pull back on the
switchandholdittoclosethe
window. Thewindowsoperateforupto10
minutes after you turn off the
ignition switch. Opening either f ront
door cancels this f unction.
To open or close the
driver
Page 138 of 429
Turnthekeyclockwiseagain,and
hold it. All f our side windows start
to open. To stop the windows,
release the key.
To open the windows f urther, turn
andholdthekeyagain(within
10 seconds).The moonroof has two positions: it
can be tilted up in the back f or
ventilation, or it can slide back into
the roof. Use the switch near the left
dashboard vent to operate the
moonroof . The ignition switch must
be in the ON (II) position.
If the windows stop bef ore
the desired position, repeat steps 2
and 3. To close the windows f urther, turn
andholdthekeyagain(within
10 seconds).
To close: If the windows stop bef ore
the desired position, repeat steps 2
and 3.
Insert the key in the driver
Page 139 of 429
You can open and close the
moonroof f or up to 10 minutes af ter
you turn of f the ignition switch.
Opening either f ront door cancels
this function.To apply the parking brake, push the
pedal down with your f oot. To
release it, pull the release handle
f ully. The parking brake indicator on
the instrument panel should go out
when the parking brake is f ully
released (see page ).
To tilt up the back of the moonroof ,
press and hold the center part of the
switch ( ). To close the
moonroof , press and hold the upper
part of the switch ( ). To open
the moonroof , press and hold the
lower part of the switch ( ).
Release the switch when the
moonroof gets to the desired
position.
Make sure everyone
Page 141 of 429
Turn the ignition switch to the ON
(II) position.When you f inish, move the
selector switch to the center (off)
position. This turns the
adjustment switch of f to keep your
settings.
The outside mirrors are heated to
remove fog and frost. With the
ignition switch in the ON (II)
position, turn on the heaters by
pressing the button. The indicator in
the button comes on as a reminder.
Press the button again to turn the
heaters off.
Push the appropriate edge of the
adjustment switch to move the
mirrorright,left,up,ordown.
Move the selector switch to L
(driver
Page 146 of 429
There are three accessory power
sockets in your vehicle. Two
accessory power sockets are above
the center pocket on the dashboard,
and another is on the back of the
center console.These sockets are intended to supply
power f or 12 volt DC accessories
that are rated 120 watts or less (10
amps).
To use an accessory power socket,
the ignition switch must be in the
ACCESSORY (I) or ON (II) position. None of the sockets will power an
automotive type cigarette lighter
element. When both sockets are
being used, the combined power
rating of the accessories should be
120 watts or less (10 amps).
A ccessory Power Sockets
Interior Convenience Items
Inst rument s and Cont rols
139
FRONT
REAR
Main MenuTable of Contents
Page 148 of 429
Always run the engine when you use
the AC power outlet.
The maximum capacity f or this
power outlet is 115 volt AC at 100
watts or less. If you use an appliance
which requires more than 100 watts,
it automatically stops supplying the
power. If this happens, turn the
ignition switch of f and turn it on
again.The AC power outlet is not
designed f or electric appliances
which require high initial peak
wattage such as cathode-ray tube
type televisions, ref rigerators,
electric pumps, etc. It is also not
suitable f or devices that process
precise data such as medical
equipment or measuring instruments.
Any appliances that require an
extremely stable power supply such
as microcomputer-controlled electric
blankets, touch sensor lamps, etc.,
should not be connected to this
outlet.
There is a 115 volt AC power outlet
inside the f ront console
compartment. To use the AC power
outlet, open the lids and open the
outlet cover. Insert the plug into the
receptacle slightly, turn it 90
Page 149 of 429
When the interior light control switch isin the ON position: When the switch is in the OFF position:
When the switch is in the door position:
None of the lights come on when a
door is opened.
The map lights in the f ront can be
turned on and of f by pushing each
lens. The rear map lights cannot
be used.
All the individual map lights and
the rear console light come on and
stay on as long as the switch
remains in the ON position. The individual map lights and the
rear console light come on when
any door is opened, or when the
remote transmitter or the key is
used to unlock the doors. When
the doors are closed, each
individual map light can be turned
on and of f by pushing the lens.
The lights fade out about 30
seconds after all the doors are
closed.
With any door lef t open and the
key removed f rom the ignition
switch, the lights stay on about 3
minutes, then go out.
Interior L ight Control Switch
Interior Lights
142
ON
OFF
DOOR POSITION
Main MenuTable of Contents
Page 150 of 429
Turn on a f ront individual map light
by pushing the lens. Push the lens
again to turn it off. With the interior
light control switch in the door
position, a rear map light can be
turned on by pushing the lens. Push
the lens again to turn it off.The courtesy light in each door
comes on when you open that door.
The light around the ignition switch
only comes on when you open the
driver
.The moonro")

 position.When you f inish, move the
selector switch to the center (off)
position. This turns the
adjustment switch of f to keep your
settings.
The outside mirr")


