Page 111 of 429

The childproof door locks are
designed to prevent children seated
in the rear f rom accidentally opening
the rear doors. Each rear door has a
lock lever near the edge. With the
lever in the LOCK position, the door
cannot be opened f rom inside
regardless of the position of the lock
tab. To open the door, pull the lock
tab up, and use the outside door
handle.The auto door locking f eature has
three possible settings:
The auto door locking is
deactivated all the time.
The doors lock whenever you
move the shift lever out of the
Park (P) position.
The doors lock when the vehicle
speedreaches10mph(15km/h).
This is the def ault setting.
Your vehicle has customizable
settings f or the doors to
automatically lock and unlock. There
are def ault settings f or each of these
f eatures. You can turn of f or change
the settings for these features as
described on the f ollowing pages.
When you customize the setting,
make sure your vehicle is parked
saf ely, the engine is of f , and the
parking brake is applied. Make all
settings bef ore you start driving.
With the auto door locking and
unlocking, the In-Bed Trunk also
locks and unlocks.
A uto Door L ocking/Unlocking
Childproof Door L ocks A uto Door L ocking
Door L ocks
104
LOCK LEVER
Main MenuTable of Contents
Page 134 of 429
Follow these precautions when using
the seat heaters:Donotusetheseatheaterinthe
HI setting f or an extended period,
because it draws large amounts of
current from the battery.
If the engine is lef t idling f or an
extended period, do not use the
seat heaters, even on the LO
setting. It can weaken the battery,
causing hard starting.
Push the top of the switch, HI, to
rapidly heat up the seat. Af ter the
seat reaches a comfortable
temperature, select LO by pushing
the bottom of the switch. This will
keep the seat warm. In the HI setting, the heater turns off
when the seat gets warm, and turns
back on after the seat
Page 148 of 429
Always run the engine when you use
the AC power outlet.
The maximum capacity f or this
power outlet is 115 volt AC at 100
watts or less. If you use an appliance
which requires more than 100 watts,
it automatically stops supplying the
power. If this happens, turn the
ignition switch of f and turn it on
again.The AC power outlet is not
designed f or electric appliances
which require high initial peak
wattage such as cathode-ray tube
type televisions, ref rigerators,
electric pumps, etc. It is also not
suitable f or devices that process
precise data such as medical
equipment or measuring instruments.
Any appliances that require an
extremely stable power supply such
as microcomputer-controlled electric
blankets, touch sensor lamps, etc.,
should not be connected to this
outlet.
There is a 115 volt AC power outlet
inside the f ront console
compartment. To use the AC power
outlet, open the lids and open the
outlet cover. Insert the plug into the
receptacle slightly, turn it 90
Page 156 of 429
. If it moves near the red mark,
turn of f the A/C until the gauge
reads normally.
The heate")
Air conditioning places an extra load
on the engine. Watch the engine
coolant temperature gauge (see page). If it moves near the red mark,
turn of f the A/C until the gauge
reads normally.
The heater uses engine coolant to
warm the air. If the engine is cold, it
will be several minutes bef ore you
f eel warm air coming f rom the
system.
Select .
When you select , the system
automatically switches to the fresh
air mode.
Set the f an to the desired speed.
Adjust the warmth of the air with
the temperature control dial.
Set the temperature to the lower
limit.
Make sure the A/C is of f .
Select and fresh air mode.
Set the f an to the desired speed.
If the outside air is humid, select
recirculation mode. If the outside
air is dry, select f resh air mode.
Select .
Make sure the temperature is set
to the lower limit.
Turn on the A/C by pressing the
button. You will see A/C ON in
the display.
Set the f an to the desired speed.
The ventilation system draws in
outside air, circulates it through the
interior, then exhausts it through
vents near the back window.
1.2. 3. 4. 5.
1. 2. 3.
1. 2. 3.4. 76
CONT INUED
Vents, Heating, and A/C
Using the A /C
Ventilation Using the Heater
Features
149
Main MenuTable of Contents
Page 254 of 429
Bef ore you begin driving your
vehicle, you should know what
gasoline to use and how to check the
levels of important f luids. You also
need to know how to properly store
luggage or packages. The
inf ormation in this section will help
you. If you plan to add any
accessories to your vehicle, please
read the information in this section
first..............................
Break-in Period . 248
.................
Fuel Recommendation . 248
.........
Service Station Procedures . 250
....................................
Ref ueling . 250
Opening and Closing the
.......................................
Hood . 254
...................................
Oil Check . 255
.............
Engine Coolant Check . 255
...............................
Fuel Economy . 256
...
Accessories and Modif ications . 259
.............................
Carrying Cargo . 261
Bef ore Driving
Bef ore Driving
247
Main MenuINDEX
Page 262 of 429
Wait a f ew minutes af ter turning the
engine of f bef ore you check the oil.Remove the dipstick (orange loop).
Wipe of f the dipstick with a clean
cloth or paper towel.
Insert the dipstick all the way back
into its hole. Remove the dipstick again, and
check the level. It should be
between the upper and lower
marks.
If it is near or below the lower mark,
see on page . Look at the coolant level in the
radiator reserve tank. Make sure it is
between the MAX and MIN lines. If
it is below the MIN line, see
on page f or
inf ormation on adding the proper
coolant.
Refer to
on page f or inf ormation
about checking other items on your
vehicle.
1. 2. 3.
4.
328 331
325
A dding Engine Oil Engine Coolant Check
Oil Check
A dding
Engine Coolant
Owner
Page 265 of 429
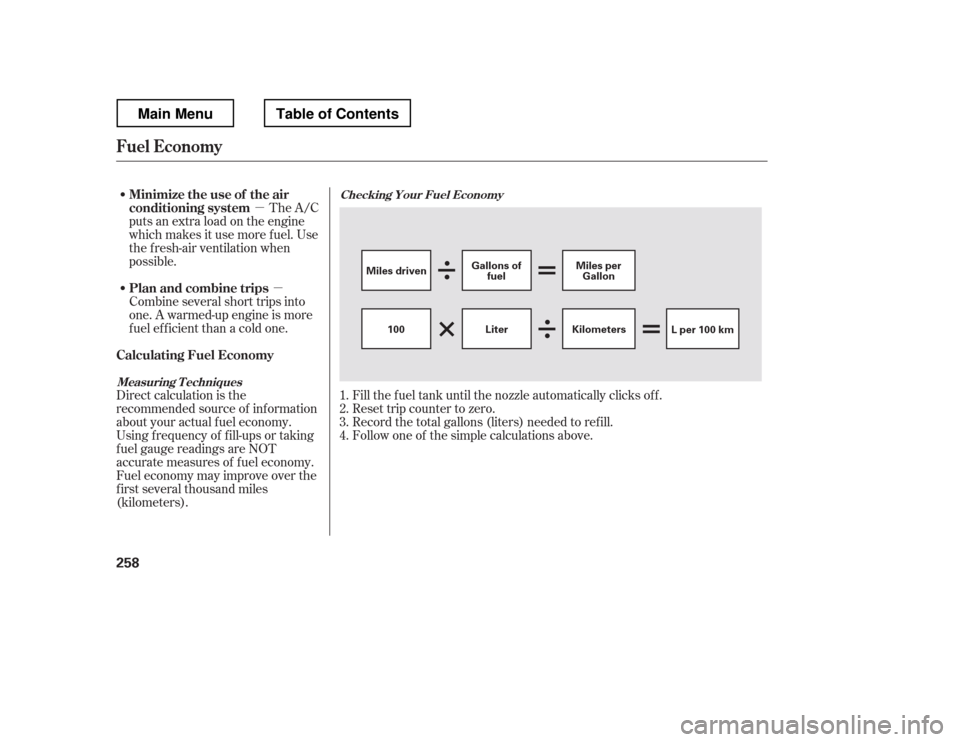
�µ�µ
Fill the f uel tank until the nozzle automatically clicks of f .
Reset trip counter to zero.
Record the total gallons (liters) needed to ref ill.
Follow one of the simple calculations above.
The A/C
puts an extra load on the engine
which makes it use more f uel. Use
the f resh-air ventilation when
possible.
Combine several short trips into
one. A warmed-up engine is more
f uel ef f icient than a cold one.
Direct calculation is the
recommended source of inf ormation
about your actual f uel economy.
Using f requency of f ill-ups or taking
f uel gauge readings are NOT
accurate measures of f uel economy.
Fuel economy may improve over the
f irst several thousand miles
(kilometers). 1.2.3.4.
Checking Your Fuel Economy
Measuring T echniques
Fuel Economy
Minimize the use of the air
conditioning system
Plan and combine trips
Calculating Fuel Economy
258
Miles driven Gallons of
fuel Miles per
Gallon
100 KilometersL per 100 km
Liter
Main MenuTable of Contents
Page 276 of 429

This section gives you tips on
starting the engine under various
conditions, and how to operate the
automatic transmission. It also
includes important inf ormation on
parking your vehicle, the braking
system, the Variable Torque
Management
4-wheel drive
(VTM-4
) system, the vehicle
stability assist (VSA
), aka
Electronic Stability Control (ESC),
system, the tire pressure monitoring
system (TPMS), and f acts you need
if you are planning to tow a trailer or
drive of f -highway. ........................
Driving Guidelines . 270
........................
Preparing to Drive . 271
.......................
Starting the Engine . 272
..............
Automatic Transmission . 273
Variable Torque Management
...........
4WD (VTM-4) System . 278
Tire Pressure Monitoring System
......................................
(TPMS) . 280
...........................................
Parking . 288
.............................
Braking System . 290
...............
Anti-lock Brakes (ABS) . 291
Vehicle Stability Assist (VSA
),
aka Electronic Stability Control .......................
(ESC), System . 292
.................
Towing Weight Limits . 295
..........
Towing Weight Guidelines . 297
...........................
Towing a Trailer . 298
Of f -Highway Driving
..................................
Guidelines . 308
Driving
Driving
269
Main MenuINDEX


.
Wipe of f the dipstick with a clean
cloth or paper towel.
Insert the dipstick all th")