Page 344 of 681

Playlists are track lists in a certain
playback group.
This playlist is automatically
generated when the music CD is
recorded. The maximum number
of original playlists that can be
stored to the HDD is 999, with 99
songs on each playlist. Each album
name on the music CD is counted
as a playlist.Songs that have been recorded on
the HDD are categorized in groups
f or easy searching.
There are six categories:
Album record date: Album titles are
arranged by date of recording.
Album: Album names are arranged
in alphabetical order.
Artist: Artist names are arranged in
alphabetical order.
Genre: Songs are arranged by genre.
Playlist: Any of six playlists that are
arranged by the user.
Track: Track titles are arranged in
alphabetical order. If you play a music CD that has not
yet been recorded on the HDD, the
system will automatically begin
recording to the HDD once the disc
is loaded. To turn this f eature of f ,
see page .
The HDD has six playlist f olders f or
user customizing. Each playlist can
be edited by the user, and will store
up to 999 songs. For more
inf ormation on how to edit the user
playlist, see page . For more inf ormation on how to
search f or music on the HDD, see
page .
349 339
344
CONT INUED
Playlists
Original Playlist
User Playlist T rack Search Methods Recording a Music CD to HDD
Audio
Playing Hard Disc Drive (HDD) Audio (Models with navigation syst em)
Features
337
Main MenuTable of Contents
Page 351 of 681

While playing music in the HDD
playback screen, push the interf ace
selector up to select MUSIC
SEARCH. You can search a track by
album, artist, track, playlist, genre,
or album record date, or you can
shuf f le all tracks.
While a track is playing on an
Original Playlist or User Playlist
Playback screen, push the interf ace
selector down. Turn the interf ace
dial and select Add to Playlist, then
press ENTER on the interf ace
selector. After storing music data, you can
customize the original and user
playlists (see page ).
On the Playlist screen, turn the
interf ace dial and select the Playlist
to which the song is to be added,
then press ENTER on the interf ace
selector. You will be returned to the
Playback screen. The audio system, including the
music search f eature Song By
Voice , can be operated by voice
control. See the navigation system
manual f or complete details.
349 Searching the Music
A dding a T rack t o an Original/User
Playlist
Playing Hard Disc Drive (HDD) Audio (Models with navigation syst em)
344
TM
Main MenuTable of Contents
Page 369 of 681

Gracenote makes no representations
or warranties, express or implied,
regarding the accuracy of any
Gracenote Data from in the
Gracenote Servers. Gracenote
reserves the right to delete data
from the Gracenote Servers or to
change data categories f or any cause
that Gracenote deems suf f icient. No
warranty is made that the Gracenote
Software or Gracenote Servers are
error-f ree or that f unctioning of
Gracenote Sof tware or Gracenote
Servers will be uninterrupted.
Gracenote is not obligated to provide
you with new enhanced or additional
data types or categories that
Gracenote may provide in the f uture
and is f ree to discontinue its services
at any time.
Gracenote reserves all rights in
Gracenote Data, the Gracenote
Software, and the Gracenote Servers,
including all ownership rights. Under
no circumstances will Gracenote
become liable f or any payment to
you f or any inf ormation that you
provide. You agree that Gracenote,
Inc. may enf orce its rights under this
Agreement against you directly in its
own name.
The Gracenote service uses a unique
identif ier to track queries f or
statistical purposes. The purpose of a
randomly assigned numeric
identif ier is to allow the Gracenote
service to count queries without
knowing anything about who you are.
For more inf ormation, see the web
page for the Gracenote Privacy
Policy f or the Gracenote service.
The Gracenote Sof tware and each
item of Gracenote Data are licensed
to you ‘‘AS IS.
Page 395 of 681

Turn the dial to select a sound setup
mode, then press ENTER to set your
selection. See page f or more
sound setting inf ormation.
If you receive a call when the
Audio is playing, press the
PICK-UPbuttononthesteering
wheel. The screen and the center
displayswitchtotheHFLmode(see
page ).
Af ter ending the call, press the
HANG-UP button to go back to the
Audio mode. To take the system out of the
Audio mode, press one of
the other source buttons than the
USB/AUX button. When a
compatible audio unit is connected to
the auxiliary input jack, press the
USB/AUX button to select it.
Switching to another mode pauses
the music playing f rom your phone.
309
463
As required by the FCC: This device complies with Part 15 of theFCC rules. Operation is subject to the
f ollowing two conditions: (1) This device may not cause harmf ul interf erence, and(2) this device must accept any
interf erence received, includinginterf erence that may cause undesiredoperation.
Changes or modif ications not expresslyapproved by the party responsible f or
compliance could void the user
Page 398 of 681
For more inf ormation, see page .
Auxiliary input jacks and headphone
connectors f or the rear
entertainment system are on the
back of the center console
compartment.
The auxiliary input jack is inside the
f ront console compartment. The
system will accept auxiliary input
f rom standard audio accessories.
When a compatible audio unit is
connected to the jack, press the AUX
or CD/AUX button to select it.
428
On vehicles with rear entertainment
system
Auxiliary Input Jack
Features
391
Touring model is shown.
Main MenuTable of Contents
Page 407 of 681
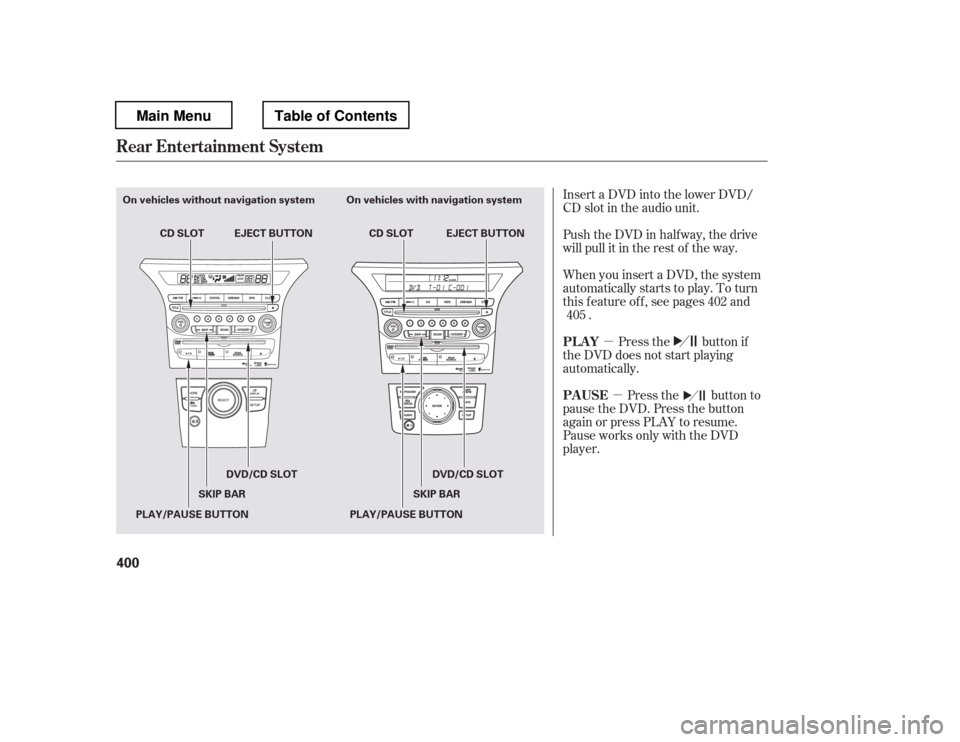
�µ�µ
Insert a DVD into the lower DVD/
CD slot in the audio unit.
Push the DVD in half way, the drive
will pull it in the rest of the way.
When you insert a DVD, the system
automatically starts to play. To turn
this f eature of f , see pages and
.
Press the button if
the DVD does not start playing
automatically.
Press the button to
pause the DVD. Press the button
again or press PLAY to resume.
Pause works only with the DVD
player. 402
405
Rear Entertainment System
PL A Y
PAUSE
400
On vehicles without navigation system On vehicles with navigation syste m
EJECT BUTTON
CD SLOT
DVD/CD SLOT
SKIP BAR
PLAY/PAUSE BUTTON EJECT BUTTON
CD SLOT
PLAY/PAUSE BUTTON SKIP BAR
DVD/CD SLOT
Main MenuTable of Contents
Page 442 of 681
Once the correct zone is displayed,
press the selector knob. The
display then returns to normal.
Find the zone f or your area on the
map (see page ). If the correct
zone is not shown, turn the
selector knob to cycle the zone
lists up or down.
In most areas, there is a variation
between magnetic north and true
north. Zone selection is required so
the compass can compensate f or this
variation. To check and select the
zone, do this:
Turn the ignition switch to the ON
(II) position.
If necessary, press the RETURN
button to return to the previous
display. Pressing the SETUP
button will cancel the compass
setting mode.
Press and hold the SETUP button
f or about 5 seconds. The display
shows you the compass setting
menu items.
Turn the selector knob to select
‘‘ZONE
Page 449 of 681

�µ�µ
�µ
�µ To change the volume level of
HFL, use the audio system volume
knob or the steering wheel volume
controls.
Try to reduce all background
noise. If the microphone picks up
voices other than yours,
commands may be misinterpreted.
Press and
release to answer a call, or press to
go directly to the Phone screen. Press and
release to end or decline a call. Airorwindnoisefromthe
dashboard and side vents and all
windows may interfere with the
microphone. Adjust or close them
as necessary.You can change the system language
to English, French, or Spanish (see
page ).
Press and release
to call a number with a stored voice
tag. Press and release
to cancel a command. Press and release the Talk button
when you want to call a number
using a stored voice tag. Af ter the
beep, speak in a clear, natural tone. 297
Voice Cont rol T ips
HFL Buttons
L anguage Select ion
BluetoothHandsFreeL ink(Models without navigation syst em)
PICK -UP Button
HANG-UP Button
TALK Button
BACK Button
442
BACK BUTTON
TALK BUTTON PICK-UP BUTTON
HANG-UP BUTTON MICROPHONE
EX-L model shown.
Main MenuTable of Contents

. If the correct
zone is not shown, turn the
select")