Page 260 of 441

259
Continued
Features
Bluetooth
® HandsFreeLink
®*
For models with the navigation system, see Navigation System Manual for how to
operate the Bluetooth
® HandsFreeLink
®.
Bluetooth
® HandsFreeLink
® (HFL) allows you to place and receive phone calls using
your vehicle's audio system, without handling your cell phone.
Using HFL
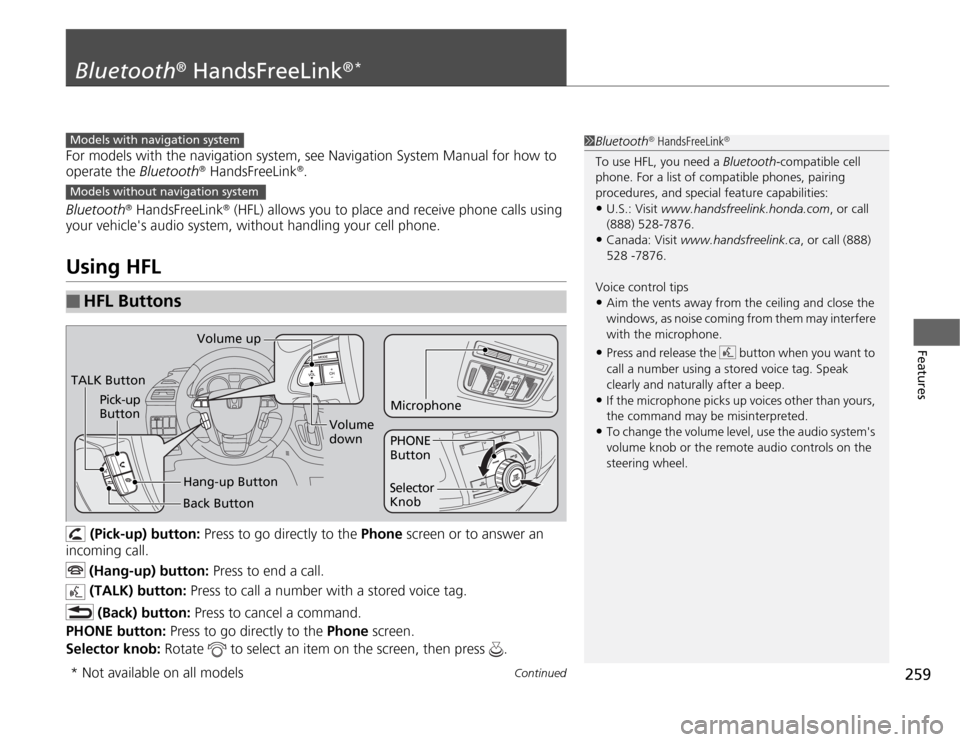
(Pick-up) button: Press to go directly to the Phone screen or to answer an
incoming call.
(Hang-up) button: Press to end a call.
(TALK) button: Press to call a number with a stored voice tag.
(Back) button: Press to cancel a command.
PHONE button: Press to go directly to the Phone screen.
Selector knob: Rotate to select an item on the screen, then press .
■
HFL Buttons
1Bluetooth
® HandsFreeLink
®
To use HFL, you need a Bluetooth-compatible cell
phone. For a list of compatible phones, pairing
procedures, and special feature capabilities:•U.S.: Visit www.handsfreelink.honda.com, or call
(888) 528-7876.•Canada: Visit www.handsfreelink.ca, or call (888)
528 -7876.
Voice control tips•Aim the vents away from the ceiling and close the
windows, as noise coming from them may interfere
with the microphone.•Press and release the button when you want to
call a number using a stored voice tag. Speak
clearly and naturally after a beep.•If the microphone picks up voices other than yours,
the command may be misinterpreted.•To change the volume level, use the audio system's
volume knob or the remote audio controls on the
steering wheel.
Models with navigation systemModels without navigation systemTALK ButtonVolume up
Microphone
Hang-up Button Pick-up
Button
Volume
down
Selector
KnobPHONE
Button
Back Button
* Not available on all models
Page 261 of 441
uuBluetooth
® HandsFreeLink
®*uUsing HFL
260Features
The multi-information display notifies you
when there is an incoming call.
■
HFL Status Display
1Bluetooth
® HandsFreeLink
®
Bluetooth
® Wireless Technology
Bluetooth® name and logos are registered
trademarks owned by Bluetooth SIG, Inc., and any
use of such marks by Honda Motors Co., Ltd., is
under license. Other trademarks and trade names are
those of their respective owners.
HFL Limitations
An incoming call on HFL will interrupt the audio
system when it is playing. It will resume when the call
is ended.
Signal Strength
HFL Mode
Battery Level
Status Roam Status
Call NameBluetooth IndicatorComes on when your
phone is connected to
HFL.
1HFL Status Display
The information that appears on the multi-
information display varies between phone models.
You can change the system language to English,
French, or Spanish.
2Customized Features P. 101
Page 277 of 441
uuBluetooth
® HandsFreeLink
®*uHFL Menus
276Features
You can make calls by inputting any phone number, or by using the imported
phonebook, call history, speed dial entries, or redial.■
Making a Call
1Making a Call
Any voice-tagged speed dial entry can be dialed by
voice from any screen.
Press the button and wait for a beep before
giving a command.
The maximum range between your phone and
vehicles is 30 feet (10 meters).
Once a call is connected, you can hear the voice of
the person you are calling through the audio
speakers.
Page 280 of 441

Continued
279
uuBluetooth
® HandsFreeLink
®*uHFL Menus
Features
■
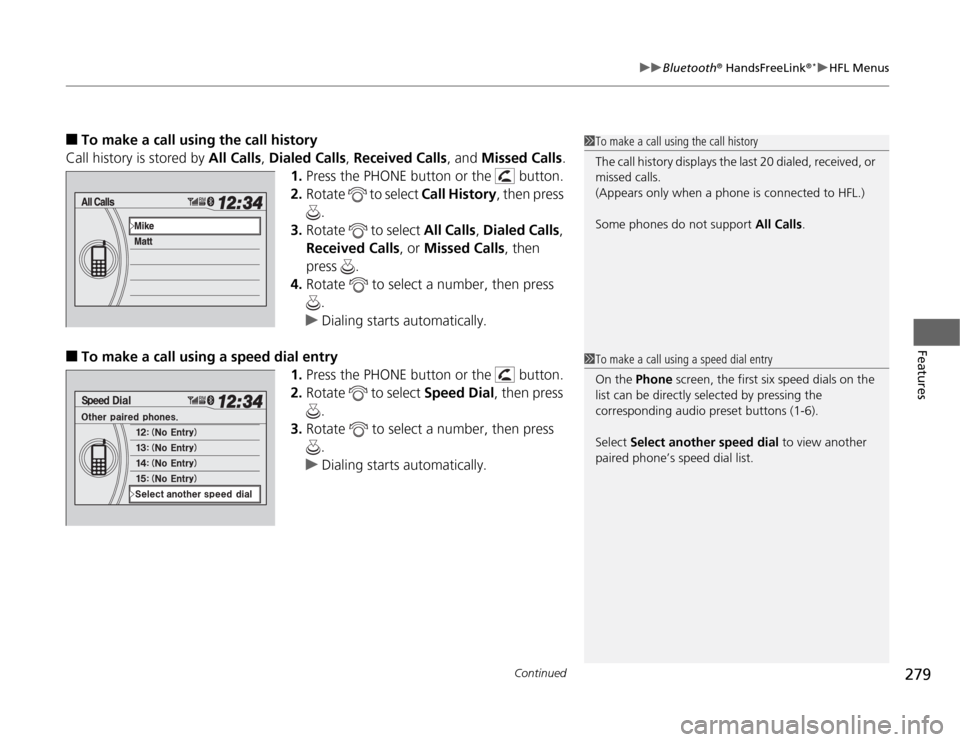
To make a call using the call history
Call history is stored by All Calls, Dialed Calls, Received Calls, and Missed Calls.
1.Press the PHONE button or the button.
2.Rotate to select Call History, then press
.
3.Rotate to select All Calls, Dialed Calls,
Received Calls, or Missed Calls, then
press .
4.Rotate to select a number, then press
.
uDialing starts automatically.
■
To make a call using a speed dial entry
1.Press the PHONE button or the button.
2.Rotate to select Speed Dial, then press
.
3.Rotate to select a number, then press
.
uDialing starts automatically.
1To make a call using the call history
The call history displays the last 20 dialed, received, or
missed calls.
(Appears only when a phone is connected to HFL.)
Some phones do not support All Calls.1To make a call using a speed dial entry
On the Phone screen, the first six speed dials on the
list can be directly selected by pressing the
corresponding audio preset buttons (1-6).
Select Select another speed dial to view another
paired phone’s speed dial list.
Page 284 of 441
283
uuCompass
*uCompass Zone Selection
Features
Compass Zone Selection
1.Turn the ignition switch to ON
(w
.
2.Press and hold the SETUP button until the
display shows the compass setting menu
list.
3.Rotate to select Zone Adjust, then
press . The display shows the current
zone number.
4.Rotate to select the zone number of
your area (See Zone Map), then press .
1Compass Zone SelectionThe zone selection is done to compensate the variation
between magnetic north and true north. If the calibration starts while the audio system is in
use, the display returns to normal after the calibration
is completed,
Zone Number
Zone Map
Guam Island: Zone 8
Puerto Rico: Zone11
Page 322 of 441
321
uuParking Your VehicleuParking Sensor System
*
Continued
Driving
■
When the distance between your vehicle and obstacles behind becomes shorter
*1: At this stage, only the center sensors detect obstacles.Length of the
intermittent
beep
Distance between the Bumper and
Obstacle
Appropriate Indicator
Audio/
navigation
screen
indicator color
Corner Sensors
Center Sensors
Long
—
About 43-28 in
(110-70 cm)
Yellow
Short
About 24-18 in
(60-45 cm)
About 28-22 in
(70-55 cm)
Amber
Very short
About 18-14 in
(45-35 cm)
About 22-18 in
(55-45 cm)
Amber
Continuous
About 14 in (35 cm)
or less
About 18 in (45 cm)
or less
Red
Instrument
panel
Stays on
Multi-
information
display
Stays on
Audio/
navigation
screen
Blinks
Page 323 of 441

uuParking Your VehicleuParking Sensor System
*
322Driving
■
The parking sensor system on audio/navigation screen
•An appropriate indicator blinks when there
are any obstacles around the parking
sensors. The color of the indicator changes
in accordance with the distance between
your vehicle and obstacles.
•An appropriate indicator stays on in red
when there is a problem with the
corresponding parking sensor.
2Parking Sensor Indicator
* P. 77
2Multi-Information Display Warning
and Information Messages* P. 85
1.Make sure that the parking sensor system is not activated. Turn the ignition
switch to LOCK
(0
.
2.Press and hold the parking sensor system button, and turn the ignition switch to
ON
(w
.
3.Keep pressing the button for ten seconds. Release the button when the indicator
in the button flashes.
4.Press the button again. The indicator in the button goes off.
uThe beeper sounds twice. The rear sensors are now turned off.
To turn the rear sensors on again, follow the above procedure. The beeper sounds
three times when the rear sensors come back on.
Models without navigation systemModels without navigation system
■
Turning off All Rear Sensors
1Turning off all Rear Sensors
When you shift to
(R
, the indicator in the parking
sensor system button blinks as a reminder that the
rear sensors have been turned off.
* Not available on all models
Page 324 of 441

323
Driving
Rearview Camera
*
About Your Rearview CameraFor models with the navigation system, see the Navigation System Manual.
The audio/information screen can display your vehicle’s rear view.
The display automatically changes to a rear view when the shift lever is moved to (R
.
The rearview camera has a unique lens that makes objects appear closer or further
than they actually are.
■
Rearview Camera Display Area
1About Your Rearview Camera
The rearview the camera is view restricted. You
cannot see the corner ends of the bumper or what is
underneath the bumper. Its unique lens also makes
closer or farther than they actually are.
Visually confirm that it is safe to drive on before
backing up. Do not rely on the rearview display which
does not give you all information about conditions at
the back of your vehicle.
Certain conditions (such as weather, lighting, and
high temperatures) may also restrict the rear view.
Use a soft, moist cloth to keep the lens clean and free
of debris.
To turn the guide lines on or off, press and hold the
RETURN button for about three seconds.
If you turn the guide lines off, they remain off until
you turn them back on.
Rotate to adjust the brightness of the rearview
camera.
Models with navigation systemModels without navigation systemScreen display
Bumper Guidelines
Approx. 118 in (3 m)
Approx. 79 in (2 m)
Approx. 39 in (1 m)
Approx. 20 in (0.5 m)
Approx. 118 in (3 m) Approx. 79 in (2 m) Approx. 39 in (1 m)Camera* Not available on all models