Page 171 of 286

uuWhen DrivinguShifting
170Driving
■
Second gear lock mode
If you pull the
(+
paddle shifter while stopped or driving at 6 mph (10 km/h) or less,
the gear position will be locked in 2nd gear. This makes it easier to pull away on
slippery surfaces such as snow covered roads.
To cancel the 2nd gear lock mode, pull the
(-
paddle shifter, or move the shift lever
from
(S
to
(D
.
■
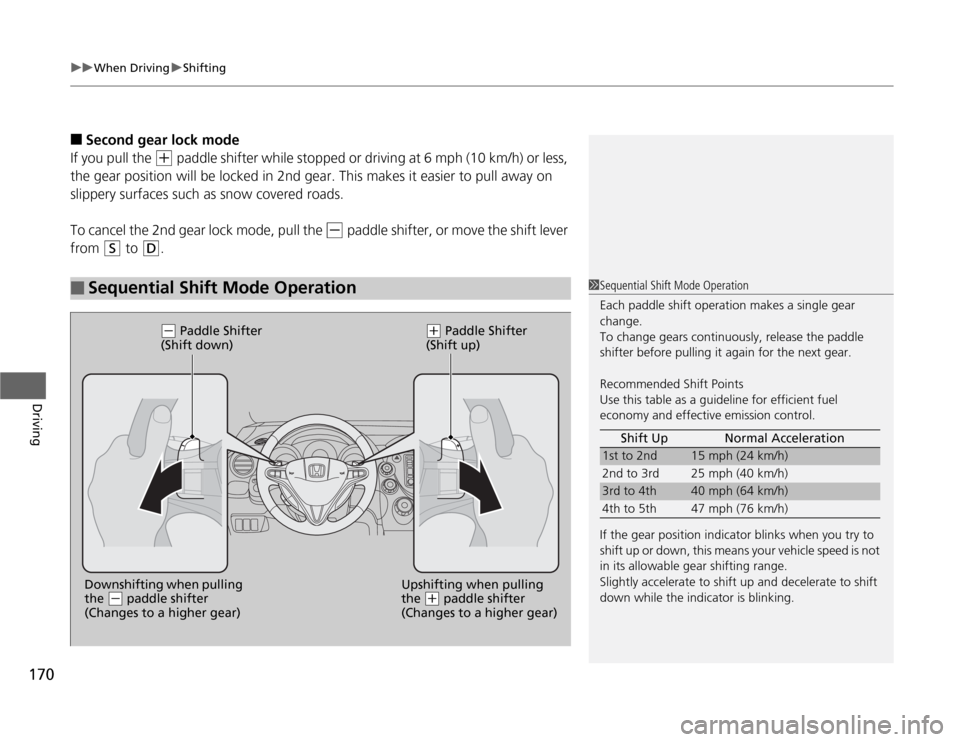
Sequential Shift Mode Operation
1Sequential Shift Mode Operation
Each paddle shift operation makes a single gear
change.
To change gears continuously, release the paddle
shifter before pulling it again for the next gear.
Recommended Shift Points
Use this table as a guideline for efficient fuel
economy and effective emission control.
If the gear position indicator blinks when you try to
shift up or down, this means your vehicle speed is not
in its allowable gear shifting range.
Slightly accelerate to shift up and decelerate to shift
down while the indicator is blinking.Shift Up Normal Acceleration
1st to 2nd
15 mph (24 km/h)
2nd to 3rd 25 mph (40 km/h)
3rd to 4th
40 mph (64 km/h)
4th to 5th 47 mph (76 km/h)
Upshifting when pulling
the
(+
paddle shifter
(Changes to a higher gear) Downshifting when pulling
the
(-
paddle shifter
(Changes to a higher gear)
(-
Paddle Shifter
(Shift down)
(+
Paddle Shifter
(Shift up)
Page 172 of 286
171
uuWhen DrivinguShifting
Continued
Driving
ShiftingFully depress the clutch pedal to operate the shift lever and change gears, then
slowly release the pedal.
Depress the clutch pedal, and pause for a few seconds before shifting into
(R
, or
shift into one of the forward gears for a moment. This stops the gears so they do not
“grind.”
■
Shift Lever Operation
Manual transmission models
1Shifting
NOTICEDo not shift to
(R
before the vehicle comes to a
complete stop.
Shifting to
(R
before stopping can damage the
transmission.
NOTICEBefore downshifting, make sure the engine will not
go into the tachometer’s red zone. Should this occur,
it can severely damage your engine.
Page 178 of 286

177
uuWhen DrivinguVSA® (Vehicle Stability Assist), aka ESC (Electronic Stability Control), System
Driving
This button is on the driver side control panel.
To turn the VSA® system on and off, press and
hold it until you hear a beep.
VSA® will stop and the indicator will come on.
To turn it on again, press the (VSA® OFF)
button until you hear a beep.
VSA® is turned on every time you start the
engine, even if you turned it off the last time
you drove the vehicle.
■
VSA® On and Off
1VSA® (Vehicle Stability Assist), aka ESC (Electronic Stability Control), System
Without VSA®, your vehicle will have normal braking
and cornering ability, but it will not have VSA®
traction and stability enhancement.
In certain unusual conditions when your vehicle gets
stuck in shallow mud or fresh snow, it may be easier
to free it with the VSA® temporarily switched off.
When the VSA® system is off, the traction control
system is also off. You should only attempt to free
your vehicle with the VSA® off if you are not able to
free it when the VSA® is on.
Immediately after freeing your vehicle, be sure to
switch VSA® on again. We do not recommend driving
your vehicle with the VSA® and traction control
systems switched off.
If the low tire pressure
* or TPMS indicator
* comes on
or blinks, the VSA® system comes on automatically. In
this case, you cannot turn the system off by pressing
the button.
You may hear a motor sound coming from the
engine compartment while system checks are being
performed immediately after starting the engine or
while driving. This is normal.
VSA® OFF Indicator
* Not available on all models
Page 179 of 286
178
uuWhen DrivinguTPMS (Tire Pressure Monitoring System)
Driving
TPMS (Tire Pressure Monitoring System)
Monitors the tire pressure while you are
driving. If your vehicle’s tire pressure becomes
significantly low, the low tire pressure
indicator comes on.
U.S. models only
1TPMS (Tire Pressure Monitoring System)
Conditions such as low ambient temperature and
altitude change directly affect tire pressure and can
trigger the low tire pressure indicator to come on.
2If the Low Tire Pressure Indicator Comes
On P. 259
Tire pressure checked and inflated in:•Warm weather can become under-inflated in
colder weather.•Cold weather can become over-inflated in warmer
weather.
The low tire pressure indicator will not come on as a
result of over inflation.
Page 180 of 286

179
uuWhen DrivinguTire Pressure Monitoring System (TPMS) - Required Federal Explanation
Continued
Driving
Tire Pressure Monitoring System (TPMS) - Required Federal ExplanationEach tire, including the spare (if provided), should be checked
monthly when cold and inflated to the inflation pressure
recommended by the vehicle manufacturer on the vehicle placard
or tire inflation pressure label.
(If your vehicle has tires of a different size than the size indicated
on the vehicle placard or tire inflation pressure label, you should
determine the proper tire inflation pressure for those tires.)
As an added safety feature, your vehicle has been equipped with
a tire pressure monitoring system (TPMS) that illuminates a low
tire pressure telltale
when one or more of your tires is significantly under-inflated.
Accordingly, when the low tire pressure telltale illuminates, you
should stop and check your tires as soon as possible, and inflate
them to the proper pressure.
Driving on a significantly under-inflated tire causes the tire to
overheat and can lead to tire failure. Under-inflation also reduces
fuel efficiency and tire tread life, and may affect the vehicle’s
handling and stopping ability.U.S. models
Page 192 of 286

191
Maintenance
This chapter discusses basic maintenance.
Before Performing Maintenance
Inspection and Maintenance ............ 192
Safety When Performing Maintenance .... 193Parts and Fluids Used in Maintenance
Service ........................................... 194
Maintenance Minder
TM
..................... 195
Maintenance Under the Hood
Maintenance Items Under the Hood ..... 199Opening the Hood ........................... 200
Recommended Engine Oil ................ 201
Oil Check ......................................... 202
Adding Engine Oil ............................ 203Changing the Engine Oil and Oil Filter..... 204
Engine Coolant ................................ 206
Transmission Fluid ............................ 208
Brake/Clutch Fluid ............................ 210
Refilling Window Washer Fluid......... 211
Replacing Light Bulbs....................... 212
Checking and Maintaining Wiper
Blades.......................................... 218Checking and Maintaining Tires
Checking Tires ................................. 222
Tire and Loading Information Label .. 223
Tire Labeling .................................... 223
DOT Tire Quality Grading (U.S. Vehicles).. 225Wear Indicators................................ 227Tire Service Life ................................ 227
Tire and Wheel Replacement ........... 228
Tire Rotation .................................... 229
Winter Tires ..................................... 230
Battery............................................... 231
Remote Transmitter Care
*
Replacing the Battery ....................... 232
Heating and Cooling
* System
Maintenance................................... 233
Cleaning
Interior Care .................................... 234
Exterior Care.................................... 235
* Not available on all models
Page 193 of 286

192Maintenance
Before Performing MaintenanceInspection and MaintenanceFor your safety, perform all listed inspections and maintenance to keep your vehicle
in good condition. If you become aware of any abnormality (noise, smell, insufficient
brake fluid, oil residue on the ground, etc.), have your vehicle inspected by a dealer.
(Note, however, that service at a dealer is not mandatory to keep your warranties in
effect.) Refer to the separate maintenance booklet for detailed maintenance and
inspection information.■
Daily inspections
Perform inspections before long distance trips, when washing the vehicle, or when
refueling.
■
Periodic inspections
•Check the automatic transmission fluid level monthly.
2Automatic Transmission Fluid P. 208
•Check the brake fluid level monthly.
2Brake/Clutch Fluid P. 210
•Check the tire pressure monthly. Examine the tread for wear and foreign objects.
2Checking and Maintaining Tires P. 222
•Check the operation of the exterior lights monthly.
2Replacing Light Bulbs P. 212
•Check the condition of the wiper blades at least every six months.
2Checking and Maintaining Wiper Blades P. 218
■
Types of Inspection and Maintenance
1Inspection and Maintenance
Maintenance, replacement, or repair of
emissions control devices and systems may be
done by any automotive repair establishment or
individuals using parts that are “certified” to
EPA standards.
According to state and federal regulations, failure to
perform maintenance on the maintenance main
items marked with # will not void your emissions
warranties. However, all maintenance services should
be performed in accordance with the intervals
indicated by the information display.
2Maintenance Service Items P. 197
If you want to perform complex maintenance tasks
that require more skills and tools, you can purchase a
subscription to the Service Express website at
www.techinfo.honda.com.
2Authorized Manuals P. 277
If you want to perform maintenance yourself, make
sure that you have the necessary tools and skills first.
After performing maintenance, update the records in
the separate maintenance booklet.
U.S. models
Page 197 of 286

196
uuMaintenance Minder
TMuTo Use Maintenance Minder
TM
Maintenance
To switch the display, press the (select/reset) knob.■
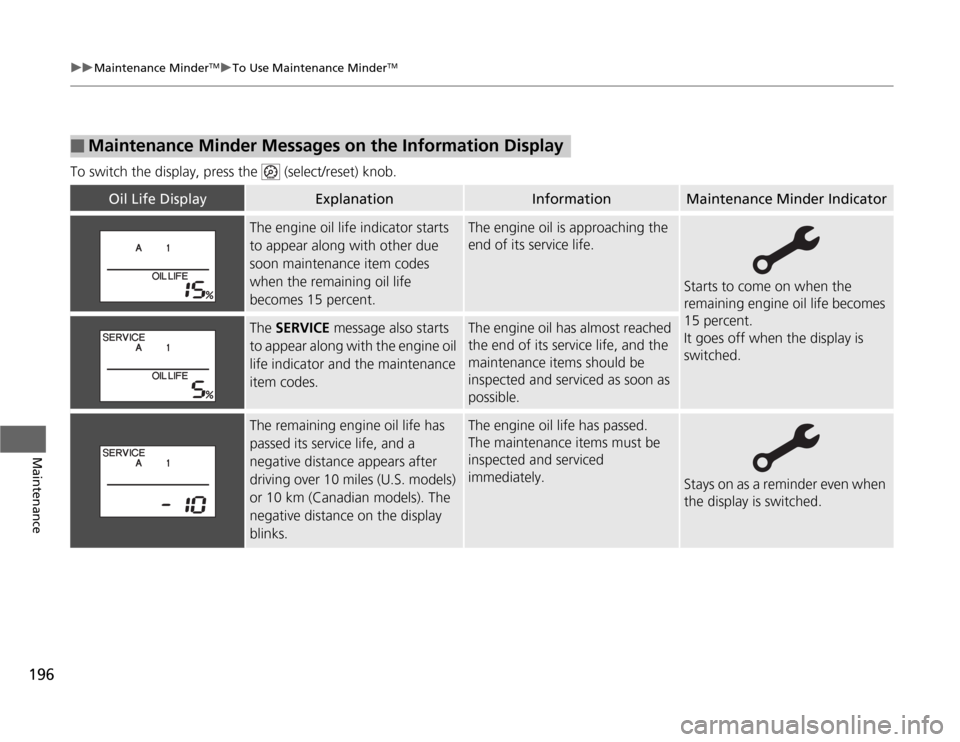
Maintenance Minder Messages on the Information Display
Oil Life Display
Explanation
Information
Maintenance Minder Indicator
The engine oil life indicator starts
to appear along with other due
soon maintenance item codes
when the remaining oil life
becomes 15 percent.
The engine oil is approaching the
end of its service life.
Starts to come on when the
remaining engine oil life becomes
15 percent.
It goes off when the display is
switched.
The SERVICE message also starts
to appear along with the engine oil
life indicator and the maintenance
item codes.
The engine oil has almost reached
the end of its service life, and the
maintenance items should be
inspected and serviced as soon as
possible.
The remaining engine oil life has
passed its service life, and a
negative distance appears after
driving over 10 miles (U.S. models)
or 10 km (Canadian models). The
negative distance on the display
blinks.
The engine oil life has passed.
The maintenance items must be
inspected and serviced
immediately.
Stays on as a reminder even when
the display is switched.