Page 305 of 424
Black plate (39,1)GMC Savana Owner Manual - 2012 - 2nd - 11/11/11
Vehicle Care 10-39
Front Turn Signal,
Sidemarker, and Parking
Lamps
A. Front Parking and TurnSignal Lamp
B. Front Sidemarker Lamp To replace the front turn signal,
sidemarker, and/or parking lamp
bulb(s):
1. Use a small tool to unlatch the
outboard clip on the lamp by
pushing inboard and prying the
lamp assembly forward.
2. Remove the lamp from the grille.
3. Turn the bulb socket counterclockwise one quarter
turn and remove it from the lamp
assembly.
4. Remove the bulb from the socket by pulling it straight out.
5. Replace the bulb.
6. Turn the bulb socket clockwise to reinstall it in the lamp
assembly. 7. Reinstall the lamp assembly into
the grille until the outboard clip
snaps into place.
Taillamps
To replace a taillamp/turn signal
lamp or back‐up lamp bulb:
1. Remove the two inboard nuts
from the inside of the taillamp
assembly.
Page 306 of 424
Black plate (40,1)GMC Savana Owner Manual - 2012 - 2nd - 11/11/11
10-40 Vehicle Care
2. The third nut (C) is under theapplique piece (B) above the
lamp. Remove the two inboard
applique nuts. Pull the
applique (B) straight rearward
slightly to clear the studs. Then
rotate the applique (B) just far
enough to gain access to the
outer push pins (A).
3. Carefully disconnect the push pins (A) from the applique
bracket 4. Remove the third nut (C) from
the upper outboard side of
the lamp.
5. Remove the taillamp assembly from the vehicle.
6. Remove the taillamp/turn signallamp (A) or back‐up lamp (B)
bulb socket by turning it
counterclockwise one quarter
turn and pulling it out of the lamp
assembly. 7. Remove the bulb by pulling it
straight out.
8. Push the new bulb into the socket.
9. Reinstall the bulb socket by turning it clockwise into the lamp
assembly.
10. Reverse Steps 1 through 5 to reinstall the taillamp assembly
and applique.
Page 307 of 424

Black plate (41,1)GMC Savana Owner Manual - 2012 - 2nd - 11/11/11
Vehicle Care 10-41
Center High-Mounted
Stoplamp (CHMSL)
The Center High-Mounted Stoplamp
(CHMSL) is located above the rear
doors at the center of the vehicle.
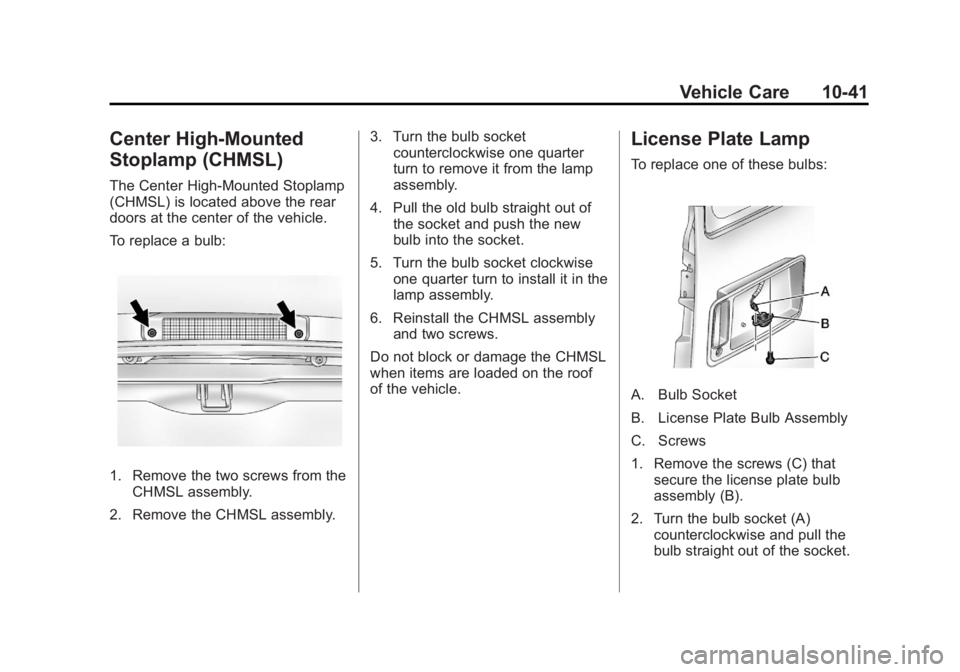
To replace a bulb:
1. Remove the two screws from theCHMSL assembly.
2. Remove the CHMSL assembly. 3. Turn the bulb socket
counterclockwise one quarter
turn to remove it from the lamp
assembly.
4. Pull the old bulb straight out of the socket and push the new
bulb into the socket.
5. Turn the bulb socket clockwise one quarter turn to install it in the
lamp assembly.
6. Reinstall the CHMSL assembly and two screws.
Do not block or damage the CHMSL
when items are loaded on the roof
of the vehicle.
License Plate Lamp
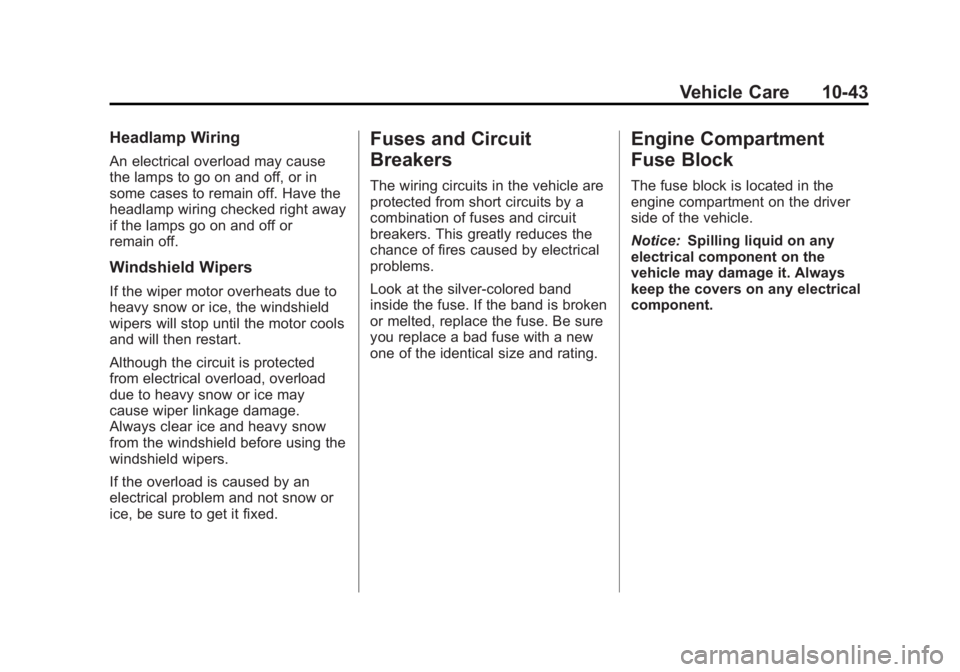
To replace one of these bulbs:
A. Bulb Socket
B. License Plate Bulb Assembly
C. Screws
1. Remove the screws (C) that secure the license plate bulb
assembly (B).
2. Turn the bulb socket (A) counterclockwise and pull the
bulb straight out of the socket.
Page 309 of 424

Black plate (43,1)GMC Savana Owner Manual - 2012 - 2nd - 11/11/11
Vehicle Care 10-43
Headlamp Wiring
An electrical overload may cause
the lamps to go on and off, or in
some cases to remain off. Have the
headlamp wiring checked right away
if the lamps go on and off or
remain off.
Windshield Wipers
If the wiper motor overheats due to
heavy snow or ice, the windshield
wipers will stop until the motor cools
and will then restart.
Although the circuit is protected
from electrical overload, overload
due to heavy snow or ice may
cause wiper linkage damage.
Always clear ice and heavy snow
from the windshield before using the
windshield wipers.
If the overload is caused by an
electrical problem and not snow or
ice, be sure to get it fixed.
Fuses and Circuit
Breakers
The wiring circuits in the vehicle are
protected from short circuits by a
combination of fuses and circuit
breakers. This greatly reduces the
chance of fires caused by electrical
problems.
Look at the silver-colored band
inside the fuse. If the band is broken
or melted, replace the fuse. Be sure
you replace a bad fuse with a new
one of the identical size and rating.
Engine Compartment
Fuse Block
The fuse block is located in the
engine compartment on the driver
side of the vehicle.
Notice:Spilling liquid on any
electrical component on the
vehicle may damage it. Always
keep the covers on any electrical
component.
Page 312 of 424
Black plate (46,1)GMC Savana Owner Manual - 2012 - 2nd - 11/11/11
10-46 Vehicle Care
Mini Fuse Usage67 Daytime Running
Lamps 1 (UPLVL
+V22) (If
Equipped)
68 Auxiliary Stop
Lamps
69 Trailer Stop Lamps
70 Spare
71 Fuel Heater/Flex
Fuel Sensor
72 Body Control
Module 6
73 Lighter/Data Link
Connection
75 V6 Fuel Injectors
76 Spare
77 Oxygen Sensor
2 (Pre) Mini Fuse Usage
78 Engine Control
Module Powertrain
79 Even Ignition/
Injectors
J‐Case Fuse Usage 1 ABS Motor
2 ABS Module
41 Spare
42 Trailer Wiring
43 Fan High
44 Starter Solenoid
45 Engine Control
Module/Powertrain
46 Spare
47 Fan Lo
74 Front Blower Relay
Usage
15 Run/Crank
37 Spare
38 Fuel Pump
39 Crank
40 Air Conditioning
Compressor
48 Fan High
49 Powertrain
50 Spare
57 Fan Low
60 Fan Control
Floor Console Fuse Block
The floor console fuse block is
located under the driver seat.
Page 315 of 424
Black plate (49,1)GMC Savana Owner Manual - 2012 - 2nd - 11/11/11
Vehicle Care 10-49
Mini‐Fuse UsageF30 Upfitter Courtesy
Lamps
F31 Front Door Lock
F32 Rear Door Lock
F33 Cargo Door Unlock
F34 Passenger Door
Unlock
F35 Rear Passenger
Door Unlock
F36 Driver Door Unlock
F37 Empty
F38 Empty J‐Case Fuse Usage
F16 Upfitter Auxiliary 1
F24 Empty
F28 Upfitter Auxiliary 2
Reading Lamps
F29 Rear Blower
Relays Usage K1 Run (High Current
Micro)
K2 Empty (High
Current Micro)
K3 Park Lamps (High
Current Micro)
K4 Upfitter Auxiliary 2
(High Current Mini) Relays Usage
K5 Rear Defogger
(High Current
Micro)
K6 Retained
Accessory Power
(RAP) (High
Current Micro)
Circuit
Breaker Usage
CB1 Power Seats
CB2 Power Windows
Page 328 of 424

Black plate (62,1)GMC Savana Owner Manual - 2012 - 2nd - 11/11/11
10-62 Vehicle Care
TPMS Sensor Matching
Process
Each TPMS sensor has a unique
identification code. The identification
code needs to be matched to a new
tire/wheel position after rotating the
vehicle’s tires or replacing one or
more of the TPMS sensors. Also,
the TPMS sensor matching process
should be performed after replacing
a spare tire with a road tire
containing the TPMS sensor. The
malfunction light and the DIC
message should go off at the next
ignition cycle. The sensors are
matched to the tire/wheel positions,
using a TPMS relearn tool, in the
following order: driver side front tire,
passenger side front tire, passenger
side rear tire, and driver side rear.
See your dealer for service or to
purchase a relearn tool.
There are two minutes to match the
first tire/wheel position, and
five minutes overall to match all four
tire/wheel positions. If it takes
longer, the matching process stops
and must be restarted.The TPMS sensor matching
process is:
1. Set the parking brake.
2. Turn the ignition to ON/RUN with
the engine off.
3. Press the Remote Keyless Entry (RKE) transmitter's LOCK and
UNLOCK buttons at the same
time for approximately
five seconds. The horn sounds
twice to signal the receiver is in
relearn mode and TIRE
LEARNING ACTIVE message
displays on the DIC screen.
If the vehicle does not have
RKE, press the Driver
Information Center (DIC) vehicle
information button until the
PRESS
VTO RELEARN TIRE
POSITIONS message displays.
The horn sounds twice to signal
the receiver is in relearn mode
and TIRE LEARNING ACTIVE
message displays on the DIC
screen. If the vehicle does not have RKE
or DIC buttons, press the trip
odometer reset stem located on
the instrument panel cluster until
the PRESS
VTO RELEARN
TIRE POSITIONS message
displays. The horn sounds twice
to signal the receiver is in
relearn mode and TIRE
LEARNING ACTIVE message
displays on the DIC screen.
4. Start with the driver side front tire.
5. Place the relearn tool against the tire sidewall, near the valve
stem. Then press the button to
activate the TPMS sensor.
A horn chirp confirms that the
sensor identification code has
been matched to this tire and
wheel position.
6. Proceed to the passenger side front tire, and repeat the
procedure in Step 5.
Page 329 of 424

Black plate (63,1)GMC Savana Owner Manual - 2012 - 2nd - 11/11/11
Vehicle Care 10-63
7. Proceed to the passenger siderear tire, and repeat the
procedure in Step 5.
8. Proceed to the driver side rear tire, and repeat the procedure in
Step 5. The horn sounds two
times to indicate the sensor
identification code has been
matched to the driver side rear
tire, and the TPMS sensor
matching process is no longer
active. The TIRE LEARNING
ACTIVE message on the DIC
display screen goes off.
9. Turn the ignition switch to LOCK/OFF.
10. Set all four tires to the recommended air pressure
level as indicated on the Tire
and Loading Information label.Tire Inspection
We recommend that the tires,
including the spare tire, if the
vehicle has one, be inspected
for signs of wear or damage at
least once a month.
Replace the tire if:
.The indicators at three or
more places around the tire
can be seen.
.There is cord or fabric
showing through the tire's
rubber.
.The tread or sidewall is
cracked, cut, or snagged
deep enough to show cord or
fabric.
.The tire has a bump, bulge,
or split.
.The tire has a puncture, cut,
or other damage that cannot
be repaired well because of
the size or location of the
damage.
Tire Rotation
Tires should be rotated every
12 000 km (7,500 mi). See
Maintenance Schedule on
page 11‑3.
Tires are rotated to achieve a
uniform wear for all tires. The
first rotation is the most
important.