2012 FIAT FREEMONT radiator
[x] Cancel search: radiatorPage 70 of 332

Defrost Mode
Air comes from the windshield and side window
demist outlets. Use Defrost mode with maxi-
mum temperature settings for best windshield and side
window defrosting and defogging. When the Defrost
mode is selected, the blower level may increase.
13. SYNC
Press the Sync soft-key to toggle the Sync feature
On/Off. The Sync indicator is illuminated when this
feature is enabled. Sync is used to synchronize the
passenger and rear temperature setting with the driver
temperature setting. Changing the passenger tempera-
ture setting while in Sync will automatically exit this
feature.
NOTE: When SYNC is ON and the driver selects
Mix or Defrost Mode, Rear mode will be Floor.
14. Temperature Control (Manual Temperature
Control Only)
Press the temperature soft-key to regulate the tem-
perature of the air inside the passenger compartment.
Moving the temperature bar into the red area, indicates
warmer temperatures. Moving the temperature bar
into the blue area indicates cooler temperatures.
CLIMATE CONTROL FUNCTIONS
A/C (Air Conditioning)
The Air Conditioning (A/C) button allows the opera-
tor to manually activate or deactivate the air condition-
ing system. When the air conditioning system is turned on, cool dehumidified air will flow through the outlets
into the cabin. For improved fuel economy, press the
A/C button to turn off the air conditioning and manu-
ally adjust the blower and airflow mode settings.
NOTE:
• For Manual Climate Controls, if the system is in Mix
or Defrost Mode, the A/C can be turned off.
• If fog or mist appears on the windshield or side glass,
select Defrost mode and increase blower speed.
• If your air conditioning performance seems lower
than expected, check the front of the A/C condenser
(located in front of the radiator), for an accumulation of
dirt or insects. Clean with a gentle water spray from
behind the radiator and through the condenser. Fabric
front fascia protectors may reduce airflow to the con-
denser, reducing air conditioning performance.
Recirculation Control
When outside air contains smoke, odors, or
high humidity, or if rapid cooling is desired,
you may wish to recirculate interior air by
pressing the Recirculation control button.
The recirculation indicator will illuminate when this
button is selected. Push the button a second time to
turn off the Recirculation mode and allow outside air
into the vehicle.
64
KNOWING YOUR
VEHICLE
SAFETY
STARTING AND
DRIVING
WARNING LIGHTSAND
MESSAGES
IN AN
EMERGENCY
SERVICING AND
CARETECHNICAL
SPECIFICATIONSCONTENTS
Page 238 of 332

WARNING!
Take care to avoid the radiator cooling
fan whenever the hood is raised. It can
start anytime the ignition switch is ON.You can
be injured by moving fan blades.
Remove any metal jewelry such as watch bands
or bracelets that might make an inadvertent
electrical contact .You could be seriously injured.
Batteries contain sulfuric acid that can burn
your skin or eyes and generate hydrogen gas
which is flammable and explosive. Keep open
flames or sparks away from the battery.
1. Set the parking brake, shift the automatic transmis- sion into PARK and turn the ignition to LOCK.
2. Turn off the heater, radio, and all unnecessary elec- trical accessories.
3. Remove the protective cover over the remote posi- tive (+)battery post. To remove the cover, press
the locking tab and pull upward on the cover.
4. If using another vehicle to jump-start the battery, park the vehicle within the jumper cables reach, set
the parking brake and make sure the ignition is OFF.
WARNING!
Do not allow vehicles to touch each
other as this could establish a ground
connection and personal injury could result .
JUMP-STARTING PROCEDURE
WARNING!
Failure to follow this procedure could
result in personal injury or property
damage due to battery explosion.Failure to follow these procedures could
result in damage to the charging system
of the booster vehicle or the discharged
vehicle.
1. Connect the positive (+)end of the jumper cable to
the remote positive (+)post of the discharged
vehicle.
2. Connect the opposite end of the positive (+)
jumper cable to the positive (+)post of the booster
battery.
3. Connect the negative end (-)of the jumper cable to
the negative (-)post of the booster battery.
4. Connect the opposite end of the negative (-)
jumper cable to the remote negative (-)post of the
vehicle with the discharged battery.
232
KNOWING YOUR
VEHICLE
SAFETY
STARTING AND
DRIVING
WARNING LIGHTSAND
MESSAGES
IN AN
EMERGENCY
SERVICING AND
CARETECHNICAL
SPECIFICATIONSCONTENTS
Page 263 of 332
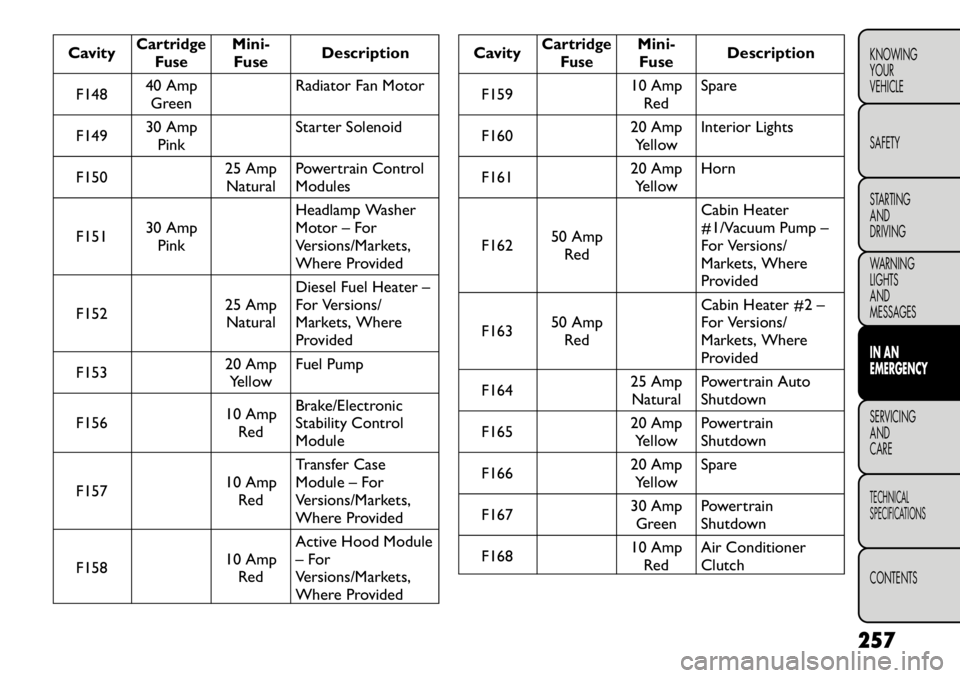
Cavity
CartridgeFuse
Mini-Fuse Description
F148 40 Amp
Green Radiator Fan Motor
F149 30 Amp
Pink Starter Solenoid
F150 25 Amp
Natural Powertrain Control Modules
F151 30 Amp
Pink Headlamp Washer
Motor – For
Versions/Markets,
Where Provided
F152 25 Amp
Natural Diesel Fuel Heater –
For Versions/
Markets, Where
Provided
F153 20 Amp
Yellow Fuel Pump
F156 10 Amp
Red Brake/Electronic
Stability ControlModule
F157 10 Amp
Red Transfer Case
Module – For
Versions/Markets,
Where Provided
F158 10 Amp
Red Active Hood Module
– For
Versions/Markets,
Where Provided
Cavity
Cartridge
Fuse
Mini-Fuse Description
F159 10 Amp
Red Spare
F160 20 Amp
Yellow Interior Lights
F161 20 Amp
Yellow Horn
F162 50 Amp
Red Cabin Heater
#1/Vacuum Pump –
For Versions/
Markets, Where
Provided
F163 50 Amp
Red Cabin Heater #2 –
For Versions/
Markets, Where
Provided
F164 25 Amp
Natural Powertrain Auto
Shutdown
F165 20 Amp
Yellow Powertrain
Shutdown
F166 20 Amp
Yellow Spare
F167 30 Amp
Green Powertrain
Shutdown
F168 10 Amp
Red Air Conditioner
Clutch
257
KNOWING
YOURVEHICLE SAFETY
STARTING ANDDRIVING
WARNING LIGHTSAND
MESSAGESIN AN
EMERGENCYSERVICING AND
CARETECHNICAL
SPECIFICATIONSCONTENTS
Page 284 of 332

Rear Wiper Removal/Installation (for
versions/markets, where provided)
1. Lift the pivot cap on the rear wiper arm upward, thiswill allow the rear wiper blade to be raised off of the
liftgate glass. (fig. 181)
NOTE: The rear wiper arm cannot be raised fully
upward unless the pivot cap is raised first.
2. Lift the rear wiper arm upward to raise the wiper blade off of the liftgate glass.
3. Grab the bottom of the wiper blade and rotate it forward to unsnap the blade pivot pin from the
wiper blade holder. (fig. 182) 4. Install the wiper blade pivot pin into the wiper blade
holder at the end of the wiper arm, and firmly press
the wiper blade until it snaps into place.
5. Lower the wiper blade and snap the pivot cap into place.
ADDING WASHER FLUID
The windshield washer and the rear window washer
share the same fluid reservoir. The fluid reservoir is
located in the engine compartment. Be sure to check
the fluid level in the reservoir at regular intervals. Fill
the reservoir with windshield washer solvent (not
radiator antifreeze) and operate the system for a few
seconds to flush out the residual water.(fig. 181) 1 — Wiper Arm
2 — Pivot Cap
(fig. 182)1 — Wiper Blade
2 — Blade Pivot Pin
3 — Wiper Arm
4 — Wiper Blade Holder
278
KNOWING YOUR
VEHICLE
SAFETY
STARTING AND
DRIVING
WARNING LIGHTSAND
MESSAGES
IN AN
EMERGENCYSERVICING AND
CARETECHNICAL
SPECIFICATIONSCONTENTS
Page 286 of 332
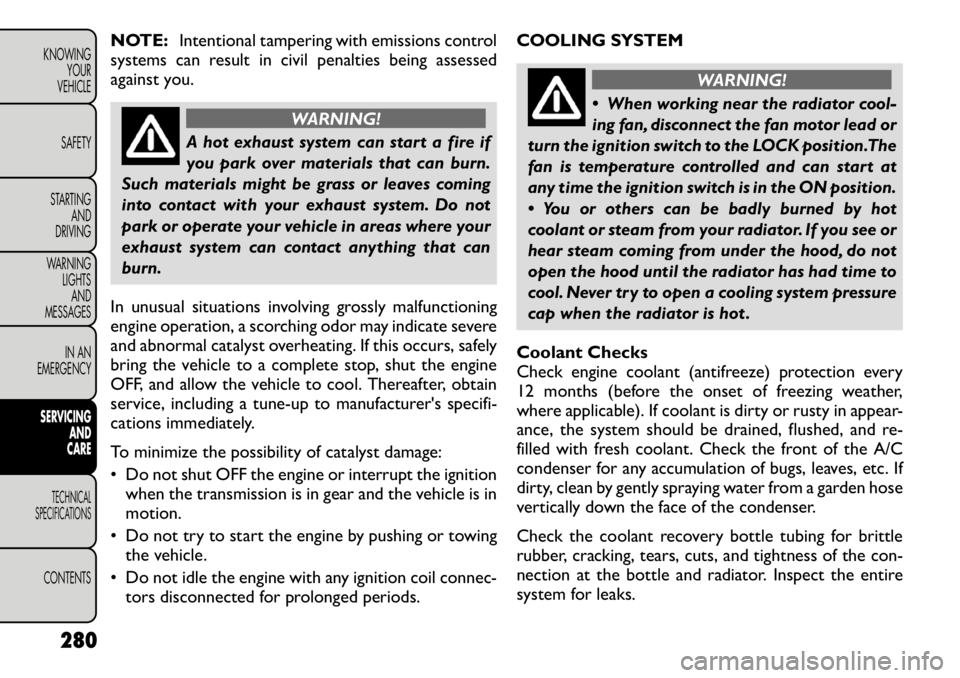
NOTE:Intentional tampering with emissions control
systems can result in civil penalties being assessed
against you.
WARNING!
A hot exhaust system can start a fire if
you park over materials that can burn.
Such materials might be grass or leaves coming
into contact with your exhaust system. Do not
park or operate your vehicle in areas where your
exhaust system can contact anything that canburn.
In unusual situations involving grossly malfunctioning
engine operation, a scorching odor may indicate severe
and abnormal catalyst overheating. If this occurs, safely
bring the vehicle to a complete stop, shut the engine
OFF, and allow the vehicle to cool. Thereafter, obtain
service, including a tune-up to manufacturer's specifi-
cations immediately.
To minimize the possibility of catalyst damage:
• Do not shut OFF the engine or interrupt the ignition when the transmission is in gear and the vehicle is in motion.
• Do not try to start the engine by pushing or towing the vehicle.
• Do not idle the engine with any ignition coil connec- tors disconnected for prolonged periods. COOLING SYSTEM
WARNING!
When working near the radiator cool-
ing fan, disconnect the fan motor lead or
turn the ignition switch to the LOCK position.The
fan is temperature controlled and can start at
any time the ignition switch is in the ON position.
You or others can be badly burned by hot
coolant or steam from your radiator. If you see or
hear steam coming from under the hood, do not
open the hood until the radiator has had time to
cool. Never try to open a cooling system pressure
cap when the radiator is hot .
Coolant Checks
Check engine coolant (antifreeze) protection every
12 months (before the onset of freezing weather,
where applicable). If coolant is dirty or rusty in appear-
ance, the system should be drained, flushed, and re-
filled with fresh coolant. Check the front of the A/C
condenser for any accumulation of bugs, leaves, etc. If
dirty, clean by gently spraying water from a garden hose
vertically down the face of the condenser.
Check the coolant recovery bottle tubing for brittle
rubber, cracking, tears, cuts, and tightness of the con-
nection at the bottle and radiator. Inspect the entire
system for leaks.
280
KNOWING YOUR
VEHICLE
SAFETY
STARTING AND
DRIVING
WARNING LIGHTSAND
MESSAGES
IN AN
EMERGENCYSERVICING AND
CARETECHNICAL
SPECIFICATIONSCONTENTS
Page 287 of 332

Cooling System – Drain, Flush, And Refill
Refer to the “Maintenance Schedule” for the proper
maintenance intervals.
If the solution is dirty or contains a considerable
amount of sediment, clean and flush with a reliable
cooling system cleaner. Follow with a thorough rinsing
to remove all deposits and chemicals. Properly dispose
of the old engine coolant (antifreeze) solution.
Selection Of Coolant – Gasoline Engine
Use only the manufacturer's recommended coolant.
Refer to “Fluids, Lubricants, and Genuine Parts” in
“Technical Specifications” for further information.
Mixing of coolants other than specified
engine coolants (antifreeze), may result
in engine damage and may decrease cor-
rosion protection. If a non-specified coolant (an-
tifreeze) is introduced into the cooling system in
an emergency, it should be replaced with the
specified coolant (antifreeze) as soon as possible.
Do not use plain water alone or alcohol-based
engine coolant (antifreeze) products. Do not use
additional rust inhibitors or antirust products, as
they may not be compatible with the radiator
engine coolant (antifreeze) and may plug the
radiator.
(Continued)(Continued)
This vehicle has not been designed for use with
Propylene Glycol based coolants. Use of Propyl-
ene Glycol based coolants is not recommended.
Selection Of Coolant – Diesel Engine
Use only the manufacturer's recommended coolant
(antifreeze). Refer to “Fluids, Lubricants, and Genuine
Parts” in “Technical Specifications” for further informa-tion.
Do not use HOAT (Hybrid Organic Ad-
ditive Technology) products in the Diesel
Engine.
Do not use OAT (Organic Additive Technology)
products containing 2-EH (2–ethyl hexanol).
Do not use plain water alone or alcohol base
engine coolant (antifreeze) products. Do not use
additional rust inhibitors or antirust products, as
they may not be compatible with the radiator
engine coolant and may plug the radiator.
This vehicle has not been designed for use with
Propylene Glycol based coolants. Use of Propyl-
ene Glycol based coolants is not recommended.
Adding Coolant – Gasoline Engine
Your vehicle has been built with an improved engine
coolant (antifreeze) that allows extended maintenance
intervals. This coolant (antifreeze) can be used up to 281
KNOWING
YOURVEHICLE SAFETY
STARTING ANDDRIVING
WARNING LIGHTSAND
MESSAGES
IN AN
EMERGENCYSERVICING AND
CARETECHNICAL
SPECIFICATIONSCONTENTS
Page 288 of 332

five years or 168 000 km before replacement. To
prevent reducing this extended maintenance period, it
is important that you use the same coolant throughout
the life of your vehicle.
• The manufacturer recommends using 50% mixtureof demineralized water and PARAFLU UP* that
meets FIAT Qualification 9.55523 Antifreeze/
Coolant or equivalent.
• Use higher concentrations (not to exceed 70%) if temperatures below 37°C are anticipated.
Use only high purity water such as distilled or deion-
ized water when mixing the water/engine coolant
(antifreeze) solution. The use of lower quality water
will reduce the amount of corrosion protection in
the engine cooling system.
Please note that it is the owner's responsibility to
maintain the proper level of protection against freezing
according to the temperatures occurring in the area
where the vehicle is operated.
NOTE: Mixing coolant types will decrease the life of
the engine coolant (antifreeze) and will require more
frequent coolant changes.
Adding Coolant – Diesel Engine
Your vehicle has been built with an improved engine
coolant (antifreeze) that allows extended maintenance
intervals. To prevent reducing this extended mainte-
nance period, it is important that you use the same
coolant throughout the life of your vehicle. Please note that it is the owner's responsibility to
maintain the proper level of protection against freezing
according to the temperatures occurring in the area
where the vehicle is operated.
NOTE:
Mixing coolant types will decrease the life of
the engine coolant (antifreeze) and will require more
frequent coolant changes.
Cooling System Pressure Cap
The cap must be fully tightened to prevent loss of
coolant, and to ensure that coolant will return to the
radiator from the coolant recovery bottle.
The cap should be inspected and cleaned if there is any
accumulation of foreign material on the sealing sur-
faces.
WARNING!
The warning words “DO NOT OPEN
HOT” on the cooling system pressure
cap are a safety precaution. Never add coolant
when the engine is overheated. Do not loosen or
remove the cap to cool an overheated engine.
Heat causes pressure to build up in the cooling
system. To prevent scalding or injury, do not re-
move the pressure cap while the system is hot or
under pressure.
(Continued)
282
KNOWING YOUR
VEHICLE
SAFETY
STARTING AND
DRIVING
WARNING LIGHTSAND
MESSAGES
IN AN
EMERGENCYSERVICING AND
CARETECHNICAL
SPECIFICATIONSCONTENTS
Page 289 of 332

(Continued)
Do not use a pressure cap other than the one
specified for your vehicle. Personal injury or en-
gine damage may result .
Disposal Of Used Coolant
Used ethylene glycol-based engine coolant is a regu-
lated substance requiring proper disposal. Check with
your local authorities to determine the disposal rules
for your community. To prevent ingestion by animals or
children, do not store ethylene glycol-based engine
coolant in open containers or allow it to remain in
puddles on the ground. If ingested by a child, contact a
physician immediately. Clean up any ground spills
immediately.
Coolant Level
The radiator normally remains completely full, so there
is no need to remove the radiator cap unless checking
for coolant freeze point or replacing coolant. Advise
your service attendant of this. As long as the engine
operating temperature is satisfactory, the coolant
bottle need only be checked once a month. When
additional coolant is needed to maintain the proper
level, it should be added to the coolant bottle. Do not
overfill.
Points To Remember
NOTE: When the vehicle is stopped after a few
kilometers of operation, you may observe vapor com- ing from the front of the engine compartment. This is
normally a result of moisture from rain, snow, or high
humidity accumulating on the radiator and being vapor-
ized when the thermostat opens, allowing hot coolant
to enter the radiator.
If an examination of your engine compartment shows
no evidence of radiator or hose leaks, the vehicle may
be safely driven. The vapor will soon dissipate.
• Do not overfill the coolant recovery bottle.
• Check coolant freeze point in the radiator and in the
coolant recovery bottle. If antifreeze needs to be
added, contents of coolant recovery bottle must also
be protected against freezing.
• If frequent coolant additions are required, or if the level in the coolant recovery bottle does not drop
when the engine cools, the cooling system should be
pressure tested for leaks.
• Make sure that the radiator and coolant recovery bottle overflow hoses are not kinked or obstructed.
• Keep the front of the radiator clean. If your vehicle is equipped with air conditioning, keep the front of the
condenser clean.
• Do not change the thermostat for Summer or Win- ter operation. If replacement is ever necessary, install
ONLY the correct type thermostat. Other designs
may result in unsatisfactory coolant performance,
poor gas mileage, and increased emissions.
283
KNOWING
YOURVEHICLE SAFETY
STARTING ANDDRIVING
WARNING LIGHTSAND
MESSAGES
IN AN
EMERGENCYSERVICING AND
CARETECHNICAL
SPECIFICATIONSCONTENTS