2012 FIAT FREEMONT buttons
[x] Cancel search: buttonsPage 71 of 332

NOTE:In cold weather, use of Recirculation mode
may lead to excessive window fogging. The Recircula-
tion mode is not allowed in Mix, Floor and Defrost
modes to improve window clearing operation. Recir-
culation will be disabled automatically if these modes
are selected. Attempting to use Recirculation while in
these modes will cause the LED in the control button
to blink and then turn off.
AUTOMATIC TEMPERATURE CONTROL
(ATC)
ATC Hard-keys are located in the center of the instru-
ment panel.
Soft-keys are accessible on the Uconnect Touch™
system screen.
Automatic Operation
1. Press the AUTO hard-key or soft-key button (9) on the Automatic Temperature Control (ATC) Panel.
2. Next, adjust the temperature you would like the system to maintain by adjusting the driver and pas-
senger temperature hard or soft control buttons (6,
7, 10, 11). Once the desired temperature is dis-
played, the system will achieve and automatically
maintain that comfort level.
3. When the system is set up for your comfort level, it is not necessary to change the settings. You will
experience the greatest efficiency by simply allowing
the system to function automatically. NOTE:
• It is not necessary to move the temperature settings
for cold or hot vehicles. The system automatically
adjusts the temperature, mode and blower speed to
provide comfort as quickly as possible.
• The temperature can be displayed in U.S. or Metric
units by selecting the US/M customer-programmable
feature. Refer to the “Uconnect Touch™ System Set-
tings” in this section of the manual.
To provide you with maximum comfort in the Auto-
matic mode, during cold start-ups the blower fan will
remain on low until the engine warms up. The blower
will increase in speed and transition into Auto mode.
Manual Operation
The system allows for manual selection of blower
speed, air distribution mode, A/C status and recircula-
tion control.
The blower fan speed can be set to any fixed speed by
adjusting the blower control. The fan will now operate
at a fixed speed until additional speeds are selected.
This allows the front occupants to control the volume
of air circulated in the vehicle and cancel the Auto
mode.
The operator can also select the direction of the
airflow by selecting one of the available mode settings.
A/C operation and Recirculation control can also be
manually selected in Manual operation.
65
KNOWING
YOURVEHICLESAFETY
STARTING ANDDRIVING
WARNING LIGHTSAND
MESSAGES
IN AN
EMERGENCY
SERVICING AND
CARETECHNICAL
SPECIFICATIONSCONTENTS
Page 87 of 332

ELECTRONIC SPEED CONTROL (for
versions/markets, where
provided)
When engaged, the Electronic Speed Control takes
over accelerator operations at speeds greater than
40 km/h.
The Electronic Speed Control buttons are located on
the right side of the steering wheel. (fig. 58)
NOTE:In order to ensure proper operation, the
Electronic Speed Control System has been designed to
shut down if multiple Speed Control functions are
operated at the same time. If this occurs, the Electronic
Speed Control System can be reactivated by pushing the Electronic Speed Control ON/OFF button and
resetting the desired vehicle set speed.
TO ACTIVATE
Push the ON/OFF button. The Cruise Indicator Light
in the instrument cluster will illuminate. To turn the
system off, push the ON/OFF button a second time.
The Cruise Indicator Light will turn off. The system
should be turned off when not in use.
WARNING!
Leaving the Electronic Speed Control
system on when not in use is dangerous.
You could accidentally set the system or cause it
to go faster than you want .You could lose control
and have an accident . Always leave the system
OFF when you are not using it .
TO SET A DESIRED SPEED
Turn the Electronic Speed Control ON. When the
vehicle has reached the desired speed, press the SET (-)
button and release. Release the accelerator and the
vehicle will operate at the selected speed.
NOTE: The vehicle should be traveling at a steady
speed and on level ground before pressing the SET
button.
TO DEACTIVATE
A soft tap on the brake pedal, pushing the CANCEL
button, or normal brake pressure while slowing the
(fig. 58)
1 — ON/OFF 2 — RES +
4 — CANCEL 3 — SET -
81
KNOWING
YOURVEHICLESAFETY
STARTING ANDDRIVING
WARNING LIGHTSAND
MESSAGES
IN AN
EMERGENCY
SERVICING AND
CARETECHNICAL
SPECIFICATIONSCONTENTS
Page 106 of 332

To Disengage The Child-Protection Door Lock
System
1. Open the rear door.
2. Insert the tip of the emergency key (or alike) intothe child lock control and rotate it to the UNLOCK
position. (fig. 85)
3. Repeat Steps 1 and 2 for the opposite rear door.
NOTE: After disengaging the Child-Protection Door
Lock system, always test the door from the inside to
make certain it is in the desired position. KEYLESS ENTER-N-GO
The Passive Entry system is an enhancement to the
vehicle’s Remote Keyless Entry (RKE) system and a
feature of Keyless Enter-N-Go. This feature allows you
to lock and unlock the vehicle’s door(s) without having
to press the RKE transmitter lock or unlock buttons.
NOTE:
• Passive Entry may be programmed ON/OFF; refer to
“Uconnect Touch™ Settings” in “Knowing Your Ve-
hicle” for further information.
• If wearing gloves on your hands, or if it has been
raining on the Passive Entry door handle, the unlock
sensitivity can be affected, resulting in a slower re-
sponse time.
• If the vehicle is unlocked by the RKE transmitter or
Passive Entry and no door goes ajar within 60 seconds,
the vehicle will re-lock and for versions/markets, where
provided will arm the theft alarm.
To Unlock From The Driver's Side:
With a valid Passive Entry RKE transmitter within
1.5 m of the driver's door handle, grab the driver's
front door handle to unlock the driver's door auto-
matically. The interior door panel lock knob will raise
when the door is unlocked. (fig. 86)
NOTE:
If “Unlock All Doors 1st Press” is pro-
grammed all doors will unlock when you grab hold of
the driver’s front door handle. To select between(fig. 85)
Child-Protection Door Lock Function
100
KNOWING YOUR
VEHICLE
SAFETY
STARTING AND
DRIVING
WARNING LIGHTSAND
MESSAGES
IN AN
EMERGENCY
SERVICING AND
CARETECHNICAL
SPECIFICATIONSCONTENTS
Page 108 of 332

have been closed the vehicle checks the inside and
outside of the vehicle for any valid Passive Entry RKE
transmitters. If one of the vehicle's Passive Entry RKE
transmitters is detected inside the vehicle, and no
other valid Passive Entry RKE transmitters are de-
tected outside the vehicle, the Passive Entry System
automatically unlocks all vehicle doors and chirps the
horn three times (on the third attempt ALL doors will
lock and the Passive Entry RKE transmitter can be
locked in the vehicle).
To Lock The Vehicle’s Doors
The front door handles have LOCK buttons located on
the outside of the handles. (fig. 88)
With one of the vehicle’s Passive Entry RKE transmit-
ters within 1.5 m of the driver or passenger front doorhandle, press the door handle LOCK button to lock all
four doors and the liftgate.
NOTE:
• After pressing the door handle LOCK button, you
must wait two seconds before you can lock or unlock
the doors, using either Passive Entry door handle. This
is done to allow you to check if the vehicle is locked by
pulling the door handle, without the vehicle reacting
and unlocking.
• The Passive Entry system will not operate if the RKE
transmitter battery is dead.
The vehicle doors can also be locked by using the RKE
transmitter lock button or the lock button located on
the vehicle’s i nterior door panel.(fig. 88)
Outside Door Handle Lock Button
102
KNOWING YOUR
VEHICLE
SAFETY
STARTING AND
DRIVING
WARNING LIGHTSAND
MESSAGES
IN AN
EMERGENCY
SERVICING AND
CARETECHNICAL
SPECIFICATIONSCONTENTS
Page 153 of 332

• When both switches are on Channel 2, the Remote
is controlling Channel 2 and the headphones are tuned
to the audio of the VES™ Channel 2.
2. Press the MODE button on the remote control.
3. If the video screen is displaying a video source (suchas a DVD Video), pressing STATUS shows the status
on a popup banner at the bottom of the screen.
Pressing the MODE button will advance to the next
mode. When the mode is in an audio only source
(such as FM), the Mode Selection menu appears on
screen.
4. When the Mode Selection menu appears on screen, use the cursor buttons on the remote control to
navigate to the available modes and press the EN-
TER button to select the new mode.
5. To cancel out of the Mode Selection menu, press the BACK button on the remote control.
Replacing The Batteries
Each set of headphones requires two AAA batteries for
operation. To replace the batteries:
• Locate the battery compartment on the left ear cup of the headphones, and then slide the battery cover
downward.
• Replace the batteries, making sure to orient them according to the polarity diagram shown.
• Replace the battery compartment cover. Unwired
®Stereo Headphone Lifetime
Limited Warranty
Who Does This Warranty Cover? This warranty
covers the initial user or purchaser ("you" or "your") of
this particular Unwired Technology LLC ("Unwired")
wireless headphone ("Product"). The warranty is not
transferable.
How Long Does The Coverage Last? This war-
ranty lasts as long as you own the Product.
What DoesThis Warranty Cover? Except as speci-
fied below, this warranty covers any Product that in
normal use is defective in workmanship or materials.
What Does This Warranty Not Cover? This war-
ranty does not cover any damage or defect that results
from misuse, abuse or modification of the Product
other than by Unwired. Foam earpieces, which will
wear over time through normal use, are specifically not
covered (replacement foam is available for a nominal
charge). UNWIRED TECHNOLOGY IS NOT LIABLE
FOR ANY INJURIES OR DAMAGES TO PERSONS
OR PROPERTY RESULTING FROM THE USE OF, OR
ANY FAILURE OR DEFECT IN, THE PRODUCT,
NOR IS UNWIRED LIABLE FOR ANY GENERAL,
SPECIAL, DIRECT, INDIRECT, INCIDENTAL, CON-
SEQUENTIAL, EXEMPLARY, PUNITIVE OR OTHER
DAMAGES OF ANY KIND OR NATURE WHATSO-
EVER. Some states and jurisdictions may not allow the
exclusion or limitation of incidental or consequential
damages, so the above limitation may not apply to you.
147
KNOWING
YOURVEHICLESAFETY
STARTING ANDDRIVING
WARNING LIGHTSAND
MESSAGES
IN AN
EMERGENCY
SERVICING AND
CARETECHNICAL
SPECIFICATIONSCONTENTS
Page 157 of 332

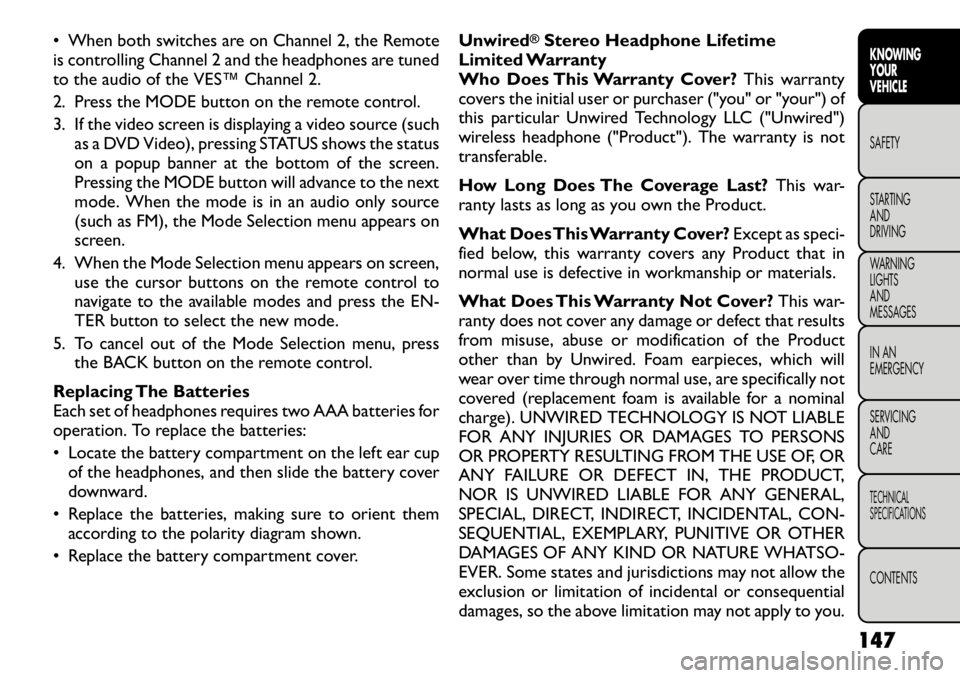
Mode Selection Menu (fig. 114)
The first press of the MODE button causes the Mode
Selection menu to appear on screen (Figure 6). The
current mode is always the default selection. The mode
can be changed for either Channel/Screen 1 or
Channel/Screen 2 using the remote control.
Use the remote control’s navigation buttons (▴,▾ ,▸ ,◂ )
to navigate through the available modes, and then press
the remote control’s ENTER button to select the
mode. An alternate method of changing modes is
repeated pressing of the MODE button until the de-
sired mode is highlighted then press the ENTER button
on the remote control to select the mode.
In a single screen system, when a video mode (such as
DVD-video, Aux video, etc.) is active and Channel/ Screen 1 is selected using the remote control selector
switch, the first press of the remote control’s MODE
button causes the Mode Selection menu to appear.
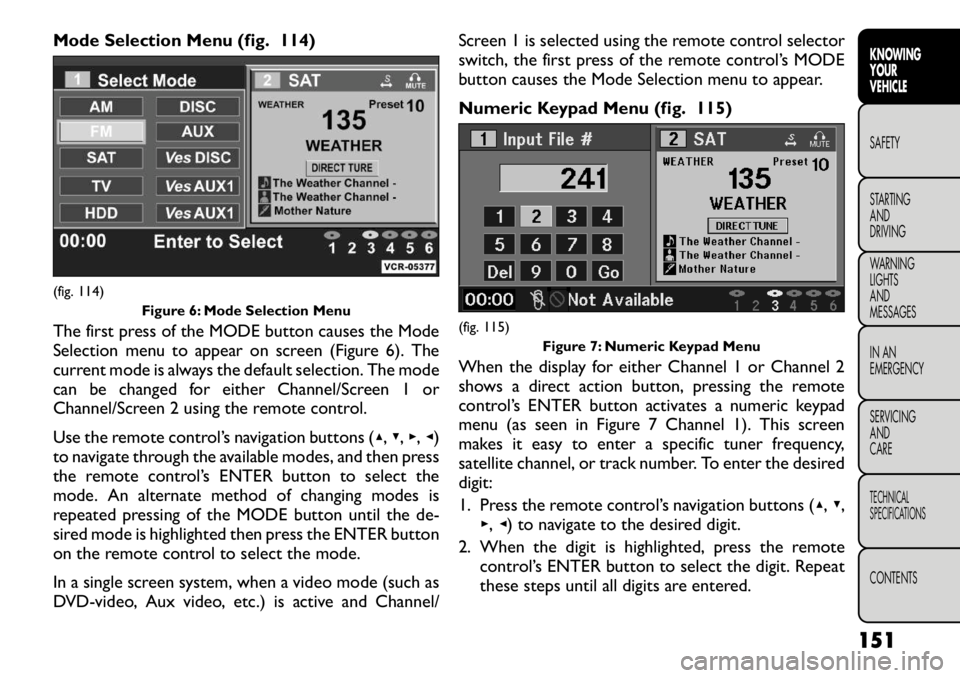
Numeric Keypad Menu (fig. 115)
When the display for either Channel 1 or Channel 2
shows a direct action button, pressing the remote
control’s ENTER button activates a numeric keypad
menu (as seen in Figure 7 Channel 1). This screen
makes it easy to enter a specific tuner frequency,
satellite channel, or track number. To enter the desireddigit:
1. Press the remote control’s navigation buttons (
▴,▾ ,
▸ ,◂ ) to navigate to the desired digit.
2. When the digit is highlighted, press the remote control’s ENTER button to select the digit. Repeat
these steps until all digits are entered.(fig. 114)
Figure 6: Mode Selection Menu
(fig. 115)Figure 7: Numeric Keypad Menu
151
KNOWING
YOURVEHICLESAFETY
STARTING ANDDRIVING
WARNING LIGHTSAND
MESSAGES
IN AN
EMERGENCY
SERVICING AND
CARETECHNICAL
SPECIFICATIONSCONTENTS
Page 158 of 332

3. To delete the last digit, navigate to the Del buttonand press the remote control’s ENTER button.
4. After all of the digits are entered, navigate to the Go button and press the remote control’s ENTER
button.
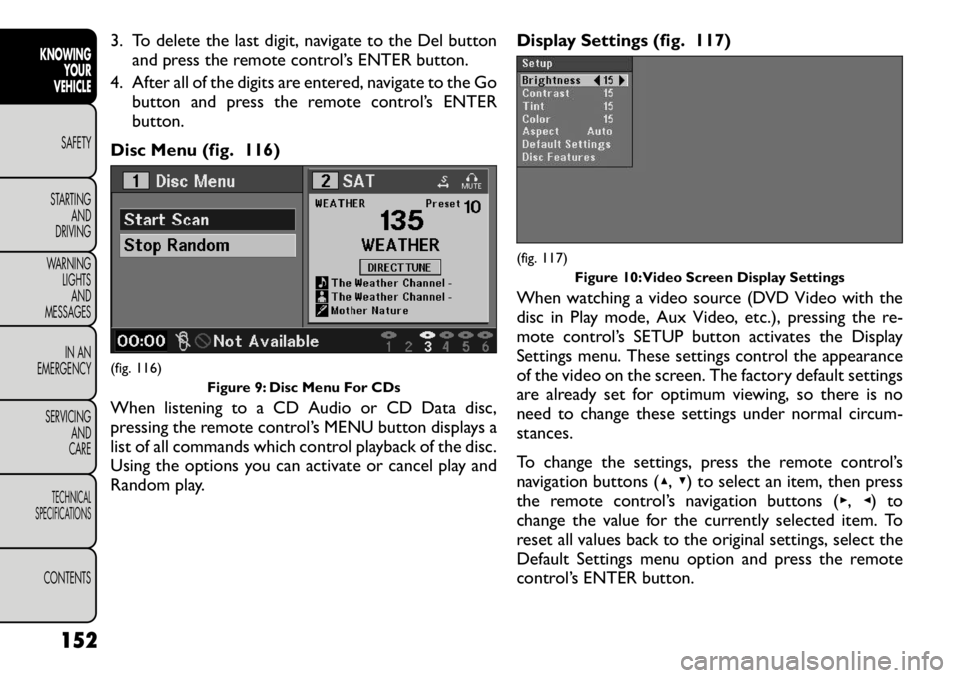
Disc Menu (fig. 116)
When listening to a CD Audio or CD Data disc,
pressing the remote control’s MENU button displays a
list of all commands which control playback of the disc.
Using the options you can activate or cancel play and
Random play. Display Settings (fig. 117)
When watching a video source (DVD Video with the
disc in Play mode, Aux Video, etc.), pressing the re-
mote control’s SETUP button activates the Display
Settings menu. These settings control the appearance
of the video on the screen. The factory default settings
are already set for optimum viewing, so there is no
need to change these settings under normal circum-
stances.
To change the settings, press the remote control’s
navigation buttons (
▴,▾ ) to select an item, then press
the remote control’s navigation buttons ( ▸, ◂) to
change the value for the currently selected item. To
reset all values back to the original settings, select the
Default Settings menu option and press the remote
control’s ENTER button.(fig. 116) Figure 9: Disc Menu For CDs
(fig. 117)Figure 10:Video Screen Display Settings
152
KNOWING YOUR
VEHICLE
SAFETY
STARTING AND
DRIVING
WARNING LIGHTSAND
MESSAGES
IN AN
EMERGENCY
SERVICING AND
CARETECHNICAL
SPECIFICATIONSCONTENTS