Page 96 of 216
94
III
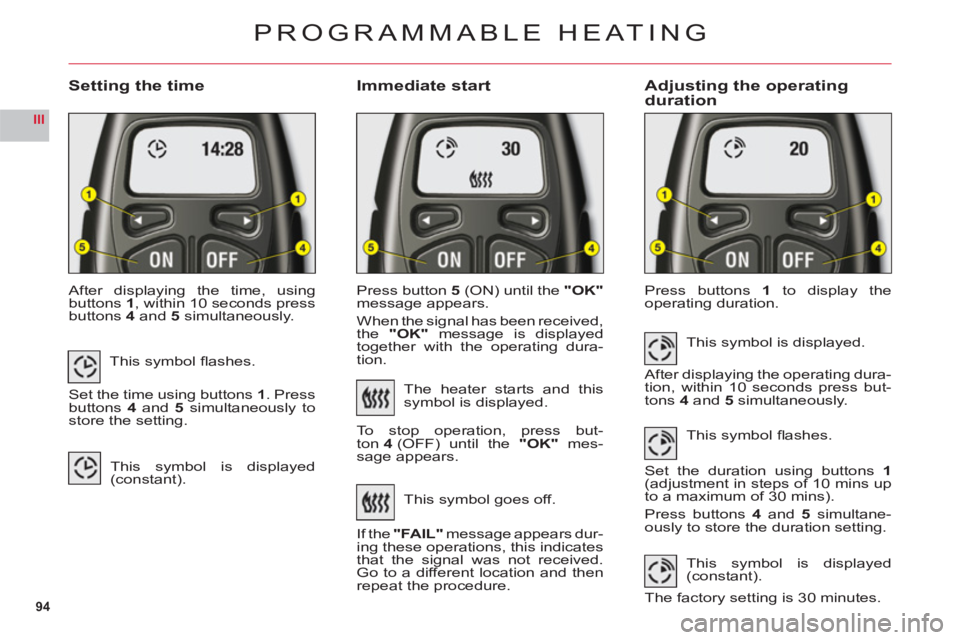
Setting the timeImmediate startAdjusting the operating duration
After displaying the time, usingbuttons1, within 10 seconds pressbuttons4and5 simultaneously.Pr
ess button5(ON) until the "OK"
message appears.
When the si
gnal has been received,
the "OK" message is displayed
together with the operating dura-
tion.Pr
ess buttons1 to display the
operating duration.
PROGRAMMABLE HEATING
This symbol fl ashes.
Set the time using buttons 1. Pressbuttons4and 5 simultaneously tostore the setting.
This symbol is displayed(constant).
The heater starts and this
symbol is displayed.
To stop operation, press but-
t
on 4 (OFF) until the"OK" mes-
sage appears.
This s
ymbol goes off.
I
f the "FAIL"message appears dur-
ing these operations, this indicates
that the signal was not received. Go to a different location and then
repeat the procedure.This s
ymbol is displayed.
After displaying the operating dura-
tion, within 10 seconds press but-
tons 4 and 5 simultaneously.
This s
ymbol fl ashes.
Set the duration using buttons1(adjustment in steps of 10 mins up
to a maximum of 30 mins).
Press buttons 4 and 5 simultane-
ously to store the duration setting.
This symbol is displayed(constant).
The factory setting is 30 minutes.
Page 97 of 216
95
III
Programming the heaterActivation – deactivation Stopping the heater
You should programme your depar-
ture time so that the system can
automatically calculate the opti-mum start time for the heater.
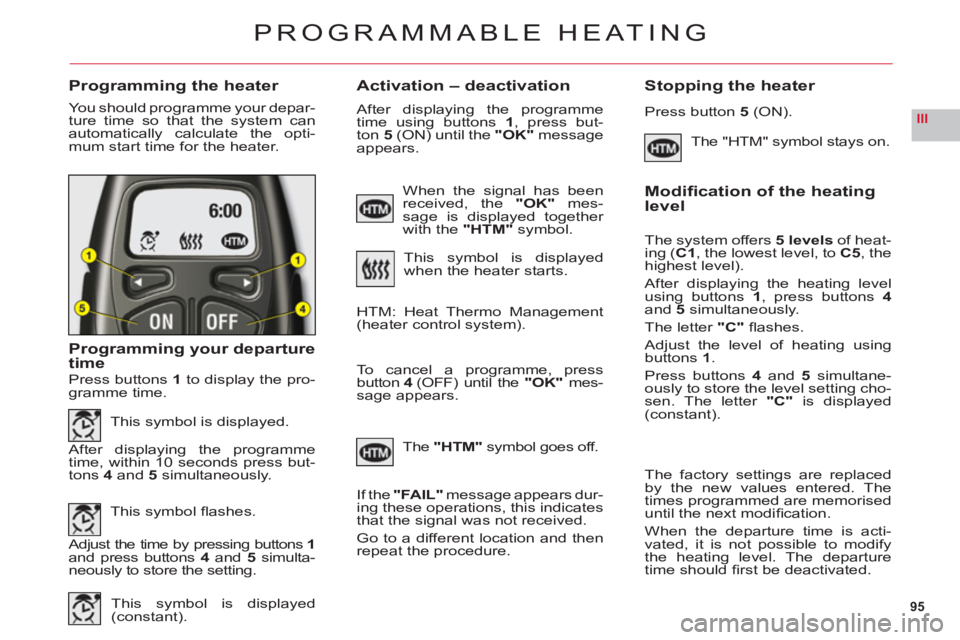
Programming your departure
time
The "HTM" symbol stays on.
PROGRAMMABLE HEATING
Press buttons 1to display the pro-
gramme time.
This symbol is displayed.
After displaying the programme
time, within 10 seconds press but-
t
ons 4 and 5 simultaneously.
This s
ymbol fl ashes.
Adjust the time by pressing buttons 1and press buttons4 and5 simulta-neously to store the setting.
This s
ymbol is displayed(constant).
When the signal has been received, the"OK" mes-sage is displayed together
with the "HTM"symbol.
This symbol is displayed
when the heater starts.
After displaying the programme
time using buttons 1, press but-
ton 5 (ON) until the "OK"message
appears.
HTM: Heat Thermo Management (heater control system).
To cancel a pro
gramme, press button 4 (OFF) until the"OK"mes-sage appears.
Th
e"HTM"symbol goes off.
If th
e "FAIL"message appears dur-
ing these operations, this indicates
that the signal was not received.
Go to a different location and then
repeat the procedure.
Press button 5(ON).
Modifi cation of the heating level
The system offers5 levels of heat-
ing (C1, the lowest level, toC5, thehighest level).
After displaying the heating levelusing buttons 1, press buttons4and5simultaneously.
The letter "C"fl ashes.
Adjust the level of heating usingbuttons1.
Press buttons 4 and 5 simultane-
ously to store the level setting cho-sen. The letter "C" is displayed(constant).
The
factory settings are replaced
by the new values entered. The
times programmed are memoriseduntil the next modifi cation.
When the de
parture time is acti-
vated, it is not possible to modifythe heating level. The departure
time should fi rst be deactivated.
Page 111 of 216
109
III221
2
2
INTERIOR LIGHTING
Front
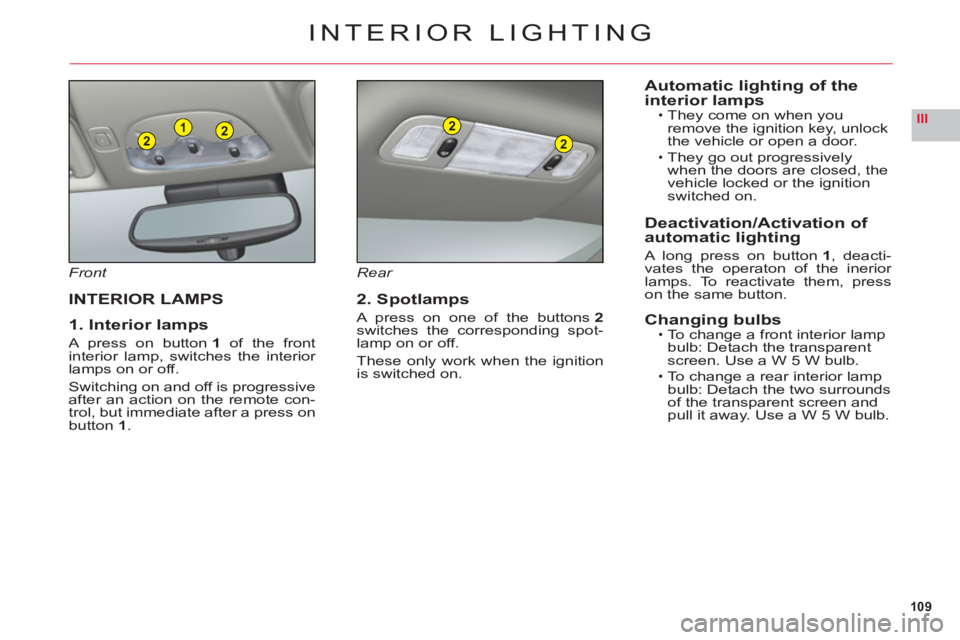
INTERIOR LAMPS
1. Interior lamps
A press on button 1 of the front
interior lamp, switches the interior lamps on or off.
Switching on and off is progressiveafter an action on the remote con-
trol, but immediate after a press on
button 1.
Rear
2. Spotlamps
A press on one of the buttons2switches the corresponding spot-lamp on or off.
These only work when the ignition
is switched on.
Automatic lighting of the
interior lampsThey come on when you
remove the ignition key, unlock
the vehicle or open a door.
They go out progressively
when the doors are closed, the
vehicle locked or the i
gnitionswitched on.
Deactivation/Activation of
automatic lighting
A long press on button1, deacti-
vates the operaton of the inerior lamps. To reactivate them, presson the same button.
Changing bulbsTo change a front interior lamp
bulb: Detach the transparent
screen. Use a W 5 W bulb.
To change a rear interior lamp bulb: Detach the two surroundsof the transparent screen and pull it away. Use a W 5 W bulb.
•
•
•
•
Page 112 of 216
110
III
C
D
LATERAL AMBIANCE LIGHTING
This is in the zone designated bythe arrows.
Adjustments
With the vehicle lamps on, presson buttonsC or D to change the
brightness of the lateral ambiancelighting.
FLOOR LIGHTING
In the front and the rear of the vehi-cle, when a door is opened, thislights up the interior of the vehicle.
Changing the bulb
To change the bulb for the fl oor lighting (front or rear): Detach thecover. Use a W 5 W bulb.
Rear
PAVEMENT LIGHTING
With the door open, this lights up
the ground next to the vehicle.
Changing the bulb
To change the bulb for the door sill lighting: Detach the cover. Use a
W 5 W bulb.
Page 167 of 216
7.17
11
22
33
44
11
22
33
44
05AUDIO/VIDEO
RADIO
SELECTING A STATION
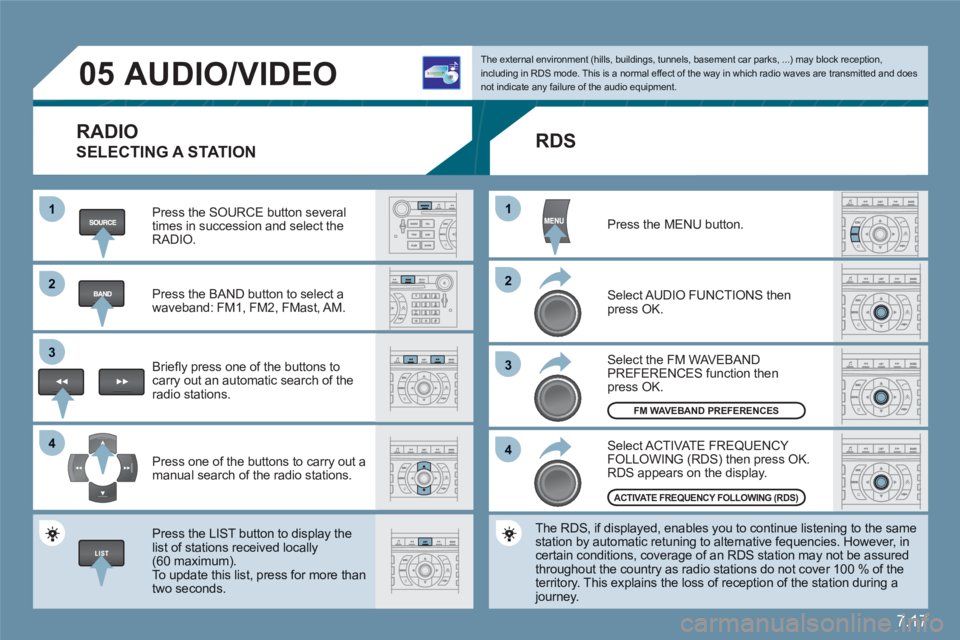
Press the SOURCE button several times in succession and select theRADIO.
Press the BAND button to select awaveband: FM1, FM2, FMast, AM.
Briefl y press one of the buttons to carry out an automatic search of theradio stations.
Press one of the buttons to carry out a manual search of the radio stations.
Press the LIST button to display the list of stations received locally(60 maximum).
To update this list, press for more than two seconds.
The external environment (hills, buildings, tunnels, basement car parks, ...) may block reception,including in RDS mode. This is a normal effect of the way in which radio waves are transmitted and does not indicate any failure of the audio equipment.
RDS
Select ACTIVATE FREQUENCY FOLLOWING (RDS) then press OK. RDS appears on the display.
Select the FM WAVEBANDPREFERENCES function thenpress OK.
Select AUDIO FUNCTIONS then press OK.
Press the MENU button.
The RDS, if displayed, enables you to continue listening to the samestation by automatic retuning to alternative fequencies. However, in certain conditions, coverage of an RDS station may not be assuredthroughout the country as radio stations do not cover 100 % of the territory. This explains the loss of reception of the station during a journey.
FM WAVEBAND PREFERENCES
ACTIVATE FREQUENCY FOLLOWING (RDS)
Page 168 of 216
7.18
1
22
05AUDIO/VIDEO
INFORMATION AND ADVICE
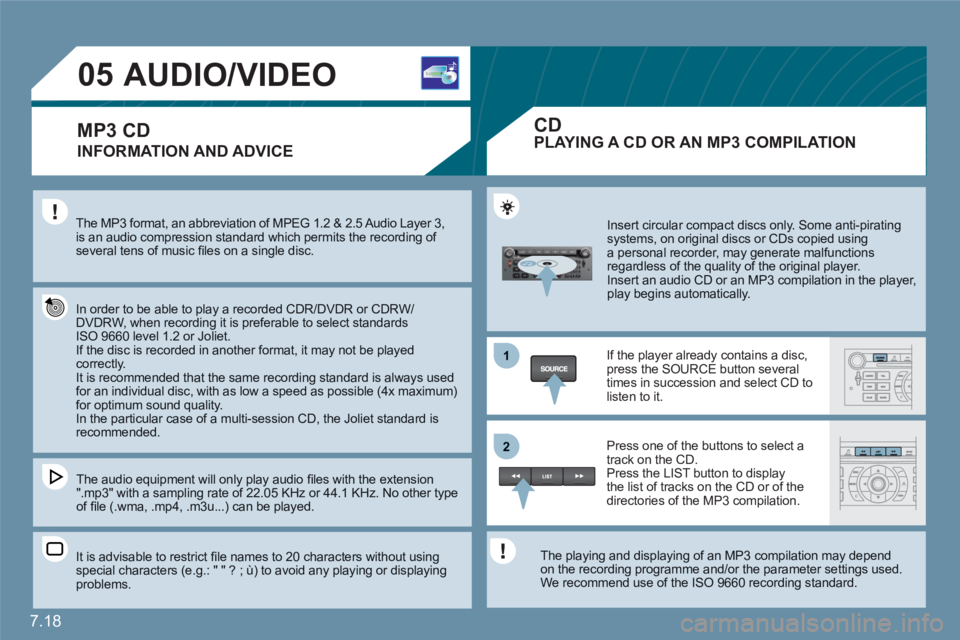
The MP3 format, an abbreviation of MPEG 1.2 & 2.5 Audio Layer 3, is an audio compression standard which permits the recording of several tens of music fi les on a single disc.
In order to be able to play a recorded CDR/DVDR or CDRW/DVDRW, when recording it is preferable to select standardsISO 9660 level 1.2 or Joliet. If the disc is recorded in another format, it may not be played correctly.It is recommended that the same recording standard is always used for an individual disc, with as low a speed as possible (4x maximum)for optimum sound quality. In the particular case of a multi-session CD, the Joliet standard isrecommended.
The audio equipment will only play audio fi les with the extension ".mp3" with a sampling rate of 22.05 KHz or 44.1 KHz. No other type of fi le (.wma, .mp4, .m3u...) can be played.
It is advisable to restrict fi le names to 20 characters without usingspecial characters (e.g.: " " ? ; ù) to avoid any playing or displayingproblems.
Insert circular compact discs only. Some anti-piratingsystems, on original discs or CDs copied usinga personal recorder, may generate malfunctionsregardless of the quality of the original player.
Insert an audio CD or an MP3 compilation in the player, play begins automatically.
If the player already contains a disc,press the SOURCE button several times in succession and select CD tolisten to it.
Press one of the buttons to select atrack on the CD. Press the LIST button to display the list of tracks on the CD or of thedirectories of the MP3 compilation.
The playing and displaying of an MP3 compilation may depend on the recording programme and/or the parameter settings used.We recommend use of the ISO 9660 recording standard.
MP3 CDPLAYING A CD OR AN MP3 COMPILATION
CD
Page 172 of 216
7.22
11
22
11
33
22
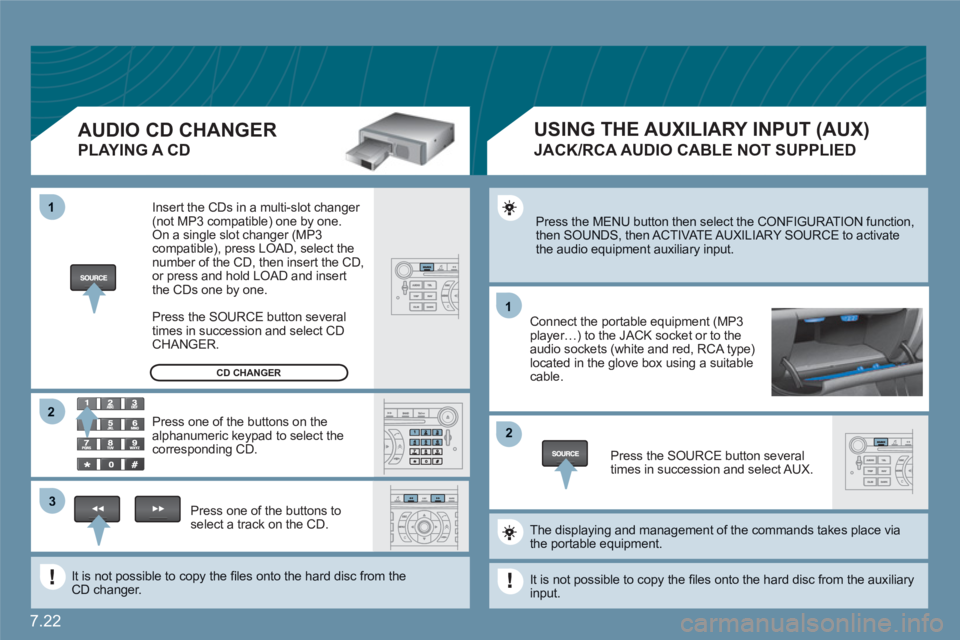
Press the MENU button then select the CONFIGURATION function, then SOUNDS, then ACTIVATE AUXILIARY SOURCE to activatethe audio equipment auxiliary input.
Connect the portable equipment (MP3player…) to the JACK socket or to the audio sockets (white and red, RCA type)located in the glove box using a suitable cable.
Press the SOURCE button severaltimes in succession and select AUX.
The displaying and management of the commands takes place viathe portable equipment.
It is not possible to copy the fi les onto the hard disc from the auxiliaryinput.
USING THE AUXILIARY INPUT (AUX)
JACK/RCA AUDIO CABLE NOT SUPPLIED
AUDIO CD CHANGER
PLAYING A CD
Insert the CDs in a multi-slot changer (not MP3 compatible) one by one. On a single slot changer (MP3compatible), press LOAD, select the number of the CD, then insert the CD,or press and hold LOAD and insert the CDs one by one.
Press the SOURCE button severaltimes in succession and select CD CHANGER.
Press one of the buttons on thealphanumeric keypad to select the corresponding CD.
Press one of the buttons toselect a track on the CD.
It is not possible to copy the fi les onto the hard disc from theCD changer.
CD CHANGER
Page 181 of 216
7.31
08CONTROL SHORT-CUTS
STEERING WHEEL CONTROLS
RADIO: selection of the previous stored station.
MP3/JUKEBOX: selection of the previous directory.
Selection of the previous item on a menu.
RADIO: selection of the next stored station.
MP3/JUKEBOX: selection of the next directory. Selection of the next item on a menu.
RADIO: automatic search for a higher frequency. CD/MP3/JUKEBOX: selection of the next track.
CD: continuous press: fast forwards play.
RADIO: automatic search for a lower frequency.CD/MP3/JUKEBOX: selection of the previous track. CD: continuous press: fast backwards play.
- Change of sound source. - Confi rmation of a selection. - Pick up/Hang up the telephone.- Press for more than 2 seconds:access to the telephone menu.
Volume increase.
Volume decrease.
Mute: by pressing the volumeincrease and decreasebuttons simultaneously.
The sound is restored by pressing one of the two volume buttons.