Page 31 of 216
29
II
i
DO NOT RUN THE ENGINE IN A CLOSED SPACE OR IN ONETHAT IS INSUFFICIENTLY VENTILATED.
DIESEL
Startin
g the engine
Turn the key to the drive position.
Wait for the preheater warning lamp
to go out, if it is on, then action thestarter until the engine starts (notmore than 10 seconds).
If the engine does not start, switch
off the ignition.
Recommence the operation.Note:During starting, do not touchthe accelerator.
ADVICE
Diesel vehicle with turbochargers
Never stop the engine without fi rst
having allowed it to idle for a few
seconds, this being the time requi-
red for the turbochargers to return
to a normal speed.
Do not "fl ick" the accelerator at the
moment you switch off the ignition
as this could seriously damage the
turbochargers. Check that the automatic
gear selector is in position P or N.
DRIVING – STARTING THE ENGINE
Page 34 of 216

32
II
INSTRUMENT PANEL
WARNING LAMPS
Front passenger'sairbag deactivation
See "Airbags".
Left handdirection indicator
See "Signalling".
Right hand directionindicator
See "Signalling".
If the hazard lam
ps are activated, this means that the direction indicatorsfl ash on both sides at the same time.
Sidelamps
See "Signalling".
Front foglamps
See "Signalling".
Dipped beams
If this warning lamp fl ashes, it indicates that the direc-
tional headlamps are mal-functioning.
Contact a CITROËN dealer
or a qualifi ed workshop.
Foglamps (rear)
See "Signalling".
Main beams
See "Signalling".
Driver's seat belt
not fastened
If this warning lamp comes on, it is reminding the driver to fasten his seat belt. While the vehicle is sta-
tionary it remains on until the belt
is fastened.
See "Seat belts warning lamp".
Depollution
system
If this warning lamp fl ashesor lights up while you are driving,
this indicates a problem with the
depollution system.
Contact a CITROËN dealer or a
qualifi ed workshop as soon as
possible.
Diesel enginepreheater
See method for starting the engine.
See "Driving".
Fuel low
When it comes on perma-
nently on level ground, you
have about 8 l of fuel left.
Depending on your driving style and your engine, you have enough fuel
left to drive approximately 30 miles (50 km). You must fi ll up as soon as
possible.
The fuel tank has a capacity of about
72 litres.
Be careful to never drive until you run
out of fuel; it could damage the emis-
sion control and injection systems.
Page 95 of 216

93
III
The programmable heating sys-
tem operates independently of theengine.
With the engine off, it is used topreheat the engine cooling systemso as to have an optimum engine
operating temperature on starting.
The programmable heating sys-
tem is started using a long-rangeremote control. It can be startedimmediately or programmed tostart later.
In the event of a malfunction of the programmable heating sys-tem, contact a CITROËN dealer pg gy
or a qualifi ed workshop.
Remote control
The remote control for the program-
mable heating system includes the following buttons and display infor-
mation:1. Menu function scroll buttons.
2. Function symbols: clock,
temperature, operating duration, programmed time, heater operation, heater control.3. Digital display of: time,
temperature, operating
duration, programmed time
or heating level.4. Off button.5. On button.
In
formation displayed in the remote control screen
Display of functions
Press buttons1repeatedly to bringup the functions.
The fi rst press of the ri
ght or leftbutton displays the time.
The left button then
gives access
to the programming time, then theheating level (C1 to C5).
The right button gives access to
the cabin temperature, then the
operating duration of the heater
where the system is to be startedimmediately.
In
formation on the cabin tem-perature is only available with theengine off.
PROGRAMMABLE HEATING
Page 96 of 216

94
III
Setting the timeImmediate startAdjusting the operating duration
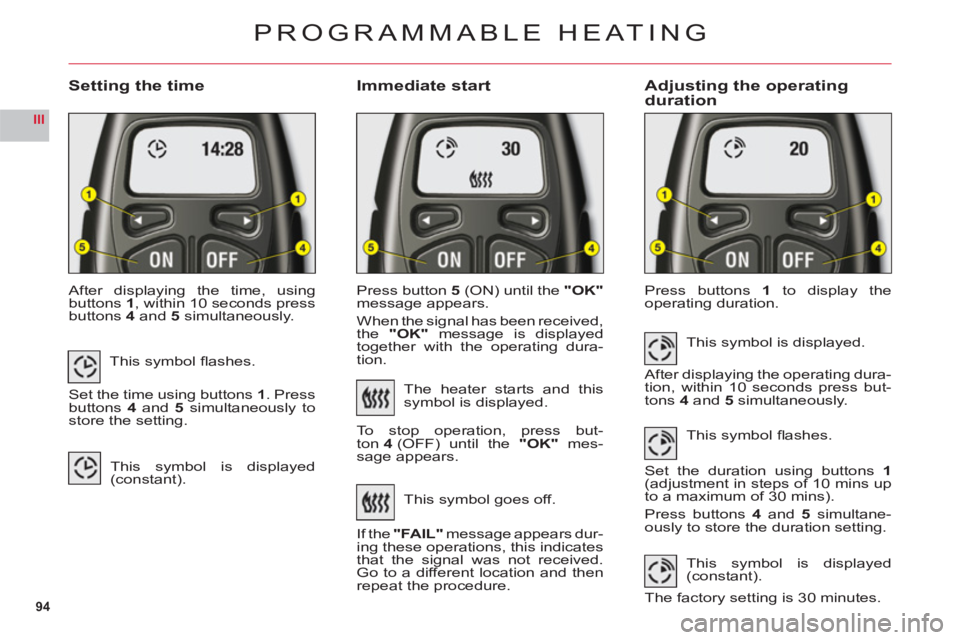
After displaying the time, usingbuttons1, within 10 seconds pressbuttons4and5 simultaneously.Pr
ess button5(ON) until the "OK"
message appears.
When the si
gnal has been received,
the "OK" message is displayed
together with the operating dura-
tion.Pr
ess buttons1 to display the
operating duration.
PROGRAMMABLE HEATING
This symbol fl ashes.
Set the time using buttons 1. Pressbuttons4and 5 simultaneously tostore the setting.
This symbol is displayed(constant).
The heater starts and this
symbol is displayed.
To stop operation, press but-
t
on 4 (OFF) until the"OK" mes-
sage appears.
This s
ymbol goes off.
I
f the "FAIL"message appears dur-
ing these operations, this indicates
that the signal was not received. Go to a different location and then
repeat the procedure.This s
ymbol is displayed.
After displaying the operating dura-
tion, within 10 seconds press but-
tons 4 and 5 simultaneously.
This s
ymbol fl ashes.
Set the duration using buttons1(adjustment in steps of 10 mins up
to a maximum of 30 mins).
Press buttons 4 and 5 simultane-
ously to store the duration setting.
This symbol is displayed(constant).
The factory setting is 30 minutes.
Page 97 of 216

95
III
Programming the heaterActivation – deactivation Stopping the heater
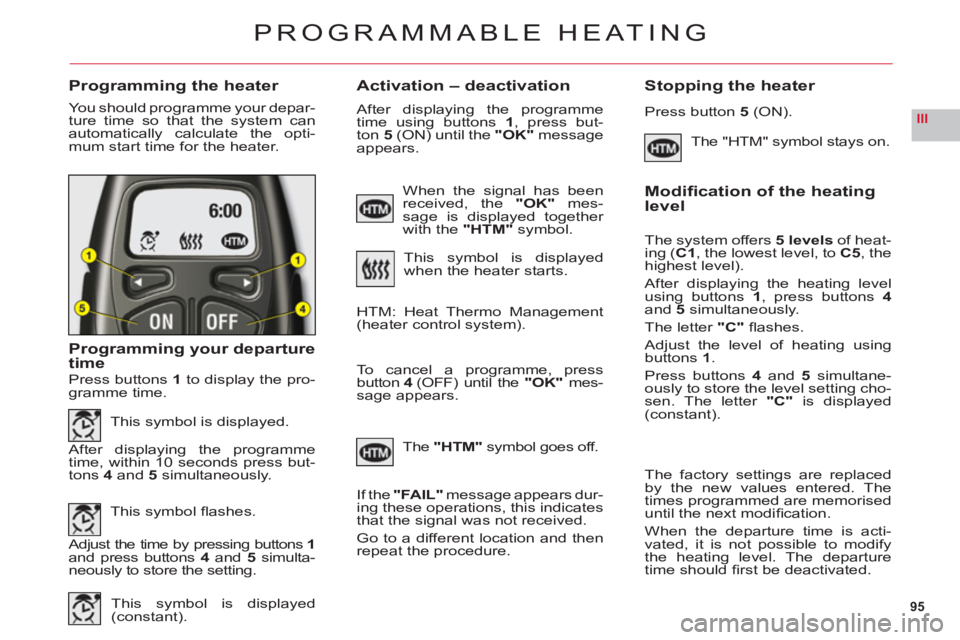
You should programme your depar-
ture time so that the system can
automatically calculate the opti-mum start time for the heater.
Programming your departure
time
The "HTM" symbol stays on.
PROGRAMMABLE HEATING
Press buttons 1to display the pro-
gramme time.
This symbol is displayed.
After displaying the programme
time, within 10 seconds press but-
t
ons 4 and 5 simultaneously.
This s
ymbol fl ashes.
Adjust the time by pressing buttons 1and press buttons4 and5 simulta-neously to store the setting.
This s
ymbol is displayed(constant).
When the signal has been received, the"OK" mes-sage is displayed together
with the "HTM"symbol.
This symbol is displayed
when the heater starts.
After displaying the programme
time using buttons 1, press but-
ton 5 (ON) until the "OK"message
appears.
HTM: Heat Thermo Management (heater control system).
To cancel a pro
gramme, press button 4 (OFF) until the"OK"mes-sage appears.
Th
e"HTM"symbol goes off.
If th
e "FAIL"message appears dur-
ing these operations, this indicates
that the signal was not received.
Go to a different location and then
repeat the procedure.
Press button 5(ON).
Modifi cation of the heating level
The system offers5 levels of heat-
ing (C1, the lowest level, toC5, thehighest level).
After displaying the heating levelusing buttons 1, press buttons4and5simultaneously.
The letter "C"fl ashes.
Adjust the level of heating usingbuttons1.
Press buttons 4 and 5 simultane-
ously to store the level setting cho-sen. The letter "C" is displayed(constant).
The
factory settings are replaced
by the new values entered. The
times programmed are memoriseduntil the next modifi cation.
When the de
parture time is acti-
vated, it is not possible to modifythe heating level. The departure
time should fi rst be deactivated.