2012 CITROEN C6 CD changer
[x] Cancel search: CD changerPage 119 of 216

117
III
5
4
4
1
3
2
6
1Pull strap (spare wheel stowage).
2Boot lamp.
To change the bulb, detach the cover and use a W 5 W bulb.
3 Elastic straps.
4 12 V accessories socket (functions with the ignition switched on).
5 B
oot lateral net.
6 Changer for 6 CDs.
BOOT
Page 130 of 216

128
IV
TABLE OF FUSES
Ref.RatingFunction
G 295 ADefl ation detection – Changer for 6 CDs
G 305 ADiagnostic socket
G 315 ATelematics according to destination
G 3225 AAmplifi er
G 3310 AHydraulic suspension system
G 3415 AAutomatic gearbox
G 3515 AFront passenger’s heated seat
G 3615 ADriver’s heated seat
G 37––
G 3830 ADriver’s electric seat
G 39––
G 4030 APassenger’s electric seat
DASHBOARD FUSES (BOX B)
Page 152 of 216

7.2
11
2020
88
99
55
44
3322
199
1661111
1001818
122
6677
1313
155
144
177
01
1. On/Off and Volume adjustment.
2. Selection of the source: radio, Jukebox, CD/DVD, CD changer and auxiliary (AUX, if activated on the Confi gurationmenu).Long press: CD copy to hard disc.
3. Audio option adjustments: front/rear, left/right balance,loudness, sound ambiences.
4. Displaying of the list of local radio stations, of the tracks onthe CD/DVD or of the MP3/USB/Jukebox directories.Long press: updating of the local radio stations.
5. Automatic search for a lower/higher frequency.Selection of the previous/next CD/DVD, MP3, USBor Jukebox track. Long press: fast forward and backward play.
6. Selection of the wavebands FM1, FM2, FMast, AM.
7. TA (Traffi c Announcement) function on/off. Long press: access to the PTY(radio Programme TYpes) mode.
8. Ejection of the CD/DVD.
9. SIM card slot.
10. Keypad for entering descriptions by successive presses.
11 . Access to the "CITROÀN" services menu.
12. Selection and confi rmation.
13. Selection of the previous/next CD/DVD. Selection of the previous/next MP3/USB/Jukebox directory.
14. Selection of a lower/higher frequency.
15. Cancellation of the current operation.Long press: return to the current application.
16. Displaying of the general menu.
17. Deletion of the last character entered or of the entire line.
18. Modifi cation of the screen display. Long press: reinitialisation of the NaviDrive system.
19. Selection of the display on the screen from the modes:TRIP, TEL, CLIM, NAV and AUDIO.
20. Long press on the SOS button: emergency call.
FIRST STEPS
Page 172 of 216

7.22
11
22
11
33
22
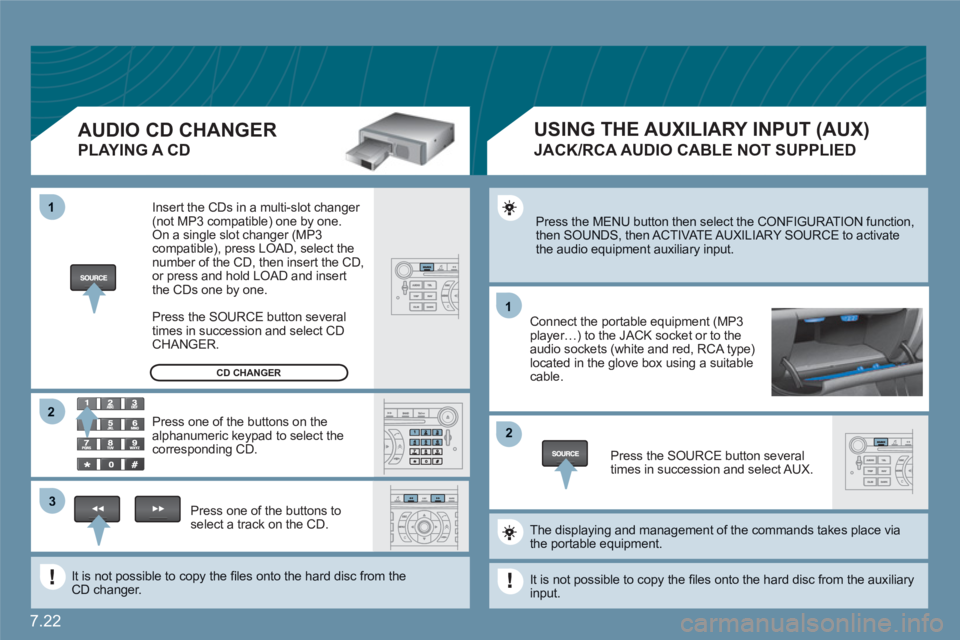
Press the MENU button then select the CONFIGURATION function, then SOUNDS, then ACTIVATE AUXILIARY SOURCE to activatethe audio equipment auxiliary input.
Connect the portable equipment (MP3player…) to the JACK socket or to the audio sockets (white and red, RCA type)located in the glove box using a suitable cable.
Press the SOURCE button severaltimes in succession and select AUX.
The displaying and management of the commands takes place viathe portable equipment.
It is not possible to copy the fi les onto the hard disc from the auxiliaryinput.
USING THE AUXILIARY INPUT (AUX)
JACK/RCA AUDIO CABLE NOT SUPPLIED
AUDIO CD CHANGER
PLAYING A CD
Insert the CDs in a multi-slot changer (not MP3 compatible) one by one. On a single slot changer (MP3compatible), press LOAD, select the number of the CD, then insert the CD,or press and hold LOAD and insert the CDs one by one.
Press the SOURCE button severaltimes in succession and select CD CHANGER.
Press one of the buttons on thealphanumeric keypad to select the corresponding CD.
Press one of the buttons toselect a track on the CD.
It is not possible to copy the fi les onto the hard disc from theCD changer.
CD CHANGER
Page 182 of 216

7.32
2 1
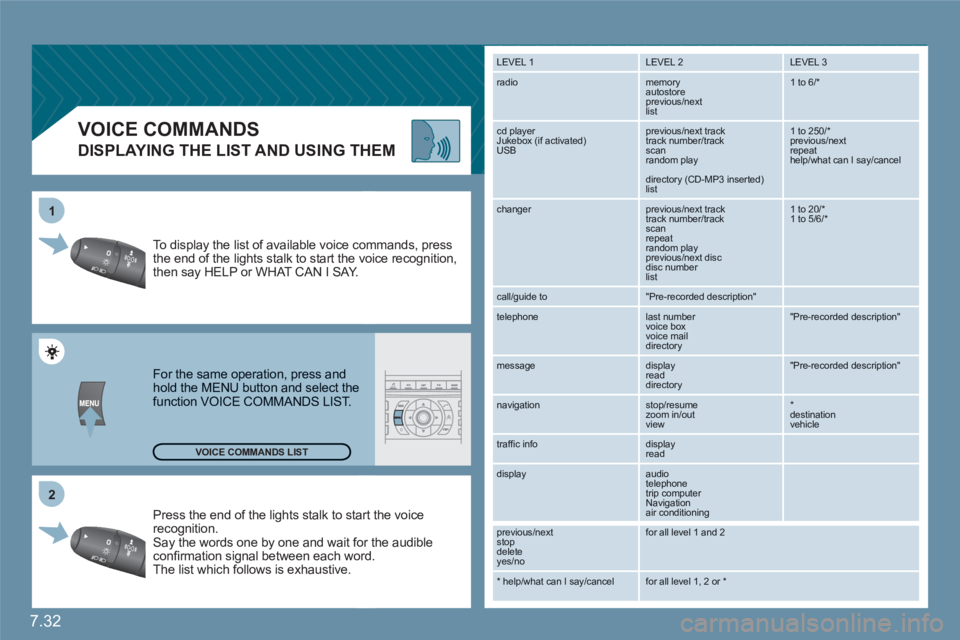
VOICE COMMANDS
DISPLAYING THE LIST AND USING THEM
Press the end of the lights stalk to staart the voicerecognition. Say the words one by one and wait foor the audibleconfi rmation signal between each woord.
The list which follows is exhaustive.
To display the list of available voice coommands, press the end of the lights stalk to start the vvoice recognition,then say HELP or WHAT CAN I SAY.
For the same operation, press and hold the MENU button and select the function VOICE COMMANDS LIST.
LEVEL 1
LEVEL 2 LEVEL 3
radio memory autostore
previous/next list
1 to 6/*
cd player
Jukebox (if activated) USB
previous/next track
track number/track scan
random play
directory (CD-MP3 inserted) list
1 to 250/* previous/next repeat help/what can I say/cancel
changer
previous/next track
track number/track scan
repeat
random play previous/next disc disc number list
1 to 20/* 1 to 5/6/*
call/guide to
"Pre-recorded description"
telephone
last number
voice box
voice mail
directory
"Pre-recorded description"
message
display
read directory
"Pre-recorded description"
navigation
stop/resume
zoom in/out
view
*destination vehicle
traffi c info display
read
display audio
telephone
trip computer
Navigation
air conditioning
previous/next
stop delete
yes/no
for all level 1 and 2
* help/what can I say/cancel for all level 1, 2 or * VOICE COMMANDS LIST
Page 187 of 216

7.37
1
2
2
1
2
1
2
2
2
3
3
4
4
4
3
2
2
2
3
4
4
4
3
3
3
3
4
4
4
4
1
2
2
1
2
2
2
1
1
1
3
3
3
3
3
3
3
3
2
Display short cuts version 8.2
CONFIGURATION
DISPLAY CONFIGURATION
choose colour
adjust brightness
set date and time
select units
SOUND
*
The parameters vary according to vehicle.
voice commands setting
speech synthesis setting
guidance instructions volume
other message volume
select female/male voice
activate/deactivate auxiliary source
VIDEO
VEHICLE DIAGNOSTICS
SELECT LANGUAGE
DEFINE VEHICLE PARAMETERS
*
ACTIVATE VIDEO MODE
VIDEO PARAMETERS
display formats
adjust brightness
set colours
set contrasts
ALERT LOG
STATUS OF FUNCTIONS *
RESET TYRE PRESS. DETEC. SYS. *
BLUETOOTH FUNCTIONS
activation mode
deactivated
activated and visible
activated and not visible
list of paired peripheral equipment
change the name of the audio/telephone
authentication code
phone book synchronisation mode
no synchronisation
view telephone phone book
view SIM card phone book
view all phone books
ACTIVATING/DEACTIVATING THE SEPARATE LH-RH CONTROL
SWITCHING THE AIR CONDITIONING ON/OFF
AIR CONDITIONING
Press the MENU button for more than 2 seconds to access thefollowing fl ow chart.
VOICE COMMANDS LIST
Press the Music button severaltimes in succession to access the following settings.
AUTO VOLUME CORRECTION
Each audio source (Radio, CD, MP3,Jukebox, CD changer) has its own separate settings.
AUDIO/TELEPHONE DIAGNOSTICS
GPS COVERAGE
UNIT BACKUP POWER
UNIT DESCRIPTION
NAVIGATION DEMONSTRATION
SERVICES CONFIGURATION
LOUDNESS CORRECTION TREBLEBASS MUSICAL AMBIENCE
FR - RR BALANCE LH - RH BALANCE
Page 188 of 216

7.38
sound quality between the different audio sources (radio, CD,CD changer...).
Check that the audio settings (Volume, Bass, Treble, Ambience, Loudness) are adapted to the sources listened to. It is advisable to set the AUDIO functions (Bass, Treble, Front-Rear Balance, Left-Right Balance) to the middle position, select the musical ambience "None"and set the loudness correction to the "Active" position in CD mode or to the "Inactive" position in radio mode.
For optimum sound quality, the audio settings (Volume, Bass, Treble, Ambience, Loudness) can be adapted to the different sound sources, which may result in audible differences when changing source (radio, CD,CD changer...).
The CD is ejectedautomatically or is notplayed by the player.
The CD is protected by an anti-pirating protectionsystem which is not recognised by the audio equipment.
The CD is inserted upside down, is unplayable, does not contain any audiodata or contains an audio format which the player cannot play.
The CD player sound is poor.
Insert good quality CDs and store them insuitable conditions.
The CD used is scratched or of poor quality.
The audio equipment settings (bass, treble, ambiences) are unsuitable. Set the treble or bass level to 0, without selectingan ambience.
The table below groups together the answers to the most frequently asked questions.
QUESTION SOLUTION
RESPONSE
FREQUENTLY ASKED QUESTIONS
- Check that the CD is inserted in the player the right way up.
- Check the condition of the CD: the CD cannot be played if it is too damaged.
- Check the content in the case of a recordedCD: consult the advice in the Audio section.
-The audio equipment's CD player does not play DVDs.
- Due to inadequate quality, certain recordedCDs will not be played by the audio system.
- The CD changer does not play MP3 CDs.
Page 193 of 216

7.43
11
223344
55
6677
1010
111
1212131314141515
88
99
01 FIRST STEPS
1.On/Off and volume adjustment.
2.Selection of the display on the screen from the modes:AUDIO, trip computer (TRIP), air conditioning (CLIM) and hands-free kit (TEL). The TEL button is not active if the hands-free kit option is not fi tted.
3.Selection of the source: radio, CD and CD changer.
4.Displaying of the general menu.
5.Cancellation of the current operation/return to the previous screen.
6.Confi rmation.
7.Automatic search for a lower/higher frequency. Selection of previous/next CD or MP3 track.
8. TA (Traffi c Announcement) function on/off.Long press: access to the PTY(radio Programme TYpes) mode.
9.Displaying of the list of local stations, of the tracks on the CD or of the MP3 directories.
10.
CD eject.
11 .
Buttons 1 to 6: Selection of a stored radio station. Selection of a CD in the CD changer. Long press: storing of a station.
12. Selection of the FM1, FM2, FMast and AM wavebands.
13.
Selection of a lower/higher radio frequency. Selection of the previous/next CD. Selection of the previous/next MP3 directory.
14.
Setting the audio options: front/rear balance, left/rightbalance, loudness, sound ambiences.
15.
The DARK button changes the screen display for greater driving comfort at night.1st press: lighting of the upper banner only.2nd press: black screen display.3rd press: return to the standard display.