2012 CHEVROLET SUBURBAN stop start
[x] Cancel search: stop startPage 32 of 514
Black plate (26,1)Chevrolet Tahoe/Suburban Owner Manual - 2012
1-26 In Brief
When the sunroof is opened, an air
deflector will automatically raise.
The air deflector will retract when
the sunroof is closed.
The sunroof also has a sunshade
which can be pulled forward to block
sun rays. The sunshade must be
opened and closed manually.
If an object is in the path of the
sunroof while it is closing, the
anti-pinch feature will detect the
object and stop the sunroof.
SeeSunroof on page 2‑22.Performance and
Maintenance
StabiliTrak®System
If equipped, the vehicle has a
traction control system that limits
wheel spin and the StabiliTrak
system that assists with directional
control of the vehicle in difficult
driving conditions. Both systems
turn on automatically every time the
vehicle is started.
.To turn off traction control, press
and release
gon the instrument
panel. The appropriate DIC
message displays. See Ride
Control System Messages on
page 5‑41.
.To turn off both traction control
and StabiliTrak, press and
hold
guntilgilluminates and the
appropriate DIC message
displays. See Ride Control
System Messages on page 5‑41.
.Press and releasegagain to
turn on both systems.
For more information, see
StabiliTrak
®System on page 9‑45.
Tire Pressure Monitor
This vehicle may have a Tire
Pressure Monitor System (TPMS).
The TPMS warning light alerts you
to a significant loss in pressure of
one of the vehicle's tires. If the
warning light comes on, stop as
soon as possible and inflate the
tires to the recommended pressure
shown on the Tire and Loading
Information label. See Vehicle Load
Limits on page 9‑16. The warning
light will remain on until the tire
pressure is corrected.
Page 33 of 514
Black plate (27,1)Chevrolet Tahoe/Suburban Owner Manual - 2012
In Brief 1-27
During cooler conditions, the low tire
pressure warning light may appear
when the vehicle is first started and
then turn off. This may be an early
indicator that the tire pressures are
getting low and the tires need to be
inflated to the proper pressure.
The TPMS does not replace normal
monthly tire maintenance. It is the
driver’s responsibility to maintain
correct tire pressures.
See Tire Pressure Monitor System
on page 10‑53.
Engine Oil Life System
The engine oil life system calculates
engine oil life based on vehicle use
and, on most vehicles, displays a
DIC message when it is necessary
to change the engine oil and filter.
The oil life system should be reset
to 100% only following an oil
change. Resetting the Oil Life System
To reset the Engine Oil Life System
on most vehicles:
1. Display OIL LIFE REMAINING
on the DIC. If the vehicle does
not have DIC buttons, the
vehicle must be in P (Park) to
access this display.
2. Press and hold the SET/RESET button on the DIC, or the trip
odometer reset stem if the
vehicle does not have DIC
buttons, for more than
five seconds. The oil life will
change to 100%.
On all vehicles, the Engine Oil Life
System can be reset as follows:
1. Turn the ignition to ON/RUN with the engine off.
2. Fully press the accelerator pedal slowly three times within
five seconds.
3. Display OIL LIFE REMAINING on the DIC. If the display
shows 100%, the system is
reset. See
Engine Oil Life System on
page 10‑9.
Fuel E85 (85% Ethanol)
Vehicles that have a FlexFuel badge
and a yellow fuel cap can use either
unleaded gasoline or ethanol fuel
containing up to 85% ethanol (E85).
See Fuel E85 (85% Ethanol) on
page 9‑62. For all other vehicles,
use only the unleaded gasoline
described under Recommended
Fuel on page 9‑60.
Driving for Better Fuel
Economy
Driving habits can affect fuel
mileage. Here are some driving
tips to get the best fuel economy
possible.
.Avoid fast starts and accelerate
smoothly.
.Brake gradually and avoid
abrupt stops.
.Avoid idling the engine for long
periods of time.
Page 39 of 514
Black plate (5,1)Chevrolet Tahoe/Suburban Owner Manual - 2012
Keys, Doors, and Windows 2-5
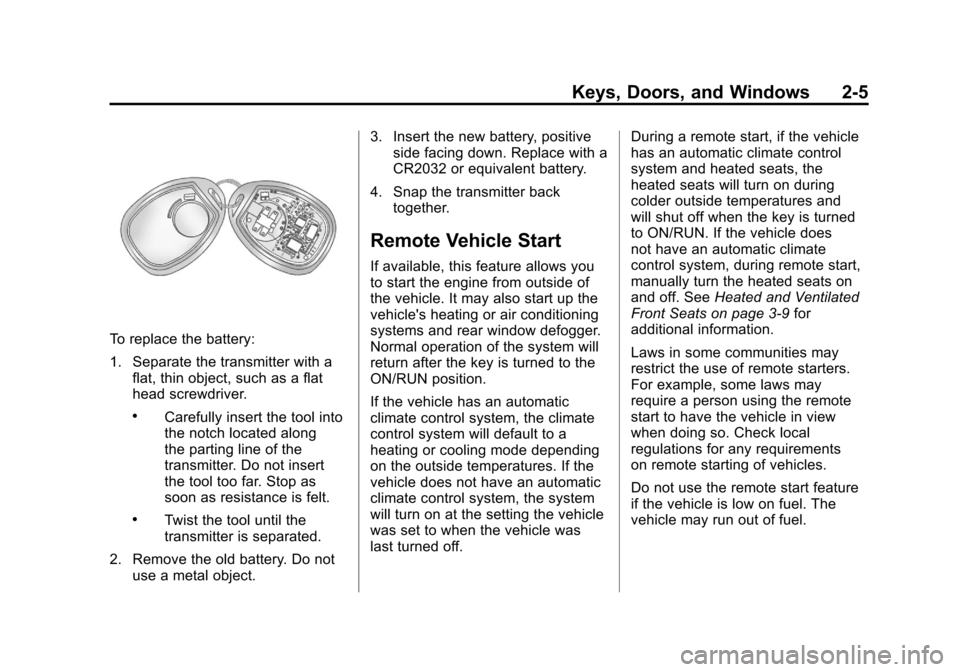
To replace the battery:
1. Separate the transmitter with aflat, thin object, such as a flat
head screwdriver.
.Carefully insert the tool into
the notch located along
the parting line of the
transmitter. Do not insert
the tool too far. Stop as
soon as resistance is felt.
.Twist the tool until the
transmitter is separated.
2. Remove the old battery. Do not use a metal object. 3. Insert the new battery, positive
side facing down. Replace with a
CR2032 or equivalent battery.
4. Snap the transmitter back together.
Remote Vehicle Start
If available, this feature allows you
to start the engine from outside of
the vehicle. It may also start up the
vehicle's heating or air conditioning
systems and rear window defogger.
Normal operation of the system will
return after the key is turned to the
ON/RUN position.
If the vehicle has an automatic
climate control system, the climate
control system will default to a
heating or cooling mode depending
on the outside temperatures. If the
vehicle does not have an automatic
climate control system, the system
will turn on at the setting the vehicle
was set to when the vehicle was
last turned off. During a remote start, if the vehicle
has an automatic climate control
system and heated seats, the
heated seats will turn on during
colder outside temperatures and
will shut off when the key is turned
to ON/RUN. If the vehicle does
not have an automatic climate
control system, during remote start,
manually turn the heated seats on
and off. See
Heated and Ventilated
Front Seats on page 3‑9 for
additional information.
Laws in some communities may
restrict the use of remote starters.
For example, some laws may
require a person using the remote
start to have the vehicle in view
when doing so. Check local
regulations for any requirements
on remote starting of vehicles.
Do not use the remote start feature
if the vehicle is low on fuel. The
vehicle may run out of fuel.
Page 40 of 514
Black plate (6,1)Chevrolet Tahoe/Suburban Owner Manual - 2012
2-6 Keys, Doors, and Windows
If the vehicle has the remote
start feature, the RKE transmitter
functions will have an increased
range of operation. However, the
range may be less while the vehicle
is running.
There are other conditions which
can affect the performance of the
transmitter. SeeRemote Keyless
Entry (RKE) System on page 2‑2 for
additional information.
/(Remote Start): This button will
be on the RKE transmitter if the
vehicle has remote start.
To start the vehicle using the remote
start feature:
1. Aim the RKE transmitter at the
vehicle.
2. Press and release
Q.
3. Immediately press and hold
/until the turn signal
lamps flash. If you cannot see
the vehicle's lamps, press and
hold
/for two to four seconds. When the vehicle starts, the
parking lamps will turn on and
remain on while the vehicle
is running. The doors will be
locked and the climate control
system may come on.
The engine will continue to run
for 10 minutes. Repeat the steps
for a 10-minute time extension.
Remote start can be extended
only once.
After entering the vehicle during a
remote start, insert and turn the key
to ON/RUN to drive the vehicle.
To cancel a remote start:
.Aim the RKE transmitter at
the vehicle and press and
hold
/until the parking lamps
turn off.
.Turn on the hazard warning
flashers.
.Turn the ignition on and then
back off. The vehicle can be remote started
two separate times between driving
sequences. The engine will run for
10 minutes after each remote start.
Or, you can extend the engine run
time by another 10 minutes within
the first 10 minute remote start time
frame, and before the engine stops.
For example, if
Qand then/are
pressed again after the vehicle
has been running for 5 minutes,
10 minutes are added, allowing the
engine to run for 15 minutes.
The additional 10 minutes are
considered a second remote vehicle
start.
Once two remote starts, or a single
remote start with one time extension
has been done, the vehicle must be
started with the key. After the key
is removed from the ignition, the
vehicle can be remote started again.
Page 41 of 514
Black plate (7,1)Chevrolet Tahoe/Suburban Owner Manual - 2012
Keys, Doors, and Windows 2-7
The vehicle cannot be remote
started if the key is in the ignition,
the hood is not closed, or if there
is an emission control system
malfunction and the check engine
light is on.
Also, the engine will turn off during a
remote vehicle start if the coolant
temperature gets too high or if the
oil pressure gets low.
Remote Start Ready
If the vehicle does not have the
remote vehicle start feature, it may
have the remote start ready feature.
This feature allows your dealer to
add the manufacturer's remote
vehicle start feature.
See your dealer to add the
manufacturer's remote vehicle
start feature to the vehicle.
Door Locks
{WARNING
Unlocked doors can be
dangerous.
.Passengers, especially
children, can easily open
the doors and fall out of a
moving vehicle. When a door
is locked, the handle will not
open it. The chance of being
thrown out of the vehicle in
a crash is increased if the
doors are not locked. So,
all passengers should wear
safety belts properly and
the doors should be locked
whenever the vehicle is
driven.
.Young children who get into
unlocked vehicles may be
unable to get out. A child can
be overcome by extreme heat
and can suffer permanent(Continued)
WARNING (Continued)
injuries or even death from
heat stroke. Always lock the
vehicle whenever leaving it.
.Outsiders can easily enter
through an unlocked door
when you slow down or stop
the vehicle. Locking the doors
can help prevent this from
happening.
There are several ways to lock and
unlock the vehicle.
From outside, use the Remote
Keyless Entry (RKE) transmitter or
the key in the driver door.
From inside, use the power door
locks or manual door locks. To lock
or unlock the door with the manual
locks, push down or pull up on the
manual lock knob.
Page 48 of 514
Black plate (14,1)Chevrolet Tahoe/Suburban Owner Manual - 2012
2-14 Keys, Doors, and Windows
Your vehicle's headlamps will flash
and the horn will sound for about
30 seconds, then will turn off to save
the battery power.
The theft-deterrent system will not
activate if the doors are locked with
the vehicle's key or the manual door
lock. It activates only if you use the
power door lock switch with the door
open or the RKE transmitter. You
should also remember that you can
start your vehicle with the correct
ignition key if the alarm has been
set off.
To avoid setting off the alarm by
accident:
.If you do not want to activate the
theft-deterrent system, the
vehicle should be locked with
the door key after the doors are
closed.
.Always unlock the doors with the
RKE transmitter. Unlocking a
door any other way will set off
the alarm if it is armed.If you set off the alarm by accident,
press unlock on the RKE transmitter
or place the key in the ignition and
turn it to START to turn off the
alarm. The alarm will not stop if you
try to unlock a door any other way.
Testing the Alarm
To test the alarm:
1. From inside the vehicle, lower
the driver window and open the
driver door.
2. Activate the system by locking the doors with the power door
lock switch while the door is
open, or with the RKE
transmitter.
3. Get out of the vehicle, close the door and wait for the security
light to go out.
4. Then reach in through the window, unlock the door with the
manual door lock and open the
door. This should set off the
alarm. While the alarm is set, the power
door unlock switch will not work.
If the alarm does not sound when
it should but the headlamps flash,
check to see if the horn works. The
horn fuse may be blown. To replace
the fuse, see
Fuses and Circuit
Breakers on page 10‑37.
If the alarm does not sound or the
headlamps do not flash, the vehicle
should be serviced by your dealer.
Immobilizer
See Radio Frequency Statement on
page 13‑20 for information
regarding Part 15 of the Federal
Communications Commission (FCC)
rules and Industry Canada
Standards RSS-GEN/210/220/310.
Immobilizer Operation
This vehicle has PASS-Key®III+
(Personalized Automotive Security
System) theft-deterrent system.
PASS-Key III+ is a passive
theft-deterrent system.
Page 62 of 514
Black plate (6,1)Chevrolet Tahoe/Suburban Owner Manual - 2012
3-6 Seats and Restraints
Manual Reclining Seatbacks
{WARNING
You can lose control of the
vehicle if you try to adjust a
manual driver seat while the
vehicle is moving. The sudden
movement could startle and
confuse you, or make you push a
pedal when you do not want to.
Adjust the driver seat only when
the vehicle is not moving.
{WARNING
If either seatback is not locked, it
could move forward in a sudden
stop or crash. That could cause
injury to the person sitting there.
Always push and pull on the
seatbacks to be sure they are
locked.
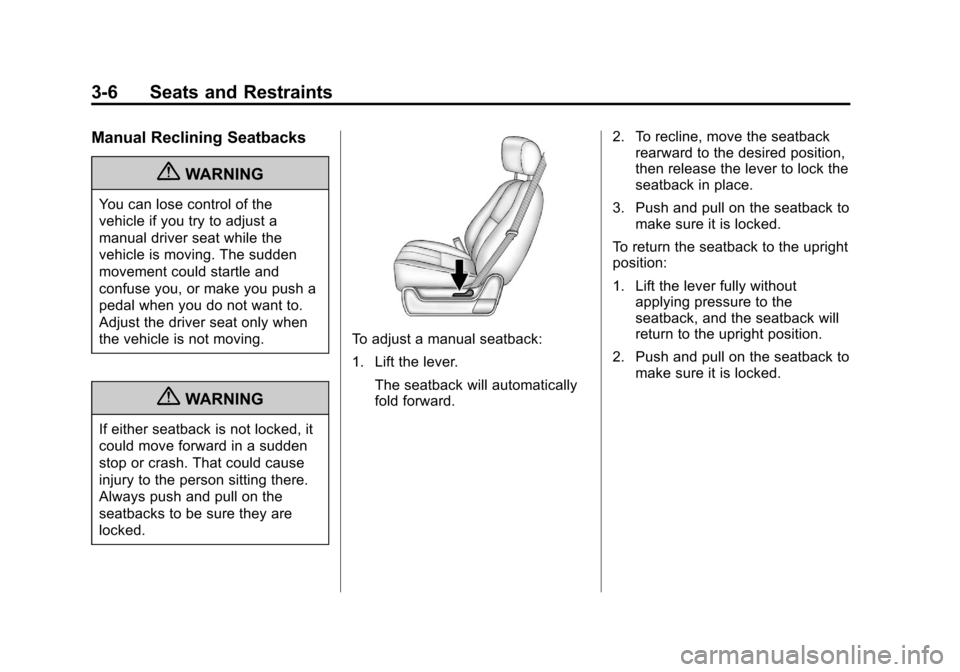
To adjust a manual seatback:
1. Lift the lever.The seatback will automatically
fold forward. 2. To recline, move the seatback
rearward to the desired position,
then release the lever to lock the
seatback in place.
3. Push and pull on the seatback to make sure it is locked.
To return the seatback to the upright
position:
1. Lift the lever fully without applying pressure to the
seatback, and the seatback will
return to the upright position.
2. Push and pull on the seatback to make sure it is locked.
Page 125 of 514
Black plate (3,1)Chevrolet Tahoe/Suburban Owner Manual - 2012
Storage 4-3
3. Move the other end of the coverforward and hold it next to the
driver side trim panel slot.
4. Press the end caps in, to allow the cover to fit into the trim slot.
5. Pull lightly on the cover holder to make sure it is secure.
On extended wheelbase models
there are two cover positions.
The slots furthest forward allow
the cover to be used if the third
seat is removed or folded down.
The cover can be installed and
removed from either side.Roof Rack System
{WARNING
If something is carried on top of
the vehicle that is longer or wider
than the roof rack —like paneling,
plywood, or a mattress —the
wind can catch it while the vehicle
is being driven. The item being
carried could be violently torn off,
and this could cause a collision
and damage the vehicle. Never
carry something longer or wider
than the roof rack on top of the
vehicle unless using a GM
certified accessory carrier.
For vehicles with a roof rack, the
rack can be used to load items.
For roof racks that do not have
crossrails included, GM Certified
crossrails can be purchased as an
accessory. See your dealer for
additional information. Notice:
Loading cargo on the
roof rack that weighs more than
91 kg (200 lbs) or hangs over the
rear or sides of the vehicle may
damage the vehicle. Load cargo
so that it rests evenly between
the crossrails, making sure to
fasten cargo securely.
To prevent damage or loss of cargo
when driving, check to make sure
crossrails and cargo are securely
fastened. Loading cargo on the roof
rack will make the vehicle’ s center
of gravity higher. Avoid high speeds,
sudden starts, sharp turns, sudden
braking or abrupt maneuvers,
otherwise it may result in loss of
control. If driving for a long distance,
on rough roads, or at high speeds,
occasionally stop the vehicle to
make sure the cargo remains in its
place.