2012 CHEVROLET ORLANDO turn signal
[x] Cancel search: turn signalPage 144 of 378
Black plate (4,1)Chevrolet Orlando Owner Manual - 2012
6-4 Lighting
system, to make the front and rear
turn signal lamps flash on and off.
This warns others that you are
having trouble. Press and
momentarily hold again to turn the
flashers off.
Turn and Lane-Change
Signals
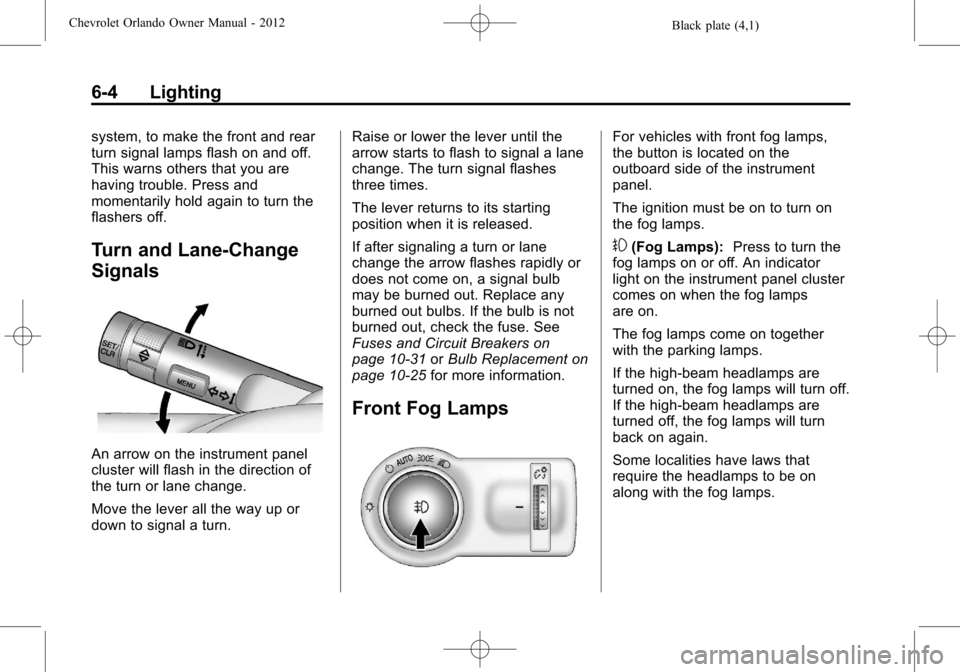
An arrow on the instrument panel
cluster will flash in the direction of
the turn or lane change.
Move the lever all the way up or
down to signal a turn.Raise or lower the lever until the
arrow starts to flash to signal a lane
change. The turn signal flashes
three times.
The lever returns to its starting
position when it is released.
If after signaling a turn or lane
change the arrow flashes rapidly or
does not come on, a signal bulb
may be burned out. Replace any
burned out bulbs. If the bulb is not
burned out, check the fuse. See
Fuses and Circuit Breakers on
page 10‑31
orBulb Replacement on
page 10‑25 for more information.
Front Fog Lamps
For vehicles with front fog lamps,
the button is located on the
outboard side of the instrument
panel.
The ignition must be on to turn on
the fog lamps.
#(Fog Lamps): Press to turn the
fog lamps on or off. An indicator
light on the instrument panel cluster
comes on when the fog lamps
are on.
The fog lamps come on together
with the parking lamps.
If the high‐beam headlamps are
turned on, the fog lamps will turn off.
If the high‐beam headlamps are
turned off, the fog lamps will turn
back on again.
Some localities have laws that
require the headlamps to be on
along with the fog lamps.
Page 161 of 378
Black plate (15,1)Chevrolet Orlando Owner Manual - 2012
Infotainment System 7-15
No Subscription Please Renew:
XM subscription needs to be
reactivated. Contact XM at
www.xmradio.com or
1-800-929-2100 in the U.S. and
www.xmradio.ca or
1-877-438-9677 in Canada.
No XM Signal:The system is
working properly. The vehicle may
be in a location where the XM signal
is being blocked. When the vehicle
is moved into an open area, the
signal should return.
CAT Not Found: The system is
working properly. There are no
channels available for the selected
category.
XM Radio ID: If tuned to channel 0,
this message alternates with the XM
radio eight‐digit radio ID label. This
label is needed to activate the
service.
Unknown: If this message is
received when tuned to channel 0,
there could be a receiver fault.
Consult with your dealer. Check Antenna:
If this message
does not clear within a short period
of time, the receiver could have a
fault. Consult with your dealer.
XM Not Available: If this message
does not clear within a short period
of time, the receiver could have a
fault. Consult with your dealer.
Radio Reception
Frequency interference and static
can occur during normal radio
reception if items such as cell phone
chargers, vehicle convenience
accessories, and external electronic
devices are plugged into the
accessory power outlet. If there is
interference or static, unplug the
item from the accessory power
outlet.
FM
FM signals only reach about 16 to
65 km (10 to 40 mi). Although the
radio has a built-in electronic circuit
that automatically works to reduce
interference, some static can occur, especially around tall buildings or
hills, causing the sound to fade in
and out.
AM
The range for most AM stations is
greater than for FM, especially at
night. The longer range can cause
station frequencies to interfere
with each other. For better radio
reception, most AM radio stations
boost the power levels during the
day, and then reduce these levels
during the night. Static can also
occur when things like storms and
power lines interfere with radio
reception. When this happens, try
reducing the treble on the radio.
XM™
Satellite Radio Service
XM Satellite Radio Service gives
digital radio reception from coast to
coast in the 48 contiguous United
States, and in Canada. Just as
with FM, tall buildings or hills can
interfere with satellite radio signals,
causing the sound to fade in and
out. In addition, traveling or standing
Page 162 of 378

Black plate (16,1)Chevrolet Orlando Owner Manual - 2012
7-16 Infotainment System
under heavy foliage, bridges,
garages, or tunnels may cause loss
of the XM signal for a period of time.
Cellular Phone Usage
Cellular phone usage may cause
interference with the vehicle's radio.
This interference may occur when
making or receiving phone calls,
charging the phone's battery,
or simply having the phone on. This
interference can cause an increased
level of static while listening to the
radio. If static is received while
listening to the radio, unplug the
cellular phone and turn it off.
Satellite Radio Antenna
The XM Satellite Radio antenna is
located on the roof of the vehicle.
Keep the antenna clear of
obstructions for clear radio
reception.
If the vehicle has a sunroof, the
performance of the XM system may
be affected if the sunroof is open.
Multi-Band Antenna
The multi-band antenna is on the
roof of the vehicle. The antenna is
used for the AM‐FM radio, OnStar,
the XM Satellite Radio Service
System, and GPS (Global
Positioning System), if the vehicle
has these features. Keep the
antenna clear of obstructions for
clear reception.
Audio Players
CD Player
The CD player can play audio CDs
and MP3 CDs.
The CD player will not play
8 cm (3 in) CDs.
Care of CDs
Sound quality can be reduced due
to disc quality, recording method,
quality of the music recorded, and
how the disc has been handled.
Handle discs carefully and store
them in their original cases or other
protective cases away from direct
sunlight and dust. If the bottom
surface of a disc is damaged, the
disc may not play properly or at all.
Do not touch the bottom surface of
a disc while handling it; this could
damage the surface. Pick up discs
by grasping the outer edges or the
edge of the hole and the outer edge.
If the bottom surface of a disc is
dirty, take a soft lint‐free cloth,
or dampen a clean soft cloth in a
Page 197 of 378
Black plate (9,1)Chevrolet Orlando Owner Manual - 2012
Driving and Operating 9-9
WARNING (Continued)
If the vehicle is stuck in the snow:
.Clear away snow from around
the base of your vehicle,
especially any that is blocking
the exhaust pipe.
.Check again from time to
time to be sure snow does
not collect there.
.Open a window about 5 cm
(2 in) on the side of the
vehicle that is away from the
wind to bring in fresh air.
.Fully open the air outlets on
or under the instrument
panel.
.Adjust the climate control
system to a setting that
circulates the air inside the
vehicle and set the fan speed
to the highest setting.
See“Climate Control
Systems”in the Index.
(Continued)
WARNING (Continued)
For more information about
carbon monoxide, see Engine
Exhaust on page 9‑21.
Run the engine for short periods
only as needed to keep warm, but
be careful.
To save fuel, run the engine for only
short periods as needed to warm
the vehicle and then shut the engine
off and close the window most of
the way to save heat. Repeat this
until help arrives but only when you
feel really uncomfortable from the
cold. Moving about to keep warm
also helps.
If it takes some time for help to
arrive, now and then when you run
the engine, push the accelerator
pedal slightly so the engine runs
faster than the idle speed. This
keeps the battery charged to restart
the vehicle and to signal for help
with the headlamps. Do this as little
as possible to save fuel.
If the Vehicle Is Stuck
Slowly and cautiously spin the
wheels to free the vehicle when
stuck in sand, mud, ice, or snow.
If the vehicle has a traction system,
it can often help to free a stuck
vehicle. Refer to the vehicle's
traction system in the Index. If stuck
too severely for the traction system
to free the vehicle, turn the traction
system off and use the rocking
method.
{WARNING
If the vehicle's tires spin at high
speed, they can explode, and you
or others could be injured. The
vehicle can overheat, causing an
engine compartment fire or other
damage. Spin the wheels as little
as possible and avoid going
above 55 km/h (35 mph).
Page 231 of 378
Black plate (43,1)Chevrolet Orlando Owner Manual - 2012
Driving and Operating 9-43
shoulders, curbs, road signs, trees,
or other objects. Avoid jerky or
sudden maneuvers. Signal well in
advance.
Turn Signals When Towing a
Trailer
The arrows on the instrument panel
flash whenever signaling a turn or
lane change. Properly hooked up,
the trailer lamps also flash, telling
other drivers the vehicle is turning,
changing lanes, or stopping.
When towing a trailer, the arrows on
the instrument panel flash for turns
even if the bulbs on the trailer are
burned out. For this reason you may
think other drivers are seeing the
signal when they are not. It is
important to check occasionally to
be sure the trailer bulbs are still
working.
Driving On Grades
Reduce speed and shift to a lower
gear before starting down a long
or steep downgrade. If the
transmission is not shifted down, thebrakes might have to be used so
much that they would get hot and no
longer work well.
Vehicles with an automatic
transmission can tow in D (Drive)
but M (Manual Mode) is
recommended. Shift the
transmission to a lower gear if the
transmission shifts too often under
heavy loads and/or hilly conditions.
For vehicles with a manual
transmission, it is better not to use
the highest gear.
When towing at high altitude on
steep uphill grades, consider the
following: Engine coolant will boil at
a lower temperature than at normal
altitudes. If the engine is turned off
immediately after towing at high
altitude on steep uphill grades, the
vehicle may show signs similar to
engine overheating. To avoid this,
let the engine run while parked,
preferably on level ground, with the
automatic transmission in P (Park)
for a few minutes before turning the
engine off. For vehicles with manual
transmissions, let the engine runwhile parked, preferably on level
ground, with the transmission out of
gear and the parking brake applied,
for a few minutes before turning the
engine off. If the overheat warning
comes on, see
Engine Overheating
on page 10‑17.
Parking on Hills
{WARNING
Parking the vehicle on a hill with
the trailer attached can be
dangerous. If something goes
wrong, the rig could start to move.
People can be injured, and both
the vehicle and the trailer can be
damaged. When possible, always
park the rig on a flat surface.
If parking the rig on a hill:
1. Press the brake pedal, but do not shift into P (Park) yet for
vehicles with an automatic
transmission, or into gear for
vehicles with a manual
Page 235 of 378
Black plate (1,1)Chevrolet Orlando Owner Manual - 2012
Vehicle Care 10-1
Vehicle Care
General Information
General Information . . . . . . . . . . 10-2
Accessories andModifications . . . . . . . . . . . . . . . 10-2
Vehicle Checks
Doing Your OwnService Work . . . . . . . . . . . . . . . 10-3
Hood . . . . . . . . . . . . . . . . . . . . . . . . 10-4
Engine Compartment Overview . . . . . . . . . . . . . . . . . . . 10-6
Engine Oil . . . . . . . . . . . . . . . . . . . 10-7
Engine Oil Life System . . . . . . 10-9
Automatic Transmission Fluid . . . . . . . . . . . . . . . . . . . . . . 10-10
Manual Transmission Fluid . . . . . . . . . . . . . . . . . . . . . . 10-11
Hydraulic Clutch . . . . . . . . . . . . 10-11
Engine Air Cleaner/Filter . . . . 10-11
Cooling System . . . . . . . . . . . . 10-13
Engine Coolant . . . . . . . . . . . . . 10-14
Engine Overheating . . . . . . . . 10-17
Washer Fluid . . . . . . . . . . . . . . . 10-18
Brakes . . . . . . . . . . . . . . . . . . . . . 10-19
Brake Fluid . . . . . . . . . . . . . . . . . 10-20 Battery . . . . . . . . . . . . . . . . . . . . . 10-21
Starter Switch Check . . . . . . . 10-22
Automatic Transmission Shift
Lock Control Function
Check . . . . . . . . . . . . . . . . . . . . . 10-23
Ignition Transmission Lock Check . . . . . . . . . . . . . . . . . . . . . 10-23
Park Brake and P (Park) Mechanism Check . . . . . . . . 10-23
Wiper Blade Replacement . . . . . . . . . . . . . . 10-24
Headlamp Aiming
Headlamp Aiming . . . . . . . . . . 10-25
Bulb Replacement
Bulb Replacement . . . . . . . . . . 10-25
Halogen Bulbs . . . . . . . . . . . . . . 10-25
Headlamps, Front TurnSignal, Sidemarker, and
Parking Lamps . . . . . . . . . . . . 10-26
Fog Lamps . . . . . . . . . . . . . . . . . 10-27
Taillamps, Turn Signal, Sidemarker, and
Stoplamps . . . . . . . . . . . . . . . . 10-27
Back-Up Lamps . . . . . . . . . . . . 10-29
License Plate Lamp . . . . . . . . 10-30
Replacement Bulbs . . . . . . . . . 10-30
Electrical System
Electrical System Overload . . . . . . . . . . . . . . . . . . 10-31
Fuses and Circuit Breakers . . . . . . . . . . . . . . . . . . 10-31
Engine Compartment Fuse
Block . . . . . . . . . . . . . . . . . . . . . 10-32
Instrument Panel Fuse Block . . . . . . . . . . . . . . . . . . . . . 10-35
Wheels and Tires
Tires . . . . . . . . . . . . . . . . . . . . . . . . 10-38
Winter Tires . . . . . . . . . . . . . . . . 10-38
Tire Sidewall Labeling . . . . . . 10-39
Tire Designations . . . . . . . . . . . 10-40
Tire Terminology andDefinitions . . . . . . . . . . . . . . . . 10-41
Tire Pressure . . . . . . . . . . . . . . . 10-44
Tire Pressure Monitor
System . . . . . . . . . . . . . . . . . . . 10-45
Tire Pressure Monitor Operation . . . . . . . . . . . . . . . . . 10-46
Tire Inspection . . . . . . . . . . . . . . 10-49
Tire Rotation . . . . . . . . . . . . . . . 10-49
When It Is Time for New Tires . . . . . . . . . . . . . . . . . . . . . . 10-50
Buying New Tires . . . . . . . . . . . 10-51
Page 244 of 378

Black plate (10,1)Chevrolet Orlando Owner Manual - 2012
10-10 Vehicle Care
year. The engine oil and filter must
be changed at least once a year
and, at this time, the system must
be reset. Your dealer has trained
service people who will perform this
work and reset the system. It is also
important to check the oil regularly
over the course of an oil drain
interval and keep it at the proper
level.
If the system is ever reset
accidentally, the oil must be
changed at 5 000 km (3,000 mi)
since the last oil change.
Remember to reset the oil life
system whenever the oil is changed.
How to Reset the Engine Oil
Life System
Reset the system whenever the
engine oil is changed so that the
system can calculate the next
engine oil change. To reset the
system:
1. Turn the ignition to ON/RUN withthe engine off. 2. Press the DIC MENU button on
the turn signal lever to enter the
Vehicle Information Menu. Use
the thumbwheel to scroll through
the menu items until you reach
REMAINING OIL LIFE.
3. Press the SET/CLR button to reset the oil life at 100%.
4. Turn the ignition to LOCK/OFF.
The system is reset when the
CHANGE ENGINE OIL SOON DIC
message or Code 82 DIC message
is off and the REMAINING OIL LIFE
100% message is displayed.
If the CHANGE ENGINE OIL SOON
DIC message or Code 82 DIC
message comes back on when the
vehicle is started, the engine oil life
system has not been reset. Repeat
the procedure.
Automatic Transmission
Fluid
How to Check Automatic
Transmission Fluid
It is not necessary to check the
transmission fluid level. A
transmission fluid leak is the only
reason for fluid loss. If a leak
occurs, take the vehicle to your
dealer and have it repaired as soon
as possible.
There is a special procedure for
checking and changing the
transmission fluid. Because this
procedure is difficult, this should be
done at your dealer. Contact your
dealer for additional information or
the procedure can be found in the
service manual. To purchase a
service manual, see Service
Publications Ordering Information
on page 13‑11.
Page 260 of 378
Black plate (26,1)Chevrolet Orlando Owner Manual - 2012
10-26 Vehicle Care
Headlamps, Front Turn
Signal, Sidemarker, and
Parking Lamps
High‐Beam Headlamp/
Low‐Beam Headlamp
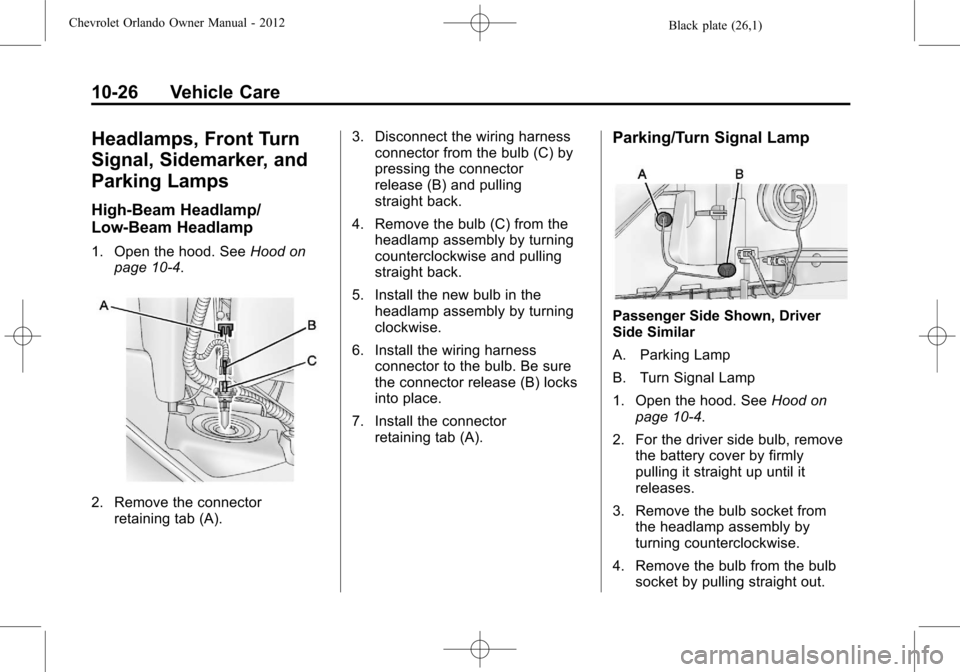
1. Open the hood. SeeHood on
page 10‑4.
2. Remove the connector retaining tab (A). 3. Disconnect the wiring harness
connector from the bulb (C) by
pressing the connector
release (B) and pulling
straight back.
4. Remove the bulb (C) from the headlamp assembly by turning
counterclockwise and pulling
straight back.
5. Install the new bulb in the headlamp assembly by turning
clockwise.
6. Install the wiring harness connector to the bulb. Be sure
the connector release (B) locks
into place.
7. Install the connector retaining tab (A).
Parking/Turn Signal Lamp
Passenger Side Shown, Driver
Side Similar
A. Parking Lamp
B. Turn Signal Lamp
1. Open the hood. See Hood on
page 10‑4.
2. For the driver side bulb, remove the battery cover by firmly
pulling it straight up until it
releases.
3. Remove the bulb socket from the headlamp assembly by
turning counterclockwise.
4. Remove the bulb from the bulb socket by pulling straight out.