2012 CHEVROLET ORLANDO wheel
[x] Cancel search: wheelPage 27 of 378

Black plate (21,1)Chevrolet Orlando Owner Manual - 2012
In Brief 1-21
Engine Oil Life System
The engine oil life system calculates
engine oil life based on vehicle use
and displays the CHANGE ENGINE
OIL SOON DIC message or
Code 82 DIC message when it is
time to change the engine oil and
filter. The oil life system should be
reset to 100% only following an oil
change.
Resetting the Oil Life System
1. Turn the ignition to ON/RUN withthe engine off.
2. Press the DIC MENU button on the turn signal lever to enter the
Vehicle Information Menu. Use
the thumbwheel to scroll through
the menu items until you reach
REMAINING OIL LIFE.
3. Press the SET/CLR button to reset the oil life at 100%.
4. Turn the ignition to LOCK/OFF.
See Engine Oil Life System on
page 10‑9.
Driving for Better Fuel
Economy
Driving habits can affect fuel
mileage. Here are some driving
tips to get the best fuel economy
possible.
.Avoid fast starts and accelerate
smoothly.
.Brake gradually and avoid
abrupt stops.
.Avoid idling the engine for long
periods of time.
.When road and weather
conditions are appropriate,
use cruise control.
.Always follow posted speed
limits or drive more slowly when
conditions require.
.Keep vehicle tires properly
inflated.
.Combine several trips into a
single trip.
.Replace the vehicle's tires with
the same TPC Spec number
molded into the tire's sidewall
near the size.
.Follow recommended scheduled
maintenance.
Roadside Assistance
Program
U.S.: 1-800-243-8872
TTY Users: 1-888-889-2438
Canada: 1-800-268-6800
As the owner of a new Chevrolet,
you are automatically enrolled in the
Roadside Assistance program.
See Roadside Assistance Program
on page 13‑5 for more information.
Roadside Assistance and OnStar
If you have an active OnStar
subscription, press the
Qbutton
and the current GPS location will be
sent to an OnStar advisor who will
assess your problem, contact
Page 71 of 378
Black plate (25,1)Chevrolet Orlando Owner Manual - 2012
Seats and Restraints 3-25
After a minor crash, replacement of
safety belts may not be necessary.
But the safety belt assemblies that
were used during any crash may
have been stressed or damaged.
See your dealer to have the safety
belt assemblies inspected or
replaced.
New parts and repairs may be
necessary even if the safety belt
system was not being used at the
time of the crash.
Have the safety belt pretensioners
checked if the vehicle has been in a
crash, or if the airbag readiness light
stays on after you start the vehicle
or while you are driving. SeeAirbag
Readiness Light on page 5‑12.Airbag System
The vehicle has the following
airbags:
.A frontal airbag for the driver.
.A frontal airbag for the front
outboard passenger.
.A seat-mounted side impact
airbag for the driver.
.A seat-mounted side impact
airbag for the front outboard
passenger.
.A roof-rail airbag for the driver
and the passenger seated
directly behind the driver.
.A roof-rail airbag for the front
outboard passenger and for
the passenger seated directly
behind the front outboard
passenger. All vehicle airbags have the word
AIRBAG on the trim or on a label
near the deployment opening.
For frontal airbags, the word
AIRBAG is on the center of the
steering wheel for the driver and on
the instrument panel for the front
outboard passenger.
For seat-mounted side impact
airbags, the word AIRBAG is on
the side of the seatback closest to
the door.
For roof-rail airbags, the word
AIRBAG is on the ceiling or trim.
Airbags are designed to supplement
the protection provided by safety
belts. Even though today's airbags
are also designed to help reduce
the risk of injury from the force of an
inflating bag, all airbags must inflate
very quickly to do their job.
Page 73 of 378
Black plate (27,1)Chevrolet Orlando Owner Manual - 2012
Seats and Restraints 3-27
There is an airbag readiness light
on the instrument panel cluster,
which shows the airbag symbol.
The system checks the airbag
electrical system for malfunctions.
The light tells you if there is an
electrical problem. SeeAirbag
Readiness Light on page 5‑12 for
more information.
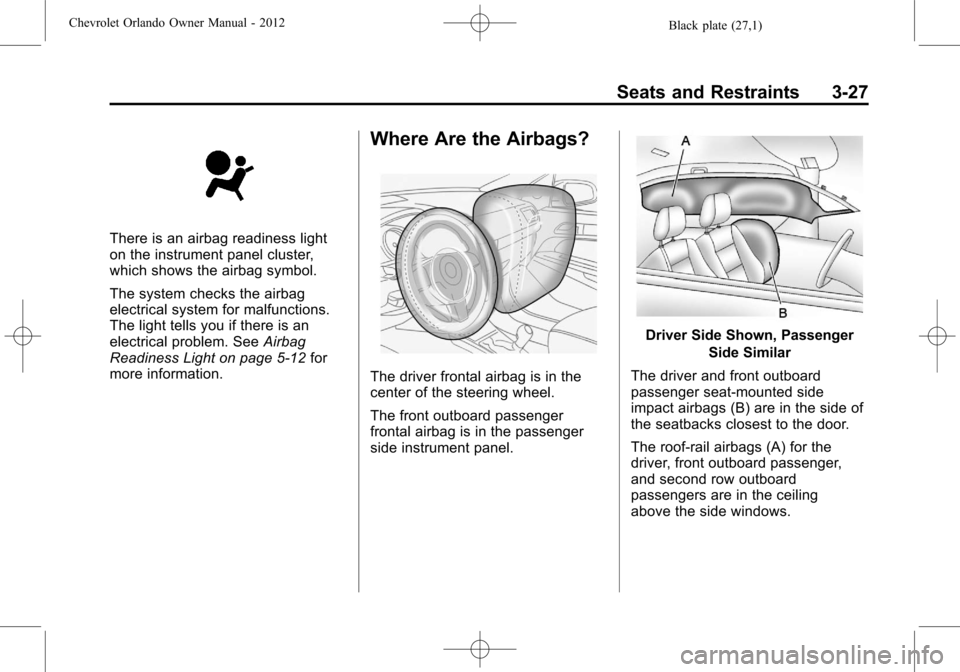
Where Are the Airbags?
The driver frontal airbag is in the
center of the steering wheel.
The front outboard passenger
frontal airbag is in the passenger
side instrument panel.
Driver Side Shown, Passenger
Side Similar
The driver and front outboard
passenger seat-mounted side
impact airbags (B) are in the side of
the seatbacks closest to the door.
The roof-rail airbags (A) for the
driver, front outboard passenger,
and second row outboard
passengers are in the ceiling
above the side windows.
Page 74 of 378
Black plate (28,1)Chevrolet Orlando Owner Manual - 2012
3-28 Seats and Restraints
{WARNING
If something is between an
occupant and an airbag, the
airbag might not inflate properly
or it might force the object into
that person causing severe injury
or even death. The path of an
inflating airbag must be kept
clear. Do not put anything
between an occupant and an
airbag, and do not attach or put
anything on the steering wheel
hub or on or near any other
airbag covering.
Do not use seat accessories that
block the inflation path of a
seat-mounted side impact airbag.
Never secure anything to the roof
of a vehicle with roof-rail airbags
by routing a rope or tie‐down
through any door or window
opening. If you do, the path of an
inflating roof-rail airbag will be
blocked.
When Should an Airbag
Inflate?
Frontal airbags are designed to
inflate in moderate to severe frontal
or near frontal crashes to help
reduce the potential for severe
injuries, mainly to the driver's or
right front passenger's head and
chest. However, they are only
designed to inflate if the impact
exceeds a predetermined
deployment threshold. Deployment
thresholds are used to predict how
severe a crash is likely to be in time
for the airbags to inflate and help
restrain the occupants.
Whether the frontal airbags will or
should inflate is not based primarily
on how fast the vehicle is traveling.
It depends largely on what is hit, the
direction of the impact, and how
quickly the vehicle slows down.
Frontal airbags may inflate at
different crash speeds depending on
whether the vehicle hits an object
straight on or at an angle, andwhether the object is fixed or
moving, rigid or deformable, narrow
or wide.
Thresholds can also vary with
specific vehicle design.
Frontal airbags are not intended to
inflate during vehicle rollovers, rear
impacts, or in many side impacts.
In addition, the vehicle has
dual-stage frontal airbags.
Dual-stage airbags adjust the
restraint according to crash severity.
The vehicle has electronic frontal
sensors, that help the sensing
system distinguish between a
moderate frontal impact and a more
severe frontal impact. For moderate
frontal impacts, dual-stage airbags
inflate at a level less than full
deployment. For more severe frontal
impacts, full deployment occurs.
The vehicle has seat-mounted side
impact and roof-rail airbags. See
Airbag System on page 3‑25.
Seat-mounted side impact and
roof-rail airbags are intended to
inflate in moderate to severe side
Page 75 of 378
Black plate (29,1)Chevrolet Orlando Owner Manual - 2012
Seats and Restraints 3-29
crashes, depending on the location
of the impact. In addition, these
roof-rail airbags are intended to
inflate during a rollover or in a
severe frontal impact. Seat-mounted
side impact and roof-rail airbags will
inflate if the crash severity is above
the system's designed threshold
level. The threshold level can vary
with specific vehicle design.
Seat-mounted side impact airbags
are not intended to inflate in frontal
impacts, near frontal impacts,
rollovers, or rear impacts. Roof-rail
airbags are not intended to inflate in
rear impacts. A seat-mounted side
impact airbag is intended to inflate
on the side of the vehicle that is
struck. Both roof-rail airbags will
inflate when either side of the
vehicle is struck, or if the sensing
system predicts that the vehicle is
about to roll over, or in a severe
frontal impact.
In any particular crash, no one can
say whether an airbag should have
inflated simply because of the
vehicle damage or repair costs.What Makes an Airbag
Inflate?
In a deployment event, the sensing
system sends an electrical signal
triggering a release of gas from the
inflator. Gas from the inflator fills the
airbag causing the bag to break out
of the cover. The inflator, the airbag,
and related hardware are all part of
the airbag module.
For airbag location, seeWhere Are
the Airbags? on page 3‑27.
How Does an Airbag
Restrain?
In moderate to severe frontal or
near frontal collisions, even belted
occupants can contact the steering
wheel or the instrument panel. In
moderate to severe side collisions,
even belted occupants can contact
the inside of the vehicle. Airbags supplement the protection
provided by safety belts by
distributing the force of the
impact more evenly over the
occupant's body.
Rollover capable roof‐rail airbags
are designed to help contain the
head and chest of occupants in the
outboard seating positions in the
first and second rows. The rollover
capable roof‐rail airbags are
designed to help reduce the risk of
full or partial ejection in rollover
events, although no system can
prevent all such ejections.
But airbags would not help in many
types of collisions, primarily
because the occupant's motion is
not toward those airbags. See
When
Should an Airbag Inflate? on
page 3‑28 for more information.
Airbags should never be regarded
as anything more than a supplement
to safety belts.
Page 78 of 378
Black plate (32,1)Chevrolet Orlando Owner Manual - 2012
3-32 Seats and Restraints
diagnostic module, steering wheel,
instrument panel, roof-rail airbag
modules, ceiling headliner or pillar
garnish trim, overhead console,
front sensors, side impact sensors,
or airbag wiring.
Your dealer and the service manual
have information about the location
of the airbag sensors, sensing and
diagnostic module, and airbag
wiring.
If the vehicle has rollover roof‐rail
airbags, seeDifferent Size Tires
and Wheels on page 10‑52 for
important information.
If you have to modify your vehicle
because you have a disability and
have questions about whether the
modifications will affect the vehicle's
airbag system, or if you have
questions about whether the airbag
system will be affected if the vehicle
is modified for any other reason, call
Customer Assistance. See
Customer Assistance Offices on
page 13‑3.Airbag System Check
The airbag system does not need
regularly scheduled maintenance or
replacement. Make sure the airbag
readiness light is working. See
Airbag Readiness Light on
page 5‑12 for more information.
Notice: If an airbag covering is
damaged, opened, or broken, the
airbag may not work properly. Do
not open or break the airbag
coverings. If there are any
opened or broken airbag covers,
have the airbag covering and/or
airbag module replaced. For the
location of the airbags, see
Where Are the Airbags? on
page 3‑27. See your dealer for
service.
Replacing Airbag System
Parts after a Crash
{WARNING
A crash can damage the airbag
systems in the vehicle.
A damaged airbag system
may not work properly and may
not protect you and your
passenger(s) in a crash, resulting
in serious injury or even death. To
help make sure the airbag
systems are working properly
after a crash, have them
inspected and any necessary
replacements made as soon as
possible.
Page 105 of 378

Black plate (1,1)Chevrolet Orlando Owner Manual - 2012
Instruments and Controls 5-1
Instruments and
Controls
Controls
Steering Wheel Adjustment . . . 5-2
Steering Wheel Controls . . . . . . 5-3
Horn . . . . . . . . . . . . . . . . . . . . . . . . . . 5-3
Windshield Wiper/Washer . . . . . 5-3
Rear Window Wiper/Washer . . . . . . . . . . . . . . . . . . . . . . 5-5
Compass . . . . . . . . . . . . . . . . . . . . . 5-5
Clock . . . . . . . . . . . . . . . . . . . . . . . . . 5-5
Power Outlets . . . . . . . . . . . . . . . . . 5-6
Cigarette Lighter . . . . . . . . . . . . . . 5-7
Ashtrays . . . . . . . . . . . . . . . . . . . . . . 5-7
Warning Lights, Gauges, and
Indicators
Warning Lights, Gauges, and Indicators . . . . . . . . . . . . . . . . . . . . 5-7
Instrument Cluster . . . . . . . . . . . . 5-9
Speedometer . . . . . . . . . . . . . . . . 5-10
Odometer . . . . . . . . . . . . . . . . . . . . 5-10
Tachometer . . . . . . . . . . . . . . . . . . 5-10 Fuel Gauge . . . . . . . . . . . . . . . . . . 5-10
Engine Coolant Temperature
Gauge . . . . . . . . . . . . . . . . . . . . . . 5-11
Safety Belt Reminders . . . . . . . 5-11
Airbag Readiness Light . . . . . . 5-12
Charging System Light . . . . . . 5-12
Malfunction Indicator Lamp . . . . . . . . . . . . . 5-13
Service Vehicle Soon Light . . . . . . . . . . . . . . . . . . . . . . . 5-15
Brake System Warning Light . . . . . . . . . . . . . . . . . . . . . . . 5-15
Antilock Brake System (ABS) Warning Light . . . . . . . . . . . . . . 5-16
Up-Shift Light . . . . . . . . . . . . . . . . 5-17
Power Steering Warning Light . . . . . . . . . . . . . . . . . . . . . . . 5-17
Traction Off Light . . . . . . . . . . . . 5-17
StabiliTrak
®OFF Light . . . . . . . 5-18
Traction Control System (TCS)/StabiliTrak
®Light . . . . 5-18
Tire Pressure Light . . . . . . . . . . 5-18
Engine Oil Pressure Light . . . . 5-19
Low Fuel Warning Light . . . . . . 5-20
Security Light . . . . . . . . . . . . . . . . 5-20
Reduced Engine Power Light . . . . . . . . . . . . . . . . . . . . . . . 5-20 High-Beam On Light . . . . . . . . . 5-21
Daytime Running Lamps
(DRL) Indicator Light . . . . . . . 5-21
Front Fog Lamp Light . . . . . . . . 5-21
Lamps On Reminder . . . . . . . . . 5-21
Cruise Control Light . . . . . . . . . 5-22
Door Ajar Light . . . . . . . . . . . . . . 5-22
Information Displays
Driver Information Center (DIC) . . . . . . . . . . . . . . . 5-22
Vehicle Messages
Vehicle Messages(Base Level) . . . . . . . . . . . . . . . 5-26
Vehicle Messages (Uplevel) . . . . . . . . . . . . . . . . . . . 5-26
Battery Voltage and Charging Messages . . . . . . . . . . . . . . . . . . 5-26
Brake System Messages . . . . 5-27
Compass Messages . . . . . . . . . 5-27
Cruise Control Messages . . . . 5-27
Door Ajar Messages . . . . . . . . . 5-27
Engine Cooling System Messages . . . . . . . . . . . . . . . . . . 5-27
Engine Oil Messages . . . . . . . . 5-28
Engine Power Messages . . . . 5-28
Page 106 of 378

Black plate (2,1)Chevrolet Orlando Owner Manual - 2012
5-2 Instruments and Controls
Fuel System Messages . . . . . . 5-29
Key and Lock Messages . . . . . 5-29
Lamp Messages . . . . . . . . . . . . . 5-29
Object Detection SystemMessages . . . . . . . . . . . . . . . . . . 5-29
Ride Control System Messages . . . . . . . . . . . . . . . . . . 5-30
Airbag System Messages . . . . 5-30
Security Messages . . . . . . . . . . 5-30
Service Vehicle Messages . . . 5-30
Starting the Vehicle Messages . . . . . . . . . . . . . . . . . . 5-30
Tire Messages . . . . . . . . . . . . . . . 5-31
Transmission Messages . . . . . 5-31
Vehicle Reminder Messages . . . . . . . . . . . . . . . . . . 5-31
Vehicle Personalization
Vehicle Personalization . . . . . . 5-32
Controls
Steering Wheel
Adjustment
The vehicle may have a tilt or tilt
and telescoping steering wheel.
Tilt Steering Wheel
To adjust the steering wheel:
1. Pull the lever (A) down.
2. Move the steering wheel up
or down.
3. Push the lever (A) up to lock the steering wheel in place.
Tilt and Telescoping Steering
Wheel
To adjust the steering wheel:
1. Pull the lever (A) down.
2. Move the steering wheel up or down.
3. Pull or push the steering wheel closer or away from you.
4. Push the lever (A) up to lock the steering wheel in place.
Do not adjust the steering wheel
while driving.