2012 CHEVROLET ORLANDO engine
[x] Cancel search: enginePage 255 of 378
Black plate (21,1)Chevrolet Orlando Owner Manual - 2012
Vehicle Care 10-21
When the brake/clutch fluid falls to a
low level, the brake warning light
comes on. SeeBrake System
Warning Light on page 5‑15.
What to Add
Use only new DOT 4 brake fluid
from a sealed container. It is
recommended that the brake/clutch
hydraulic system be flushed and
refilled with new DOT 4 fluid at a
regular maintenance service every
two years. See Special Application
Services on page 11‑9 and
Recommended Fluids and
Lubricants on page 11‑13.
Always clean the brake/clutch fluid
reservoir cap and the area around
the cap before removing it. This
helps keep dirt from entering the
reservoir.{WARNING
With the wrong kind of fluid in the
brake/clutch hydraulic system, the
brakes might not work well. This
could cause a crash. Always use
the proper brake/clutch fluid.
Notice
.Using the wrong fluid can
badly damage brake/clutch
hydraulic system parts. For
example, just a few drops of
mineral-based oil, such as
engine oil, in the brake
hydraulic system can
damage brake hydraulic
system parts so badly that
they will have to be replaced.
Do not let someone put in
the wrong kind of fluid.
.If brake fluid is spilled on the
vehicle's painted surfaces,
the paint finish can be
damaged. Be careful not to
spill brake fluid on the
vehicle. If you do, wash it off
immediately.
Battery
Refer to the replacement number
shown on the original battery label
when a new battery is needed. See
Engine Compartment Overview on
page 10‑6 for battery location.
{WARNING
Battery posts, terminals, and
related accessories contain lead
and lead compounds, chemicals
known to the State of California to
cause cancer and reproductive
harm. Wash hands after handling.
Page 256 of 378
Black plate (22,1)Chevrolet Orlando Owner Manual - 2012
10-22 Vehicle Care
Vehicle Storage
{WARNING
Batteries have acid that can burn
you and gas that can explode.
You can be badly hurt if you are
not careful. SeeJump Starting on
page 10‑73 for tips on working
around a battery without
getting hurt.
Infrequent Usage: Remove the
black, negative (−) cable from the
battery to keep the battery from
running down.
Extended Storage: Remove the
black, negative (−) cable from the
battery or use a battery trickle
charger.
Starter Switch Check
{WARNING
When you are doing this
inspection, the vehicle could
move suddenly. If the vehicle
moves, you or others could be
injured.
1. Before starting this check, be sure there is enough room
around the vehicle.
2. Firmly apply both the parking brake and the regular brake.
See Parking Brake on
page 9‑28.
Do not use the accelerator
pedal, and be ready to turn off
the engine immediately if it
starts. 3. For automatic transmission
vehicles, try to start the engine
in each gear. The vehicle
should start only in P (Park) or
N (Neutral). If the vehicle starts
in any other position, contact
your dealer for service.
For manual transmission
vehicles, put the shift lever in
Neutral, push the clutch pedal
down halfway, and try to start
the engine. The vehicle should
start only when the clutch pedal
is pushed down all the way to
the floor. If the vehicle starts
when the clutch pedal is not
pushed all the way down,
contact your dealer for service.
Page 257 of 378
Black plate (23,1)Chevrolet Orlando Owner Manual - 2012
Vehicle Care 10-23
Automatic Transmission
Shift Lock Control
Function Check
{WARNING
When you are doing this
inspection, the vehicle could
move suddenly. If the vehicle
moves, you or others could be
injured.
1. Before starting this check, be sure there is enough room
around the vehicle. It should be
parked on a level surface.
2. Firmly apply the parking brake. See Parking Brake on
page 9‑28.
Be ready to apply the regular
brake immediately if the vehicle
begins to move. 3. With the engine off, turn the
ignition on, but do not start the
engine. Without applying the
regular brake, try to move the
shift lever out of P (Park) with
normal effort. If the shift lever
moves out of P (Park), contact
your dealer for service.
Ignition Transmission
Lock Check
While parked, and with the parking
brake set, try to turn the ignition to
LOCK/OFF in each shift lever
position.
.For automatic transmission
vehicles, the ignition should turn
to LOCK/OFF only when the
shift lever is in P (Park). The
ignition key should come out
only in LOCK/OFF.
.For manual transmission
vehicles, the ignition key should
come out only in LOCK/OFF.
Contact your dealer if service is
required.
Park Brake and P (Park)
Mechanism Check
{WARNING
When you are doing this check,
the vehicle could begin to move.
You or others could be injured
and property could be damaged.
Make sure there is room in front
of the vehicle in case it begins to
roll. Be ready to apply the regular
brake at once should the vehicle
begin to move.
Park on a fairly steep hill, with the
vehicle facing downhill. Keeping
your foot on the regular brake, set
the parking brake.
.To check the parking brake's
holding ability: With the engine
running and the transmission in
N (Neutral), slowly remove foot
pressure from the regular brake
pedal. Do this until the vehicle is
held by the parking brake only.
Page 258 of 378
Black plate (24,1)Chevrolet Orlando Owner Manual - 2012
10-24 Vehicle Care
.To check the P (Park)
mechanism's holding
ability: With the engine running,
shift to P (Park). Then release
the parking brake followed by
the regular brake.
Contact your dealer if service is
required.
Wiper Blade Replacement
Front Wiper Blade
Replacement
Windshield wiper blades should be
inspected for wear or cracking. See
Maintenance Schedule on
page 11‑3 for more information.
Replacement blades come in
different types and are removed in
different ways. For proper
windshield wiper blade length and
type, see Maintenance
Replacement Parts on page 11‑15.
Notice: Allowing the wiper arm to
touch the windshield when no
wiper blade is installed could
damage the windshield. Any damage that occurs would not be
covered by your warranty. Do not
allow the wiper arm to touch the
windshield.A. Wiper Arm
B. Release Lever
C. Blade Assembly
To replace the windshield wiper
blade:
1. Lift the wiper arm (A) away from
the windshield.
2. Push the release lever (B) to disengage the hook and push
the wiper arm (A) out of the
blade assembly (C). 3. Push the new blade assembly
securely on the wiper arm until
the release lever clicks into
place.
Rear Wiper Blade Replacement
1. Pull the wiper arm a short
distance away from the
glass (A).
2. Push the blade away from the arm (B).
It may require extra effort to
remove the old blade.
Page 265 of 378
Black plate (31,1)Chevrolet Orlando Owner Manual - 2012
Vehicle Care 10-31
Electrical System
Electrical System
Overload
The vehicle has fuses and circuit
breakers to protect against an
electrical system overload.
When the current electrical load is
too heavy, the circuit breaker opens
and closes, protecting the circuit
until the current load returns to
normal or the problem is fixed. This
greatly reduces the chance of circuit
overload and fire caused by
electrical problems.
Fuses and circuit breakers protect
power devices in the vehicle.
Replace a bad fuse with a new one
of the identical size and rating.
If there is a problem on the road and
a fuse needs to be replaced, the
same amperage fuse can be
borrowed. Choose some feature of
the vehicle that is not needed to use
and replace it as soon as possible.
Headlamp Wiring
An electrical overload may cause
the lamps to go on and off, or in
some cases to remain off. Have the
headlamp wiring checked right away
if the lamps go on and off or
remain off.
Windshield Wipers
If the wiper motor overheats due to
heavy snow or ice, the windshield
wipers will stop until the motor cools
and will then restart.
Although the circuit is protected
from electrical overload, overload
due to heavy snow or ice may
cause wiper linkage damage.
Always clear ice and heavy snow
from the windshield before using the
windshield wipers.
If the overload is caused by an
electrical problem and not snow or
ice, be sure to get it fixed.
Fuses and Circuit
Breakers
The wiring circuits in the vehicle are
protected from short circuits by a
combination of fuses and circuit
breakers. This greatly reduces the
chance of damage caused by
electrical problems.
To check a fuse, look at the
silver-colored band inside the fuse.
If the band is broken or melted,
replace the fuse. Be sure to replace
a bad fuse with a new one of the
identical size and rating.
Fuses of the same amperage can
be temporarily borrowed from
another fuse location, if a fuse goes
out. Replace the fuse as soon as
possible.
To identify and check fuses, circuit
breakers, and relays, seeEngine
Compartment Fuse Block on
page 10‑32 andInstrument Panel
Fuse Block on page 10‑35.
Page 266 of 378
Black plate (32,1)Chevrolet Orlando Owner Manual - 2012
10-32 Vehicle Care
Engine Compartment
Fuse Block
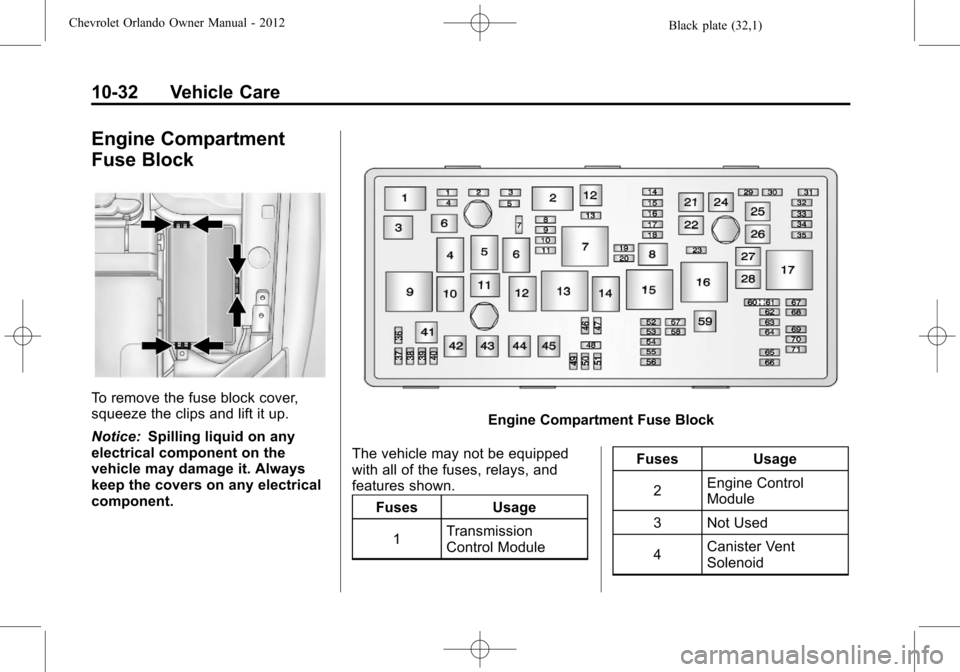
To remove the fuse block cover,
squeeze the clips and lift it up.
Notice:Spilling liquid on any
electrical component on the
vehicle may damage it. Always
keep the covers on any electrical
component.
Engine Compartment Fuse Block
The vehicle may not be equipped
with all of the fuses, relays, and
features shown. Fuses Usage
1 Transmission
Control Module Fuses Usage
2 Engine Control
Module
3 Not Used
4 Canister Vent
Solenoid
Page 267 of 378
Black plate (33,1)Chevrolet Orlando Owner Manual - 2012
Vehicle Care 10-33
FusesUsage
5 Ignition, Engine
Control Module/
Transmission
Control Module
6 Front Wipers
7 Not Used
8 Fuel Injectors 2
and 4
9 Fuel Injectors 1
and 3
10 Engine Control
Module
11 Lambda Sensor 2
12 Starter Solenoid
13 Canister Vent
Solenoid
14 Not Used
15 Rear Wiper
16 Ignition, Air Quality
Sensor Shutter
17 Ignition, Airbag Fuses
Usage
18 Fuel System Control
Module
19 Not Used
20 Fuel Pump
21 Rear Power
Windows
22 Not Used
23 Not Used
24 Front Power
Windows
25 Electronic
Vacuum Pump
26 Antilock Brake
System Pump
27 Passive Entry/
Passive Start
28 Rear Window
Defogger
29 Not Used
30 Antilock Brake
System Valve Fuses
Usage
31 Body Control
Module, VBAT 07
32 Body Control
Module VBAT 06
33 Front Seat Heating
34 Sunroof
35 Amplifier
36 Not Used
37 High Beam,
Right Side
38 High Beam,
Left Side
39 Not Used
40 Not Used
41 Not Used
42 Cooling Fan K2
43 Not Used
44 Not Used
45 Cooling Fan K1
Page 274 of 378
Black plate (40,1)Chevrolet Orlando Owner Manual - 2012
10-40 Vehicle Care
Tire Identification Number
(TIN). The TIN shows the
manufacturer and plant code,
tire size, and date the tire was
manufactured. The TIN is
molded onto both sides of the
tire, although only one side may
have the date of manufacture.
(E) Tire Ply Material
:The type
of cord and number of plies in
the sidewall and under the tread.
(F) Uniform Tire Quality
Grading (UTQG)
:Tire
manufacturers are required to
grade tires based on three
performance factors: treadwear,
traction, and temperature
resistance. For more information
see Uniform Tire Quality
Grading on page 10‑53.
(G) Maximum Cold Inflation
Load Limit
:Maximum load
that can be carried and the
maximum pressure needed to
support that load.
Tire Designations
Tire Size
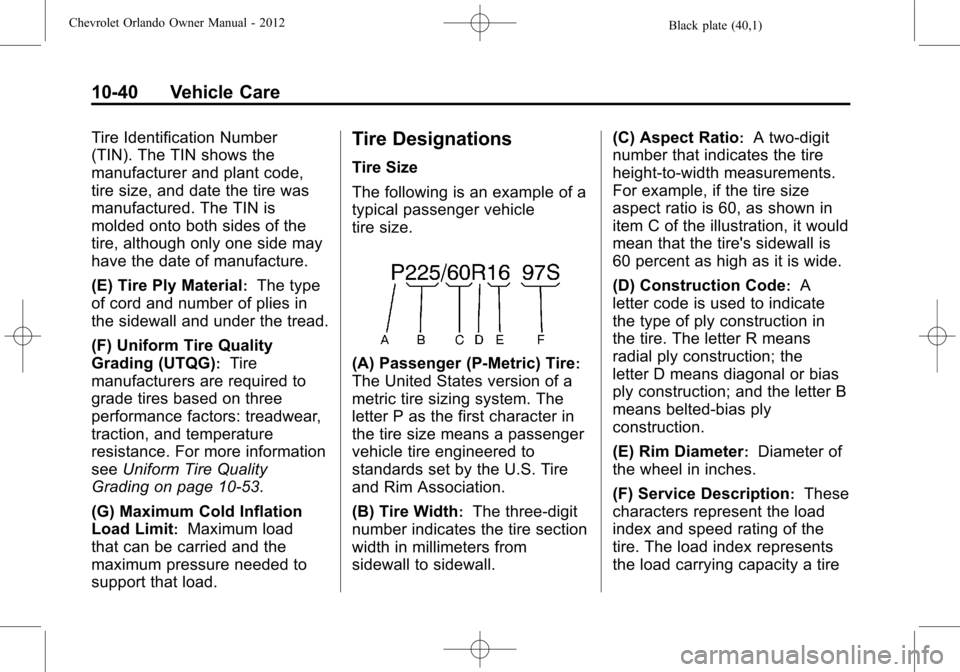
The following is an example of a
typical passenger vehicle
tire size.
(A) Passenger (P‐Metric) Tire:
The United States version of a
metric tire sizing system. The
letter P as the first character in
the tire size means a passenger
vehicle tire engineered to
standards set by the U.S. Tire
and Rim Association.
(B) Tire Width
:The three‐digit
number indicates the tire section
width in millimeters from
sidewall to sidewall. (C) Aspect Ratio
:A two‐digit
number that indicates the tire
height‐to‐width measurements.
For example, if the tire size
aspect ratio is 60, as shown in
item C of the illustration, it would
mean that the tire's sidewall is
60 percent as high as it is wide.
(D) Construction Code
:A
letter code is used to indicate
the type of ply construction in
the tire. The letter R means
radial ply construction; the
letter D means diagonal or bias
ply construction; and the letter B
means belted‐bias ply
construction.
(E) Rim Diameter
:Diameter of
the wheel in inches.
(F) Service Description
:These
characters represent the load
index and speed rating of the
tire. The load index represents
the load carrying capacity a tire