2012 CHEVROLET MALIBU wheel
[x] Cancel search: wheelPage 320 of 398
Black plate (80,1)Chevrolet Malibu Owner Manual - 2012
10-80 Vehicle Care
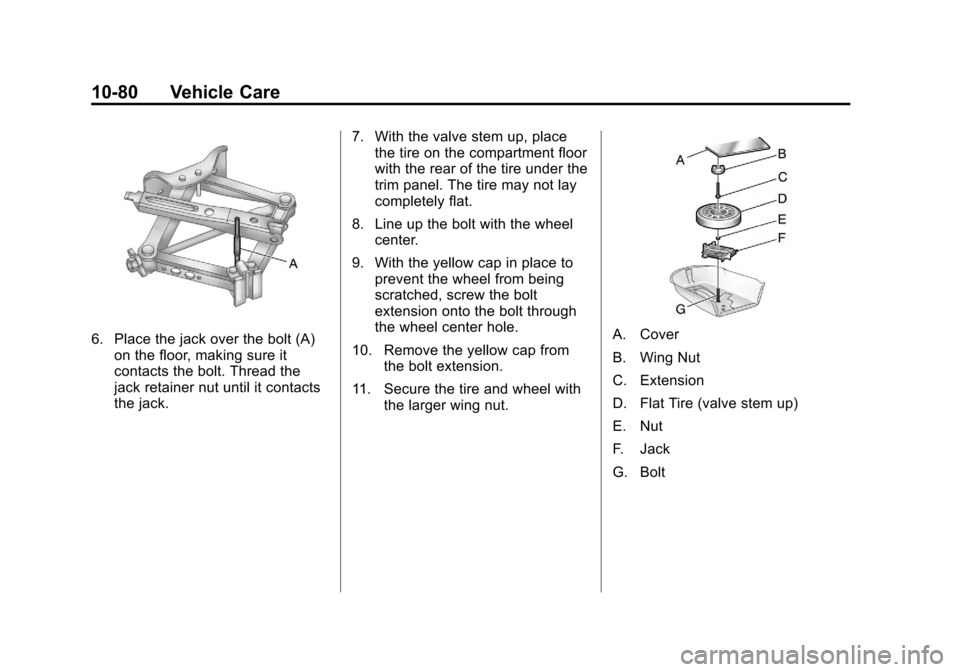
6. Place the jack over the bolt (A)on the floor, making sure it
contacts the bolt. Thread the
jack retainer nut until it contacts
the jack. 7. With the valve stem up, place
the tire on the compartment floor
with the rear of the tire under the
trim panel. The tire may not lay
completely flat.
8. Line up the bolt with the wheel center.
9. With the yellow cap in place to prevent the wheel from being
scratched, screw the bolt
extension onto the bolt through
the wheel center hole.
10. Remove the yellow cap from the bolt extension.
11. Secure the tire and wheel with the larger wing nut.A. Cover
B. Wing Nut
C. Extension
D. Flat Tire (valve stem up)
E. Nut
F. Jack
G. Bolt
Page 322 of 398
Black plate (82,1)Chevrolet Malibu Owner Manual - 2012
10-82 Vehicle Care
5. Place the jack in the spare tirewell. Make sure the stow bolt
goes through the hole in the
center of the wrench on the jack,
with the base of the jack towards
the front of the vehicle. Turn the
jack retainer nut until it firmly
contacts the wrench. Do not
over tighten.
6. Place the compact spare into the tire compartment with the stow
bolt going through the center
hole of the wheel.
7. Turn the spare tire retainer nut until it firmly contacts the wheel.
Do not over tighten.Compact Spare Tire
{WARNING
Driving with more than one
compact spare tire at a time could
result in loss of braking and
handling. This could lead to a
crash and you or others could be
injured. Use only one compact
spare tire at a time.
If this vehicle has a compact spare
tire it was fully inflated when the
vehicle was new, however, it can
lose air after a time. Check the
inflation pressure regularly. It should
be 60 psi (420 kPa). After installing the compact spare
on the vehicle, stop as soon as
possible and make sure the
spare tire is correctly inflated.
The compact spare is made to
perform well at speeds up to 65 mph
(105 km/h) for distances up to
3,000 miles (5 000 km), so you can
finish your trip and have the full-size
tire repaired or replaced at your
convenience. Of course, it is best to
replace the spare with a full-size tire
as soon as possible. The spare tire
will last longer and be in good
shape in case it is needed again.
Notice:
When the compact spare
is installed, do not take the
vehicle through an automatic
car wash with guide rails.
The compact spare can get
caught on the rails which can
damage the tire, wheel, and other
parts of the vehicle.
Page 323 of 398
Black plate (83,1)Chevrolet Malibu Owner Manual - 2012
Vehicle Care 10-83
Do not use the compact spare on
other vehicles.
Do not mix the compact spare tire or
wheel with other wheels or tires.
They will not fit. Keep the spare tire
and its wheel together.
Notice:Tire chains will not fit the
compact spare. Using them can
damage the vehicle and can
damage the chains too. Do not
use tire chains on the compact
spare.Jump Starting
For more information about the
vehicle battery, see Battery on
page 10‑26.
If the battery has run down, you
may want to use another vehicle
and some jumper cables to start
your vehicle. Be sure to use the
following steps to do it safely.
{WARNING
Batteries can hurt you. They can
be dangerous because:
.They contain acid that can
burn you.
.They contain gas that can
explode or ignite.
.They contain enough
electricity to burn you.
If you do not follow these steps
exactly, some or all of these
things can hurt you. Notice:
Ignoring these steps
could result in costly damage to
the vehicle that would not be
covered by the warranty.
Trying to start the vehicle by
pushing or pulling it will not
work, and it could damage the
vehicle.
1. Check the other vehicle. It must
have a 12-volt battery with a
negative ground system.
Notice: Only use a vehicle that
has a 12-volt system with a
negative ground for jump
starting. If the other vehicle
does not have a 12-volt system
with a negative ground, both
vehicles can be damaged.
Page 327 of 398
Black plate (87,1)Chevrolet Malibu Owner Manual - 2012
Vehicle Care 10-87
To disconnect the jumper cables
from both vehicles, do the following:
1. Disconnect the blacknegative (−) cable from the
vehicle that had the dead
battery.
2. Disconnect the black negative (−) cable from the
vehicle with the good battery.
3. Disconnect the red positive (+) cable from the vehicle with the
good battery.
4. Disconnect the red positive (+) cable from the other vehicle.
5. Return the caps over the positive (+) and negative (−)
terminals to their original
positions.Towing
Towing the Vehicle
Notice: To avoid damage, the
disabled vehicle should be towed
with all four wheels off the
ground. Care must be taken
with vehicles that have low
ground clearance and/or special
equipment. Always flatbed on a
car carrier.
Consult your dealer or a
professional towing service if the
disabled vehicle must be towed.
See Roadside Assistance Program
(U.S. and Canada) on page 13‑7 or
Roadside Assistance Program
(Mexico) on page 13‑10.
To tow the vehicle behind another
vehicle for recreational purposes,
such as behind a motor home,
see “Recreational Vehicle Towing”
in this section.
Recreational Vehicle
Towing
Recreational vehicle towing means
towing the vehicle behind another
vehicle –such as behind a motor
home. The two most common types
of recreational vehicle towing are
known as dinghy towing and dolly
towing. Dinghy towing is towing the
vehicle with all four wheels on the
ground. Dolly towing is towing the
vehicle with two wheels on the
ground and two wheels up on a
device known as a dolly.
Page 328 of 398
Black plate (88,1)Chevrolet Malibu Owner Manual - 2012
10-88 Vehicle Care
Here are some important things to
consider before recreational vehicle
towing:
.What's the towing capacity of the
towing vehicle? Be sure to read
the tow vehicle manufacturer's
recommendations.
.How far will the vehicle be
towed? Some vehicles have
restrictions on how far and
how long they can tow.
.Does the vehicle have the
proper towing equipment?
See your dealer or trailering
professional for additional
advice and equipment
recommendations.
.Is the vehicle ready to be
towed? Just as preparing the
vehicle for a long trip, make sure
the vehicle is prepared to be
towed.
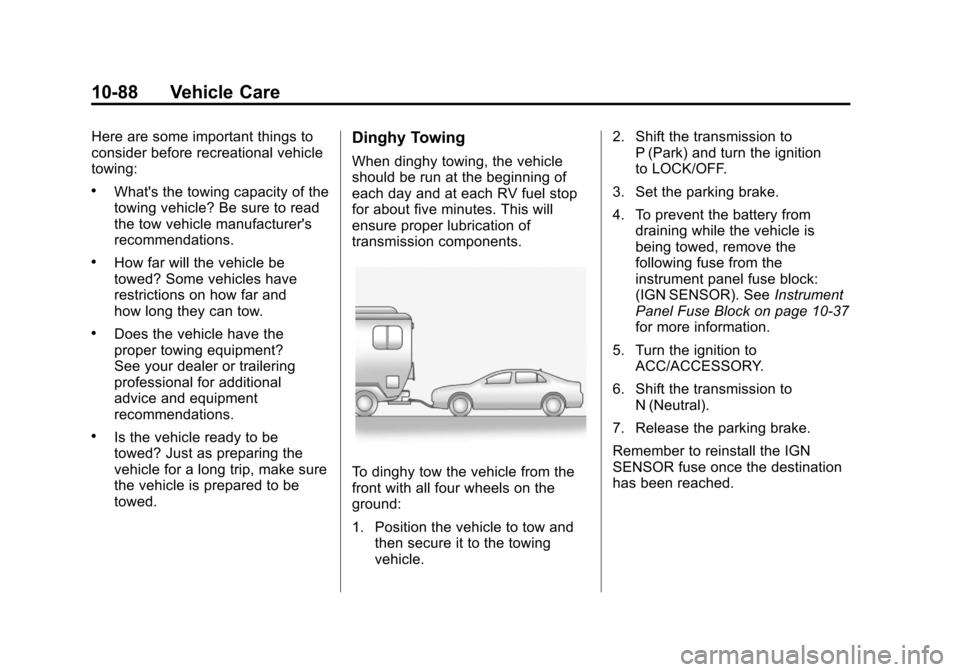
Dinghy Towing
When dinghy towing, the vehicle
should be run at the beginning of
each day and at each RV fuel stop
for about five minutes. This will
ensure proper lubrication of
transmission components.
To dinghy tow the vehicle from the
front with all four wheels on the
ground:
1. Position the vehicle to tow andthen secure it to the towing
vehicle. 2. Shift the transmission to
P (Park) and turn the ignition
to LOCK/OFF.
3. Set the parking brake.
4. To prevent the battery from draining while the vehicle is
being towed, remove the
following fuse from the
instrument panel fuse block:
(IGN SENSOR). See Instrument
Panel Fuse Block on page 10‑37
for more information.
5. Turn the ignition to ACC/ACCESSORY.
6. Shift the transmission to N (Neutral).
7. Release the parking brake.
Remember to reinstall the IGN
SENSOR fuse once the destination
has been reached.
Page 329 of 398
Black plate (89,1)Chevrolet Malibu Owner Manual - 2012
Vehicle Care 10-89
Notice:If 105 km/h (65 mph) is
exceeded while towing the
vehicle, it could be damaged.
Never exceed 105 km/h (65 mph)
while towing the vehicle.
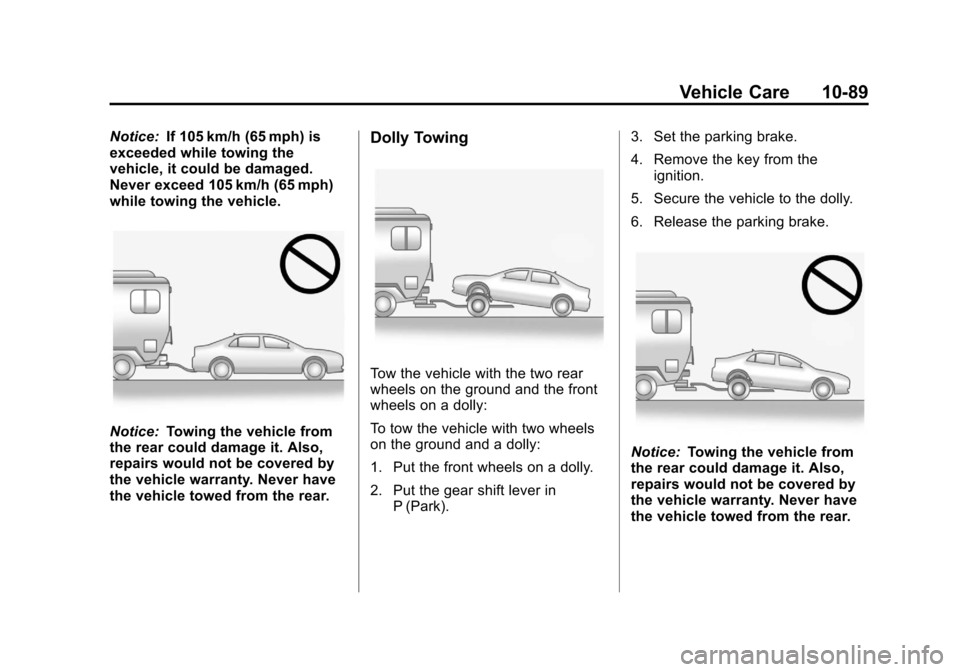
Notice: Towing the vehicle from
the rear could damage it. Also,
repairs would not be covered by
the vehicle warranty. Never have
the vehicle towed from the rear.
Dolly Towing
Tow the vehicle with the two rear
wheels on the ground and the front
wheels on a dolly:
To tow the vehicle with two wheels
on the ground and a dolly:
1. Put the front wheels on a dolly.
2. Put the gear shift lever in P (Park). 3. Set the parking brake.
4. Remove the key from the
ignition.
5. Secure the vehicle to the dolly.
6. Release the parking brake.
Notice: Towing the vehicle from
the rear could damage it. Also,
repairs would not be covered by
the vehicle warranty. Never have
the vehicle towed from the rear.
Page 332 of 398
Black plate (92,1)Chevrolet Malibu Owner Manual - 2012
10-92 Vehicle Care
Wheels and Trim—Aluminum
or Chrome
Use a soft, clean cloth with mild
soap and water to clean the wheels.
After rinsing thoroughly with clean
water, dry with a soft, clean towel.
A wax may then be applied.
Keep the wheels clean using a soft,
clean cloth with mild soap and
water. Rinse with clean water. After
rinsing thoroughly, dry with a soft,
clean towel. A wax may then be
applied.
Notice: Chrome wheels and other
chrome trim may be damaged if
the vehicle is not washed after
driving on roads that have been
sprayed with magnesium,
calcium, or sodium chloride.
These chlorides are used on
roads for conditions such as ice
and dust. Always wash the
chrome with soap and water after
exposure. Notice:
To avoid surface damage,
do not use strong soaps,
chemicals, abrasive polishes,
cleaners, brushes, or cleaners
that contain acid on aluminum or
chrome-plated wheels. Use only
approved cleaners. Also, never
drive a vehicle with aluminum or
chrome-plated wheels through an
automatic car wash that uses
silicone carbide tire cleaning
brushes. Damage could occur
and the repairs would not be
covered by the vehicle warranty.
Steering, Suspension, and
Chassis Components
Visually inspect front and rear
suspension and steering system for
damaged, loose, or missing parts or
signs of wear. Inspect power
steering lines and hoses for proper
hook-up, binding, leaks, cracks,
chafing, etc. Visually check constant
velocity joints, rubber boots, and
axle seals for leaks.
Body Component Lubrication
Lubricate all key lock cylinders,
hood hinges, liftgate hinges, and the
steel fuel door hinge unless the
components are plastic. Applying
silicone grease on weatherstrips
with a clean cloth will make them
last longer, seal better, and not stick
or squeak.
Underbody Maintenance
Use plain water to flush dirt and
debris from the vehicle's underbody.
Your dealer or an underbody car
washing system can do this. If not
removed, rust and corrosion can
develop.
Sheet Metal Damage
If the vehicle is damaged and
requires sheet metal repair or
replacement, make sure the body
repair shop applies anti-corrosion
material to parts repaired or
replaced to restore corrosion
protection.
Page 346 of 398
Black plate (10,1)Chevrolet Malibu Owner Manual - 2012
11-10 Service and Maintenance
Shocks and Struts
Shocks and struts help aid in control
for a smoother ride.
.Signs of wear may include
steering wheel vibration,
bounce/sway while braking,
longer stopping distance,
or uneven tire wear.
.As part of the multi‐point
inspection, trained dealer
technicians can visually inspect
the shocks and struts for signs
of leaking, blown seals,
or damage, and can advise
when service is needed.Tires
Tires need to be properly inflated,
rotated, and balanced. Maintaining
the tires can save money, fuel, and
can reduce the risk of tire failure.
.Signs that the tires need to be
replaced include three or more
visible treadwear indicators; cord
or fabric showing through the
rubber; cracks or cuts in the
tread or sidewall; or a bulge or
split in the tire.
.Trained dealer technicians can
inspect and recommend the
right tires. Your dealer can also
provide tire/wheel balancing
services to ensure smooth
vehicle operation at all speeds.
Your dealer sells and services
name brand tires.Vehicle Care
To help keep the vehicle looking
like new, vehicle care products
are available from your dealer.
For information on how to clean
and protect the vehicle’s interior
and exterior, see
Interior Care on
page 10‑93 andExterior Care on
page 10‑90.
Wheel Alignment
Wheel alignment is critical for
ensuring that the tires deliver
optimal wear and performance.
.Signs that the alignment may
need to be adjusted include
pulling, improper vehicle
handling, or unusual tire wear.
.Your dealer has the required
equipment to ensure proper
wheel alignment.