2012 CHEVROLET CORVETTE wheel
[x] Cancel search: wheelPage 90 of 434

Black plate (26,1)Chevrolet Corvette Owner Manual - 2012
3-26 Seats and Restraints
Adding Equipment to the
Airbag-Equipped Vehicle
Adding accessories that change the
vehicle's frame, bumper system,
height, front end or side sheet
metal, may keep the airbag system
from working properly. The
operation of the airbag system can
also be affected by changing or
moving any parts of the front seats,
safety belts, the airbag sensing and
diagnostic module, steering wheel,
instrument panel, inside rearview
mirror, front sensors, or airbag
wiring.
Your dealer and the service manual
have information about the location
of the airbag sensors, sensing and
diagnostic module, and airbag
wiring.In addition, the vehicle has a
passenger sensing system for the
front outboard passenger position,
which includes sensors that are
part of the passenger seat. The
passenger sensing system may not
operate properly if the original seat
trim is replaced with non-GM
covers, upholstery or trim, or with
GM covers, upholstery or trim
designed for a different vehicle. Any
object, such as an aftermarket seat
heater or a comfort enhancing pad
or device, installed under or on top
of the seat fabric, could also
interfere with the operation of the
passenger sensing system.
This could either prevent proper
deployment of the passenger
airbag(s) or prevent the passenger
sensing system from properly
turning off the passenger airbag(s).
See
Passenger Sensing System on
page 3‑21. If you have to modify your vehicle
because you have a disability and
have questions about whether the
modifications will affect the vehicle's
airbag system, or if you have
questions about whether the airbag
system will be affected if the vehicle
is modified for any other reason,
call Customer Assistance.
See
Customer Assistance Offices
(U.S. and Canada) on page 13‑5 or
Customer Assistance Offices
(Mexico) on page 13‑6.
Page 111 of 434

Black plate (1,1)Chevrolet Corvette Owner Manual - 2012
Instruments and Controls 5-1
Instruments and
Controls
Controls
Steering Wheel Adjustment . . . 5-2
Steering Wheel Controls . . . . . . 5-3
Horn . . . . . . . . . . . . . . . . . . . . . . . . . . 5-4
Windshield Wiper/Washer . . . . . 5-4
Compass . . . . . . . . . . . . . . . . . . . . . 5-5
Clock . . . . . . . . . . . . . . . . . . . . . . . . . 5-6
Power Outlets . . . . . . . . . . . . . . . . . 5-6
Cigarette Lighter . . . . . . . . . . . . . . 5-7
Ashtrays . . . . . . . . . . . . . . . . . . . . . . 5-7
Warning Lights, Gauges, and
Indicators
Warning Lights, Gauges, andIndicators . . . . . . . . . . . . . . . . . . . . 5-8
Instrument Cluster . . . . . . . . . . . . 5-9
Speedometer . . . . . . . . . . . . . . . . 5-12
Odometer . . . . . . . . . . . . . . . . . . . . 5-12
Tachometer . . . . . . . . . . . . . . . . . . 5-12
Fuel Gauge . . . . . . . . . . . . . . . . . . 5-13
Boost Gauge (ZR1) . . . . . . . . . . 5-14
Engine Oil Pressure Gauge . . . . . . . . . . . . . . . . . . . . . . 5-14 Engine Coolant Temperature
Gauge . . . . . . . . . . . . . . . . . . . . . . 5-16
Voltmeter Gauge . . . . . . . . . . . . . 5-17
Safety Belt Reminders . . . . . . . 5-17
Airbag Readiness Light . . . . . . 5-18
Passenger Airbag Status Indicator . . . . . . . . . . . . . . . . . . . . 5-18
Malfunction Indicator Lamp . . . . . . . . . . . . . 5-19
Brake System Warning Light . . . . . . . . . . . . . . . . . . . . . . . 5-22
Antilock Brake System (ABS) Warning Light . . . . . . . . . . . . . . 5-22
One-to-Four Shift Light (Manual Transmission) . . . . . 5-23
Traction Off Light . . . . . . . . . . . . 5-24
StabiliTrak
®OFF Light . . . . . . . 5-24
Active Handling System Light . . . . . . . . . . . . . . . . . . . . . . . 5-25
Tire Pressure Light . . . . . . . . . . 5-25
Security Light . . . . . . . . . . . . . . . . 5-26
High-Beam On Light . . . . . . . . . 5-27
Front Fog Lamp Light . . . . . . . . 5-27
Lamps On Reminder . . . . . . . . . 5-27
Information Displays
Driver Information Center (DIC) . . . . . . . . . . . . . . . 5-28
Head-Up Display (HUD) . . . . . 5-32
Vehicle Messages
Vehicle Messages . . . . . . . . . . . 5-36
Battery Voltage and Charging Messages . . . . . . . . . . . . . . . . . . 5-37
Brake System Messages . . . . 5-37
Convertible Top Messages . . . 5-38
Cruise Control Messages . . . . 5-39
Door Ajar Messages . . . . . . . . . 5-40
Engine Cooling System Messages . . . . . . . . . . . . . . . . . . 5-40
Engine Oil Messages . . . . . . . . 5-41
Engine Power Messages . . . . 5-42
Fuel System Messages . . . . . . 5-43
Key and Lock Messages . . . . . 5-43
Lamp Messages . . . . . . . . . . . . . 5-45
Ride Control System Messages . . . . . . . . . . . . . . . . . . 5-45
Safety Belt Messages . . . . . . . 5-49
Anti-theft Alarm System Messages . . . . . . . . . . . . . . . . . . 5-50
Service Vehicle Messages . . . 5-50
Starting the Vehicle Messages . . . . . . . . . . . . . . . . . . 5-50
Tire Messages . . . . . . . . . . . . . . . 5-51
Transmission Messages . . . . . 5-53
Vehicle Reminder Messages . . . . . . . . . . . . . . . . . . 5-54
Washer Fluid Messages . . . . . 5-54
Page 112 of 434

Black plate (2,1)Chevrolet Corvette Owner Manual - 2012
5-2 Instruments and Controls
Vehicle Personalization
Vehicle Personalization . . . . . . 5-55
Universal Remote System
Universal Remote System . . . 5-64
Universal Remote SystemProgramming . . . . . . . . . . . . . . . 5-64
Universal Remote System Operation . . . . . . . . . . . . . . . . . . 5-70
Controls
Steering Wheel
Adjustment
The lever is located on the left side
of the steering column.
To adjust the steering wheel:
1. Pull the lever toward you.
2. Move the steering wheel up
or down.
3. Release the lever to lock the steering wheel in place.
Telescopic Steering Column
For vehicles with this feature, the
telescopic steering column control is
located on the right side of the
steering column.
To adjust the telescopic steering
column:
1. Push the switch forward to movethe wheel away from you.
2. Pull the switch toward you to move the wheel closer to you.
Page 113 of 434

Black plate (3,1)Chevrolet Corvette Owner Manual - 2012
Instruments and Controls 5-3
The telescopic steering column
position can be stored with your
memory settings. See“Memory
Seat, Mirrors, and Steering Wheel”
under Power Seat Adjustment on
page 3‑3 for more information.
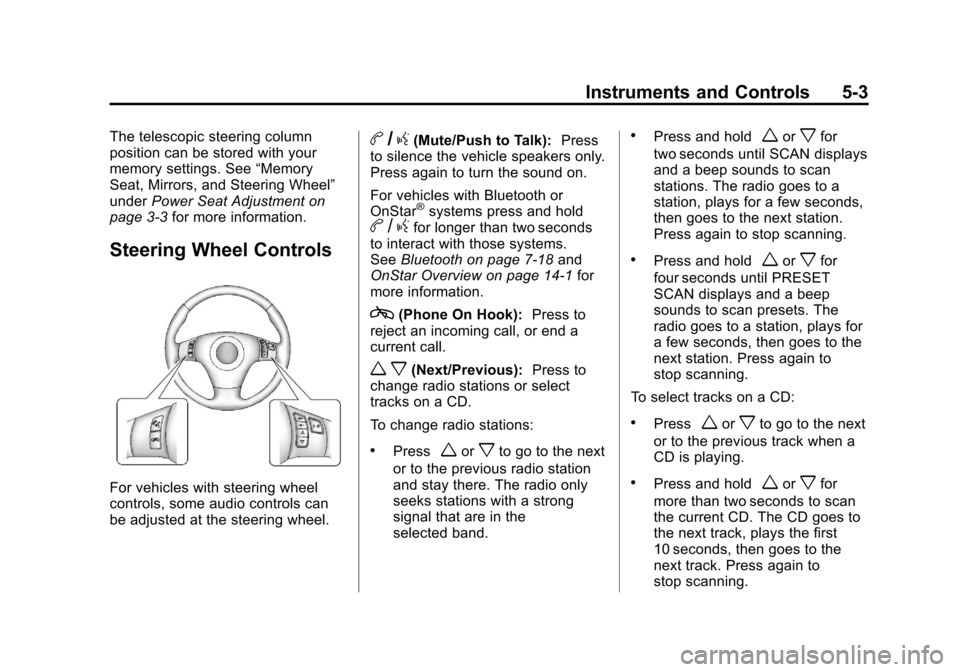
Steering Wheel Controls
For vehicles with steering wheel
controls, some audio controls can
be adjusted at the steering wheel.
b/g(Mute/Push to Talk): Press
to silence the vehicle speakers only.
Press again to turn the sound on.
For vehicles with Bluetooth or
OnStar
®systems press and holdb /gfor longer than two seconds
to interact with those systems.
See Bluetooth on page 7‑18 and
OnStar Overview on page 14‑1 for
more information.
c(Phone On Hook): Press to
reject an incoming call, or end a
current call.
w x(Next/Previous): Press to
change radio stations or select
tracks on a CD.
To change radio stations:
.Pressworxto go to the next
or to the previous radio station
and stay there. The radio only
seeks stations with a strong
signal that are in the
selected band.
.Press and holdworxfor
two seconds until SCAN displays
and a beep sounds to scan
stations. The radio goes to a
station, plays for a few seconds,
then goes to the next station.
Press again to stop scanning.
.Press and holdworxfor
four seconds until PRESET
SCAN displays and a beep
sounds to scan presets. The
radio goes to a station, plays for
a few seconds, then goes to the
next station. Press again to
stop scanning.
To select tracks on a CD:
.Pressworxto go to the next
or to the previous track when a
CD is playing.
.Press and holdworxfor
more than two seconds to scan
the current CD. The CD goes to
the next track, plays the first
10 seconds, then goes to the
next track. Press again to
stop scanning.
Page 114 of 434

Black plate (4,1)Chevrolet Corvette Owner Manual - 2012
5-4 Instruments and Controls
.Press and holdworxfor
more than four seconds to scan
all of the CDs loaded. The CD
goes to the next CD, plays the
first 10 seconds of each track,
then goes to the next CD.
Press again to stop scanning.
+
e−e(Volume): Press to
increase or to decrease the radio
volume.
1 to 6 (Preset Pushbuttons):
Press to play stations that are
programmed on the radio preset
pushbuttons.
Horn
Press near or on the horn symbols
on the steering wheel pad to sound
the horn.
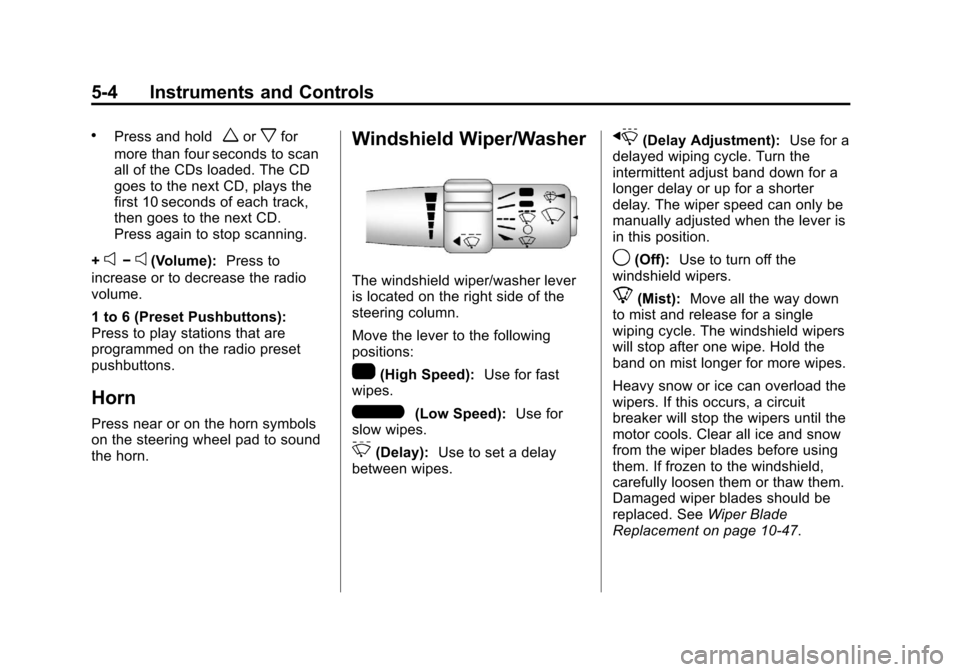
Windshield Wiper/Washer
The windshield wiper/washer lever
is located on the right side of the
steering column.
Move the lever to the following
positions:
1(High Speed): Use for fast
wipes.
6(Low Speed): Use for
slow wipes.
3(Delay): Use to set a delay
between wipes.
x(Delay Adjustment): Use for a
delayed wiping cycle. Turn the
intermittent adjust band down for a
longer delay or up for a shorter
delay. The wiper speed can only be
manually adjusted when the lever is
in this position.
9(Off): Use to turn off the
windshield wipers.
8(Mist): Move all the way down
to mist and release for a single
wiping cycle. The windshield wipers
will stop after one wipe. Hold the
band on mist longer for more wipes.
Heavy snow or ice can overload the
wipers. If this occurs, a circuit
breaker will stop the wipers until the
motor cools. Clear all ice and snow
from the wiper blades before using
them. If frozen to the windshield,
carefully loosen them or thaw them.
Damaged wiper blades should be
replaced. See Wiper Blade
Replacement on page 10‑47.
Page 131 of 434

Black plate (21,1)Chevrolet Corvette Owner Manual - 2012
Instruments and Controls 5-21
.Check that good quality fuel is
used. Poor fuel quality causes
the engine not to run as
efficiently as designed and may
cause: stalling after start-up,
stalling when the vehicle is
changed into gear, misfiring,
hesitation on acceleration,
or stumbling on acceleration.
These conditions might go away
once the engine is warmed up.
If one or more of these
conditions occurs, change the
fuel brand used. It will require at
least one full tank of the proper
fuel to turn the light off.See Recommended Fuel on
page 9‑48.
If none of the above have made the
light turn off, your dealer can check
the vehicle. The dealer has the
proper test equipment and
diagnostic tools to fix any
mechanical or electrical problems
that might have developed.Emissions Inspection and
Maintenance Programs
Some local governments may have
programs to inspect the on-vehicle
emission control equipment. For the
inspection, the emission system test
equipment is connected to the
vehicle’s Data Link
Connector (DLC).
The DLC is under the instrument
panel to the left of the steering
wheel. See your dealer if assistance
is needed.
The vehicle may not pass
inspection if:
.The malfunction indicator lamp is
on with the engine running, or if
the vehicle is placed in Service
Only Mode and the malfunction indicator lamp does not come
on. See your dealer for
assistance in verifying proper
operation of the malfunction
indicator lamp.
.The OBD II (On-Board
Diagnostics) system determines
that critical emission control
systems have not been
completely diagnosed. The
vehicle would be considered not
ready for inspection. This can
happen if the 12-volt battery has
recently been replaced or run
down. The diagnostic system is
designed to evaluate critical
emission control systems during
normal driving. This can take
several days of routine driving.
If this has been done and the
vehicle still does not pass the
inspection for lack of OBD II
system readiness, your dealer
can prepare the vehicle for
inspection.
Page 134 of 434

Black plate (24,1)Chevrolet Corvette Owner Manual - 2012
5-24 Instruments and Controls
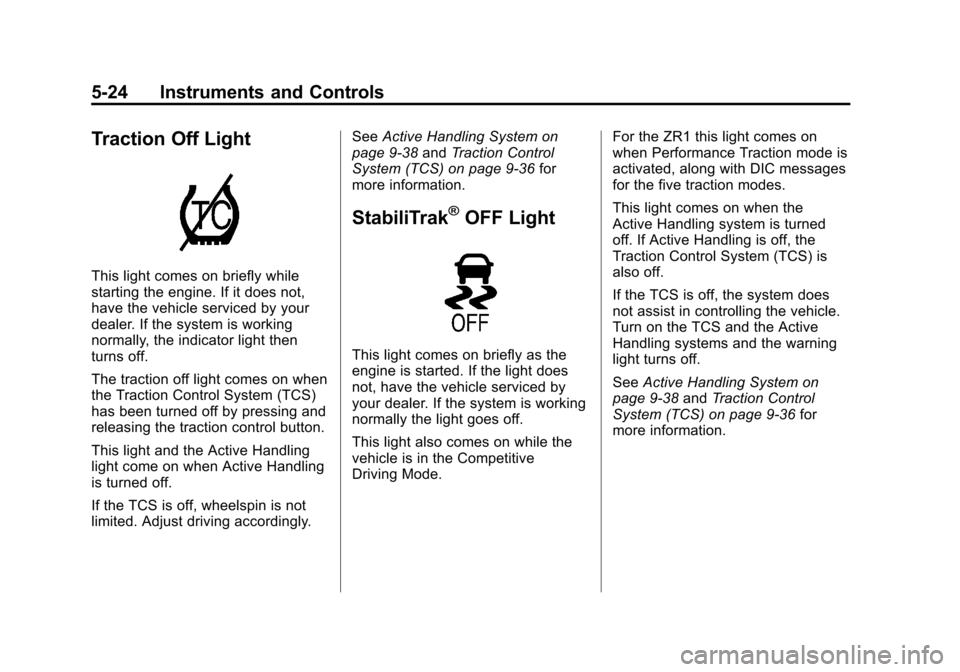
Traction Off Light
This light comes on briefly while
starting the engine. If it does not,
have the vehicle serviced by your
dealer. If the system is working
normally, the indicator light then
turns off.
The traction off light comes on when
the Traction Control System (TCS)
has been turned off by pressing and
releasing the traction control button.
This light and the Active Handling
light come on when Active Handling
is turned off.
If the TCS is off, wheelspin is not
limited. Adjust driving accordingly.See
Active Handling System on
page 9‑38 andTraction Control
System (TCS) on page 9‑36 for
more information.
StabiliTrak®OFF Light
This light comes on briefly as the
engine is started. If the light does
not, have the vehicle serviced by
your dealer. If the system is working
normally the light goes off.
This light also comes on while the
vehicle is in the Competitive
Driving Mode. For the ZR1 this light comes on
when Performance Traction mode is
activated, along with DIC messages
for the five traction modes.
This light comes on when the
Active Handling system is turned
off. If Active Handling is off, the
Traction Control System (TCS) is
also off.
If the TCS is off, the system does
not assist in controlling the vehicle.
Turn on the TCS and the Active
Handling systems and the warning
light turns off.
See
Active Handling System on
page 9‑38 andTraction Control
System (TCS) on page 9‑36 for
more information.
Page 145 of 434

Black plate (35,1)Chevrolet Corvette Owner Manual - 2012
Instruments and Controls 5-35
English
Metric
Be sure to continue scanning the
displays, controls, and driving
environment just as you would in a
vehicle without HUD. If you never
look at the instrument panel cluster,
you may miss something important,
such as a warning light. Under
important warning conditions, the
CHECK GAGES warning will
illuminate in the HUD. View your
Driver Information Center (DIC) for
more information.
The HUD controls are located to the
left of the steering wheel.
To adjust the HUD so it can be seen
properly, do the following:
1. Start the engine and press the HUD dimmer control all the way
up by pressing the (+) button.
The brightness of the HUD
image is determined by the light
conditions in the direction the
vehicle is facing and where you
have the HUD dimmer control
set. If you are facing a dark
object or a heavily shaded area, the HUD may anticipate that you
are entering a dark area and
may begin to dim.
It is possible for sunlight to enter
the HUD making it difficult to see
the image. The display will
return to normal when the
sunlight is no longer entering
the HUD.
2. Adjust the seat to a comfortable driving position. If your seat
position changes, the HUD may
need to be re-adjusted.
3. Press the up or down arrows to center the HUD image in
your view.
The HUD image can only be
adjusted up and down, not side
to side.
4. Press the dimmer control downward until the HUD image
is no brighter than necessary.
To turn HUD off, press and hold
the (–) button until the HUD display
turns off.