Page 271 of 434
Black plate (51,1)Chevrolet Corvette Owner Manual - 2012
Driving and Operating 9-51
Filling the Tank
{WARNING
Fuel vapor burns violently and a
fuel fire can cause bad injuries.
To help avoid injuries to you and
others, read and follow all the
instructions on the fuel pump
island. Turn off the engine when
refueling. Do not smoke near fuel
or when refueling the vehicle.
Do not use cellular phones.
Keep sparks, flames, and
smoking materials away from fuel.
Do not leave the fuel pump
unattended when refueling the
vehicle. This is against the law in
some places. Do not re-enter the
vehicle while pumping fuel. Keep
children away from the fuel pump;
never let children pump fuel.
The tethered fuel cap is located
behind a hinged fuel door on the
driver side of the vehicle.The fuel door release button is
located on the instrument panel to
the left of the steering wheel. Push
the button to release the fuel door.
Page 276 of 434

Black plate (2,1)Chevrolet Corvette Owner Manual - 2012
10-2 Vehicle Care
Electrical System
Electrical SystemOverload . . . . . . . . . . . . . . . . . . 10-50
Fuses and Circuit Breakers . . . . . . . . . . . . . . . . . . 10-51
Engine Compartment
Fuse Block . . . . . . . . . . . . . . . . 10-52
Instrument Panel Fuse Block . . . . . . . . . . . . . . . . . . . . . 10-55
Wheels and Tires
Tires . . . . . . . . . . . . . . . . . . . . . . . . 10-58
Winter Tires . . . . . . . . . . . . . . . . 10-59
Run-Flat Tires . . . . . . . . . . . . . . 10-59
Low-Profile Tires . . . . . . . . . . . 10-60
Sport Cup Tires . . . . . . . . . . . . 10-61
Tire Sidewall Labeling . . . . . . 10-62
Tire Designations . . . . . . . . . . . 10-63
Tire Terminology andDefinitions . . . . . . . . . . . . . . . . 10-63
Tire Pressure . . . . . . . . . . . . . . . 10-66 Tire Pressure for
High-Speed Operation . . . . 10-68
Tire Pressure Monitor System . . . . . . . . . . . . . . . . . . . 10-68
Tire Pressure Monitor
Operation . . . . . . . . . . . . . . . . . 10-70
Tire Inspection . . . . . . . . . . . . . . 10-72
Tire Rotation . . . . . . . . . . . . . . . 10-72
When It Is Time for New Tires . . . . . . . . . . . . . . . . . 10-73
Buying New Tires . . . . . . . . . . . 10-74
Different Size Tires and Wheels . . . . . . . . . . . . . . . . . . . 10-76
Uniform Tire Quality Grading . . . . . . . . . . . . . . . . . . . 10-76
Wheel Alignment and Tire Balance . . . . . . . . . . . . . . 10-78
Wheel Replacement . . . . . . . . 10-78
Tire Chains . . . . . . . . . . . . . . . . . 10-80
If a Tire Goes Flat . . . . . . . . . . 10-81
Jump Starting
Jump Starting . . . . . . . . . . . . . . 10-82
Towing
Towing the Vehicle . . . . . . . . . 10-86
Recreational Vehicle Towing . . . . . . . . . . . . . . . . . . . . 10-86
Appearance Care
Exterior Care . . . . . . . . . . . . . . . 10-86
Interior Care . . . . . . . . . . . . . . . . 10-90
Floor Mats . . . . . . . . . . . . . . . . . . 10-93
Page 278 of 434

Black plate (4,1)Chevrolet Corvette Owner Manual - 2012
10-4 Vehicle Care
Accessories and
Modifications
Adding non‐dealer accessories or
making modifications to the vehicle
can affect vehicle performance and
safety, including such things as
airbags, braking, stability, ride and
handling, emissions systems,
aerodynamics, durability, and
electronic systems like antilock
brakes, traction control, and stability
control. These accessories or
modifications could even cause
malfunction or damage not covered
by the vehicle warranty.Damage to vehicle components
resulting from modifications or the
installation or use of non‐GM
certified parts, including control
module or software modifications,
is not covered under the terms of
the vehicle warranty and may affect
remaining warranty coverage for
affected parts.
GM Accessories are designed to
complement and function with other
systems on the vehicle. See your
dealer to accessorize the vehicle
using genuine GM Accessories
installed by a dealer technician.
Also, see
Adding Equipment to
the Airbag-Equipped Vehicle on
page 3‑26.
Lifting the Vehicle
{WARNING
Lifting a vehicle can cause an
injury. The vehicle can slip off the
jack and roll over you or other
people. You and they could be
badly injured. Find a level place
to lift your vehicle. To help
prevent the vehicle from moving:
1. Set the parking brake firmly.
2. Put an automatic transmission shift lever in
P (Park), or shift a manual
transmission to 1 (First) or
R (Reverse).
3. Turn off the engine.
To be even more certain the
vehicle won't move, put blocks in
front of and behind the wheels.
Page 313 of 434

Black plate (39,1)Chevrolet Corvette Owner Manual - 2012
Vehicle Care 10-39
Some driving conditions or
climates can cause a brake squeal
when the brakes are first applied
or lightly applied. This does not
mean something is wrong with
the brakes.
Brake linings should always be
replaced as complete axle sets.
Brake Wear (ZR1, Z06, and
Grand Sport Only)
The ZR1, Z06, and Grand Sport
models do not have built-in brake
pad wear indicators and periodic
visual inspection of the brake pads
is required to determine when to
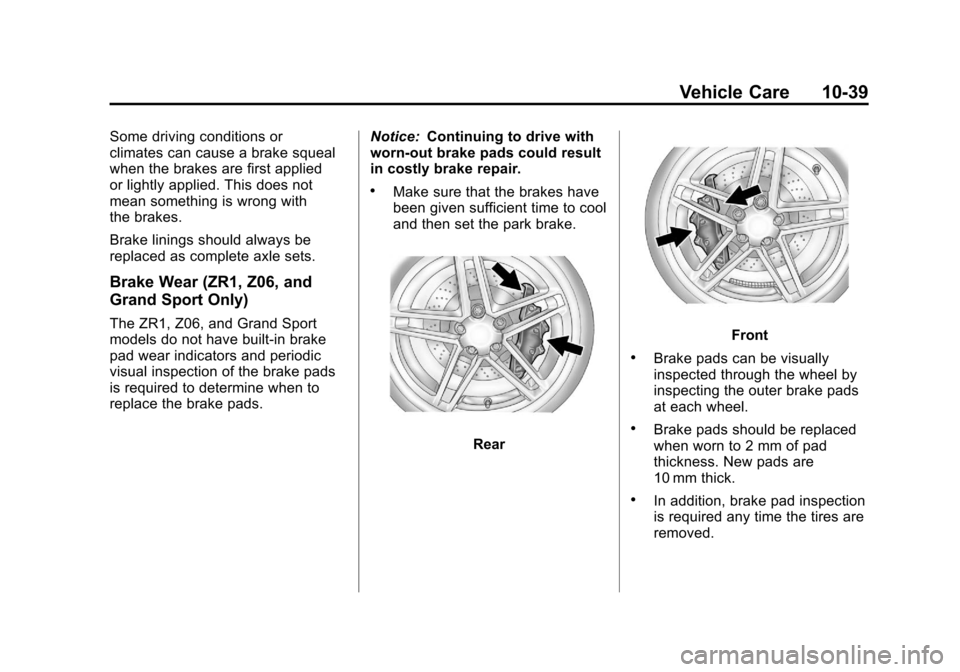
replace the brake pads.Notice:
Continuing to drive with
worn-out brake pads could result
in costly brake repair.
.Make sure that the brakes have
been given sufficient time to cool
and then set the park brake.
Rear
Front
.Brake pads can be visually
inspected through the wheel by
inspecting the outer brake pads
at each wheel.
.Brake pads should be replaced
when worn to 2 mm of pad
thickness. New pads are
10 mm thick.
.In addition, brake pad inspection
is required any time the tires are
removed.
Page 314 of 434

Black plate (40,1)Chevrolet Corvette Owner Manual - 2012
10-40 Vehicle Care
The ZR1, Z06, and Grand Sport
models also have an electronic
brake pad wear sensor system.
When pads are worn, the CHANGE
BRAKE PADS message displays
in the Driver Information Center.
SeeBrake System Messages on
page 5‑37.
Some driving conditions or climates
can cause a brake squeal when the
brakes are first applied or lightly
applied. This does not mean
something is wrong with the brakes.
Brake linings should always be
replaced as complete axle sets. Brake Rotor Wear
ZR1 models have, and Z06 and
Grand Sport models may have,
ceramic brake rotors. Rotors should
be visually inspected whenever the
brake pads are replaced. Rotors
also need to be weighed before
brake pads are replaced to confirm
that the rotor mass is greater than
the wear‐out mass printed on the
rotor. The rotor can be reused if the
weight of the rotor is above the
mass limit. Rotor inspection and
weighing methods can be found in
the service manual. See
Service
Publications Ordering Information
on page 13‑17. Brake Rotor Protector
{WARNING
Ceramic rotors will be very hot
after operation and touching them
may cause burns. Be sure brake
system is completely cool prior to
installation of protector, or coming
in contact with them.
Notice: Rotors may be chipped if
hard contact is made with the
wheel during wheel installation or
removal. Always use the rotor
protectors. Be sure to carefully
follow wheel removal and
installation instructions.
Page 315 of 434

Black plate (41,1)Chevrolet Corvette Owner Manual - 2012
Vehicle Care 10-41
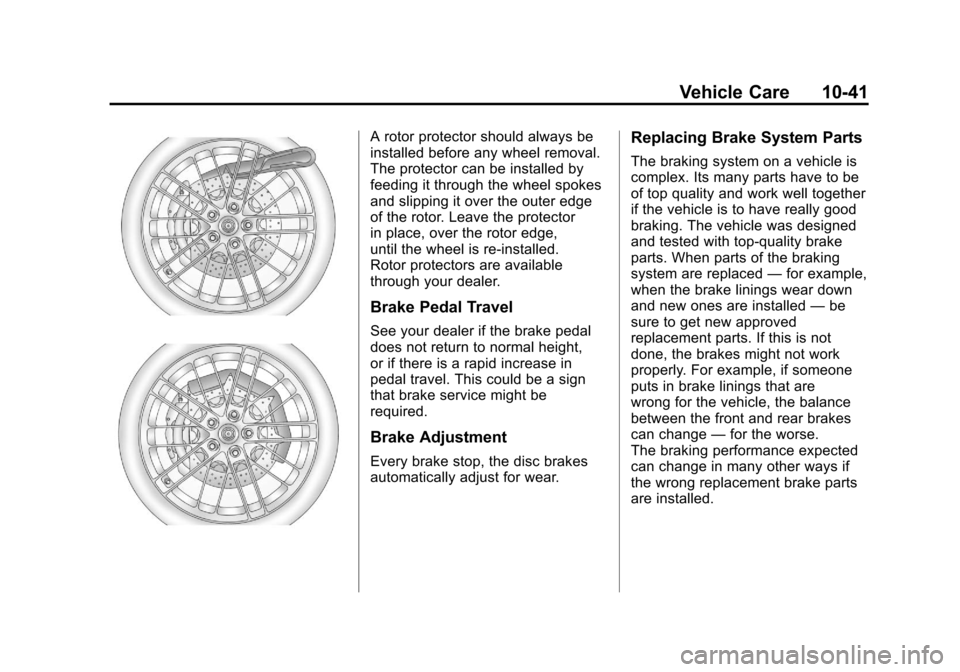
A rotor protector should always be
installed before any wheel removal.
The protector can be installed by
feeding it through the wheel spokes
and slipping it over the outer edge
of the rotor. Leave the protector
in place, over the rotor edge,
until the wheel is re‐installed.
Rotor protectors are available
through your dealer.
Brake Pedal Travel
See your dealer if the brake pedal
does not return to normal height,
or if there is a rapid increase in
pedal travel. This could be a sign
that brake service might be
required.
Brake Adjustment
Every brake stop, the disc brakes
automatically adjust for wear.
Replacing Brake System Parts
The braking system on a vehicle is
complex. Its many parts have to be
of top quality and work well together
if the vehicle is to have really good
braking. The vehicle was designed
and tested with top-quality brake
parts. When parts of the braking
system are replaced—for example,
when the brake linings wear down
and new ones are installed —be
sure to get new approved
replacement parts. If this is not
done, the brakes might not work
properly. For example, if someone
puts in brake linings that are
wrong for the vehicle, the balance
between the front and rear brakes
can change —for the worse.
The braking performance expected
can change in many other ways if
the wrong replacement brake parts
are installed.
Page 323 of 434
Black plate (49,1)Chevrolet Corvette Owner Manual - 2012
Vehicle Care 10-49
Headlamps, Front Turn
Signal and Parking
Lamps
A. High-beam Headlamp
B. Low-beam Headlamp
C. Front Parking/Turn Signal
If the low-beam headlamp needs
to be replaced, see your dealer.
SeeHigh Intensity Discharge (HID)
Lighting on page 10‑48 for more
information. To replace a high-beam or front
parking/turn signal bulb:
1. Turn the wheel to allow access
to the wheel well.2. Remove the three outerfasteners to move the access
panel back.
3. Remove the outer cover to expose the high-beam headlamp
bulb socket.
4. Remove the headlamp bulb byreleasing the outer tabs from the
socket.
5. Remove the front parking/turn signal bulb by turning the bulb
socket counterclockwise.
6. Replace the high-beam headlamp bulb with a new bulb
and reattach to the bulb socket.
Replace the front parking/turn
signal bulb by turning the bulb
socket clockwise.
7. Reverse the Steps 2 through 4 to reinstall.
Page 330 of 434

Black plate (56,1)Chevrolet Corvette Owner Manual - 2012
10-56 Vehicle Care
FusesUsage
BTSI
SOL/STR
WHL LCK Brake
Transmission
Shift Interlock,
Steering Wheel
Column Lock
CLSTR/HUD Cluster,
Heads‐Up
Display
CRUISE
SWTCH Cruise Control
Switch
CTSY/LAMP Courtesy Lamp
DR LCK Door Locks
DRIV DR
SWITCH Driver Door
Switch
ECM Engine Control
Module (ECM)
EXH MDL Exhaust Module
(Z06 & ZR1),
Spare (Coupe
and Convertible)
GM LAN
RUN/CRNK GM LAN Devices Fuses
Usage
HTD SEAT/
WPR RLY Heated Seat,
Wiper Relays
HVAC/
PWR SND Heating
Ventilation/Air
Conditioning,
Power Sounder
IGN SWTCH/
INTR SNSR Ignition Switch,
Intrusion Sensor
ISRVM/HVAC Electric Inside
Rearview
Mirror, Heating,
Ventilation, Air
Conditioning
ONSTAR OnStar
(if equipped)
RDO/S‐BAND Radio, S‐Band
REAR FOG/
ALDL/TOP
SWTCH Rear Fog Lamp,
Assembly Line
Diagnostic Link
Connector,
Convertible Top
Switch Fuses
Usage
REVERSE
LAMPS Reverse Lamps
RUN CRNK Run/Crank Relay
SDM/AOS
SWTCH
AIRBAG Sensing and
Diagnostic
Module,
Automatic
Occupant
Sensing Module,
Airbag
SPARE Spare
SPARE Spare
SPARE Spare
SPARE Spare
STOP LAMP Stop Lamp
SWC DM Steering Wheel
Dimming