2012 BMW Z4 SDRIVE35I lock
[x] Cancel search: lockPage 123 of 220
Changing the channel using the buttons
Press the button for the correspond‐
ing direction. The next enabled channel is
opened.
Search
1. Press and hold the button for the
corresponding direction. The activated
channels appear on the display one after the
other.2.Release the button to select the displayed
channel.
Notes
When there is a signal blockage or the transmis‐
sion is suspended momentarily for more than
4 seconds, a message will appear on the display.
Service may be interrupted or unavailable for
specific reasons such as environmental or topo‐
graphic conditions and others that Satellite
Radio cannot directly control. Signal may not be
available under tunnels, in parking garages, next
to tall buildings, nearby trees with dense foliage,
nearby mountains or other possible strong sour‐
ces of radio interference. Service should resume
normally after the source of signal unavailability
has been cleared.
CD/multimedia
CD player and CD/DVD changer
Filling the CD player
Insert the CD into the CD drive with the printed
side up.
Playback begins automatically.
Reading can take a few minutes with com‐
pressed audio files.
Starting the CD player
A CD is contained in the CD player.1.Switch on the car radio if necessary.2. Press the button.3."CD"
Starting the CD/DVD changer
1.Switch on the car radio if necessary.2.Fill the CD/DVD compartments, refer to
page 125.3. Press the button.4."DVD"5.Press the button of the desired CD/DVD
number.
The corresponding CD/DVD number is shown
on the display. At the end of the last track, the
device changes to the next CD/DVD.
Skipping to another track
Press the button repeatedly until the
desired track is played.
With the right knob:
Turn the right knob until the desired track is
played back.
Fast forward/reverse
Hold the button down.
Tracks can be heard but are distorted.
Briefly playing and selecting a track
"SC"
All tracks are played briefly one after the other.
To interrupt the function and select a track:
"SC"
Random playback
"RND"
Seite 123Professional RadioEntertainment123
Online Edition for Part no. 01 40 2 609 184 - 09 11 500
Page 145 of 220
ConnectedDriveVehicle equipment
This chapter describes all series equipment as
well as country-specific and special equipment
offered for this model series.Therefore, it also
describes equipment that may not be found in
your vehicle, for instance due to the selected
special equipment or the country version. This
also applies to safety-related functions and sys‐
tems.
BMW Assist
General information
BMW Assist provides you with certain services,
e.g., transmission of the position data of your
vehicle to the BMW Assist Response Center if
an Emergency Request has been initiated.
Many BMW Assist services depend on the indi‐
vidually agreed upon contract.
After your contract has expired, the BMW Assist
system will be deactivated by the BMW Assist
Response Center without your having to visit a
service center. After the BMW Assist system
has been deactivated, no BMW Assist services
will be available. The BMW Assist system can be
reactivated by a service center after you sign a
new contract.
Requirements▷The installed BMW Assist system is logged
in to a wireless communications network.
This network must be capable of transmit‐
ting the services.▷To transmit position data, the vehicle must
be able to determine the current position.▷The BMW Assist service contract was
signed with your service center or with the
BMW Assist Response Center. Enabling
must have been completed.▷BMW Assist is activated.
Services offered
▷Emergency Request: when you press the
SOS button, a connection to the BMW As‐
sist Response Center is established. The
BMW Assist Response Center then speaks
with you and takes further steps to help you.▷Automatic Collision Notification: under cer‐
tain conditions, a connection is established
to the BMW Assist Response Center after a
serious accident. If possible, the BMW As‐
sist Response Center then speaks with you
and takes further steps to help you.▷Enhanced Roadside Assistance: BMW
Roadside Assistance can be contacted if as‐
sistance is needed in the event of a break‐
down. If possible, the vehicle and position
data are transmitted in the process.▷Customer Relations: connection with Cus‐
tomer Relations for information on all as‐
pects of your vehicle.▷TeleService: data on your vehicle's service
status or required inspections are transmit‐
ted to your service center, either automati‐
cally before a service due date or when you
request a BMW service appointment.▷Remote Door Unlock: the BMW Assist Re‐
sponse Center provides assistance if, for ex‐
ample, the remote control is not available
and the vehicle needs to be opened.▷Stolen Vehicle Recovery: after you report
that your vehicle was stolen to the police, the
BMW Assist Response Center can deter‐
mine its position.▷In addition to these services, the optional
Convenience Plan offers Concierge service
and information for route planning, traffic,
and weather. A limited number of calls can
be made via the BMW Assist Response
Center with Critical Calling if, for example,Seite 145ConnectedDriveCommunication145
Online Edition for Part no. 01 40 2 609 184 - 09 11 500
Page 152 of 220
RefuelingVehicle equipment
This chapter describes all series equipment as
well as country-specific and special equipment
offered for this model series.Therefore, it also
describes equipment that may not be found in
your vehicle, for instance due to the selected
special equipment or the country version. This
also applies to safety-related functions and sys‐
tems.
General information Refuel promptly
At the latest, refuel at a range of 30 miles/
50 km; otherwise, the engine function is not en‐
sured and damage may occur.◀
Notes Switch off the engine before refueling
Always switch off the engine before refu‐
eling; otherwise, fuel cannot be added to the
tank and a message will be displayed.◀
Observe when handling fuel▷Take all precautionary measures and
observe all applicable regulations
when handling fuel.▷Do not carry any spare fuel containers in
your vehicle. They can develop a leak and
cause an explosion or cause a fire in the
event of an accident.◀Fuel filler flap
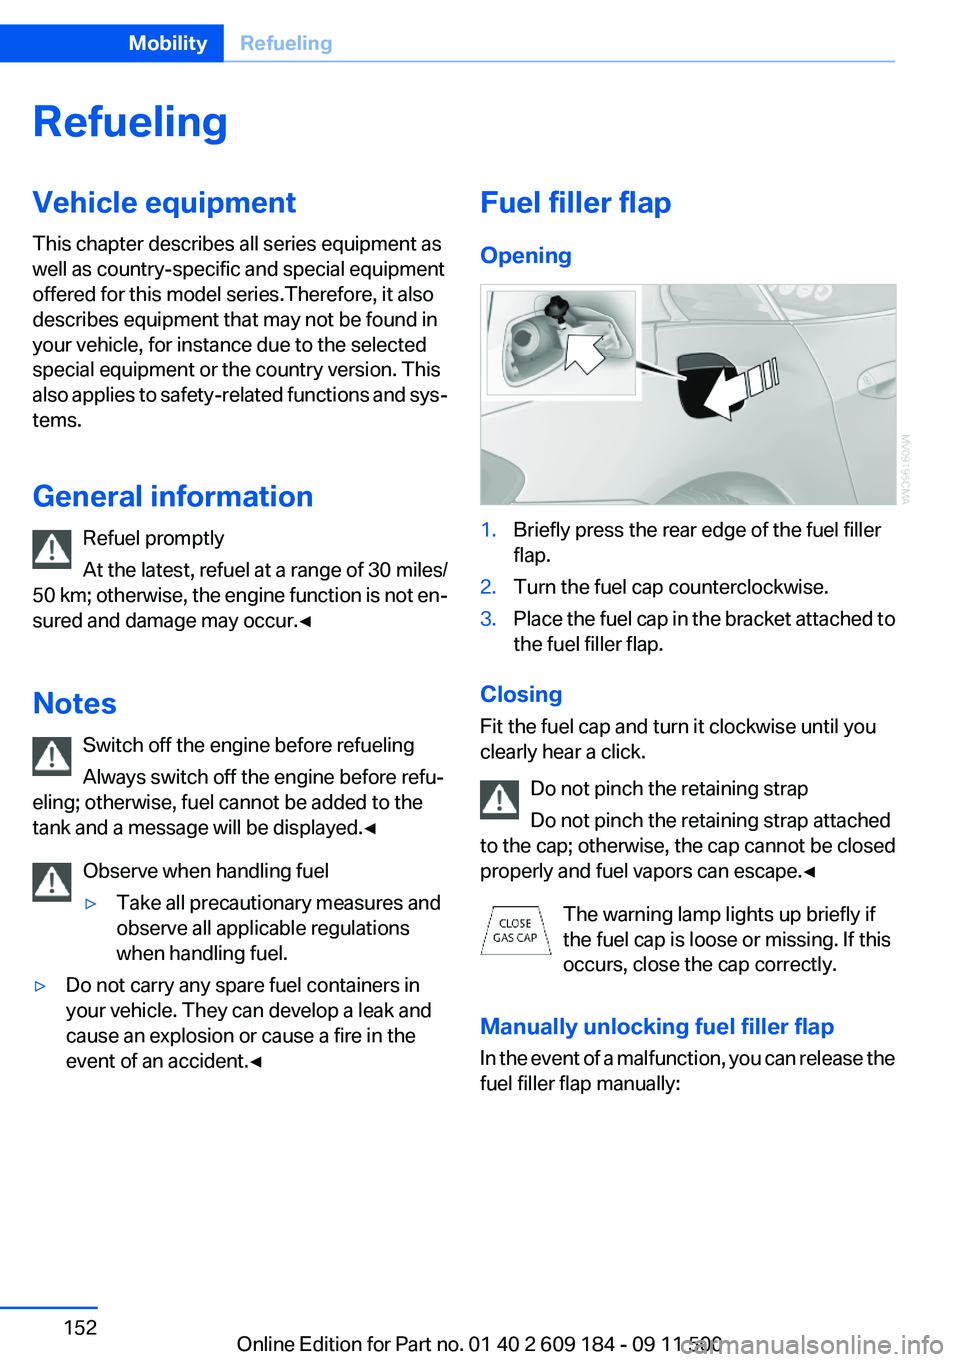
Opening1.Briefly press the rear edge of the fuel filler
flap.2.Turn the fuel cap counterclockwise.3.Place the fuel cap in the bracket attached to
the fuel filler flap.
Closing
Fit the fuel cap and turn it clockwise until you
clearly hear a click.
Do not pinch the retaining strap
Do not pinch the retaining strap attached
to the cap; otherwise, the cap cannot be closed
properly and fuel vapors can escape.◀
The warning lamp lights up briefly if
the fuel cap is loose or missing. If this
occurs, close the cap correctly.
Manually unlocking fuel filler flap
In the event of a malfunction, you can release the
fuel filler flap manually:
Seite 152MobilityRefueling152
Online Edition for Part no. 01 40 2 609 184 - 09 11 500
Page 167 of 220
Suitable additives
Only use suitable additives; otherwise, en‐
gine damage may occur. The additives are
harmful to your health.◀
Coolant consists of water and additives.
Not all commercially available additives are suit‐
able for your vehicle. Ask your service center for
suitable additives.
Checking the coolant level1.Let the engine cool.2.Turn the expansion tank cap counterclock‐
wise slightly to allow any accumulated pres‐
sure to escape, then continue turning to
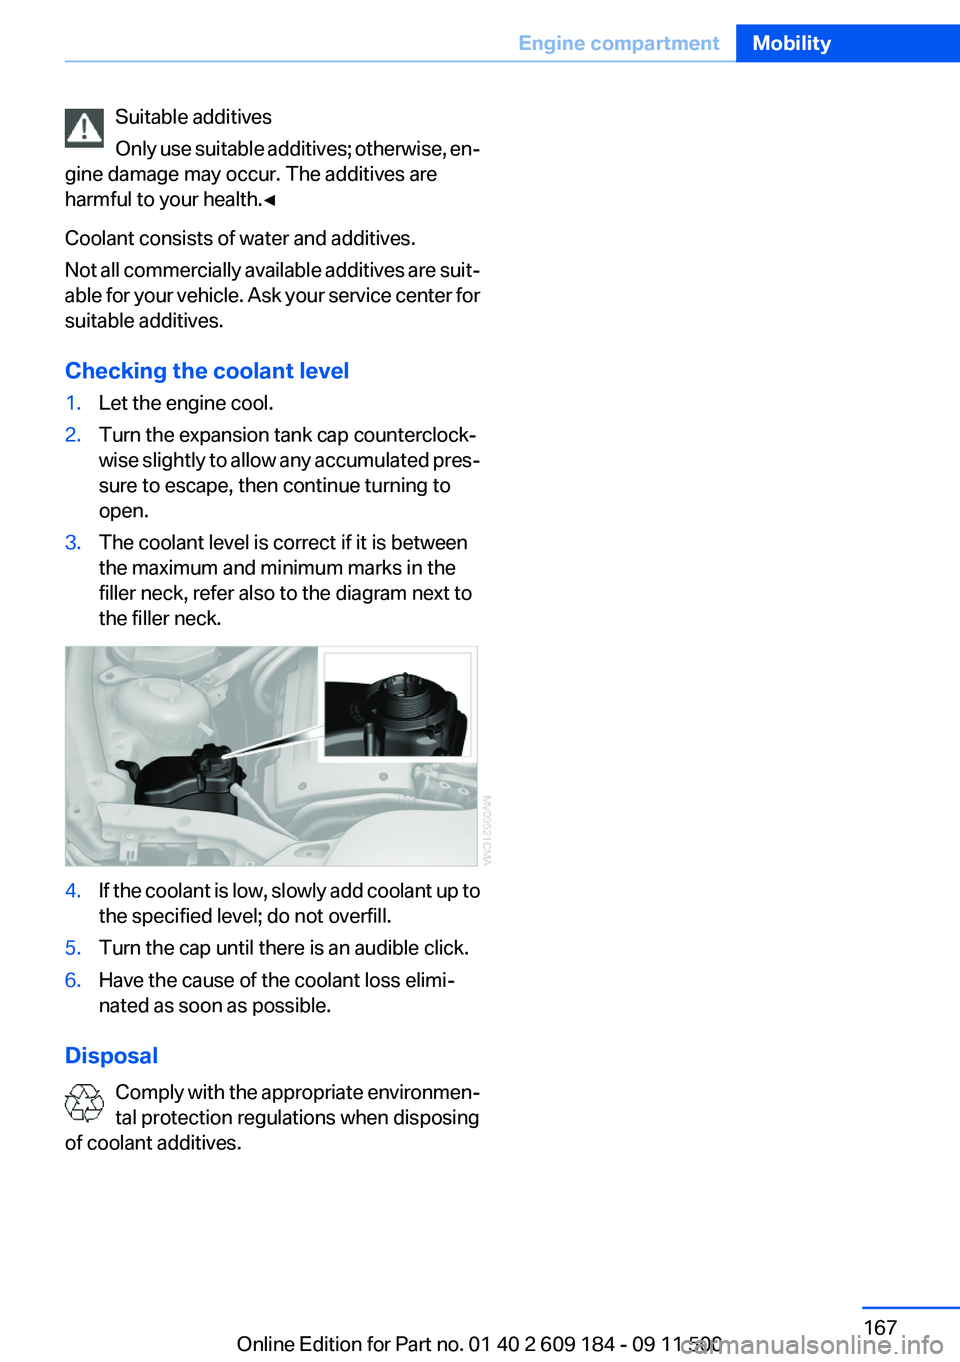
open.3.The coolant level is correct if it is between
the maximum and minimum marks in the
filler neck, refer also to the diagram next to
the filler neck.4.If the coolant is low, slowly add coolant up to
the specified level; do not overfill.5.Turn the cap until there is an audible click.6.Have the cause of the coolant loss elimi‐
nated as soon as possible.
Disposal
Comply with the appropriate environmen‐
tal protection regulations when disposing
of coolant additives.
Seite 167Engine compartmentMobility167
Online Edition for Part no. 01 40 2 609 184 - 09 11 500
Page 171 of 220
Use a clean tissue, cloth or something similar, or
hold the bulb by its base.◀
Light-emitting diodes LED
Light-emitting diodes installed behind translu‐
cent lenses serve as the light source for many of
the controls and displays in your vehicle.
These light-emitting diodes, which operate us‐
ing a concept similar to that applied in conven‐
tional lasers, are officially designated as Class 1
light-emitting diodes.
Do not remove the covers
Do not remove the covers, and never stare
into the unfiltered light for several hours; other‐
wise, irritation of the retina could result.◀
Headlamp glass
Condensation can form on the inside of the ex‐
ternal lamps in cool or humid weather. When you
drive with the lights switched on, the conden‐
sation evaporates after a short time. The head‐
lamp glasses do not need to be changed.
If the condensation in the headlamps does not
evaporate after trips with the lights switched on,
and the amount of moisture in the headlamps
increases, for example if water droplets form,
have them checked by your service center.
Xenon headlamps
Because of the long life of these bulbs, the like‐
lihood of failure is very low. Switching the lamps
on and off frequently shortens their life.
Do not perform work/bulb replacement on
xenon headlamps
Have any work on the xenon lighting system, in‐
cluding bulb replacement, performed only by a
service center.
Due to the high voltage present in the system,
there is the danger of fatal injuries if work is car‐
ried out improperly.◀Parking lamps, roadside parking lamps,
daytime running lights
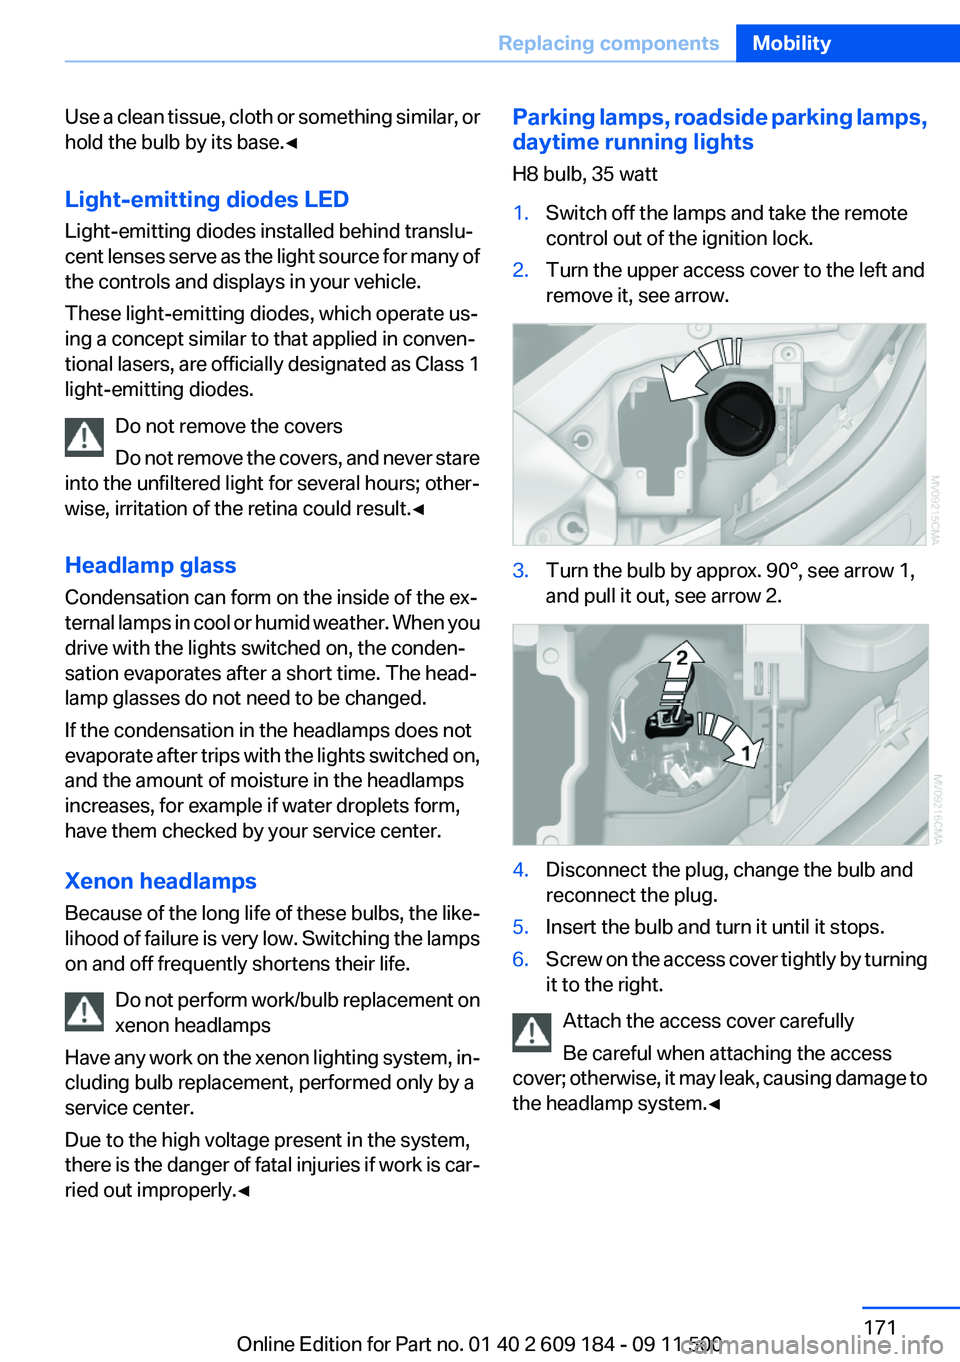
H8 bulb, 35 watt1.Switch off the lamps and take the remote
control out of the ignition lock.2.Turn the upper access cover to the left and
remove it, see arrow.3.Turn the bulb by approx. 90°, see arrow 1,
and pull it out, see arrow 2.4.Disconnect the plug, change the bulb and
reconnect the plug.5.Insert the bulb and turn it until it stops.6.Screw on the access cover tightly by turning
it to the right.
Attach the access cover carefully
Be careful when attaching the access
cover; otherwise, it may leak, causing damage to
the headlamp system.◀
Seite 171Replacing componentsMobility171
Online Edition for Part no. 01 40 2 609 184 - 09 11 500
Page 172 of 220
Turn signals, front
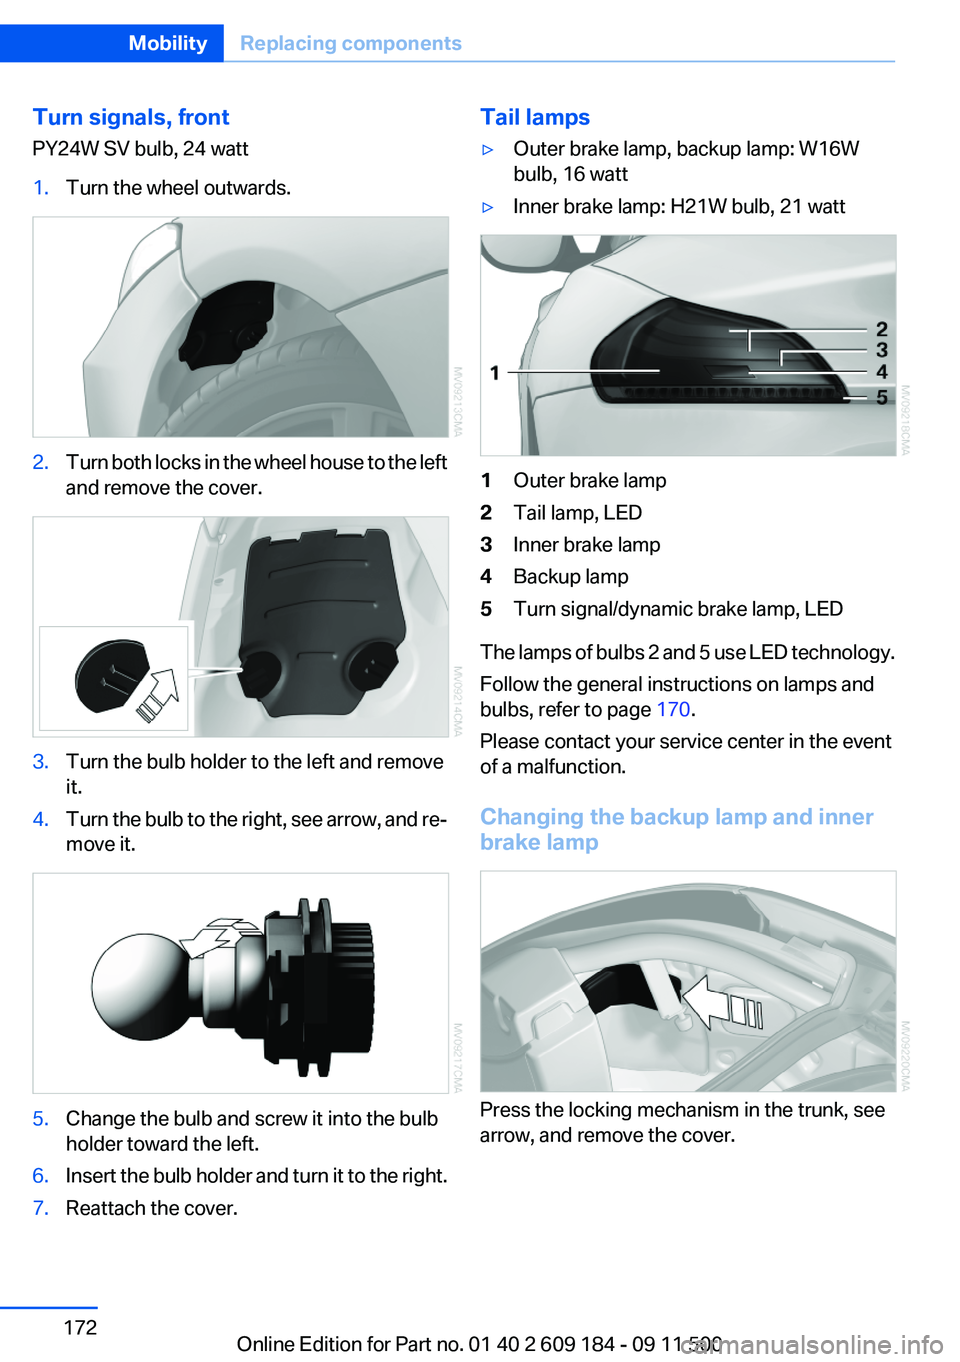
PY24W SV bulb, 24 watt1.Turn the wheel outwards.2.Turn both locks in the wheel house to the left
and remove the cover.3.Turn the bulb holder to the left and remove
it.4.Turn the bulb to the right, see arrow, and re‐
move it.5.Change the bulb and screw it into the bulb
holder toward the left.6.Insert the bulb holder and turn it to the right.7.Reattach the cover.Tail lamps▷Outer brake lamp, backup lamp: W16W
bulb, 16 watt▷Inner brake lamp: H21W bulb, 21 watt1Outer brake lamp2Tail lamp, LED3Inner brake lamp4Backup lamp5Turn signal/dynamic brake lamp, LED
The lamps of bulbs 2 and 5 use LED technology.
Follow the general instructions on lamps and
bulbs, refer to page 170.
Please contact your service center in the event
of a malfunction.
Changing the backup lamp and inner
brake lamp
Press the locking mechanism in the trunk, see
arrow, and remove the cover.
Seite 172MobilityReplacing components172
Online Edition for Part no. 01 40 2 609 184 - 09 11 500
Page 174 of 220
No spare tire is available in the case of a flat tire.
The tools for changing wheels are available as
accessories from your service center.
Jacking points for the vehicle jack
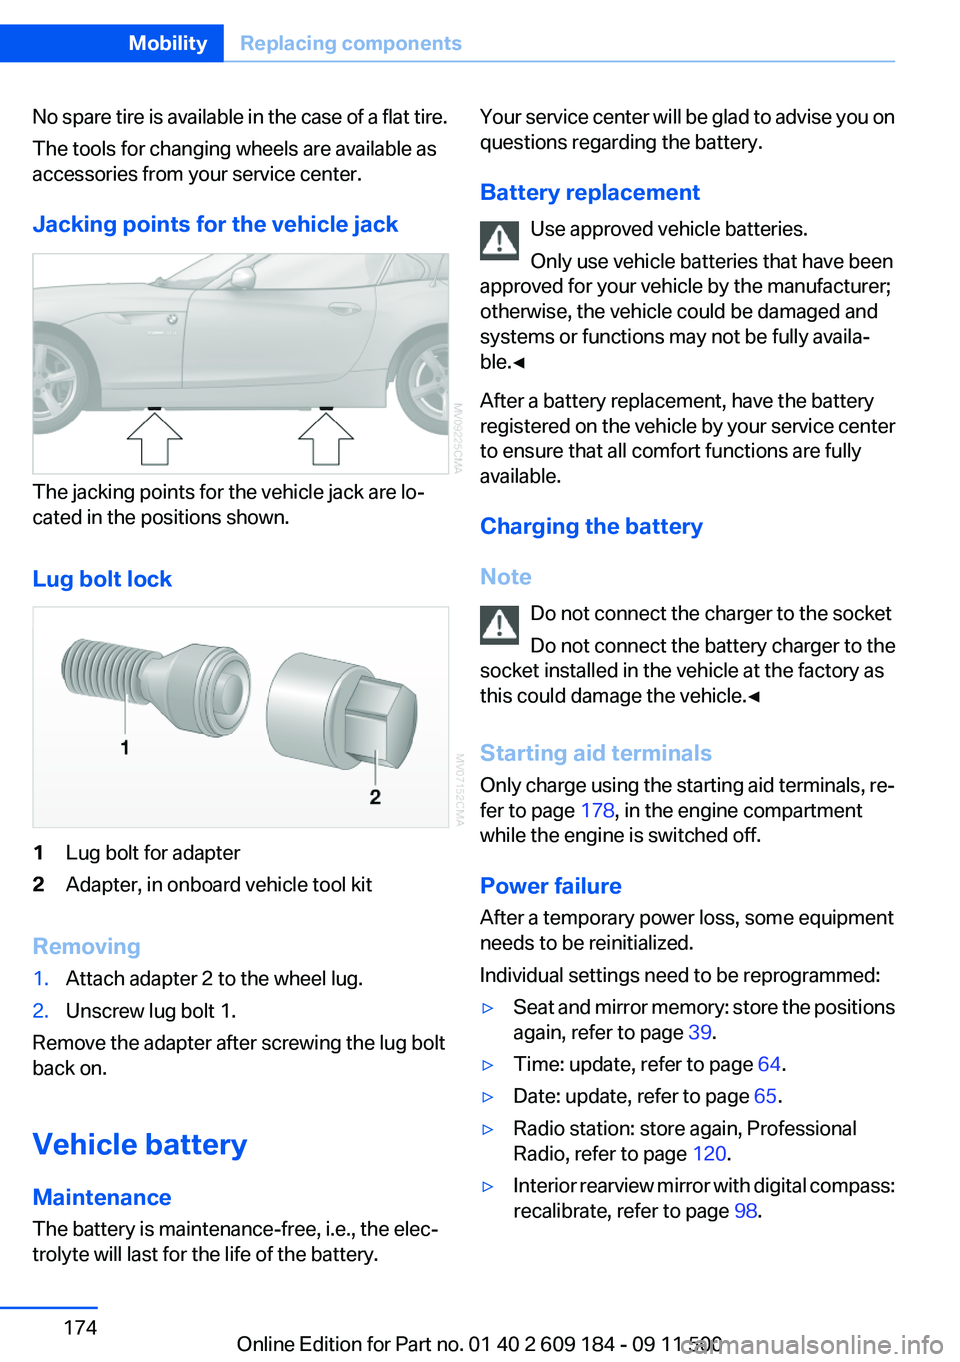
The jacking points for the vehicle jack are lo‐
cated in the positions shown.
Lug bolt lock
1Lug bolt for adapter2Adapter, in onboard vehicle tool kit
Removing
1.Attach adapter 2 to the wheel lug.2.Unscrew lug bolt 1.
Remove the adapter after screwing the lug bolt
back on.
Vehicle battery
Maintenance
The battery is maintenance-free, i.e., the elec‐
trolyte will last for the life of the battery.
Your service center will be glad to advise you on
questions regarding the battery.
Battery replacement Use approved vehicle batteries.
Only use vehicle batteries that have been
approved for your vehicle by the manufacturer;
otherwise, the vehicle could be damaged and
systems or functions may not be fully availa‐
ble.◀
After a battery replacement, have the battery
registered on the vehicle by your service center
to ensure that all comfort functions are fully
available.
Charging the battery
Note Do not connect the charger to the socket
Do not connect the battery charger to the
socket installed in the vehicle at the factory as
this could damage the vehicle.◀
Starting aid terminals
Only charge using the starting aid terminals, re‐
fer to page 178, in the engine compartment
while the engine is switched off.
Power failure
After a temporary power loss, some equipment
needs to be reinitialized.
Individual settings need to be reprogrammed:▷Seat and mirror memory: store the positions
again, refer to page 39.▷Time: update, refer to page 64.▷Date: update, refer to page 65.▷Radio station: store again, Professional
Radio, refer to page 120.▷Interior rearview mirror with digital compass:
recalibrate, refer to page 98.Seite 174MobilityReplacing components174
Online Edition for Part no. 01 40 2 609 184 - 09 11 500
Page 177 of 220
After the Emergency Request arrives at the
BMW Assist Response Center, the BMW
Assist Response Center contacts you and
takes further steps to help you.
Even if you are unable to respond, the BMW
Assist Response Center can take further
steps to help you under certain circumstan‐
ces.
For this purpose, data that are used to de‐
termine the necessary rescue measures,
such as the current position of the vehicle if
it can be established, are transmitted to the
BMW Assist Response Center.▷If the LED is flashing but the BMW Assist
Response Center cannot be heard on the
hands-free system, the hands-free system
may be malfunctioning. However, the BMW
Assist Response Center may still be able to
hear you.
Initiating an Emergency Request
automatically
Under certain conditions, an Emergency Re‐
quest is automatically initiated immediately after
a severe accident. Automatic Collision Notifica‐
tion is not affected by pressing the SOS button.
Warning triangle
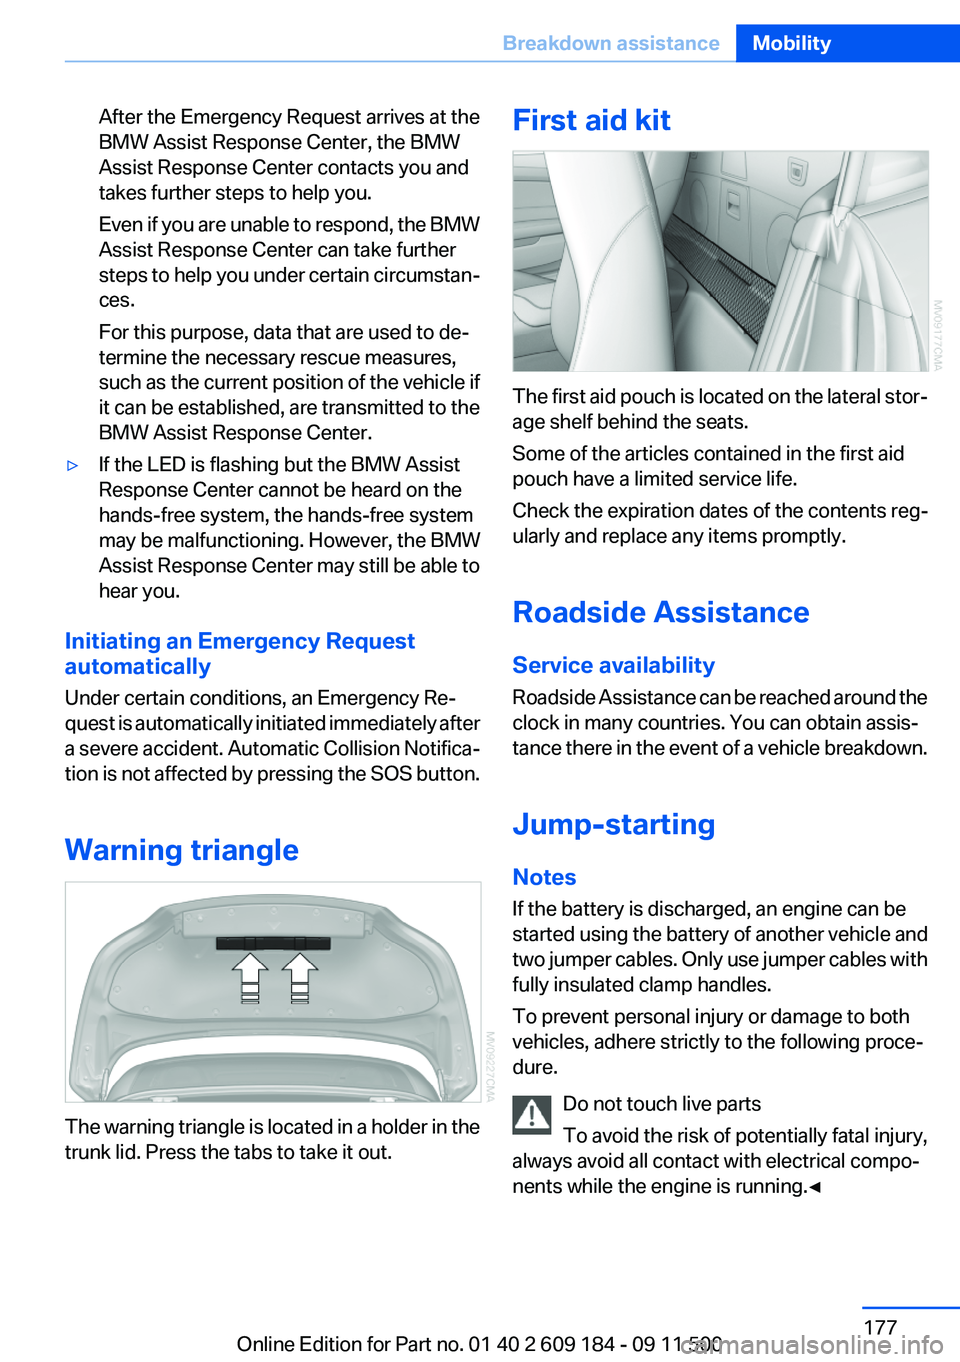
The warning triangle is located in a holder in the
trunk lid. Press the tabs to take it out.
First aid kit
The first aid pouch is located on the lateral stor‐
age shelf behind the seats.
Some of the articles contained in the first aid
pouch have a limited service life.
Check the expiration dates of the contents reg‐
ularly and replace any items promptly.
Roadside Assistance
Service availability
Roadside Assistance can be reached around the
clock in many countries. You can obtain assis‐
tance there in the event of a vehicle breakdown.
Jump-starting
Notes
If the battery is discharged, an engine can be
started using the battery of another vehicle and
two jumper cables. Only use jumper cables with
fully insulated clamp handles.
To prevent personal injury or damage to both
vehicles, adhere strictly to the following proce‐
dure.
Do not touch live parts
To avoid the risk of potentially fatal injury,
always avoid all contact with electrical compo‐
nents while the engine is running.◀
Seite 177Breakdown assistanceMobility177
Online Edition for Part no. 01 40 2 609 184 - 09 11 500