2012 BMW Z4 SDRIVE35I lock
[x] Cancel search: lockPage 68 of 220
LampsVehicle equipment
This chapter describes all series equipment as
well as country-specific and special equipment
offered for this model series.Therefore, it also
describes equipment that may not be found in
your vehicle, for instance due to the selected
special equipment or the country version. This
also applies to safety-related functions and sys‐
tems.
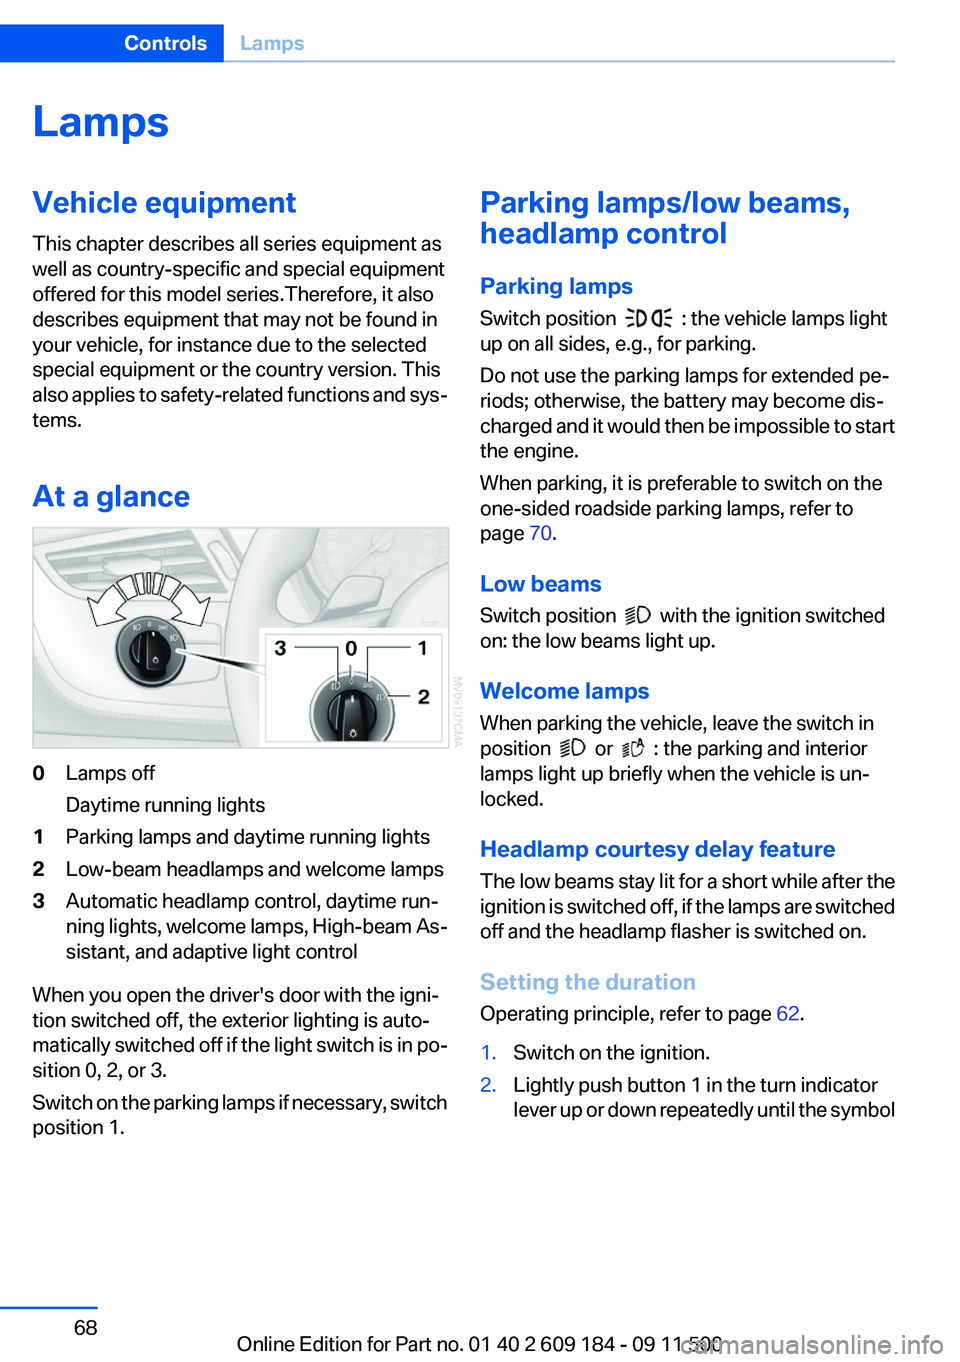
At a glance0Lamps off
Daytime running lights1Parking lamps and daytime running lights2Low-beam headlamps and welcome lamps3Automatic headlamp control, daytime run‐
ning lights, welcome lamps, High-beam As‐
sistant, and adaptive light control
When you open the driver's door with the igni‐
tion switched off, the exterior lighting is auto‐
matically switched off if the light switch is in po‐
sition 0, 2, or 3.
Switch on the parking lamps if necessary, switch
position 1.
Parking lamps/low beams,
headlamp control
Parking lamps
Switch position
: the vehicle lamps light
up on all sides, e.g., for parking.
Do not use the parking lamps for extended pe‐
riods; otherwise, the battery may become dis‐
charged and it would then be impossible to start
the engine.
When parking, it is preferable to switch on the
one-sided roadside parking lamps, refer to
page 70.
Low beams
Switch position
with the ignition switched
on: the low beams light up.
Welcome lamps
When parking the vehicle, leave the switch in
position
or : the parking and interior
lamps light up briefly when the vehicle is un‐
locked.
Headlamp courtesy delay feature
The low beams stay lit for a short while after the
ignition is switched off, if the lamps are switched
off and the headlamp flasher is switched on.
Setting the duration
Operating principle, refer to page 62.
1.Switch on the ignition.2.Lightly push button 1 in the turn indicator
lever up or down repeatedly until the symbolSeite 68ControlsLamps68
Online Edition for Part no. 01 40 2 609 184 - 09 11 500
Page 73 of 220
SafetyVehicle equipment
This chapter describes all series equipment as
well as country-specific and special equipment
offered for this model series.Therefore, it also
describes equipment that may not be found in
your vehicle, for instance due to the selected
special equipment or the country version. This
also applies to safety-related functions and sys‐
tems.
Airbags
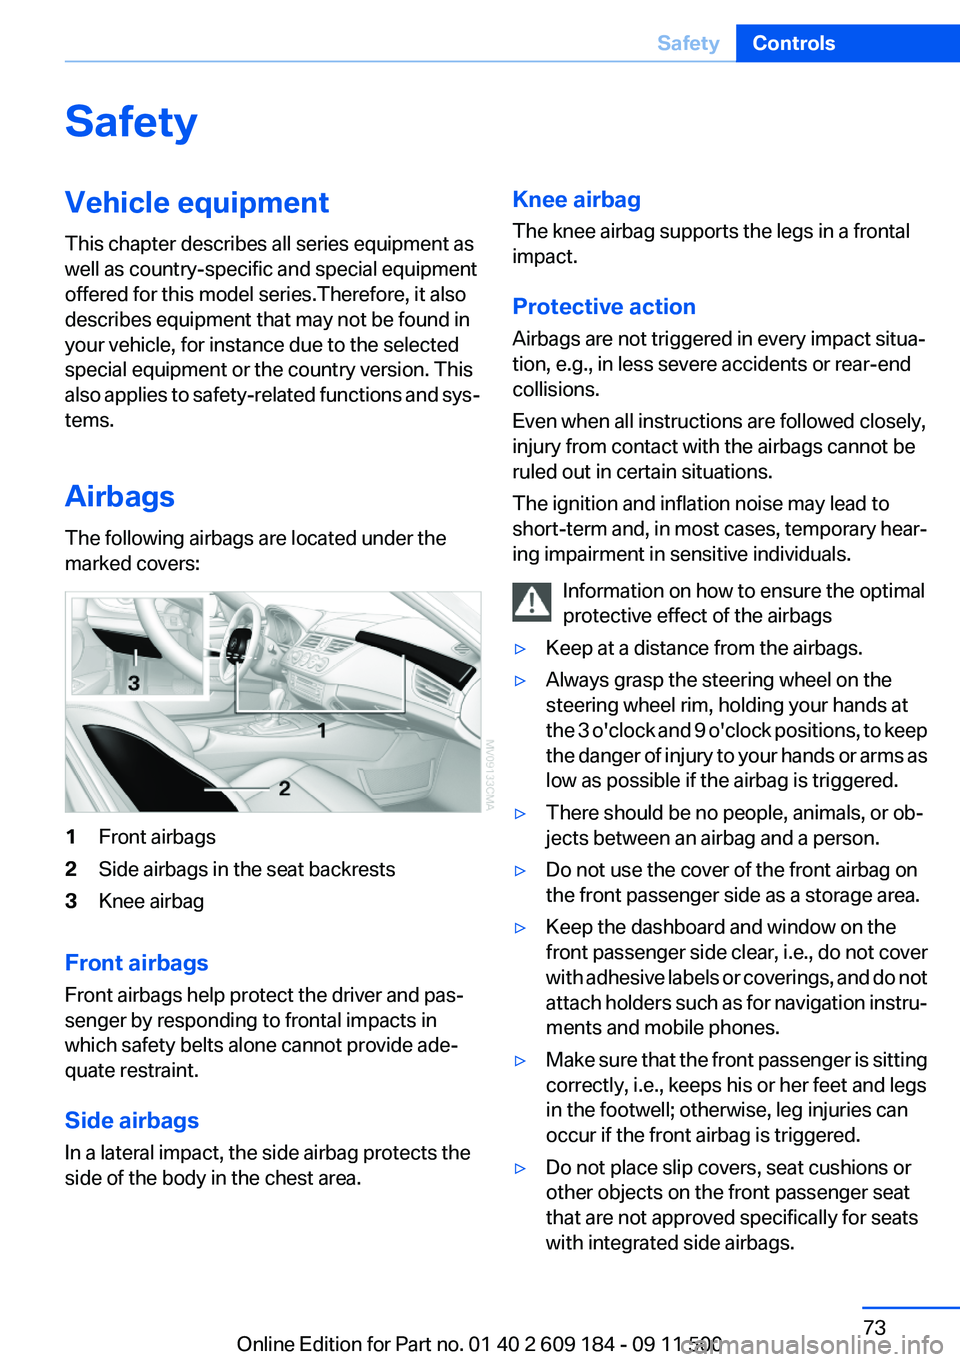
The following airbags are located under the
marked covers:1Front airbags2Side airbags in the seat backrests3Knee airbag
Front airbags
Front airbags help protect the driver and pas‐
senger by responding to frontal impacts in
which safety belts alone cannot provide ade‐
quate restraint.
Side airbags
In a lateral impact, the side airbag protects the
side of the body in the chest area.
Knee airbag
The knee airbag supports the legs in a frontal
impact.
Protective action
Airbags are not triggered in every impact situa‐
tion, e.g., in less severe accidents or rear-end
collisions.
Even when all instructions are followed closely,
injury from contact with the airbags cannot be
ruled out in certain situations.
The ignition and inflation noise may lead to
short-term and, in most cases, temporary hear‐
ing impairment in sensitive individuals.
Information on how to ensure the optimal
protective effect of the airbags▷Keep at a distance from the airbags.▷Always grasp the steering wheel on the
steering wheel rim, holding your hands at
the 3 o'clock and 9 o'clock positions, to keep
the danger of injury to your hands or arms as
low as possible if the airbag is triggered.▷There should be no people, animals, or ob‐
jects between an airbag and a person.▷Do not use the cover of the front airbag on
the front passenger side as a storage area.▷Keep the dashboard and window on the
front passenger side clear, i.e., do not cover
with adhesive labels or coverings, and do not
attach holders such as for navigation instru‐
ments and mobile phones.▷Make sure that the front passenger is sitting
correctly, i.e., keeps his or her feet and legs
in the footwell; otherwise, leg injuries can
occur if the front airbag is triggered.▷Do not place slip covers, seat cushions or
other objects on the front passenger seat
that are not approved specifically for seats
with integrated side airbags.Seite 73SafetyControls73
Online Edition for Part no. 01 40 2 609 184 - 09 11 500
Page 81 of 220
Driving stability control systemsVehicle equipment
This chapter describes all series equipment as
well as country-specific and special equipment
offered for this model series.Therefore, it also
describes equipment that may not be found in
your vehicle, for instance due to the selected
special equipment or the country version. This
also applies to safety-related functions and sys‐
tems.
Antilock Brake System ABS
ABS prevents locking of the wheels during brak‐
ing.
The vehicle remains steerable even during full
brake applications, thus increasing active
safety.
ABS is operational every time you start the en‐
gine.
Electronic brake-force
distribution
The system controls the brake pressure in the
rear wheels to ensure stable braking behavior.
Dynamic Brake Control DBC
When you apply the brakes rapidly, this system
automatically produces the maximum braking
force boost. It thus helps to achieve the shortest
possible braking distance during full braking.
This system utilizes all of the benefits provided
by ABS.
Do not reduce the pressure on the brake pedal
for the duration of the full braking.Dynamic Stability Control
DSC
The concept
DSC prevents traction loss in the driving wheels
when driving away and accelerating.
DSC also recognizes unstable vehicle condi‐
tions, such as fishtailing or nose-diving. Subject
to physical limits, DSC helps to keep the vehicle
on a steady course by reducing engine speed
and by applying brakes to the individual wheels.
Adjust your driving style to the situation
An appropriate driving style is always the
responsibility of the driver.
The laws of physics cannot be repealed, even
with DSC.
Therefore, do not reduce the additional safety
margin by driving in a risky manner.◀
Activating/deactivating DSC
DSC can be deactivated/activated via the DSC
OFF program of the Dynamic Driving Control,
refer to page 82.
For better control The DSC indicator lamp flashes: DSC is
controlling the drive forces and brake
forces.
The DSC indicator lamp lights up: DSC has
failed.Seite 81Driving stability control systemsControls81
Online Edition for Part no. 01 40 2 609 184 - 09 11 500
Page 90 of 220

supply continuously; the levers change the
direction of the airflow.5Air vent: air for the knee area, footwell
Air conditioner
1Vent settings2Recirculated air mode3Cooling function4Temperature5Air volume6Rear window defrosterVent settings
Direct the flow of air to the win‐
dows
, to the upper body area
, or to the knee area and foot‐
well
. Intermediate positions are
possible. In the 6 o'clock position, a
small amount of air is also directed toward the
windows to keep them from fogging over.
Recirculated air mode If the air outside the car has an un‐
pleasant odor or contains pollu‐
tants, shut off the supply to the interior of the car
temporarily. The system then recirculates the air
currently within the vehicle.
The recirculated air mode can also be activated/
deactivated, refer to page 12, via a button on the
steering wheel.
Only use recirculated air mode for a limited
period
If condensation starts to form on the inside win‐
dow surfaces during operation in the recircu‐
lated air mode, you should switch it off while also
increasing the air flow rate as required. The re‐
circulated air mode should not be used contin‐
uously for lengthy periods; otherwise, the qual‐
ity of the air inside the car will gradually
deteriorate.◀
Air volume Press the corresponding button.
The higher the rate, the more ef‐
fective the heating or cooling will
be.
The air flow rate may be reduced or the blower
may be switched off entirely to save on battery
power.
Switching the system on/off Press the left button at the mini‐
mum fan speed. The blower and air
conditioner are completely
switched off and the air supply is cut off.Seite 90ControlsClimate90
Online Edition for Part no. 01 40 2 609 184 - 09 11 500
Page 91 of 220

To switch on the air conditioner, set the desired
air flow rate.
Switching cooling function on/off The cooling function cools and de‐
humidifies the incoming air before
reheating it as required, according to the tem‐
perature setting. This function is only available
while the engine is running.
The cooling function helps to prevent conden‐
sation on the windows or to remove it quickly.
Depending on the weather, the windshield may
fog over briefly when the engine is started.
Rear window defroster The defroster switches off auto‐
matically after a certain time or
when the hardtop is opened.
Temperature To increase the temperature, turn
the rotary switch clockwise to‐
wards red. For a lower temperature,
turn the rotary switch counter‐
clockwise towards blue.
Defrosting windows and removing
condensation1Air distribution 1 in position .2Deactivate recirculated air mode 2.3Switch on cooling function 3.4Temperature 4 to the right, red.5Set the air flow rate 5 to the maximum level.6Switch on the rear window defroster 6 to
defrost the rear window
.
Ventilation
1Use the lever to change the direction of the
air flow2Use the thumbwheels to smoothly open and
close the air vents
Ventilation for cooling
Adjust the vents to direct the flow of cool air in
your direction, for instance if the interior has be‐
come too warm.
Draft-free ventilation
Adjust the vents to let the air flow past you.
Microfilter
The microfilter removes dust and pollen from
the incoming air. The microfilter is changed by
your service center during routine maintenance
work.
Seite 91ClimateControls91
Online Edition for Part no. 01 40 2 609 184 - 09 11 500
Page 94 of 220

Press any button except the rear window de‐
froster to reactivate the automatic climate con‐
trol.
Residual heat
The heat stored in the engine is used to heat the
interior.
This function can be switched on
using the right-hand button under
the following conditions:▷Up to 15 minutes after switching off the en‐
gine.▷When the engine is warm.▷With sufficient battery voltage.▷At an external temperature under 77 ℉/
25 ℃.
The middle LED is lit when the function is on.
Automatic recirculated air mode/
recirculated air mode
Switch on the desired operating
mode by pressing this button re‐
peatedly:
▷LED off: outside air flows in
continuously.▷Left LED on, automatic recirculated air con‐
trol: a sensor detects pollutants in the out‐
side air. If necessary, the system blocks the
supply of outside air and recirculates the in‐
side air. As soon as the concentration of pol‐
lutants in the outside air has decreased suf‐
ficiently, the system automatically switches
back to outside air supply.▷Right LED on, recirculated air mode: the
supply of outside air into the vehicle is per‐
manently blocked. The system then recir‐
culates the air currently within the vehicle.
Only use recirculated air mode for a limited
period
If condensation starts to form on the inside win‐
dow surfaces during operation in the recircu‐
lated air mode, you should switch it off while also
increasing the air flow rate as required. The re‐
circulated air mode should not be used for an
extended period of time, as the air quality inside
the vehicle deteriorates steadily.◀
Defrosting and defogging windows Quickly removes ice and conden‐
sation from the windshield and
front side windows.
For this purpose, also switch on the cooling
function.
Rear window defroster The defroster switches off auto‐
matically after a certain time or
when the hardtop is opened.
Ventilation1Use the lever to change the direction of the
air flow2Use the thumbwheels to smoothly open and
close the air vents3Thumbwheel for adjusting the amount of
cool air from the vents to the upper body
area. This can be used to adjust the air tem‐
perature for the upper body area.
Ventilation for cooling
Adjust the vents to direct the flow of cool air in
your direction, for instance if the interior has be‐
come too warm.
Seite 94ControlsClimate94
Online Edition for Part no. 01 40 2 609 184 - 09 11 500
Page 100 of 220
The setting is automatically saved after approx.
10 seconds.
Connecting electrical devices
Note Do not connect the charger to the socket
Do not connect the battery charger to the
socket installed in the vehicle at the factory as
this could damage the vehicle.◀
Sockets
In your BMW, when the engine is running or the
ignition is switched on, you can use electrical
devices such as a hand lamp, car vacuum
cleaner, etc., as long as one of the following
sockets is available. The total load of all sockets
must not exceed 140 Watt at 12 V. Avoid dam‐
aging the sockets by attempting to insert plugs
of unsuitable shape or size.
Cigarette lighter socket
Access to socket: remove the lighter from the
socket.
Under the center armrest
External audio device, refer to page 103.
In the passenger footwell
A socket is located on the left below the glove
compartment.
Trunk
Depending on your vehicle's equipment, the fol‐
lowing storage spaces can be found in the cargo
area:▷Rubber band for securing light objects▷Storage compartment.
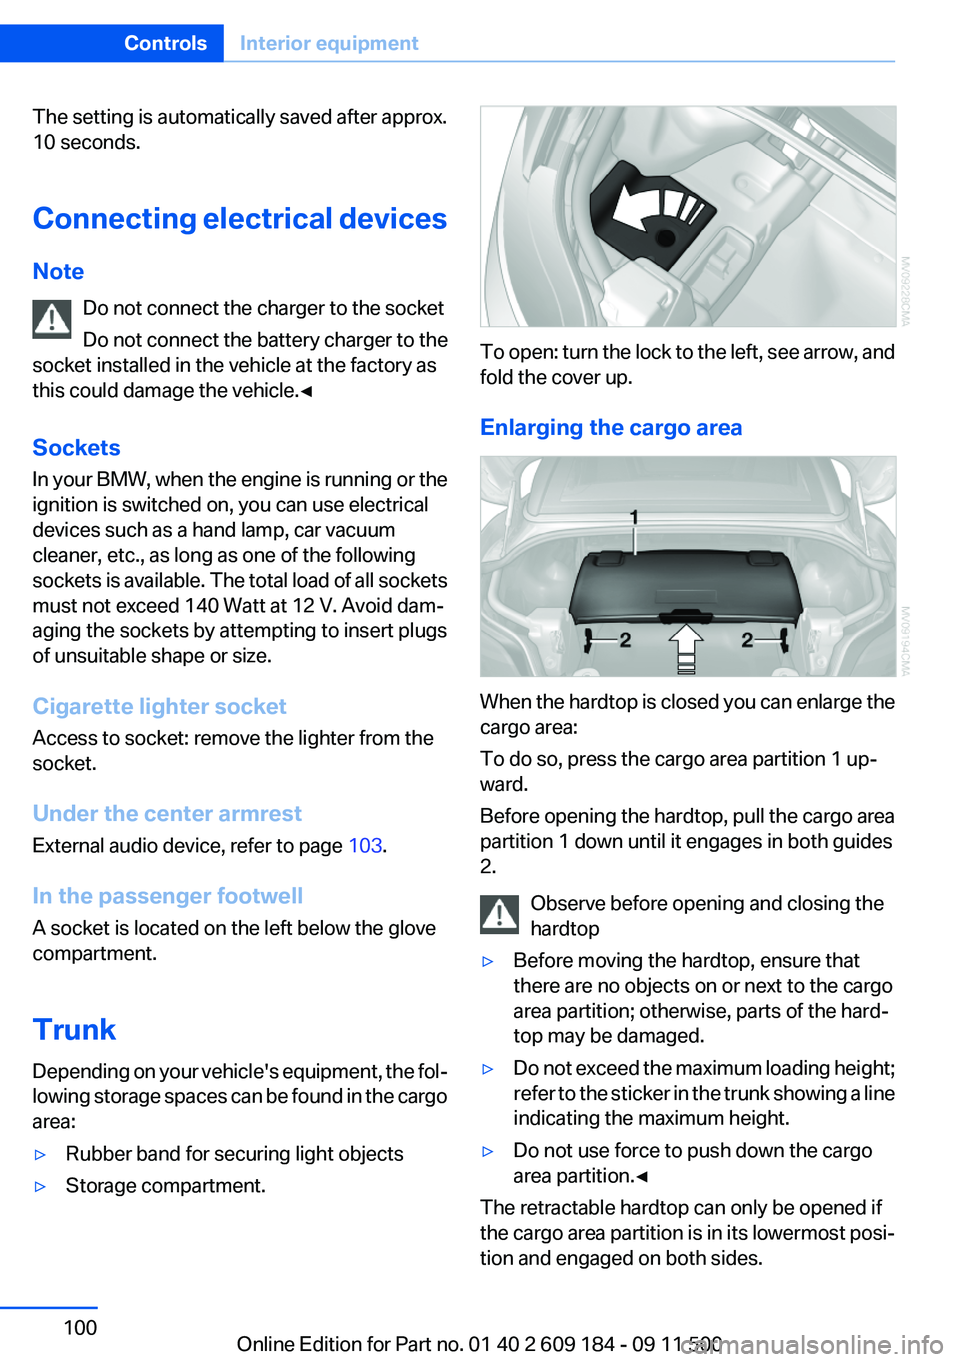
To open: turn the lock to the left, see arrow, and
fold the cover up.
Enlarging the cargo area
When the hardtop is closed you can enlarge the
cargo area:
To do so, press the cargo area partition 1 up‐
ward.
Before opening the hardtop, pull the cargo area
partition 1 down until it engages in both guides
2.
Observe before opening and closing the
hardtop
▷Before moving the hardtop, ensure that
there are no objects on or next to the cargo
area partition; otherwise, parts of the hard‐
top may be damaged.▷Do not exceed the maximum loading height;
refer to the sticker in the trunk showing a line
indicating the maximum height.▷Do not use force to push down the cargo
area partition.◀
The retractable hardtop can only be opened if
the cargo area partition is in its lowermost posi‐
tion and engaged on both sides.
Seite 100ControlsInterior equipment100
Online Edition for Part no. 01 40 2 609 184 - 09 11 500
Page 103 of 220
Storage compartmentsVehicle equipment
This chapter describes all series equipment as
well as country-specific and special equipment
offered for this model series.Therefore, it also
describes equipment that may not be found in
your vehicle, for instance due to the selected
special equipment or the country version. This
also applies to safety-related functions and sys‐
tems.
Glove compartment
Opening
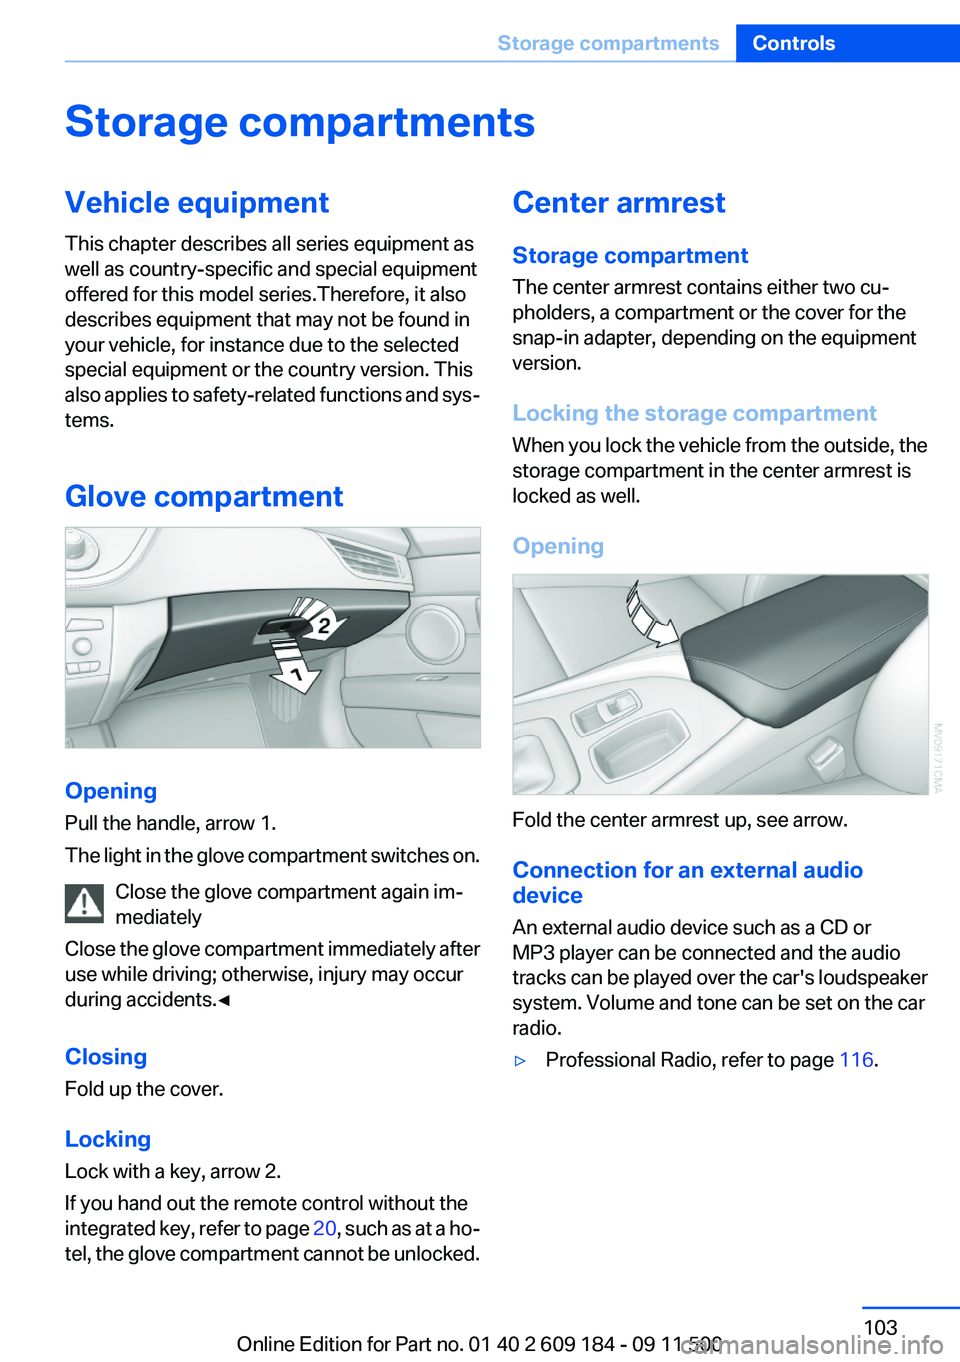
Pull the handle, arrow 1.
The light in the glove compartment switches on.
Close the glove compartment again im‐
mediately
Close the glove compartment immediately after
use while driving; otherwise, injury may occur
during accidents.◀
Closing
Fold up the cover.
Locking
Lock with a key, arrow 2.
If you hand out the remote control without the
integrated key, refer to page 20, such as at a ho‐
tel, the glove compartment cannot be unlocked.
Center armrest
Storage compartment
The center armrest contains either two cu‐
pholders, a compartment or the cover for the
snap-in adapter, depending on the equipment
version.
Locking the storage compartment
When you lock the vehicle from the outside, the
storage compartment in the center armrest is
locked as well.
Opening
Fold the center armrest up, see arrow.
Connection for an external audio
device
An external audio device such as a CD or
MP3 player can be connected and the audio
tracks can be played over the car's loudspeaker
system. Volume and tone can be set on the car
radio.
▷Professional Radio, refer to page 116.Seite 103Storage compartmentsControls103
Online Edition for Part no. 01 40 2 609 184 - 09 11 500