2012 BMW Z4 SDRIVE35I lock
[x] Cancel search: lockPage 49 of 220
Parking brake
The concept
Your vehicle is equipped with an electrome‐
chanical parking brake that can be set and re‐
leased by using a button.
The parking brake is primarily used to prevent
the vehicle from rolling when it is parked.
When the vehicle is stationary, the parking brake
acts on the rear wheels via an electromechanical
mechanism. When the vehicle is rolling or being
driven, the parking brake acts on the disc brakes
of the front and rear wheels via the hydraulic
brake system.
Setting
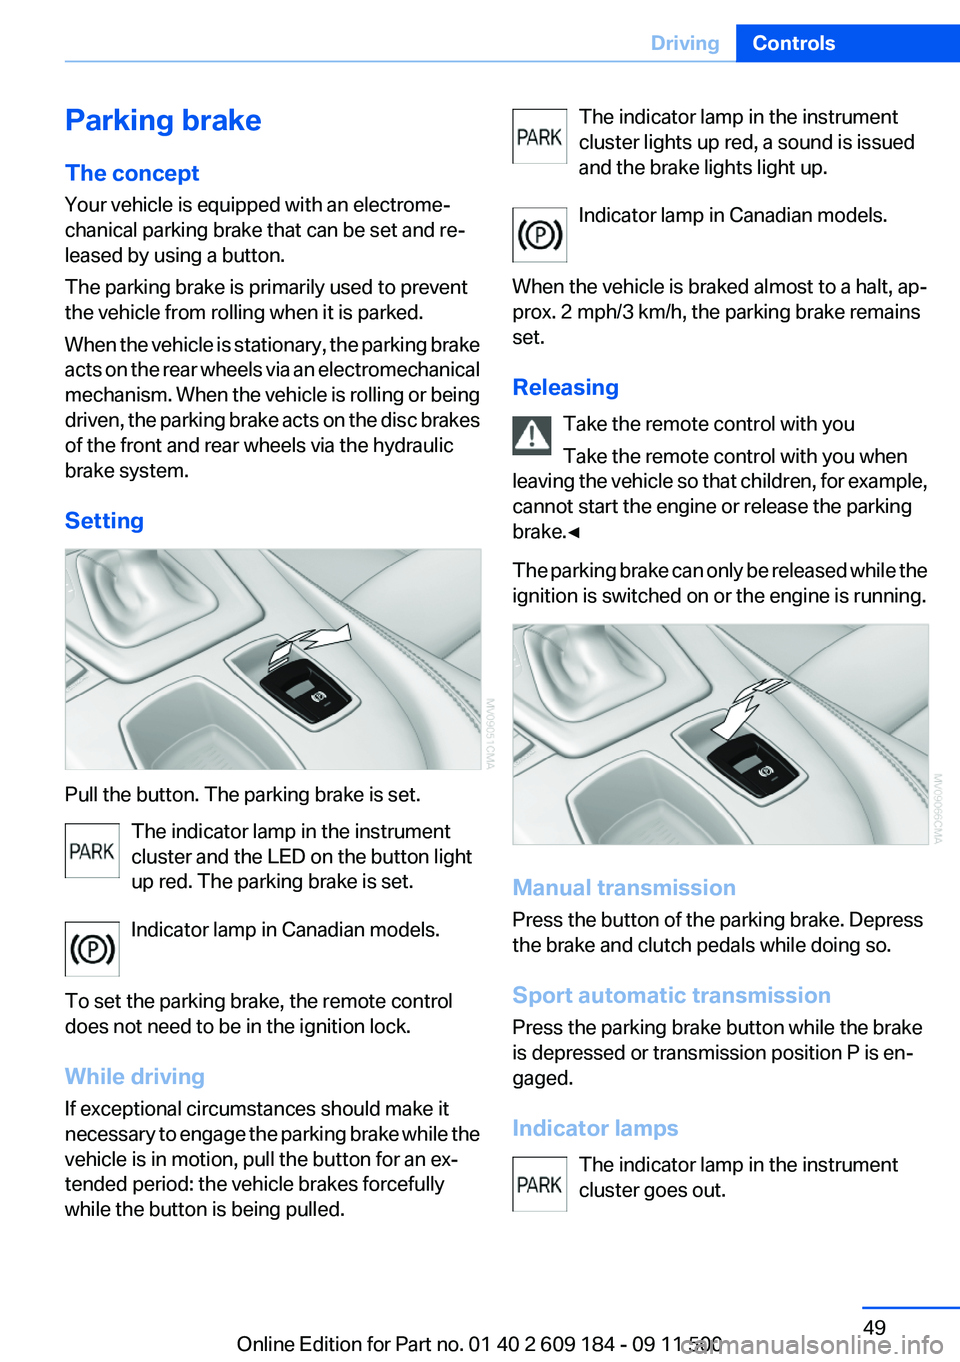
Pull the button. The parking brake is set. The indicator lamp in the instrument
cluster and the LED on the button light
up red. The parking brake is set.
Indicator lamp in Canadian models.
To set the parking brake, the remote control
does not need to be in the ignition lock.
While driving
If exceptional circumstances should make it
necessary to engage the parking brake while the
vehicle is in motion, pull the button for an ex‐
tended period: the vehicle brakes forcefully
while the button is being pulled.
The indicator lamp in the instrument
cluster lights up red, a sound is issued
and the brake lights light up.
Indicator lamp in Canadian models.
When the vehicle is braked almost to a halt, ap‐
prox. 2 mph/3 km/h, the parking brake remains
set.
Releasing Take the remote control with you
Take the remote control with you when
leaving the vehicle so that children, for example,
cannot start the engine or release the parking
brake.◀
The parking brake can only be released while the
ignition is switched on or the engine is running.
Manual transmission
Press the button of the parking brake. Depress
the brake and clutch pedals while doing so.
Sport automatic transmission
Press the parking brake button while the brake
is depressed or transmission position P is en‐
gaged.
Indicator lamps The indicator lamp in the instrument
cluster goes out.
Seite 49DrivingControls49
Online Edition for Part no. 01 40 2 609 184 - 09 11 500
Page 53 of 220
8-gear Sport automatic
transmission
Transmission positions
D Drive, automatic position
Position for normal vehicle operation. All for‐
ward gears are available.
Under normal operating conditions, fuel con‐
sumption is lowest when you are driving in po‐
sition D.
Kickdown
Kickdown is used to achieve maximum driving
performance. Press on the accelerator beyond
the resistance point at the full throttle position.
R is Reverse
Select only when the vehicle is stationary.
N is Neutral
The vehicle can roll.
N remains engaged after the engine is switched
off if the remote control remains in the ignition
lock. This function can be used in an automatic
car wash, refer to page 182, for example. P is
automatically engaged after approx. 30 minutes.
P Park
The rear wheels are locked.
P is engaged automatically when the following
conditions are met:▷The driver's door is opened while the engine
is running, the safety belt is not fastened and
neither the brake pedal nor the accelerator
is activated.▷The engine is switched off unless N is en‐
gaged and the remote control is in the igni‐
tion lock.▷The remote control is removed from the ig‐
nition lock, refer to page 45.Before leaving the vehicle, ensure that the trans‐
mission position P is engaged; otherwise, the
vehicle may begin to roll.
Engaging transmission position▷Transmission position P can only be disen‐
gaged if the engine is running and the brake
pedal is pressed.▷With the vehicle stationary, press on the
brake pedal before shifting out of P or N;
otherwise, the shift command will not be
executed: shift lock.
Press on the brake pedal until you start
driving
To prevent the vehicle from creeping after you
select a driving position, maintain pressure on
the brake pedal until you are ready to start.◀
Engaging transmission positions D, R,
N
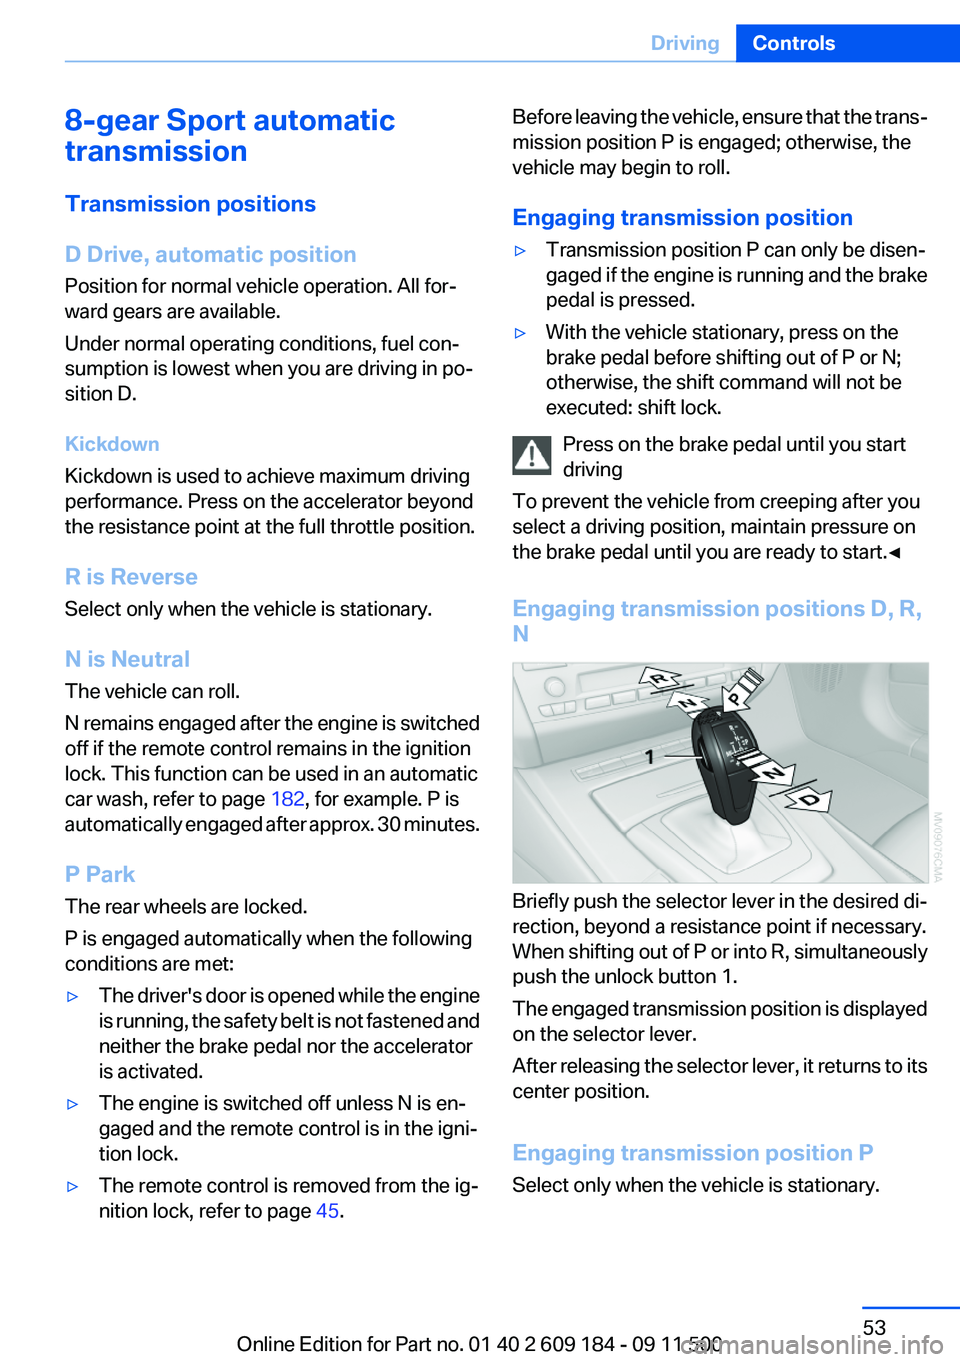
Briefly push the selector lever in the desired di‐
rection, beyond a resistance point if necessary.
When shifting out of P or into R, simultaneously
push the unlock button 1.
The engaged transmission position is displayed
on the selector lever.
After releasing the selector lever, it returns to its
center position.
Engaging transmission position P
Select only when the vehicle is stationary.
Seite 53DrivingControls53
Online Edition for Part no. 01 40 2 609 184 - 09 11 500
Page 56 of 220
Engaging transmission positions N, D,
R▷Transmission position P can only be disen‐
gaged if the engine is running.▷Before moving the lever away from P or N
with the vehicle stationary, depress the
brake; otherwise, the transmission will not
shift.
Press on the brake pedal until you start
driving
To prevent the vehicle from creeping after you
select a driving position, maintain pressure on
the brake pedal until you are ready to start.◀
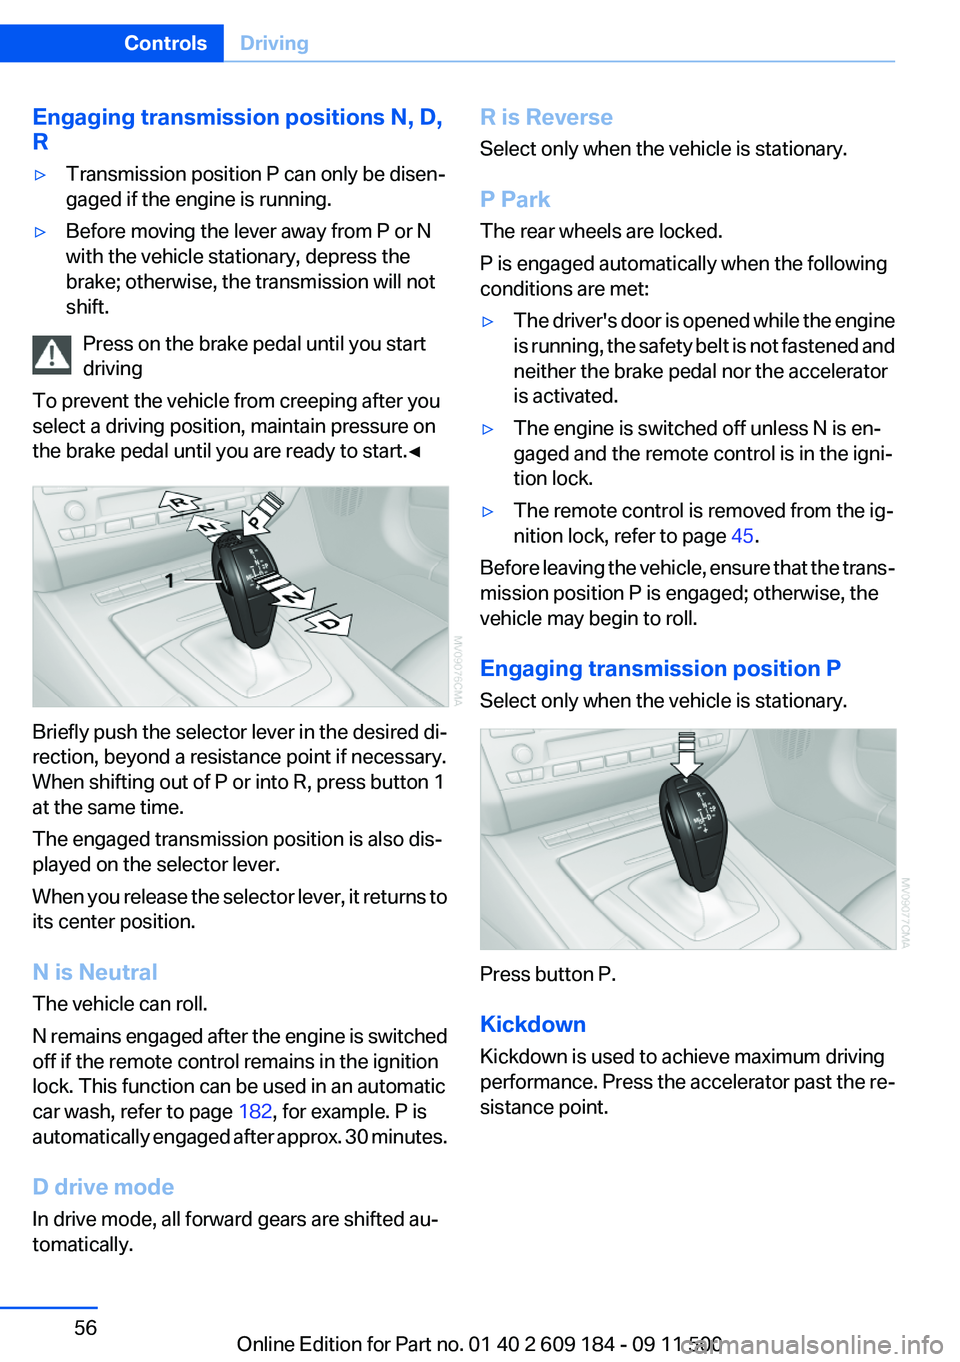
Briefly push the selector lever in the desired di‐
rection, beyond a resistance point if necessary.
When shifting out of P or into R, press button 1
at the same time.
The engaged transmission position is also dis‐
played on the selector lever.
When you release the selector lever, it returns to
its center position.
N is Neutral
The vehicle can roll.
N remains engaged after the engine is switched
off if the remote control remains in the ignition
lock. This function can be used in an automatic
car wash, refer to page 182, for example. P is
automatically engaged after approx. 30 minutes.
D drive mode
In drive mode, all forward gears are shifted au‐
tomatically.
R is Reverse
Select only when the vehicle is stationary.
P Park
The rear wheels are locked.
P is engaged automatically when the following
conditions are met:▷The driver's door is opened while the engine
is running, the safety belt is not fastened and
neither the brake pedal nor the accelerator
is activated.▷The engine is switched off unless N is en‐
gaged and the remote control is in the igni‐
tion lock.▷The remote control is removed from the ig‐
nition lock, refer to page 45.
Before leaving the vehicle, ensure that the trans‐
mission position P is engaged; otherwise, the
vehicle may begin to roll.
Engaging transmission position P
Select only when the vehicle is stationary.
Press button P.
Kickdown
Kickdown is used to achieve maximum driving
performance. Press the accelerator past the re‐
sistance point.
Seite 56ControlsDriving56
Online Edition for Part no. 01 40 2 609 184 - 09 11 500
Page 58 of 220
cient, the forward gears are changed again au‐
tomatically.
Launch Control
Launch Control enables you to drive off with an
optimal vehicle acceleration on a high grip road
surface.
Do not use Launch Control too often
Do not use Launch Control too often, as
the higher loads on the vehicle lead to premature
component wear.◀
Launch Control is available when the engine is
at operating temperature, i.e., after driving con‐
tinuously for at least 6 miles/10 km.1.With the engine running, depress the brake
pedal with your left foot.2.Activate the SPORT+ program of the Dy‐
namic Driving Control, refer to page 82.3.With the vehicle stationary, activate manual
mode and select first gear.4.Press the accelerator all the way down. The
engine speed when driving off is controlled.
A flag symbol appears in the instrument
cluster.5.The vehicle accelerates when you release
the brake pedal. Keep the accelerator
pressed all the way down.6.The transmission shifts up automatically as
long as the accelerator is pressed all the way
down.
Launch Control only becomes available again
after a certain distance has been driven.
Launch Control can only be used after the
break-in phase, refer to page 108.
To maintain driving stability, activate DSC
whenever possible.
Manually releasing and engaging the
transmission lock
If a power failure occurs, e.g., if the battery is
discharged or disconnected, the transmission
lock must be released manually, otherwise the
rear wheels are blocked and the vehicle cannot
be towed.
Release the transmission lock manually for tow‐
ing only and set the parking brake beforehand to
prevent the vehicle from rolling. After parking
the vehicle, engage the transmission lock again
manually, refer to page 59.
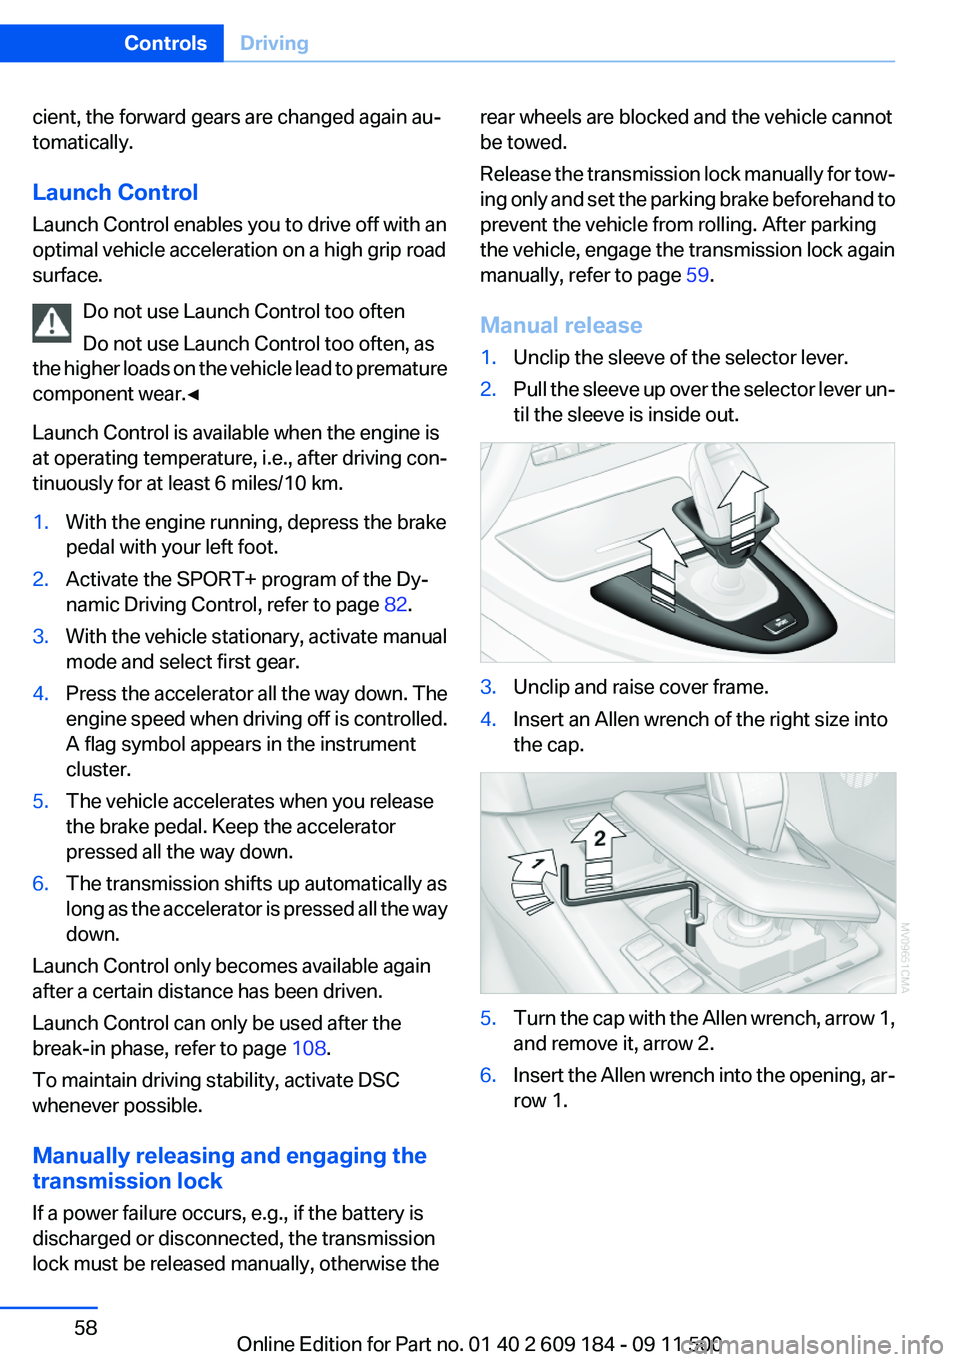
Manual release1.Unclip the sleeve of the selector lever.2.Pull the sleeve up over the selector lever un‐
til the sleeve is inside out.3.Unclip and raise cover frame.4.Insert an Allen wrench of the right size into
the cap.5.Turn the cap with the Allen wrench, arrow 1,
and remove it, arrow 2.6.Insert the Allen wrench into the opening, ar‐
row 1.Seite 58ControlsDriving58
Online Edition for Part no. 01 40 2 609 184 - 09 11 500
Page 59 of 220
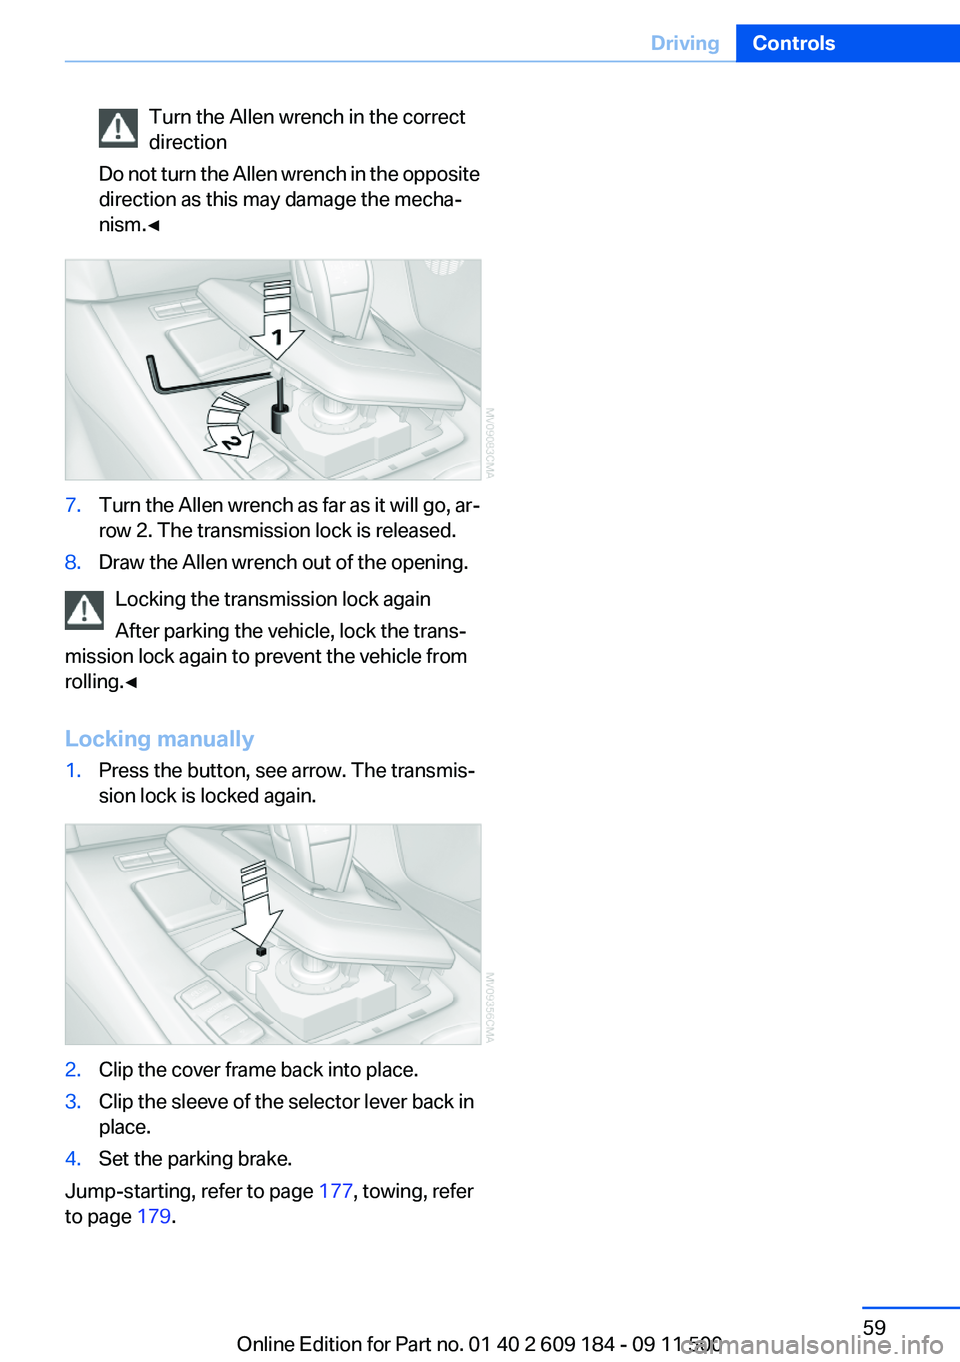
Turn the Allen wrench in the correct
direction
Do not turn the Allen wrench in the opposite
direction as this may damage the mecha‐
nism.◀7.Turn the Allen wrench as far as it will go, ar‐
row 2. The transmission lock is released.8.Draw the Allen wrench out of the opening.
Locking the transmission lock again
After parking the vehicle, lock the trans‐
mission lock again to prevent the vehicle from
rolling.◀
Locking manually
1.Press the button, see arrow. The transmis‐
sion lock is locked again.2.Clip the cover frame back into place.3.Clip the sleeve of the selector lever back in
place.4.Set the parking brake.
Jump-starting, refer to page 177, towing, refer
to page 179.
Seite 59DrivingControls59
Online Edition for Part no. 01 40 2 609 184 - 09 11 500
Page 60 of 220

DisplaysVehicle equipment
This chapter describes all series equipment as
well as country-specific and special equipment
offered for this model series.Therefore, it also
describes equipment that may not be found in
your vehicle, for instance due to the selected
special equipment or the country version. This
also applies to safety-related functions and sys‐
tems.
Odometer, outside
temperature display, clock1Knob in the instrument cluster2Outside temperature display and clock3Odometer and trip odometer
Knob in the instrument cluster
▷To reset the trip odometer while the ignition
is switched on.▷To display the time, external temperature
and odometer briefly while the ignition is
switched off.
Units of measure
To set the respective units of measure, miles or
km for the odometer and ℃ or ℉ for the external
temperature, refer to page 63.
The setting is stored for the remote control cur‐
rently in use.
Time, outside temperature display
Set the time, refer to page 64.
External temperature warning
If the display drops to 37 ℉/3 ℃, a signal sounds
and a warning lamp lights up. There is the in‐
creased danger of ice.
Ice on roads
Even at temperatures above +37 ℉/+3 ℃,
there can be a risk of ice on roads.
Therefore, drive carefully on bridges and shady
roads, for example, to avoid the increased dan‐
ger of an accident.◀
Odometer and trip odometer
Resetting trip odometer:
With the ignition switched on, press button 1 in
the instrument cluster.
When the vehicle is parked
If you still want to view the time, outside tem‐
perature and odometer reading briefly after the
remote control has been taken out of the ignition
lock:
Press button 1 in the instrument cluster.Seite 60ControlsDisplays60
Online Edition for Part no. 01 40 2 609 184 - 09 11 500
Page 63 of 220

1Button for:▷Selecting the display▷Setting values2Button for:▷Confirming selected display or set val‐
ues▷Calling up computer information 623With the lights switched on: dimming the in‐
strument lighting 714Calling up Check Control 665Checking the engine oil level 1646Initializing the Flat Tire Monitor 76
Resetting the Tire Pressure Monitor 77.7Setting the time 648Setting the date 659Viewing service requirement display 6510Setting formats and units of measure, re‐
setting to factory settings 6311Changing settings▷Confirmation signals when locking and
unlocking the vehicle 24▷Response during unlocking proce‐
dure 22▷Automatic locking 26▷Headlamp courtesy delay feature 68▷Daytime running lights 69▷Triple turn signal activation 50▷Seat memory 39Exiting displays
The external temperature reading and the time
reappear when you press button 2 or if you make
no entries within approx. 15 seconds. If required,
complete the current setting first.Formats and units of measure
You can set formats and units of measure.1.Switch on the ignition, refer to page 45.2.Lightly push button 1 in the turn indicator
lever up or down repeatedly until the symbolSeite 63DisplaysControls63
Online Edition for Part no. 01 40 2 609 184 - 09 11 500
Page 64 of 220
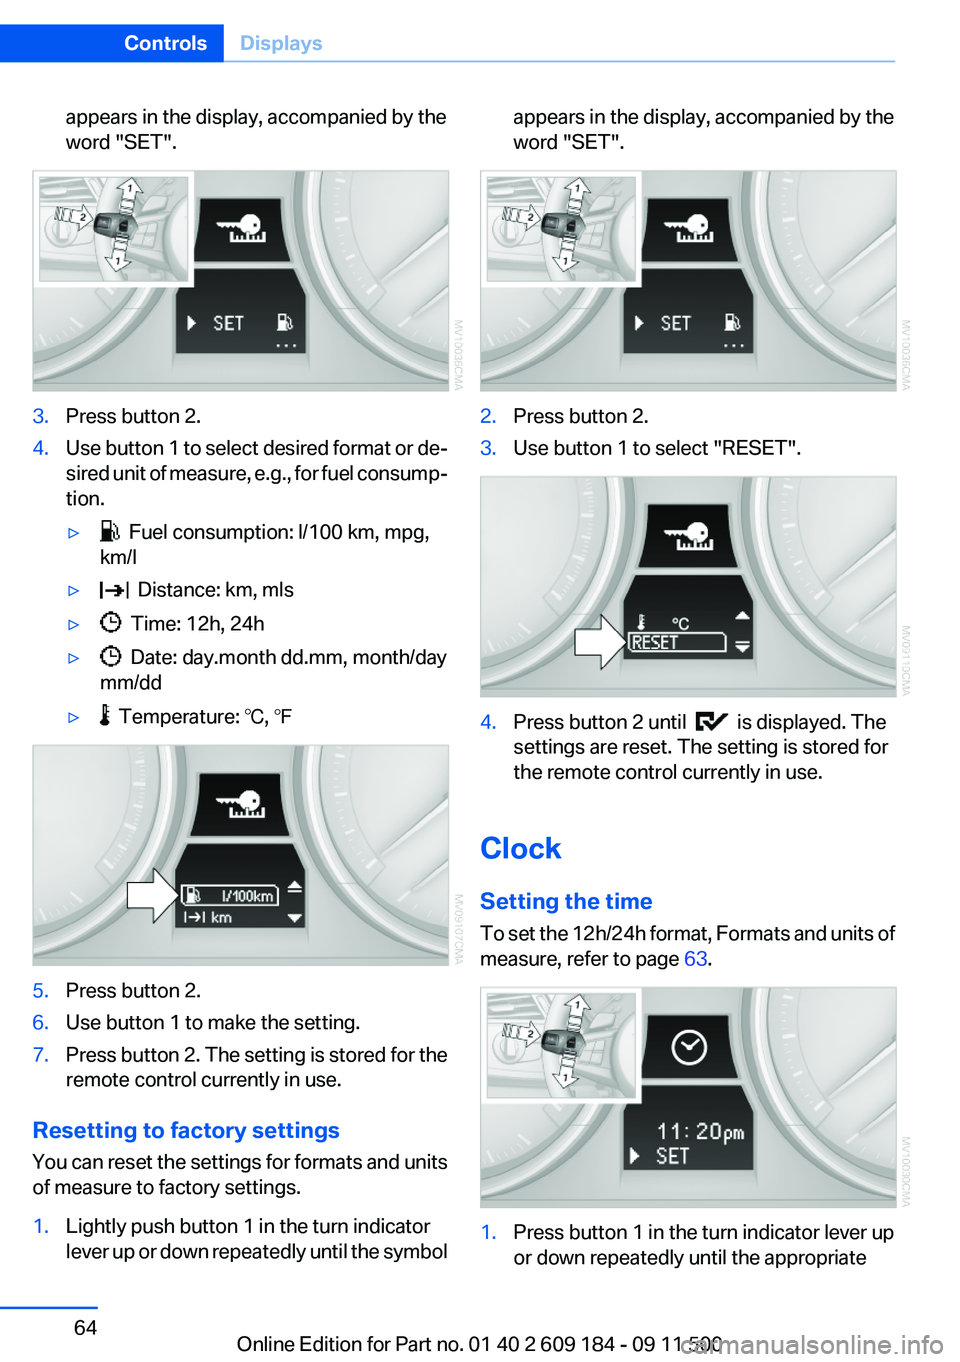
appears in the display, accompanied by the
word "SET".3.Press button 2.4.Use button 1 to select desired format or de‐
sired unit of measure, e.g., for fuel consump‐
tion.▷ Fuel consumption: l/100 km, mpg,
km/l▷ Distance: km, mls▷ Time: 12h, 24h▷ Date: day.month dd.mm, month/day
mm/dd▷ Temperature: ℃, ℉5.Press button 2.6.Use button 1 to make the setting.7.Press button 2. The setting is stored for the
remote control currently in use.
Resetting to factory settings
You can reset the settings for formats and units
of measure to factory settings.
1.Lightly push button 1 in the turn indicator
lever up or down repeatedly until the symbolappears in the display, accompanied by the
word "SET".2.Press button 2.3.Use button 1 to select "RESET".4.Press button 2 until is displayed. The
settings are reset. The setting is stored for
the remote control currently in use.
Clock
Setting the time
To set the 12h/24h format, Formats and units of
measure, refer to page 63.
1.Press button 1 in the turn indicator lever up
or down repeatedly until the appropriateSeite 64ControlsDisplays64
Online Edition for Part no. 01 40 2 609 184 - 09 11 500