2012 BMW Z4 SDRIVE35I radio
[x] Cancel search: radioPage 34 of 220

Folding down the cargo area partition
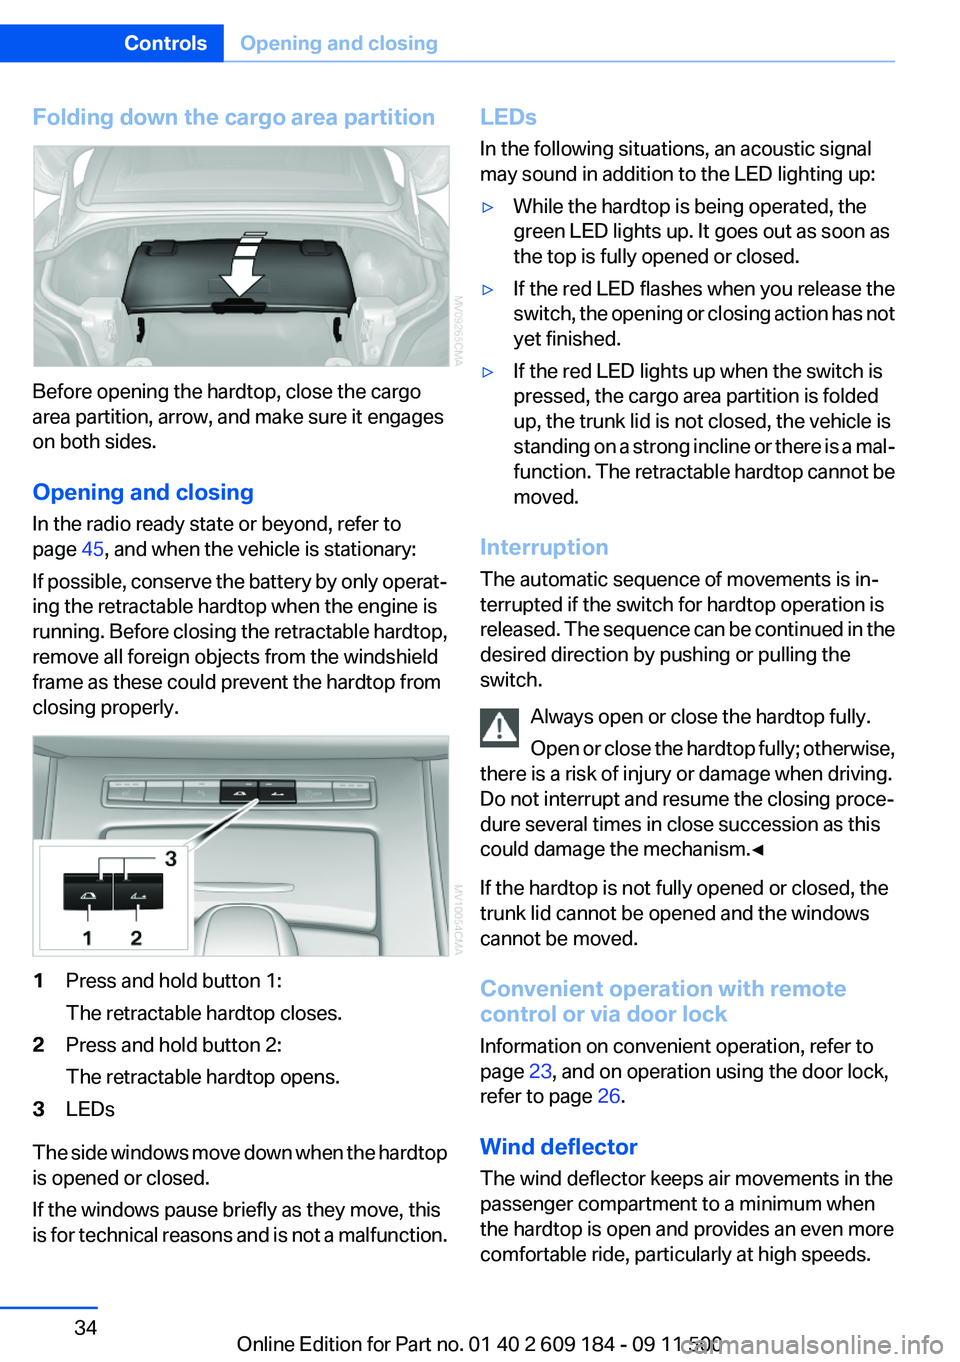
Before opening the hardtop, close the cargo
area partition, arrow, and make sure it engages
on both sides.
Opening and closing
In the radio ready state or beyond, refer to
page 45, and when the vehicle is stationary:
If possible, conserve the battery by only operat‐
ing the retractable hardtop when the engine is
running. Before closing the retractable hardtop,
remove all foreign objects from the windshield
frame as these could prevent the hardtop from
closing properly.
1Press and hold button 1:
The retractable hardtop closes.2Press and hold button 2:
The retractable hardtop opens.3LEDs
The side windows move down when the hardtop
is opened or closed.
If the windows pause briefly as they move, this
is for technical reasons and is not a malfunction.
LEDs
In the following situations, an acoustic signal
may sound in addition to the LED lighting up:▷While the hardtop is being operated, the
green LED lights up. It goes out as soon as
the top is fully opened or closed.▷If the red LED flashes when you release the
switch, the opening or closing action has not
yet finished.▷If the red LED lights up when the switch is
pressed, the cargo area partition is folded
up, the trunk lid is not closed, the vehicle is
standing on a strong incline or there is a mal‐
function. The retractable hardtop cannot be
moved.
Interruption
The automatic sequence of movements is in‐
terrupted if the switch for hardtop operation is
released. The sequence can be continued in the
desired direction by pushing or pulling the
switch.
Always open or close the hardtop fully.
Open or close the hardtop fully; otherwise,
there is a risk of injury or damage when driving.
Do not interrupt and resume the closing proce‐
dure several times in close succession as this
could damage the mechanism.◀
If the hardtop is not fully opened or closed, the
trunk lid cannot be opened and the windows
cannot be moved.
Convenient operation with remote
control or via door lock
Information on convenient operation, refer to
page 23, and on operation using the door lock,
refer to page 26.
Wind deflector
The wind deflector keeps air movements in the
passenger compartment to a minimum when
the hardtop is open and provides an even more
comfortable ride, particularly at high speeds.
Seite 34ControlsOpening and closing34
Online Edition for Part no. 01 40 2 609 184 - 09 11 500
Page 39 of 220

Buckling the belt
Make sure you hear the latch plate engage in the
belt buckle.
Unbuckling the belt
1.Hold the belt firmly.2.Press the red button in the belt buckle.3.Guide the belt back into its reel.
Safety belt reminder for driver and
passenger
The indicator lamp lights up and a sig‐
nal sounds. Check whether the safety
belt has been fastened correctly.
The safety belt reminder is active at speeds
above approx. 5 mph/8 km/h. It can also be ac‐
tivated if objects are placed on the front pas‐
senger seat.
Damage to safety belts
In the case of strain caused by accidents or
damage:
Have the safety belts, including the safety belt
tensioners, replaced and have the belt anchors
checked.
Checking and replacing safety belts
Have the work performed only by your
service center; otherwise, it cannot be ensured
that this safety feature will function properly.◀
Seat and mirror memory
General information
Two different driver's seat and exterior mirror
positions can be stored and retrieved for each
remote control.
Settings for the backrest width and lumbar sup‐
port are not stored.
Storing
1.Switch on the radio ready state or the igni‐
tion, refer to page 45.2.Adjust the seat and exterior mirrors to the
desired positions.3. Press the button. The LED in the
button lights up.4.Press the desired memory button 1 or 2: the
LED goes out.
If the M button is pressed accidentally:
Press the button again. The LED goes
out.
Calling up settings Do not retrieve the memory setting while
driving
Do not retrieve the memory setting while driving,
as an unexpected movement of the seat or
steering wheel could result in an accident.◀
Seite 39AdjustingControls39
Online Edition for Part no. 01 40 2 609 184 - 09 11 500
Page 40 of 220

Comfort function1.Open the driver's door or switch on the radio
ready state, refer to page 45.2.Briefly press the desired memory but‐
ton 1 or 2.
The seat is automatically moved to the stored
position.
The procedure stops when a switch for adjust‐
ing the seat or one of the buttons is pressed.
Safety mode
1.Close the driver's door and switch the igni‐
tion on or off, refer to page 45.2.Press and hold the desired button 1 or 2 until
the adjustment procedure is completed.
Mirrors
Exterior mirrors
General information
The mirror on the passenger side is more curved
than the driver's mirror.
Estimating distances correctly
Objects reflected in the mirror are closer
than they appear. Do not estimate the distance
to the traffic behind you based on what you see
in the mirror, as this will increase your risk of an
accident.◀
The setting for the exterior mirrors is stored for
the remote control currently in use. The stored
position is called up automatically when the ve‐
hicle is unlocked.
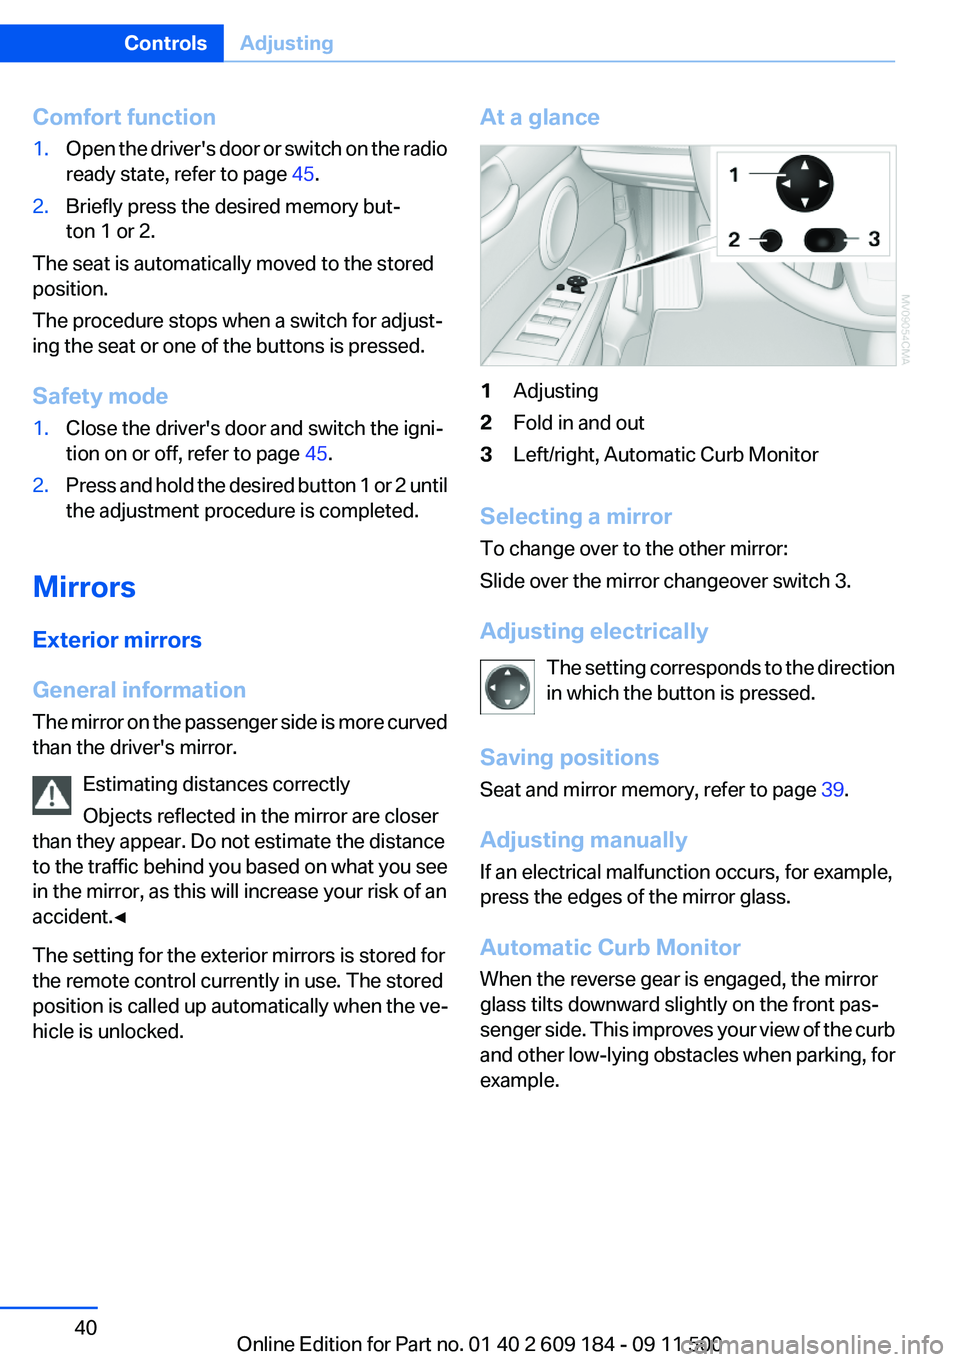
At a glance1Adjusting2Fold in and out3Left/right, Automatic Curb Monitor
Selecting a mirror
To change over to the other mirror:
Slide over the mirror changeover switch 3.
Adjusting electrically The setting corresponds to the direction
in which the button is pressed.
Saving positions
Seat and mirror memory, refer to page 39.
Adjusting manually
If an electrical malfunction occurs, for example,
press the edges of the mirror glass.
Automatic Curb Monitor
When the reverse gear is engaged, the mirror
glass tilts downward slightly on the front pas‐
senger side. This improves your view of the curb
and other low-lying obstacles when parking, for
example.
Seite 40ControlsAdjusting40
Online Edition for Part no. 01 40 2 609 184 - 09 11 500
Page 45 of 220

DrivingVehicle equipment
This chapter describes all series equipment as
well as country-specific and special equipment
offered for this model series.Therefore, it also
describes equipment that may not be found in
your vehicle, for instance due to the selected
special equipment or the country version. This
also applies to safety-related functions and sys‐
tems.
Ignition lock
Insert the remote control into the
ignition lock
Insert the remote control all the way into the ig‐
nition lock.
▷Radio ready state is switched on. Individual
electrical consumers can operate.
Comfort Access
If the car is equipped with Comfort Access, only
insert the remote control into the ignition lock,
refer to page 28, under special circumstances.
Removing the remote control from the
ignition lock
Do not forcibly pull the remote control out
of the ignition lock
Do not forcibly pull the remote control out of the
ignition lock as this may cause damage.◀
Before removing the remote control, push it all
the way in to release the locking mechanism.▷The ignition is switched off if it was on.
Sport automatic transmission
When the remote control is removed from the
ignition lock, transmission position P is engaged
automatically. To make it possible for the vehicle
to roll, such as in an automatic car wash, follow
the instructions in Car washes, refer to
page 182.
Start/Stop button
Pressing the Start/Stop button switches the
radio ready state or the ignition on and off.
The engine starts when you press the Start/Stop
button and, if the car has manual transmission,
also depress the clutch, or, if the car has auto‐
matic transmission, also depress the brake.
Radio ready state
Individual electrical consumers can operate.
The time and the external temperature are dis‐
played in the instrument cluster.
Radio ready state is switched off automatically:
▷When the remote control is removed from
the ignition lock.▷In cars with Comfort Access, by touching the
surface above the door lock, locking, refer to
page 28.Seite 45DrivingControls45
Online Edition for Part no. 01 40 2 609 184 - 09 11 500
Page 46 of 220

Ignition on
All electrical consumers can operate. The od‐
ometer and trip odometer are displayed in the
instrument cluster.
To save battery power when the engine is off,
switch off the ignition and any unnecessary
electronic systems/power consumers.
Radio ready state and ignition off
All indicator and warning lamps as well as dis‐
plays in the instrument cluster go out.
Sport automatic transmission
In certain situations, transmission position P is
engaged automatically. To make it possible for
the vehicle to roll, such as in an automatic car
wash, follow the instructions in Car washes, re‐
fer to page 182.
Starting the engine Enclosed areas
Do not let the engine run in enclosed
areas; otherwise, breathing of exhaust fumes
may lead to loss of consciousness and death.
The exhaust gases contain carbon monoxide, an
odorless and colorless but highly toxic gas.◀
Unattended vehicle
Do not leave the car unattended with the
engine running; otherwise, it presents a poten‐
tial source of danger.
Before leaving the car with the engine running,
set the parking brake and place the transmission
in position P or neutral to prevent the car from
moving.◀
Frequent starting in quick succession
Avoid repeated futile attempts at starting
the car and avoid starting the car frequently in
quick succession. Otherwise, the fuel is not
burned or is inadequately burned, and there is
the danger of overheating and damaging the
catalytic converter.◀Do not wait for the engine to warm up while the
vehicle remains stationary. Start driving right
away, but at moderate engine speeds.
Manual transmission
Remote control in the ignition lock or, with Com‐
fort Access, inside the vehicle, refer to page 28.
1.Depress the brake pedal.2.Press on the clutch and shift to neutral.3.Press the Start/Stop button.
The starter operates automatically for a certain
time, and stops automatically as soon as the en‐
gine has started.
Sport automatic transmission
Remote control in the ignition lock or, with Com‐
fort Access, inside the vehicle, refer to page 28.
1.Depress the brake pedal.2.Press the Start/Stop button.
The starter operates automatically for a certain
time, and stops automatically as soon as the en‐
gine has started.
Engine stop Take the remote control with you
Take the remote control with you when
leaving the vehicle so that children, for example,
cannot start the engine or release the parking
brake.◀
Seite 46ControlsDriving46
Online Edition for Part no. 01 40 2 609 184 - 09 11 500
Page 62 of 220

▷The remaining range is shown on the com‐
puter.▷When a dynamic driving style is used, such
as when corners are taken rapidly, engine
functions are not ensured.
Below a range of approx. 30 miles/50 km, the
indicator lamp is displayed continuously.
Refuel promptly
At the latest, refuel at a range of 30 miles/
50 km; otherwise, the engine function is not en‐
sured and damage may occur.◀
Computer
Displays in the instrument cluster
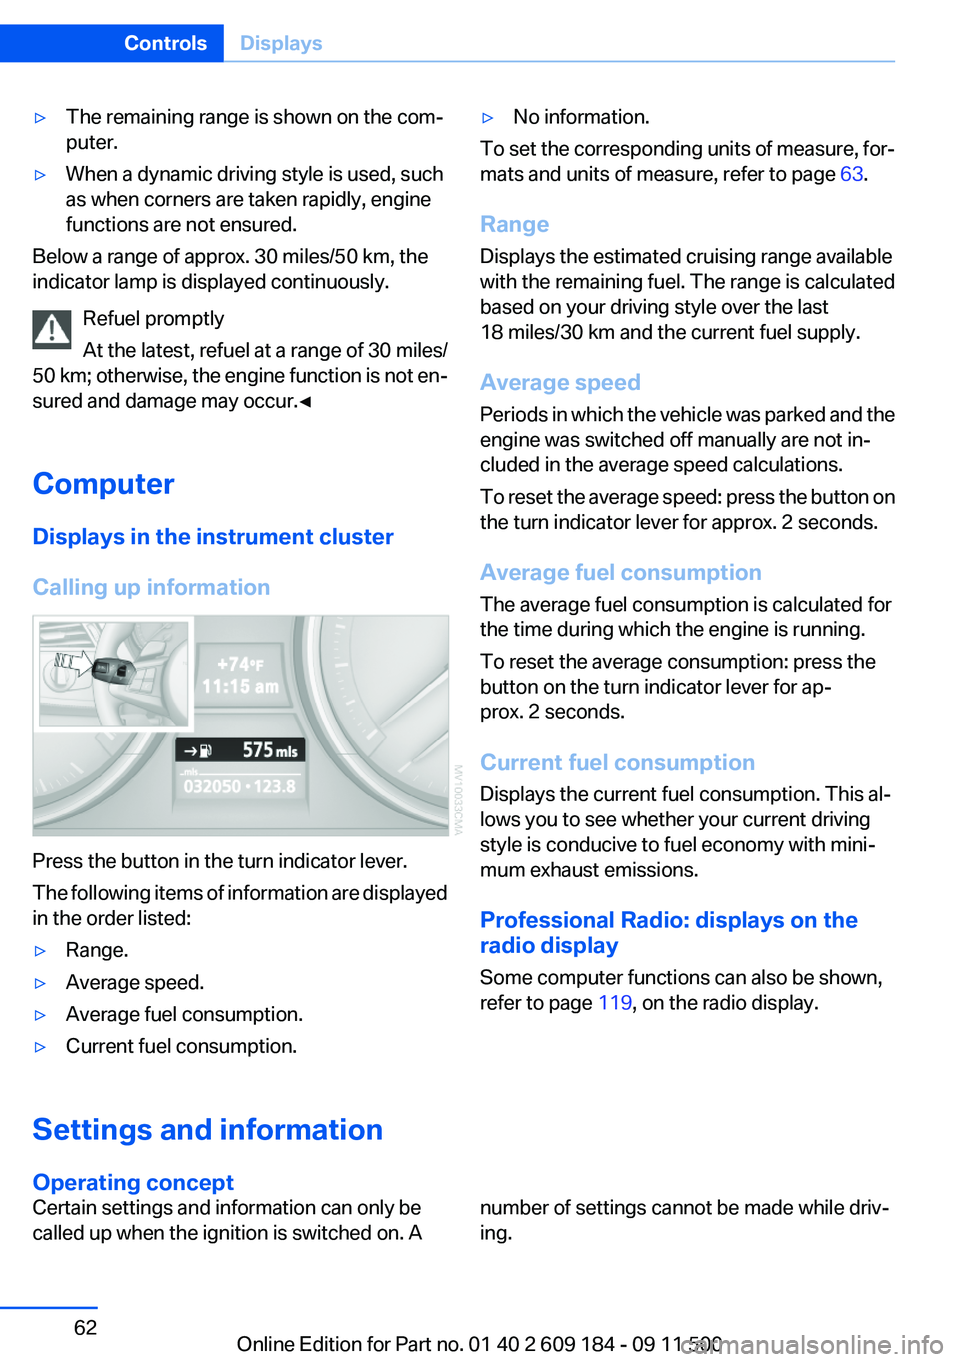
Calling up information
Press the button in the turn indicator lever.
The following items of information are displayed
in the order listed:
▷Range.▷Average speed.▷Average fuel consumption.▷Current fuel consumption.▷No information.
To set the corresponding units of measure, for‐
mats and units of measure, refer to page 63.
Range
Displays the estimated cruising range available
with the remaining fuel. The range is calculated
based on your driving style over the last
18 miles/30 km and the current fuel supply.
Average speed
Periods in which the vehicle was parked and the
engine was switched off manually are not in‐
cluded in the average speed calculations.
To reset the average speed: press the button on
the turn indicator lever for approx. 2 seconds.
Average fuel consumption
The average fuel consumption is calculated for
the time during which the engine is running.
To reset the average consumption: press the
button on the turn indicator lever for ap‐
prox. 2 seconds.
Current fuel consumption
Displays the current fuel consumption. This al‐
lows you to see whether your current driving
style is conducive to fuel economy with mini‐
mum exhaust emissions.
Professional Radio: displays on the
radio display
Some computer functions can also be shown,
refer to page 119, on the radio display.Settings and information
Operating concept
Certain settings and information can only be
called up when the ignition is switched on. Anumber of settings cannot be made while driv‐
ing.Seite 62ControlsDisplays62
Online Edition for Part no. 01 40 2 609 184 - 09 11 500
Page 80 of 220

▷A wheel without TPM electronics is fitted:
have the service center check it if necessary.▷Malfunction: have the system checked by
your service center.▷TPM could not be fully reset. Reset the sys‐
tem again.
The small warning lamp flashes in yel‐
low and then lights up continuously;
the larger warning lamp comes on in
yellow. No flat tire can be detected.
Display in the following situations:
▷Disturbance by systems or devices with the
same radio frequency. After leaving the area
of the disturbance, the system automatically
becomes active again.
Declaration according to NHTSA/
FMVSS 138 Tire Pressure Monitoring
Systems
Each tire, including the spare (if provided)
should be checked monthly when cold and in‐
flated to the inflation pressure recommended by
the vehicle manufacturer on the vehicle placard
or tire inflation pressure label (If your vehicle has
tires of a different size than the size indicated on
the vehicle placard or tire inflation pressure la‐
bel, you should determine the proper tire infla‐
tion pressure for those tires.).
As an added safety feature, your vehicle has
been equipped with a tire pressure monitoring
system (TPMS) that illuminates a low tire pres‐
sure telltale when one or more of your tires is
significantly under-inflated. Accordingly, when
the low tire pressure telltale illuminates, you
should stop and check your tires as soon as
possible, and inflate them to the proper pres‐
sure. Driving on a significantly under-inflated tire
causes the tire to overheat and can lead to tire
failure. Under-inflation also reduces fuel effi‐
ciency and tire tread life, and may affect the ve‐
hicle's handling and stopping ability.
Please note that the TPMS is not a substitute for
proper tire maintenance, and it is the driver's re‐
sponsibility to maintain correct tire pressure,
even if under-inflation has not reached the level
to trigger illumination of the TPMS low tire pres‐
sure telltale.
Your vehicle has also been equipped with a
TPMS malfunction indicator to indicate when
the system is not operating properly. The TPMS
malfunction indicator is combined with the low
tire pressure telltale. When the system detects
a malfunction, the telltale will flash for approxi‐
mately one minute and then remain continu‐
ously illuminated. This sequence will continue
upon subsequent vehicle start-ups as long as
the malfunction exists. When the malfunction
indicator is illuminated, the system may not be
able to detect or signal low tire pressure as in‐
tended. TPMS malfunctions may occur for a va‐
riety of reasons, including the installation of re‐
placement or alternate tires or wheels on the
vehicle that prevent the TPMS from functioning
properly. Always check the TPMS malfunction
telltale after replacing one or more tires or
wheels on your vehicle to ensure that the re‐
placement or alternate tires and wheels allow
the TPMS to continue to function properly.
Brake force display
The concept▷During normal brake application, the brake
lamps light up.▷During heavy brake application, the turn sig‐
nals light up in addition.
The brake force display is not activated if the
turn signal function is switched on.
Seite 80ControlsSafety80
Online Edition for Part no. 01 40 2 609 184 - 09 11 500
Page 96 of 220

Interior equipmentVehicle equipment
This chapter describes all series equipment as
well as country-specific and special equipment
offered for this model series.Therefore, it also
describes equipment that may not be found in
your vehicle, for instance due to the selected
special equipment or the country version. This
also applies to safety-related functions and sys‐
tems.
Universal Garage Door
Opener
The concept
The Universal Garage Door Opener can be used
to operate up to 3 functions in radio-controlled
systems, such as garage door drives or lighting
systems. The Universal Garage Door Opener
replaces up to 3 different hand-held transmit‐
ters. To operate it, the buttons on the interior
rearview mirror must be programmed for the de‐
sired functions. The hand-held transmitter for
the system is needed for the programming pro‐
cedure.
During programming
During programming and before activat‐
ing a device using the integrated universal re‐
mote control, ensure that there are no people,
animals, or objects in the range of movement of
the remote-controlled device; otherwise, there
is a risk of injury or damage.
Also follow the safety instructions of the hand-
held transmitter.◀
Before selling the vehicle, delete the stored
functions for security reasons.
Compatibility If this symbol is printed on the packaging
or in the operating instructions of thesystem being operated, the system is generally
compatible with the Universal Garage Door
Opener.
If you have any questions, please contact:▷Your service center.▷www.homelink.com on the Internet.
HomeLink is a registered trademark of Johnson
Controls, Inc.
Controls on the interior rearview mirror
1Buttons2LED3Hand-held transmitter, required for pro‐
gramming.
Programming
General information
1.Switch on the ignition.2.Initial setup:
Press the right and left buttons on the inte‐
rior rearview mirror simultaneously for ap‐
prox. 20 seconds until the LED on the inte‐
rior rearview mirror begins to flash. All
programmed settings of the buttons on the
interior rearview mirror are deleted.3.Hold the hand-held transmitter of the sys‐
tem to be operated a distance of approx. 1
to 3 in/2.5 to 8 cm away from the buttons on
the interior rearview mirror. The requiredSeite 96ControlsInterior equipment96
Online Edition for Part no. 01 40 2 609 184 - 09 11 500