Page 81 of 280

Warm and cold Climate controls
Description
The air conditioner is fully automatic and is
designed to maintain a comfortable and uni
form climate inside the vehicle .
We recommend the following settings:
... Se lect and set a temperature between 64 °F
(+ 22 °C) and 84 °F (+28 °C).
... Press the
!AU TO ! button.
With this setting, you attain maximum com
fort in the least amount of time. Change this
setting, as desired, to meet your personal
needs.
The climate controls are a combination of
heating, ventilation and cooling systems,
which automatically reduce humidity and cool the air inside your vehicle.
The air temperature, air flow and air distribu
tion are automatica lly regulated to achieve
and maintain the desired passenger compart
ment temperature as quickly as possib le.
The system automatically compensates for
changes in the outside temperature and for
the intensity of the sunlight entering the vehi
cle. We recommend you use the
Automatic
mode c> page 81 for year-round comfort.
Please note the following:
Turn on the air conditioner to reduce humidity
in the vehicle. This also p revent the windows
from fogging up .
When the outside temperature is high and the
air is very hum id,
condensation from the
evaporator may drip under the vehicle . This is
normal and does not indicate a leak.
If the outside temperature is low, the fan nor
mally only switches to a h igher speed once
the engine coolant has warmed up sufficient
ly.
Warm and cold 79
T he air conditioner temporari ly switches off
when you drive off from a standstill using full
throttle to save engine power.
T he compressor also switches off if the cool
ant temperature is too high so that the engine
can be adequately cooled under extreme
l oads.
Air pollutants filter
T he air pollutants filter (a combined particle
filter and activated charcoa l filter) reduces or
eliminates outside air pollution (dust, or pol
l en) from entering the vehicle .
T he air pollutants filter must be changed at
the interva ls specified in yo ur Warranty
&
Maintenance booklet, so that the air condi
tioner can properly work.
If you drive your vehicle in an area with high
air pollution, the filter may need to be
changed more frequently than specified in
your Audi Warranty
& Maintenance booklet. If
in doubt, ask your authorized Audi Service Ad
visor for advice.
Energy management
To prevent the battery from being discharged
and to restore the ba lance of energy, compo
nents which require large amounts of energy
are temporarily cut back or switched off c> page 167. Heating systems in particular re
quire a great deal of energy. If you notice, for
example, that the rear window heater is not
heating, then it has been temporarily cut back
o r switched off by
energy management.
These systems are available again as soon as
the energy balance has been restored.
_& WARNING
.-----
Reduced visibility is dangerous and can
cause accidents .
- For safe driving it is very important that
all windows be free of ice, snow and con-
densation.
- Fully familiarize yourself with the proper
use and function of the heating and ven
tilation system and especia lly how to de
fog and defrost the windows.
Page 82 of 280

80 Warm and cold
-Never use the windshield wiper/washer
system in freezing weather until you
have warmed the windshield first, using
the heating and ventilation system. The
washer solution may freeze on the wind
shield and reduce visibility .
(D Note
-If you suspect that the air conditioner
has been damaged, switch off the air
conditioner and contact an authorized
Audi dealer to have the system inspect
ed .
- Repairs to the Audi air conditioner re
quire special technical knowledge and
special tools. Contact an authorized Audi
dealer for assistance.
@ Tips
-Keep the air intake slots (in front of the
windshield) free from ice, snow and de-
Controls
bris in order to maintain the proper func
tion of the climate control system.
- Air escapes through vents under the rear
window. When placing items of clothing on the luggage compartment cover, en
sure that the openings are not covered.
- If the inside temperature is very high
(for example, if the vehicle has been
parked in sun), open the windows and al
low the hot air to escape before turning
on the air conditioner .
- A sensor in the grill provides the air-con
ditioning system continuously with read
ings of current outside temperature . So
that the air-conditioning can operate at maximum efficiency, the area below the
front license plate holder must not be
covered .
This overview will help you to familiarize yourself with the air conditioning controls.
Fig. 96 Air condi tion ing con tro ls
The display shows the temperature selected
and the blower setting.
You can set the temperature for the driver's
side using the left rotary switch @and the
temperature for the passenger's side with the
right switch @. Functions are
turned on and off by touching
the buttons. The diode in the buttons illumi
nates when the function is active.
The grille between the buttons[:]/
G and
IAUTOI must remain unobstructed; there are
measurement sensors behind it.
- Do not seal off the grille.
Page 83 of 280

-Do not clean the gri lle with a vacuum clean
er, otherwise the sensors cou ld be damaged .
Function
!ACI Switching the cooling system on/off
q page 81
!AUTO I Automatic operation
qpage 81
[:] B Blower speed setting
( in the
q page 83
center)
l=I Manual recirculation mode
qpage82
~ Automat ic recircu lation mode
q page 82
~ Defrost
qpage82
@J Air directed to the windows
¢page83
[1;] Air from the outlets
qpage83
~ Air directed to the footwe ll
~page83
-= -·--~ Rear window defogger
¢page85
The buttons for sett ing the air flow d irection
~. ~and~ can also be pushed in combina
tion .
~ Switching the air conditioner on/off
Applies to vehicles: with a utomat ic a ir conditioner
... Press the !AC I button to switch the air cond i
tioner on or off .
When the a ir cond it ione r is sw itched on, t he
i ndicator light in the b utton is lit.
When the a ir cond it ioner is sw itched off, the
cooling system is switched off -th e heat ing
an d vent ilation system is reg ulated automati
cally. Sw itch ing off the cooling system ( com
pressor) saves fuel.
Pl ease keep in mind that with the air cond i
tioner switched off , the inter io r temperature
cannot be lower than the outside tempe ra
ture. There is no coo ling and the air is not de -
Warm and cold 81
humid ified (danger o f the windows becom ing
fogged). Cooling mode switches off a utomati
ca lly when the outs ide temperature is below
zero.
(D Tips
If there is a defect in the a ir conditioner,
the air conditioner cannot be switched on. In this case, the d iode in the button does
not light after being switched on. In the
event of a system fault, please contact an
A udi or specia list garage.
~ Automatic mode
The automatic mode is the standard setting
for all seasons .
Switching on AUTO
... Select tempe rat ure between 64 ° F (+ 18 °()
and 84 °F (+28 °C).
... Press
IAUTOI q page 80, fig. 96 .
AUTO on ly works when you set the inside tem
perature between 64 °f (18 °C) and 84 °f
(28 °C). If you select a temperature be low
64 °F (18 °(),
LO will appear in the display . If
you select a temperat ure above 84 °F (28 °C),
HI w ill appea r in t he d isp lay.
The system automatically compensates for changes in outside temperature and for the
i ntensity of the su nlight.
(D Tips
By keeping the IAUTOI button on the dr iv
er's side pressed for several seconds, the
temperature of the passenger's s ide ca n
be set to the temperature o f th e d river's
side or vice v ersa. The new temperature
setting w ill be shown in the d isplay.
Page 84 of 280

82 Warm and cold
i Setting the temperature
Separate temperatures can be selected for the driver's and front passenger 's side .
.,. Turn the rotary switch @ on the driver 's
s ide and the rotary switch @ on the pas
senger 's side left(-) or right( +) to control
the temperature
¢ page 80, fig. 96.
There is a time delay before the selected tem perature is reached.
(D Tips
The temperature setting for the driver's
side can be transferred to the passenger's
side
¢ page 81.
~ Defrosting/defogging the windshield
The windshield and side windows are quickly
defrosted or defogged
... Press ~¢ page 80, fig. 96.
... Press ~ again or press !AU TO ! to switch off
the defro ster.
The temperature is automatica lly controlled .
Maximum airflow is primarily blown in
through outlets
(D , @ and ®¢ page 84.
Outlets @ can be opened and closed with the
controls behind them. Outlets @and ® must
be opened so the windows can be defrosted as
quickly as possible.
By pressing ~ and air recirculation are switch
ed off .
~ Manual air recirculation mode
The recirculation mode prevents polluted out
side air from entering the vehicle interior.
Switching on air recirculation
.,. Press the button I"" !¢ page 80, fig. 96
¢,&. .
Switching off air recirculation
.,. Press the button 1...,1 again, or
... Press the !AU TO
I button, or
... Press the~ button . In air recirculation
mode, air is drawn from
the ve hicle interior and recirculated. We rec
ommend that yo u use the manua l air recircu
lation mode under the follow ing cond itions:
When driving thro ugh a tunnel or in a traffic
jam so that exhaust fumes cannot enter the
vehicle interior.
A WARNING
-
Do not use this setting for extended peri
ods of time. The windows cou ld fog up
since no fresh air can enter the vehicle.
If
the windows fog up, press the air r ecircula
tion button again immediately to switch
off the air re cir cula tion function or select
defrost.
~ Automatic air recirculation
If outside air is polluted, an air quality sensor
in the vehicle will automatically switch on the
air recirculation .
Switching on air recirculation
.,. Press ~¢ page 80 , fig . 96 .
Switching off air recirculation
... Press ~ again, or
.,. press !AUTO !, or
.,. press ~.
The automatic air recirculation mode should
normally be left switched on at all times.
T he system is ready to operate approximately
30 seconds after you turn on the ignition or
start the vehicle. Fresh air enters the vehicle
only during this initialization period .
T he air quality sensor for detecting diesel and
gasoline exhaust fumes switches automatica l
l y to air recirculation mode if the outside air is
heavily polluted. The supply of outside air is
closed off.
As soon as the pollution level drops, fresh air
is automatically supplied to the vehicle interi
or again .
Page 85 of 280

The air recirculation opera tes for a maximum
of 12 minutes. If the windows start to fog up
while the air rec irculat ion is on, press~
Unde r certain operating condi tions (fo r exam
p le, if~ or
1-1 are pressed) the air recircu la
tion automatica lly switches off.
If the air con
d itioner is sw itched off, or if the temperature
is below 18 °F (-8 °C), the air recircu lation wi ll
operate only for 12 seconds.
Switching between Fahrenheit and
Centigrade
You can change the temperature display from
°F (Fahrenheit) to °C (Centigrade) and vice
versa.
.,. Hold the l.,s,! button down c:> page 80,
fig.
96.
.,. Turn the rotary switch (d river 's s ide) @ for
3 seconds +.
G;J Air recirculation
The air recirculation prevents exhaust fumes
or oth er pollution from entering the vehicle .
Switching air recirculation on
.,. Press ~ c:> page 80, fig. 96 c:> A
Switching air recirculat ion off
.,. Press~ again, or
.,. press
IAUTOI, or
.,. press~-
I n the ai r recircula tion mode, the air in the
passenger compa rtment is recirculated to
p revent exhaust fumes and ot her pollution
from entering the vehicle. We recommend
that you use the manual air recircu lation un
der the following conditions:
- when d riving through t unnels
- in a traffic jam.
,8. WARNING
Do not use this setting for extended pe ri
ods of time . The windows could fog up
since no fresh a ir can ente r the vehicle . If
Warm and c old 83
the windows fog u p, press the ai r rec ircula
tion button aga in immed iately to sw itch
off the air rec irculation function or select
defrost.
G IB Adjusting the fan speed
The automatically selected fan speed can be
increased or decreased.
.,. Press the[:] or El buttons in the center of
the control panel
c:> page 80, fig. 96 to ad
just the fan speed to your comfort.
T he air conditioning system automatically
r egulates the fa n speed i n respo nse to the in
terior tempe rat ure. However, you can a lso ad
j ust the fan speed ma nually. A line of small
bars in the center display above the fan con
trol buttons w ill re treat or extend to reflect
you r adjustments to the fan speed .
Air distribution
The automatically controlled air distribution
can be changed manually.
You can use the @J , [fil or~ buttons separate
ly or together in combination. To switch back
to the automatic air d istr ibu tion sett ing, ei
the r switch off the b uttons you prev iously se
lected , or press
IAUTOI.
Each of the three buttons has its own spec ific
funct io n (t he reference numbers refer to the
a ir out lets)
c:> page 84, fig. 97.
~ Air directed to the windows
A ll the air is directed to outlets
Contrary to when~ is pressed, the amount of
a ir remains the same .
~ Air directed to the driver /front
passenger
All the a ir is directed to outlets@,@ and ©
in the instrument panel. Air also is directed
th ro ugh the center console in the rear.
~ Air d irected to the footwells
A ll the air is directed to outlets ® and to the
outlets under the front seats.
Page 86 of 280

84 Warm and cold
Air outlets
Fi g. 97 Instr ument pane l: a ir ou tlet locat io ns an d airflow d irec tions
The air out lets (D and @on top of the instru
ment panel are
fixed. Outlets @ and @can
be adjusted.
Adjusting a ir outl ets ® and @
.. Turn the vertica l thumbwhee l beside the
outlet to increase, reduce or s hut down the
airflow from that out let.
.. Move the small tab in the center of the out
let louver sideways and up or down to ad just
the leve l and direction of airflow.
T he supply of air to the out lets is controlled
e ither automat ica lly or manually depending
on the operation mode se lected . The airflow
from all outlets can be heated, unheated or
cooled.
The heater out lets for the rear footwells are
located under the front seats . When you se
lect outlets @, a ir is a lso directed to t he rear
footwells .
@ Tips
-When defrosting/defogging the win
dows, air flows from outlets
(D , @ and
@ . To defrost or defog the windows as
r apidly as possib le, air outlets @ should
be ope ned
fully wi th the ad juster wheels.
- When the a ir condit ioner is working,
cooled air w ill flow pr imar ily from out
l e ts @ ,@ and @. To assure adeq uate cooling, outlets
@ and @) should never
be completely closed.
Using the climate controls economically
Using the climate controls prudently can help
save fuel .
When you use the air conditioner, eng ine pow
er is reduced and fuel consumption increases .
T o save fuel, yo u should use the air condition
er only when necessary . Also please note the
follow ing points:
.. If you wa nt to save fuel, switch off the ai r
conditioner .
.. If you are going to drive with the windows
open, switch off the air conditioner .
@ For the sake of the environment
By reducing the amount of fuel you use,
you also reduce the amount of po llutants
emitted into the air.
· Key coded settings
When the ignition is switched on, the air con
di tioner settings are automatically assigned
to the key being used .
The air conditioner settings selected are auto
matically stored and assigned to the key be ing
u sed . When the vehicle is started, the air ..,.
Page 87 of 280

conditioner automatically se lects the settings
assigned to that key. This way every driver will maintain his/her own persona l settings and
does not have to reset them manually.
(D Tips
If a d ifferent driver uses your key and
changes the air conditioner settings, the
latest adjustments w ill erase and rep lace
the settings you have stored.
mP Rear window defogger
T he rear window defogger clears the rear win
dow of conden sation .
Fig. 98 Swi tch for rea r wi ndow defogger w ith a ir -con ·
d it io nin g
.. Press the QiP switc h to switch the rear win-
dow defogger on and off.
The defogger works on ly with the engine run
n ing. When the defogger is switched on, an
indicator light in the switc h comes on.
The rear w indow defogger switches
off au to
matica lly afte r abo ut 20 m inutes.
@ For the sake of the environment
T ur n the defogger off when the rea r win
dow is clear. When you save elec tricity, you
save fuel.
Additional heater
Applies to vehicles: with diesel engine
.. Switc h the Additional heate r to AUTO .
Vehicles w it h diese l eng ine s are equipped
with an add it ional heate r to warm the interior
of the vehicle mo re q uick ly. The additional
W arm and cold 85
heater switches itse lf on and off automatically
when the o utside temperature is below 50 °F
(10 °C) and the engine is running, depending
o n the coolant temperature , interior tempera
ture and the selected temperature.
Electrically heated
front seats
Applies to vehicles: with electrically heated front seats
With the ignition on , the seat cushion and
backrest of the front seats can be heated.
F ig . 99 Ce nter co nsole: t hu m bwhee ls for front seat
h eat ing
Use the t humbwheels in the center conso le
c;:> fig . 99 to turn on and adjust front seat
heating. An infin ite range of positions are pos
sible .
.. Ro ll t he thumbw heel
(D (dr iver's seat) or@
(front passenger's seat) from pos ition
( 0 )
upward in order to activa te the heati ng e le
ments .
.. Select the desired temperat ure setting from
positions 1 t hrough 6.
When the hea ting element is activated, the
numbers on the thumbwheel will illuminate .
& WARNING
Individuals wit h reduced sensitiv ity to pai n
or temperature cou ld deve lop burns when
using the seat heating funct ion. To reduce
the r isk of injury, these ind ividuals should
not use seat heating .
Page 88 of 280

86 Warm and cold
(D Note
To prevent possible damage to the heating
elements, do not kneel on the seats or ap
ply a heavy load to relatively small areas of
the seat.
Engine preheater
Applies to vehicles: with engine p reheate r
Use of the engine pre heater is recommended
when the ambient temperature is below
-5 °F
(-20 °C) .
Fig. 100 In t he l eft fron t bump er: en gine preheater
co nn ect ion socket
The engine preheater slowly w arms the en
gine coolant using a heating element when
the vehicle is parked. The included cable
1>
must be connected to a 120 Volt Ground Fault
Circuit (GFI) protected outlet that is protected
from water (in your garage, for instance).
When the coolant is preheated, the engine
reaches its operating temperature more quick
ly and will use less fuel and produce fewer
polluting emissions during the warm-up
phase.
Preheating the engine can take up to 3 hours
depending on the temperature outside.
Connecting the engine preheater
- Only use the cable provided.
-All cables and connectors that are used
must not be damaged
¢ .&.
-Open the cover Q fig. 100 @.
l) Th e cabl e is de live red w it h veh icles i n Canada a s
s tandard e quipmen t. The cable c an be o btain ed fro m
an a uth orize d Au di d ea le r fo r veh icl es in the USA.
- Plug the connecting cable into the socket @
Q.ii_.
-Connect the connecting cable to the power
cord.
- Attach the extensions cord to the connector
cable. Always use a 12 gauge or heavier
heavy -duty extension cord that can be prop
erly grounded to a three-prong Ground Fault
Circuit (GFI) wall outlet and is not longer
than 100
ft (30 meters).
- Always plug the preheate r into an 120 Volt
Ground Fault Circuit (GFI) wall outlet that is
properly protected against rain and other
moisture. Never plug the preheater into a
normal outlet regardless of whether it is
grounded or not .
- Always disconnect the connecting cable and
close the cover
Q fig . 100 @ before starting
the engine.
_&. WARNING
-
Using incorrect or damaged outlet and
power cords, using electrical accessories
incorrectly or ignoring safety precautions
can lead to short circuits, accidents, inju ries and life-threatening electric shocks.
- Always plug the preheater into a
120 Volt Ground Fault Circuit (GFI) wall
outlet that is properly protected against
rain and other moisture.
- Always check the fuse protection of the
120 Volt power source before using the
connecting cable .
- Always use a 12 gauge or heavier heavy
duty extension cord that can be properly
grounded to a three-prong GFI outlet .
The extension cord must not be longer
than 100
ft (30 meters).
- Always connect the cable to a 120 Volt
outlet that is grounded and protected
from water .
- Check the cable for damage before every
use . Never use a damaged cable.
It must ~
 1
1 2
2 3
3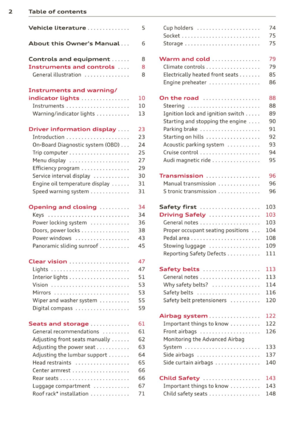 4
4 5
5 6
6 7
7 8
8 9
9 10
10 11
11 12
12 13
13 14
14 15
15 16
16 17
17 18
18 19
19 20
20 21
21 22
22 23
23 24
24 25
25 26
26 27
27 28
28 29
29 30
30 31
31 32
32 33
33 34
34 35
35 36
36 37
37 38
38 39
39 40
40 41
41 42
42 43
43 44
44 45
45 46
46 47
47 48
48 49
49 50
50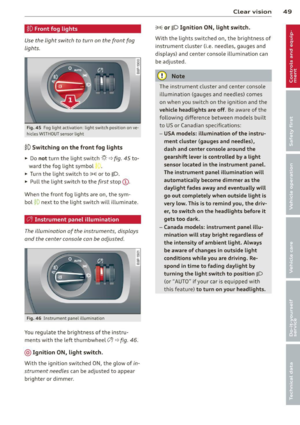 51
51 52
52 53
53 54
54 55
55 56
56 57
57 58
58 59
59 60
60 61
61 62
62 63
63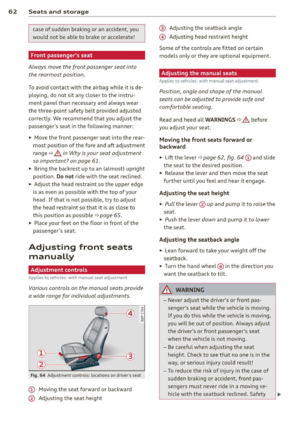 64
64 65
65 66
66 67
67 68
68 69
69 70
70 71
71 72
72 73
73 74
74 75
75 76
76 77
77 78
78 79
79 80
80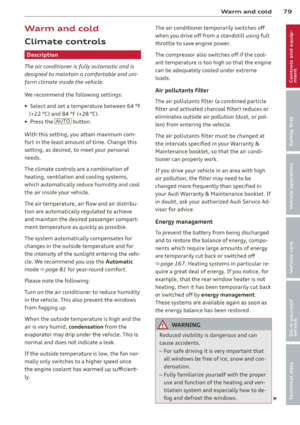 81
81 82
82 83
83 84
84 85
85 86
86 87
87 88
88 89
89 90
90 91
91 92
92 93
93 94
94 95
95 96
96 97
97 98
98 99
99 100
100 101
101 102
102 103
103 104
104 105
105 106
106 107
107 108
108 109
109 110
110 111
111 112
112 113
113 114
114 115
115 116
116 117
117 118
118 119
119 120
120 121
121 122
122 123
123 124
124 125
125 126
126 127
127 128
128 129
129 130
130 131
131 132
132 133
133 134
134 135
135 136
136 137
137 138
138 139
139 140
140 141
141 142
142 143
143 144
144 145
145 146
146 147
147 148
148 149
149 150
150 151
151 152
152 153
153 154
154 155
155 156
156 157
157 158
158 159
159 160
160 161
161 162
162 163
163 164
164 165
165 166
166 167
167 168
168 169
169 170
170 171
171 172
172 173
173 174
174 175
175 176
176 177
177 178
178 179
179 180
180 181
181 182
182 183
183 184
184 185
185 186
186 187
187 188
188 189
189 190
190 191
191 192
192 193
193 194
194 195
195 196
196 197
197 198
198 199
199 200
200 201
201 202
202 203
203 204
204 205
205 206
206 207
207 208
208 209
209 210
210 211
211 212
212 213
213 214
214 215
215 216
216 217
217 218
218 219
219 220
220 221
221 222
222 223
223 224
224 225
225 226
226 227
227 228
228 229
229 230
230 231
231 232
232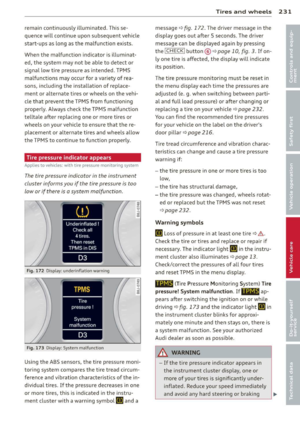 233
233 234
234 235
235 236
236 237
237 238
238 239
239 240
240 241
241 242
242 243
243 244
244 245
245 246
246 247
247 248
248 249
249 250
250 251
251 252
252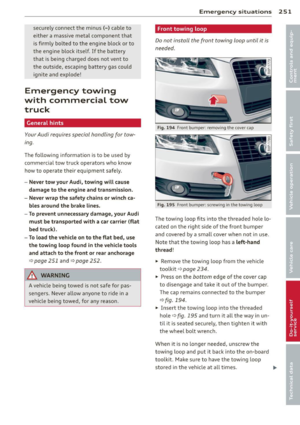 253
253 254
254 255
255 256
256 257
257 258
258 259
259 260
260 261
261 262
262 263
263 264
264 265
265 266
266 267
267 268
268 269
269 270
270 271
271 272
272 273
273 274
274 275
275 276
276 277
277 278
278 279
279