Page 233 of 280

remain continuously illuminated. This se
quence will continue upon subsequent vehicle
start-ups as long as the malfunction exists.
When the malfunction indicator is illuminat
ed, the system may not be able to detect or
signal low tire pressure as intended . TPMS
malfunct ions may occur for a variety of rea
sons, including the installation of replace
ment or alternate tires or wheels on the vehi
cle that prevent the TPMS from functioning
properly . Always check the TPMS malfunction
tellta le after replacing one or more tires or
wheels on your vehicle to ensure that the re
placement or alternate tires and wheels allow
the TPMS to continue to function properly.
Tire pressure indicator appears
Appl ies to vehicles: with tire pressur e monitoring sys te m
The tire pressure indicator in the instrument
cluster informs you if the tire pressure is too
low or if there is a system malfunction.
Fig. 172 Display : underinflation warning
Fig. 173 Display: System malfunction
Using the ABS sensors, the tire pressure moni
toring system compares the tire tread circum
ference and vibration characteristics of the in
dividual tires. If the pressure decreases in one
or more tires, this is indicated in the instru
ment cluster with a warning symbol
ti] and a
Tires and wheels 231
message r=!) fig. 172. The driver message in the
display goes out after 5 seconds. The driver
message can be displayed again by pressing
the
ICHECKI button @¢ page 10, fig . 3 . If on
ly one tire is affected, the display will indicate
its position .
The tire pressure monitoring must be reset in
the menu display each time the pressures are
adjusted (e .g. when switching between parti
al and full load pressure) or after changing or
replacing a tire on your vehicle¢
page 232.
You can find the recommended tire pressures
for your vehicle on the label on the driver's
door pillar¢
page 216.
Tire tread circumference and vibration charac
teristics can change and cause a tire pressure
warning if:
- the tire pressure in one or more tires is too
low,
- the tire has structural damage,
- the tire pressure was changed, wheels rotat- ed or replaced but the TPMS was not reset
¢page 232.
Warning symbols
ti] Loss of pressure in at least one tire¢&.
Check the tire or tires and replace or repair if
necessary. The indicator light
ti] in the instru
ment cluster also illuminates
¢page 13.
Check/correct the pressures of all four tires
and reset TPMS in the menu display .
11@1&1 (Tire Pressure Monitoring System) Tire
pressure! System malfunction . Ifll@IS, ap
pears after switching the ignition on or while
driving ¢
fig. 173 and the indicator light ti] in
the instrument cluster blinks for approx i
mately one minute and then stays on, there is
a system malfunction. See your autho rized
Audi dealer as soon as possible.
A WARNING
-If the tire pressure indicator appears in
the instrument cluster display, one or
more of your tires is significantly under
inflated. Reduce your speed immediately
and avoid any hard steering or braking ..,.
Page 234 of 280

232 Tires and wheels
maneuvers. Stop as soon as possible and
check the tires and their pressures. In
flate the tire pressure to the proper pres
sure as indicated on the vehicle's tire
pressure label ¢
page 216. Driving on a
significantly under-inf lated tire causes
the tire to overheat and can lead to tire
failure. Under-inflation also is likely to
impair the vehicle's handling and stop
ping ability.
- T he driver is responsible for maintain ing
the correct tire pressures. You must
check the tire pressures regularly.
- Under certain cond itions (such as a spor
ty driving style, winter conditions or un
paved roads), the pressure monitor indi
cator may be delayed.
- Ask your authorized Audi dealer if run
flat tires may be used on your vehicle .
Your vehicle registration becomes invalid
if you use these tires when not permit
ted. Damage to your veh icle or acc idents
could also result .
(D Tips
- The tire pressure monitoring system
stops working when there is an ESP/ABS malfunction .
- Using snow chains may result in a system
malfunction.
- Tires with the identification "AO" or "RO"
have been specially matched with your
Audi. We recommend using only these
tires because they meet the highest
standards regarding safety and driving
characteristics when used correctly. Your
a uthorized Audi dea ler will g ladly pro
v ide you w ith more information.
Reset tire pressure monitoring system
(Stepl)
Applies to veh icles: w ith tire pressure monitoring system
If the tire pressure is adjusted, wheels ore ro
tated or changed, the TPMS must be reset in
the menu display.
----- ®
Fig. 174 Wipe r lever: Contro ls fo r the menu d isplay
Fig. 175 Disp lay: S ta rt m enu
I Rese t I button @ and rocker switch @
¢ fig. 17 4 functions:
To open the menu
" Press the I Reset ! button @ unt il the menu
disp lay¢
fig. 175 appears
Selections and settings
" Press the rocker switch @ to reach a menu
d isp lay. The switch is operated the same as
the display (up/down) .
Entering and confirming
" Press the I Reset I button @.
Returning to the Start menu
" Press the I Rese t I button longer than 2 sec
onds to return from any menu level to the
Start menu.
Page 235 of 280

@ Tips
-Before resetting the TPMS, the current
pressures of
all four tires must corre
spond t o the specified va lues. Adjust the
tire pressu re and reset the pressure in
the tire pressure mon itor ing system ac
cord ing to the load yo u are carry ing
~pag e
216.
- Do not store the tire pressures if snow
cha ins a re installed. Otherw ise the sys
tem could malfunction.
Reset tire pressure monitoring system
(Step2}
Applies to vehicles: with tire pressure monitoring system
Fig. 1 76 Display: Tire pressure
Fig. 1 77 Display: Tire pressure
I Reset ! button @ and rock e r swit ch @
~ page 232, fig . 17 4 func tions:
Storing tire pressures
.. Turn on the ignition .
.. Se lect the menu:
> Adjusting * > Tire pres-
sure
> Store .
Entering and confirming
.. Se lect the menu : Store now
.. Press the
I Reset I button @ .
.. Se lect the menu : Confirm
Tires and wheels 233
.. Press the I Reset I button @.
Returning to the Start menu
.. Press the I Reset ! button longer than 2 sec
onds to re tur n from any menu level to the
S ta rt men u.
{!) Tips
Befo re resetting the TPMS, t he cur rent
p re ssu res of
all four tires mus t corres pond
to the speci fied val ues. Adjus t the tire
pr essure and rese t the pressure in the ti re
press ure monitoring system acco rding to
the load you are carry ing
~ page 216 .
Page 236 of 280

234 What do I do now ?
What do I do now?
Jack, tools and spare
wheel
Jack and tools
The tools and jack are stored underneath the
floor panel in the luggage compartment.
Fig . 178 Floor panel hung on the bottom of the lug
gage compartment cover
Fig. 179 Vehicle tool kit and jack
~ Raise the floor panel w ith the loop.
~ Hang the loop on the underside of the lug-
gage compartment cover
Q fig. 178.
~ Remove the too l kit or the jac k.
The onboard tool kit incl udes:
- Hook for removing wheel covers*
- Plastic hook to remove wheel bolt covers
- Wheel bolt wrench
- Alignment p in for changing wheels
- Screwdriver w ith reve rsible blade
- T owing eye
Before storing the jack, make sure it is wound
back down as far as it will go.
After u se , th e jack and tool s mu st be put
b ac k in pl ace under nea th t he floo r pan el in
t he luggag e comp artmen t.
Note: some of the on -board items listed
above are provided on certain mode ls only or
are optiona l extras.
A WARNING
-Improper use of the vehicle jack can cause
serious personal injuries.
- Using a bumper jack to raise the vehicle
will damage the bumper system. The
jack may slip, caus ing injury.
- Never support your vehicle on c inder
b locks, br icks or other objects. These
may not be able to support the load and
could cause injury when they fail.
- Never start or run the eng ine while the
veh icle is supported by the jack.
- If you must work under the veh icle, al
ways use safety stands specifically de signed fo r th is purpose.
- Never try and use the hexagonal socket
in the handle of the screwdriver to loos
en or tighten the whee l bolts.
- Always make sure the spare tire and even
a flat tire are secured in place and not
loose, otherwise they cou ld fly forward,
causing pe rsonal i njury to passengers in
the vehicle in an accident or sudden ma
neuver.
- Neve r use the ja ck supplied with your Au
d i on another vehicle, particularly on a
heav ier one. The jack is only s uitable for
use on the vehicle it came with.
Compact spare wheel
Applies to veh icles: w ith compact spare whee l
The compact spare wheel is only intended to
be used for a short time.
Fig . 180 Compact spare wheel in the wheel well
Page 237 of 280

You will find the compact spare wheel under
the floor in the luggage compartment . It is
secured w ith a large nut.
Using the compact spare wheel
The compact spa re wheel is only intended for
emergenc ies until you can reach a repair shop .
Replace i t as quickly as possible with a normal
wheel.
There are some restrictions on the use of the
compact spare wheel~ &. . The compact spare
wheel has been developed especially for your
type of vehicle . It must not be exchanged for
the compact spare whee l from another type of
vehicle.
Normal summer or winter tires must not be
installed on the compact spare whee l rim.
Snow chains
For technica l reasons, the use of snow chains
on the compact spare wheel is
n ot permitted .
If you do have to dr ive w ith snow cha ins and
have a t ire failure on a
front wheel, insta ll the
spa re wheel in place of a rear wheel. Install
the snow chains on the rear wheel and use it
to replace the defective front whee l.
Using the spare wheel
The spare wheel is only intended for emergen
cies until you can reach a repair shop. Replace
it as qu ickly as possib le with a no rmal wheel.
There are some restrict ions on the use of a
spare wheel
Q &. . The spare wheel has been
developed especially for your type of vehicle.
It m ust not be exchanged for the spare whee l
from anot her type of vehicle.
Normal summer or winter tires must not be
i nstalled on the spare wheel rim.
Snow t ires
For technical reasons, the use of snow chains
on the spare whee l is
not p erm itte d.
If you do have to drive with snow chains and
have a t ire failure on a
front wheel, insta ll the
spare wheel in place of a rear wheel. Install
What do I do now? 235
the snow chains on the rear whee l and use it
to replace the defective front wheel.
A WARNING -
A lways store jacking equipment, spare
wheel in the luggage compartment. Tight
en screw for the spare wheel secure ly. Un
der no circumstances should you store the
spa re wheel o r jack and tools unsecured in
the passenger compartment . This could
cause ser ious persona l inju ry to passen
gers in the veh icle in case of a collision .
- The compact spare tire is for temporary
use only and is so marked on the side
walls .
- Do not dr ive at speeds exceeding SO mph
(80 km/h) wi th the compact spare whee l
mounted . A lso rapid acce lerat ion, ha rd
braking and hard cornering must be
avoided to he lp prevent loss of vehicle
contro l.
- Any continuous road use of the compact
spare tire may result in tire failure, loss
of vehicle control and injury to vehicle
occupants.
- Do not put a snow chain on your compact
spare tire. Due to the smaller t ire size,
the chain will not fit properly and can
thus damage your vehicle. You cou ld also
lose the chain, as well as contro l of the
veh icle .
- If you have a flat front t ire in road condi
tions which require snow chains, first re
move the undamaged rea r whee l and
mount the compact spare wheel in its
place. Then remove the damaged front
wheel, take the snow cha ins off it and at
tach them to the whee l taken from the
rear. This wheel can now be mounted on
the front with its snow chains. Check and
adjust t ire pressure promptly .
- Never use two or more compact spare
tires at the same time.
(D Note
When using the compact spare wheel, note the fo llowing: •
•
Page 238 of 280
.
- The load")
236 What do I do now?
-After installing the compact spare wheel,
the tire inflation pressure should be
checked and, if necessary, increased to
60 psi (4.2 bar).
- The load carrying capacity is marked on
the tire sidewalls and must not be ex
ceeded.
- After installing the compact spare wheel,
make sure that you remount the flat tire
in its storage area properly.
- The compact spare tire should be proper
ly remounted in its storage area as soon
as the standard road tire can be re placed .
- Because the compact spare tire was spe
cifically designed for your vehicle, it must not be used on any other vehicle .
Likewise, compact spare wheels from
other vehicles must not be used on your
vehicle.
- The compact spare tire must not be
mounted on any other wheels, nor must
standard tires, snow tires, wheel covers
or trim rings be used with the compact
spare wheel. If such use is attempted,
damage to these items or other vehicle
components may occur .
(D Tips
Check the inflation pressure of the com
pact spare tire (60 psi/4.2 bar) periodically
to keep the tire ready for use.
Wheel change
Before changing a wheel
Observe the following precautions for your
own and your passenger's safety when chang
ing a wheel .
.. After you experience a tire failure, pull the
car well away from moving traffic and try to
reach
level ground before you stop c:> ,&. .
.. All passengers should leave the car and
move to a safe location (for instance, behind
the guardrail)
c:> _&. .
.. Apply the parking brake firmly c:> _&. .
.. Move selector lever to position Pon an au
tomatic transmission ; put manual transmis
sion in
first gear c:> _&..
.. If you are towing a trailer : unhitch the trail
e r from your vehicle.
.. Take the
tool and the spare tire c:> page 234
out of the luggage compartment .
.&, WARNING
You or your passengers could be injured
while changing a wheel if you do not fol
low these safety precautions:
- If you have a flat tire, move a safe dis
tance off the road. Turn off the engine,
turn the emergency flasher on and use
other warning devices to alert other mo
torists.
- Make sure that passengers wait in a safe place away from the vehicle and well
away from the roadway and traffic .
- To help prevent the vehicle from moving suddenly and possibly slipping off the
jack, always fully set the parking brake
and block the wheel diagonally opposite
the wheel being changed. When one
front wheel is lifted off the ground, plac
ing the automatic transmission in "P"
(Park) , or engaging a gear in a manual
transmission will
not prevent the vehicle
from moving.
- Before you change a wheel, be sure the
ground is level and firm. If necessary,
use a sturdy board under the jack.
- After installing the spare wheel, make
sure that you remount the flat tire/wheel
in its storage area properly and tighten
the knurled retaining screw securely.
Changing a wheel
-
When you change a wheel, follow these
quence described below step-by-step and ex
actly in that order .
1. Remove the decorative wheel cover*. For
more details see also
c:> page 23 7, Deco
rative wheel covers
or c:> page 238,
Wheels with cap-covered wheel bolts.
Page 239 of 280

2. Loosen the w hee l bol ts ¢ page 238.
3. Locate the proper mounting point for the
jack and align the jack below that point
¢ page 239.
4. Lift the car with the jack¢ page 239.
5. Take the flat wheel off and then put the
spare on
¢ page 240 .
6. Tighten all wheel bo lts light ly .
7 .
Low er the veh icle w ith the jack.
8 . Use the wheel bolt wrench and
firml y
tighten all whee l bolts ¢ page 238.
9. Put the decorative wh eel cov er* back on.
A WARNING -
Always read and head all WARNINGS and
information
¢ A in Raising the vehicle on
page 240
and ¢ page 241.
After changing a wheel
A wheel change is not complete without the
following actions .
.. Store and secu re the replaced wheel in the
spare wheel we ll.
.. Put the tool case and the jack back in place
in the luggage compartment .
.. Check the
tir e pres su re on the spare wheel
immediately after mounting it .
.. As soon as possible, have the
tightening
torqu es
on all wheel bolts checked with a
torque wrench. The correct tightening tor
que is 90 ft lb (120 Nm).
.. Have the flat tire
repl aced as soon as possi
ble.
@ Tips
- If yo u n otice wh ile chang ing a tire tha t
the wheel bo lts a re cor roded and diffi
cult to turn, then they should be re placed before you check the tightening
torque.
- Drive at reduced speed until you have the
tightening torques checked .
What do I do now ? 237
Full wheel covers
App lies to vehicles : with ful l wheel cove rs
T he wheel covers must be removed to access
the wheel bolts.
Remo val
.. Pull the full whe el cover off manua lly.
Installation
.. First press the full w hee l cover on to the rim
a t the cut-o ut prov ided for the va lve . Then
engage the outer edge of the
full wheel cov
er
in the steel rim.
Decorative wheel covers
App lies to vehicles: with decorat ive w hee l covers
The decorative wheel covers must be removed
first to access the wheel bolts .
Fig. 181 Whee l cha nge : removing the whee l cover
Remo ving
.. Insert the hook provided with the on board
tool kit into the hole on the center hub
piece.
.. Pull off the
decorati ve wh eel cover
¢ fig . 181 .
Page 240 of 280

238 What do I do now?
Wheels with cap-covered wheel bolts
Applies to vehicles: wit h cap-cove red w hee l bo lts
The caps must be removed first from the
wheel bolts before the bolts can be un
screwed.
Fig. 182 Whee l change : removing the wheel bo lt caps
Removing
.,. Push the plastic clip provided w ith the on
board tool kit down over the wheel bolt cap
u nt il it engages .
.. Pull on the properly engaged
plastic clip to
extract the cap
¢ fig. 182 .
Refitting
.. Place the caps over the wheel bolts and
push them back in .
The caps are there to p rotect and keep the
wheel bolts clean.
Anti-theft wheel bolts
Applies to vehicles : wit h ant i-t heft wheel bo lts
To tighten or untighten the anti-theft wheel
bolts you must use a special adapter.
(~
'
Fig. 183 Anti-theft w hee l bo lt w it h cap and adapter
.. Remove the cap* ¢fig. 183 @using the
plastic clip found in the vehicle tool kit. ..
Insert the adapter @ as far as it will go into
the anti -theft wheel
CD bolt.
.. Push the socket wrench over the adapter
@ .
.. Loosen or tighten the wheel bolt
¢page 238.
To remove the cap* @, make sure the plastic
clip is pushed in as far in as possible until it
lines up with the edge of the cap .
We recommend you keep the whee l bolt
adapter in the tool kit.
T he
code number of the wheel bolt lock is
stamped on the front side of the adapter . You
will need this number in order to get a re placement from your authorized A udi dealer.
Q) Tips
Write down the code number and keep it
in safe place. Do not keep it in the vehicle.
Loosening and tightening the wheel
bolts
The wheel bolts must be loosened before rais
ing the vehicle.
Fig. 184 W hee l change : loosen ing the wheel bolts
Loosening
.,. Fit the wheel bolt wrench over the wheel
bolt and push it down as far as it will go .
"' ...
-cL a, a,
.,. Close your g rip around the end of the
w rench handle for maximum torque and
turn the wheel bolts
counter-clockwise
about one single turn in the direction of ar-
row ¢
fig. 184. .,.
 1
1 2
2 3
3 4
4 5
5 6
6 7
7 8
8 9
9 10
10 11
11 12
12 13
13 14
14 15
15 16
16 17
17 18
18 19
19 20
20 21
21 22
22 23
23 24
24 25
25 26
26 27
27 28
28 29
29 30
30 31
31 32
32 33
33 34
34 35
35 36
36 37
37 38
38 39
39 40
40 41
41 42
42 43
43 44
44 45
45 46
46 47
47 48
48 49
49 50
50 51
51 52
52 53
53 54
54 55
55 56
56 57
57 58
58 59
59 60
60 61
61 62
62 63
63 64
64 65
65 66
66 67
67 68
68 69
69 70
70 71
71 72
72 73
73 74
74 75
75 76
76 77
77 78
78 79
79 80
80 81
81 82
82 83
83 84
84 85
85 86
86 87
87 88
88 89
89 90
90 91
91 92
92 93
93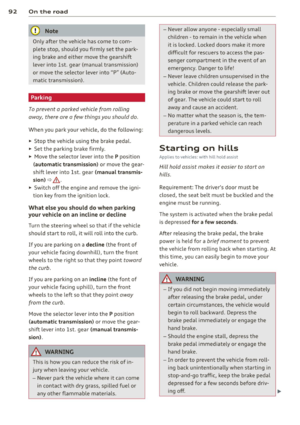 94
94 95
95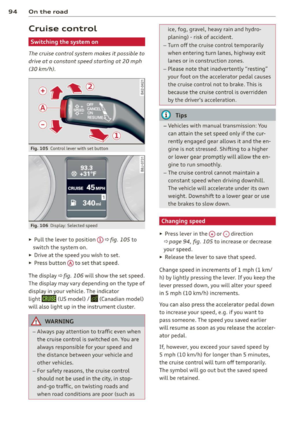 96
96 97
97 98
98 99
99 100
100 101
101 102
102 103
103 104
104 105
105 106
106 107
107 108
108 109
109 110
110 111
111 112
112 113
113 114
114 115
115 116
116 117
117 118
118 119
119 120
120 121
121 122
122 123
123 124
124 125
125 126
126 127
127 128
128 129
129 130
130 131
131 132
132 133
133 134
134 135
135 136
136 137
137 138
138 139
139 140
140 141
141 142
142 143
143 144
144 145
145 146
146 147
147 148
148 149
149 150
150 151
151 152
152 153
153 154
154 155
155 156
156 157
157 158
158 159
159 160
160 161
161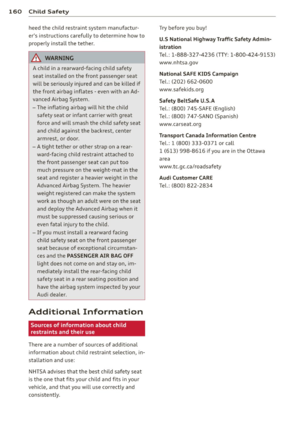 162
162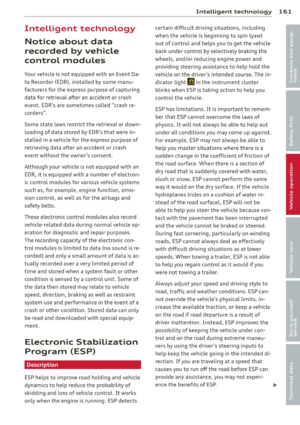 163
163 164
164 165
165 166
166 167
167 168
168 169
169 170
170 171
171 172
172 173
173 174
174 175
175 176
176 177
177 178
178 179
179 180
180 181
181 182
182 183
183 184
184 185
185 186
186 187
187 188
188 189
189 190
190 191
191 192
192 193
193 194
194 195
195 196
196 197
197 198
198 199
199 200
200 201
201 202
202 203
203 204
204 205
205 206
206 207
207 208
208 209
209 210
210 211
211 212
212 213
213 214
214 215
215 216
216 217
217 218
218 219
219 220
220 221
221 222
222 223
223 224
224 225
225 226
226 227
227 228
228 229
229 230
230 231
231 232
232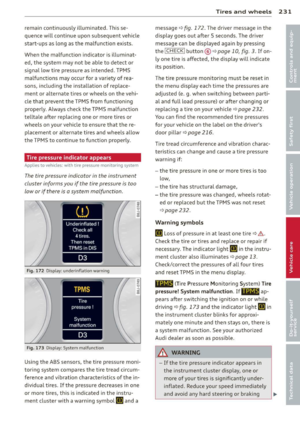 233
233 234
234 235
235 236
236 237
237 238
238 239
239 240
240 241
241 242
242 243
243 244
244 245
245 246
246 247
247 248
248 249
249 250
250 251
251 252
252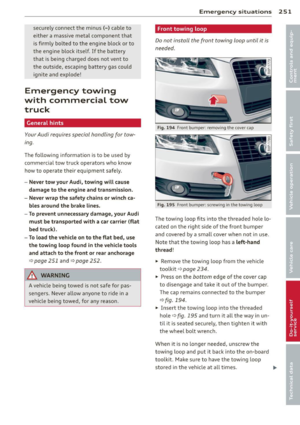 253
253 254
254 255
255 256
256 257
257 258
258 259
259 260
260 261
261 262
262 263
263 264
264 265
265 266
266 267
267 268
268 269
269 270
270 271
271 272
272 273
273 274
274 275
275 276
276 277
277 278
278 279
279