Page 233 of 621
SCAN
BUTTON
XM RADIO
BUTTON
VOL/Ⴛ
(VOLUME/
POWER)
KNOB
INTERFACE DIALINTERFACE DIAL PRESET
BUTTONS Without rear entertainment system
SKIP/
CATEGORY
BUTTONS
TUNE
(SOUND)
KNOBSCAN
BUTTON
AUDIO
BUTTONAUDIO DISPLAY
PRESET
BUTTONS With rear entertainment system
AUDIO DISPLAY NAVIGATION SCREEN
AUDIO
BUTTONSKIP/
CATEGORY
BUTTONS TITLE
BUTTONTITLE
BUTTON
TUNE
(SOUND)
KNOB XM RADIO
BUTTON
VOL/Ⴛ
(VOLUME/
POWER)
KNOB
Playing the XM
®
Radio (Models with navigation system)
226
Page 236 of 621

SCAN-The scan function gives
you a sampling of all channels while
in the channel mode. In the category
mode, only the channels within that
category are scanned. To activate
SCAN, press the SCAN button. You
will see SCAN on the screen and
audio display.
The system plays each channel in
numerical order for about 10
seconds, then selects the next
channel. When you hear a channel
you want to continue listening to,
press the SCAN button to cancel.
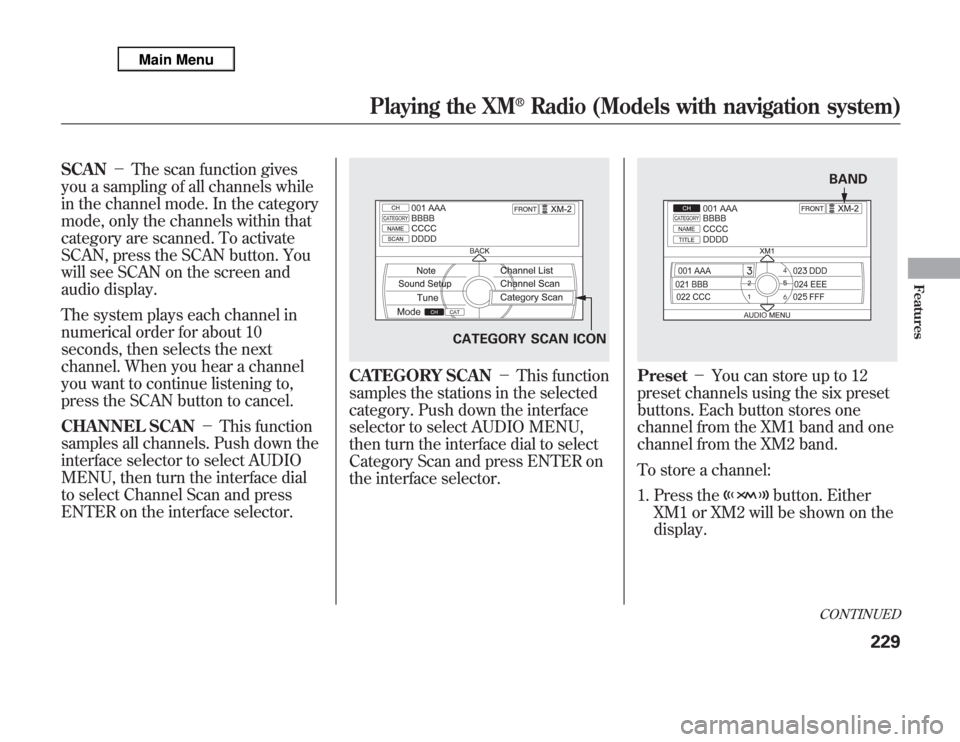
CHANNEL SCAN-This function
samples all channels. Push down the
interface selector to select AUDIO
MENU, then turn the interface dial
to select Channel Scan and press
ENTER on the interface selector.
CATEGORY SCAN-This function
samples the stations in the selected
category. Push down the interface
selector to select AUDIO MENU,
then turn the interface dial to select
Category Scan and press ENTER on
the interface selector.
Preset-You can store up to 12
preset channels using the six preset
buttons. Each button stores one
channel from the XM1 band and one
channel from the XM2 band.
To store a channel:
1. Press the
button. Either
XM1 or XM2 will be shown on the
display.
CATEGORY SCAN ICON
BANDCONTINUED
Playing the XM
®
Radio (Models with navigation system)
229
Features
Page 237 of 621

2. Use the tune, list, or scan function
to tune to a desired channel.
In category mode, only channels
within that category can be
selected. In channel mode, all
channels can be selected.
3. Pick the preset button you want for
that channel. Press and hold the
preset button until you hear a
beep. You can also pick the
number with the interface dial.
Select your desired number and
press and hold ENTER on the
interface selector.
4. Repeat steps 2 and 3 to store the
first six channels.
5. Press the
button or scroll
up again. The other XM band will
be shown. Store the next six
channels using steps 2 and 3.Once a channel is stored, press
and release the proper preset
button to tune to it.
XM Radio Display Messages
‘‘OFF AIR’’-The channel
currently selected is no longer
broadcasting.
‘‘LOADING’’-XM is loading the
audio or program information.
‘‘UPDATING’’-The encryption
code is being updated. Wait until the
encryption code is fully updated.
Channels 0 and 1 should still work
normally.‘‘NO SIGNAL’’-The signal is
currently too weak. Move the vehicle
to an area away from tall buildings,
and with an unobstructed view of the
southern horizon.
‘‘
’’-The selected channel
number does not exist, or is not part
of your subscription, or this channel
has no artist or title information at
this time.
‘‘CHECK ANTENNA’’-There is a
problem with the XM antenna.
Please consult your dealer.
Playing the XM
®
Radio (Models with navigation system)
230
Page 288 of 621

If the iPod indicator does not appear
in the audio display, check the
connections, and try to reconnect the
iPod a few times.
If the audio system still does not
recognize the iPod, the iPod may
need to be reset. Follow the
instructions that came with your
iPod, or you can find reset
instructions online at
www.apple.com/
ipod
.
The current file number and total of
the selected playable files are
displayed in the center display.
Pressing the AUDIO button displays
the artist, album and track (file)
names on the navigation screen.
To Change or Select FilesUse the SKIP button an iPod is
playing to select passages and
change files.
SKIP-Each time you press and
release the
side of the SKIP
button, the system skips forward to
the beginning of the next track.
Press and release the
side of the
button to skip backward to the
beginning of the current track. Press
it again to skip to the beginning of
the previous track.
To move rapidly within playing track,
press and hold either side (
or
) of the SKIP button.
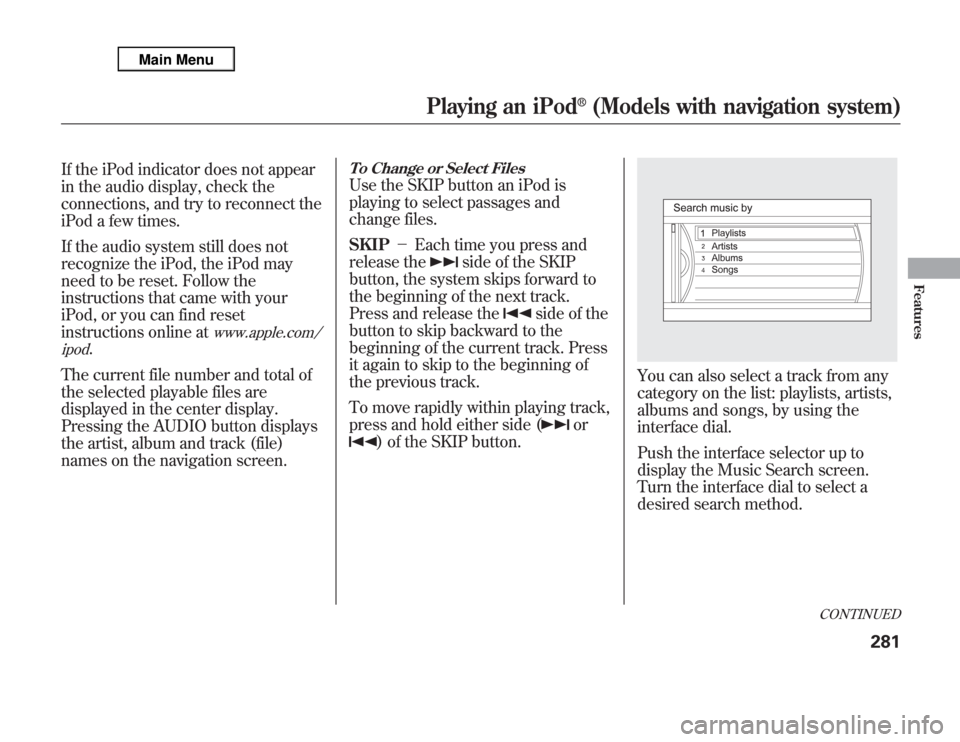
You can also select a track from any
category on the list: playlists, artists,
albums and songs, by using the
interface dial.
Push the interface selector up to
display the Music Search screen.
Turn the interface dial to select a
desired search method.
CONTINUED
Playing an iPod
®
(Models with navigation system)
281
Features
Page 312 of 621

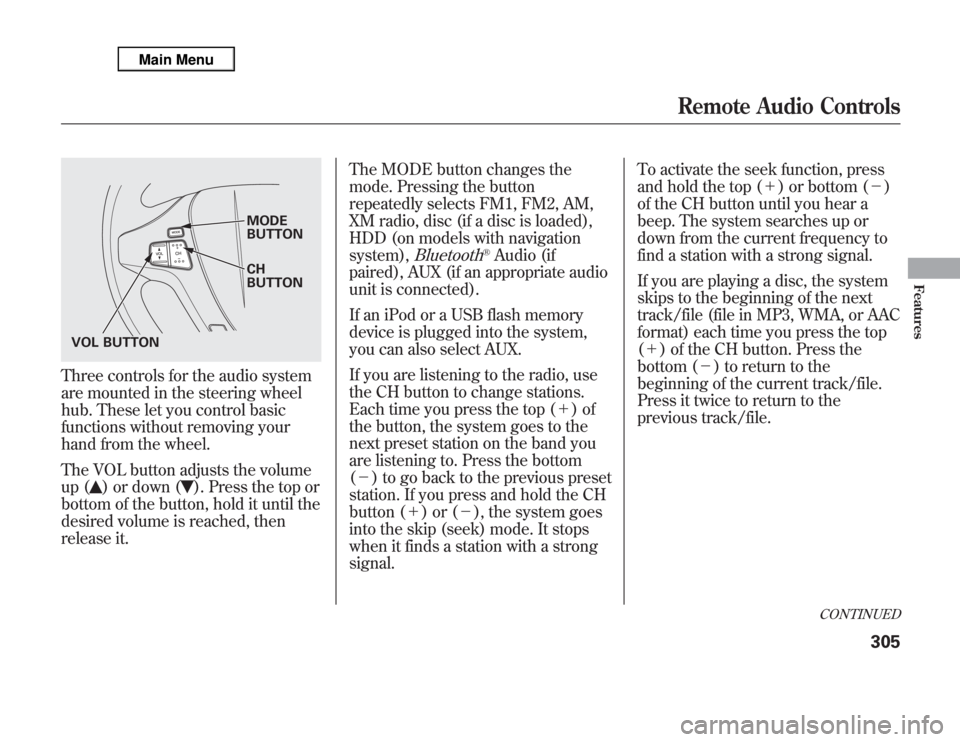
Three controls for the audio system
are mounted in the steering wheel
hub. These let you control basic
functions without removing your
hand from the wheel.
The VOL button adjusts the volume
up (
) or down (
). Press the top or
bottom of the button, hold it until the
desired volume is reached, then
release it.The MODE button changes the
mode. Pressing the button
repeatedly selects FM1, FM2, AM,
XM radio, disc (if a disc is loaded),
HDD (on models with navigation
system),
Bluetooth
®Audio (if
paired), AUX (if an appropriate audio
unit is connected).
If an iPod or a USB flash memory
device is plugged into the system,
you can also select AUX.
If you are listening to the radio, use
the CH button to change stations.
Each time you press the top (+)of
the button, the system goes to the
next preset station on the band you
are listening to. Press the bottom
(-) to go back to the previous preset
station. If you press and hold the CH
button (+)or(-), the system goes
into the skip (seek) mode. It stops
when it finds a station with a strong
signal.To activate the seek function, press
and hold the top (+) or bottom (-)
of the CH button until you hear a
beep. The system searches up or
down from the current frequency to
find a station with a strong signal.
If you are playing a disc, the system
skips to the beginning of the next
track/file (file in MP3, WMA, or AAC
format) each time you press the top
(+) of the CH button. Press the
bottom (-) to return to the
beginning of the current track/file.
Press it twice to return to the
previous track/file.
MODE
BUTTON
CH
BUTTON
VOL BUTTON
CONTINUED
Remote Audio Controls
305
Features
Page 315 of 621

If your vehicle’s battery is disconnected
or goes dead, the audio system
disables itself. If this happens, you will
see‘‘ENTER CODE’’in the frequency
display next time you turn on the
system. Use the preset buttons (Icons
on models with navigation system) to
enter the five-digit code. The code is on
the Anti-theft Identification Card
included in your owner’s manual kit.
When it is entered correctly, the radio
will start playing.
The Anti-theft Identification Card also
lists your audio serial number. It is best
to store the card in a safe place at
home. In addition, you should write the
audio system’s serial number in this
owner’s manual.
If you make a mistake entering the
code, do not start over; complete the
five-digit sequence, then enter the
correct code. You have ten tries to
enter the correct code. If you are
unsuccessful in ten attempts, you must
then leave the system on for one hour
before trying again.The system will retain your AM and
FM presets even if power is
disconnected.
NOTE:
If you have a My Acura account, it is
easy to retrieve the anti-theft code
online without having to access the
serial number.
U.S. ownersWe recommend that you register the
security code at My Acura (myacura.
com.) If you lose the Anti-theft
Identification Card before registering
the code at My Acura, you must obtain
the code from your dealer or
https://
radionavicode.acura.com/
. To do this,
you will need the audio system’s serial
number. If you do not have the serial
number with you, ask your dealer or go
to
https://radionavicode.acura.com/
for
information on how to retrieve it.
Canadian ownersIf you lose the Anti-theft Identification
Card, you must obtain the code from
your dealer. To do this, you will need
the audio system’s serial number. If
you do not have the serial number with
you, ask your dealer how to retrieve it.Models with navigation systemYou need to enter the same code for
the navigation system to reactivate.
Read the navigation system manual for
details.
Radio Theft Protection308
Page 330 of 621
Disp AdjustTo adjust the display, highlight‘‘Disp
Adjust’’from the setup menu with
the interface dial and press the
ENTER button. You can adjust these
display settings:●
Brightness
●
Contrast
●
Black Level
●
Color
●
Tint
Select the quality you want to adjust
by turning the interface dial. Adjust
the setting by turning the interface
dial. To go back to the Disp Adjust
screen, press the ENTER or
CANCEL button.
If you want to set the display to the
default setting, select‘‘Reset’’by
turning the interface dial, and, then
pressing the ENTER button.
CONTINUED
Rear Entertainment System
323
Features
Page 348 of 621

The security system helps to protect
your vehicle and valuables from
theft. The horn sounds and a
combination of headlights, position
lights, side marker lights and
taillights flashes if someone attempts
to break into your vehicle or remove
the audio unit. This alarm continues
for two minutes, then the system
resets. To deactivate the system
before the two minutes have elapsed,
unlock the driver's door with the key
or the remote transmitter.
The security system automatically
sets 15 seconds after you lock the
doors, hood, and tailgate. For the
system to activate, you must lock the
doors from the outside with the key,
or use driver's lock tab, door lock
master switch, or remote transmitter.
The security system indicator on the
instrument panel starts blinking
immediately to show you the system
is setting itself.
Once the security system sets,
opening any door, tailgate, or hood
without using the key or the remote
transmitter, will cause the alarm to
activate. It also activates if the
ignition switch is turned to the ON
(II) position, the audio unit is
removed from the dashboard or the
wiring is cut.The security system does not set if
any door, the tailgate, or hood is not
fully closed. Before you leave the
vehicle, make sure the doors, tailgate
and hood are securely closed.
To see if the system sets after you
exit the vehicle, press the LOCK
button on the remote transmitter
within five seconds. If the system is
set, the horn will beep once.
Do not attempt to alter this system or
add other devices to it.
SECURITY SYSTEM INDICATOR
Security System
341
Features