Page 57 of 86
.
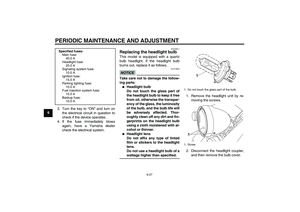
TIPIf the specified clutch lever free play
could be obtained as described abov")
PERIODIC MAINTENANCE AND ADJUSTMENT
6-16
6 decrease the clutch lever free play,
turn the adjusting bolt in direction
(b).
TIPIf the specified clutch lever free play
could be obtained as described above,
skip steps 4–7.4. Fully turn the adjusting bolt in di-
rection (a) to loosen the clutch ca-
ble.
5. Slide the rubber covers apart, and
then loosen the locknut.
6. To increase the clutch lever free
play, turn the clutch lever free play
adjusting nut in direction (a). Todecrease the clutch lever free play,
turn the adjusting nut in direction
(b).
7. Tighten the locknut at the clutch
cable, and then slide the rubber
covers to their original positions.
8. Tighten the locknut at the clutch le-
ver, and then slide the rubber cov-
er to its original position.
EAU22093
Adjusting the brake lever free
play The brake lever free play should mea-
sure 10.0–15.0 mm (0.39–0.59 in) as
shown. Periodically check the brake le-
ver free play and, if necessary, adjust it
as follows.
1. Loosen the locknut at the brake le-
ver.
2. To increase the brake lever free
play, turn the brake lever free play
adjusting screw in direction (a). To
decrease the brake lever free play,
turn the adjusting screw in direc-
tion (b).
1. Rubber cover
2. Locknut
3. Clutch lever free play adjusting nut
1
1
23(a)
(b)
1. Locknut
2. Brake lever free play adjusting screw
3. Brake lever free play
(a)
3
1
2
(b)
U26PE2E0.book Page 16 Thursday, May 13, 2010 5:38 PM
Page 58 of 86

PERIODIC MAINTENANCE AND ADJUSTMENT
6-17
63. Tighten the locknut.
WARNING
EWA10630
�
After adjusting the brake lever
free play, check the free play
and make sure that the brake is
working properly.
�
A soft or spongy feeling in the
brake lever can indicate the
presence of air in the hydraulic
system. If there is air in the hy-
draulic system, have a Yamaha
dealer bleed the system before
operating the motorcycle. Air in
the hydraulic system will dimin-
ish the braking performance,
which may result in loss of con-
trol and an accident.
EAU22273
Brake light switches The brake light, which is activated by
the brake pedal and brake lever, should
come on just before braking takes ef-
fect. If necessary, adjust the rear brake
light switch as follows, but the front
brake light switch should be adjusted
by a Yamaha dealer.
Turn the rear brake light switch adjust-
ing nut while holding the rear brake light
switch in place. To make the brake light
come on earlier, turn the adjusting nut
in direction (a). To make the brake light
come on later, turn the adjusting nut in
direction (b).
EAU22392
Checking the front and rear
brake pads The front and rear brake pads must be
checked for wear at the intervals spec-
ified in the periodic maintenance and
lubrication chart.
EAU22430
Front brake pads
Each front brake pad is provided with
wear indicator grooves, which allow
you to check the brake pad wear with-
out having to disassemble the brake.
To check the brake pad wear, check
the wear indicator grooves. If a brake
pad has worn to the point that the wear
1. Rear brake light switch
2. Rear brake light switch adjusting nut
1
2
(a)
(b)
1. Brake pad wear indicator groove11
U26PE2E0.book Page 17 Thursday, May 13, 2010 5:38 PM
Page 59 of 86

PERIODIC MAINTENANCE AND ADJUSTMENT
6-18
6 indicator grooves have almost disap-
peared, have a Yamaha dealer replace
the brake pads as a set.
EAU22500
Rear brake pads
Check each rear brake pad for damage
and measure the lining thickness. If a
brake pad is damaged or if the lining
thickness is less than 0.8 mm (0.03 in),
have a Yamaha dealer replace the
brake pads as a set.
EAU22580
Checking the brake fluid level Front brake
Rear brake
Insufficient brake fluid may allow air to
enter the brake system, possibly caus-
ing it to become ineffective.Before riding, check that the brake fluid
is above the minimum level mark and
replenish if necessary. A low brake fluid
level may indicate worn brake pads
and/or brake system leakage. If the
brake fluid level is low, be sure to check
the brake pads for wear and the brake
system for leakage.
Observe these precautions:
�
When checking the fluid level,
make sure that the top of the brake
fluid reservoir is level.
�
Use only the recommended quality
brake fluid, otherwise the rubber
seals may deteriorate, causing
leakage and poor braking perfor-
mance.
�
Refill with the same type of brake
fluid. Mixing fluids may result in a
harmful chemical reaction and
lead to poor braking performance.
1. Lining thickness
1
1. Minimum level mark
1. Minimum level mark
1
1
Recommended brake fluid:
DOT 4
U26PE2E0.book Page 18 Thursday, May 13, 2010 5:38 PM
Page 60 of 86

PERIODIC MAINTENANCE AND ADJUSTMENT
6-19
6
�
Be careful that water does not en-
ter the brake fluid reservoir when
refilling. Water will significantly
lower the boiling point of the fluid
and may result in vapor lock.
�
Brake fluid may deteriorate paint-
ed surfaces or plastic parts. Al-
ways clean up spilled fluid
immediately.
�
As the brake pads wear, it is nor-
mal for the brake fluid level to grad-
ually go down. However, if the
brake fluid level goes down sud-
denly, have a Yamaha dealer
check the cause.
EAU22731
Changing the brake fluid Have a Yamaha dealer change the
brake fluid at the intervals specified in
the TIP after the periodic maintenance
and lubrication chart. In addition, have
the oil seals of the master cylinders and
calipers as well as the brake hoses re-
placed at the intervals listed below or
whenever they are damaged or leak-
ing.�
Oil seals: Replace every two
years.
�
Brake hoses: Replace every four
years.
EAU23040
Drive belt slack The drive belt slack should be checked
and adjusted at the intervals specified
in the periodic maintenance and lubri-
cation chart.
EAU38410
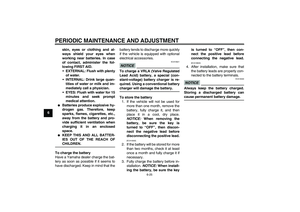
To check the drive belt slack
1. Place the vehicle on the sidestand.
2. Note the current position of the
drive belt using the marks near the
drive belt check hole.TIPThe marks near the drive belt check
hole are 5 mm (0.2 in) apart.1. Drive belt
2. Marks
3. Drive belt slack
1 2
3
U26PE2E0.book Page 19 Thursday, May 13, 2010 5:38 PM
Page 61 of 86

applied to the belt with a belt ten-
sion gauge as shown.
TIPA belt tension gau")
PERIODIC MAINTENANCE AND ADJUSTMENT
6-20
6 3. Note the position of the drive belt
with a force of 45 N (4.5 kgf, 10 lbf)
applied to the belt with a belt ten-
sion gauge as shown.
TIPA belt tension gauge is available at a
Yamaha dealer.4. Calculate the drive belt slack by
subtracting the measurement not-
ed in step 2 from the measurement
noted in step 3.
5. If the drive belt slack is incorrect,
have a Yamaha dealer adjust it.
EAU23093
Checking and lubricating the
cables The operation of all control cables and
the condition of the cables should be
checked before each ride, and the ca-
bles and cable ends should be lubricat-
ed if necessary. If a cable is damaged
or does not move smoothly, have a
Yamaha dealer check or replace it.
WARNING! Damage to the outer
housing of cables may result in in-
ternal rusting and cause interfer-
ence with cable movement. Replace
damaged cables as soon as possi-
ble to prevent unsafe conditions.[EWA10711]EAU49920
Checking and lubricating the
throttle grip and cable The operation of the throttle grip should
be checked before each ride. In addi-
tion, the cable should be lubricated by a
Yamaha dealer at the intervals speci-
fied in the periodic maintenance chart.
1. Belt tension gaugeDrive belt slack:
3.0–5.0 mm (0.12–0.20 in)1
Recommended lubricant:
Yamaha Chain and Cable Lube or
engine oil
U26PE2E0.book Page 20 Thursday, May 13, 2010 5:38 PM
Page 62 of 86
PERIODIC MAINTENANCE AND ADJUSTMENT
6-21
6
EAU44272
Checking and lubricating the
brake and shift pedals Brake pedal
Shift pedal
The operation of the brake and shift
pedals should be checked before each
ride, and the pedal pivots should be lu-
bricated if necessary.
EAU23142
Checking and lubricating the
brake and clutch levers Brake lever
Clutch lever
The operation of the brake and clutch
levers should be checked before each
ride, and the lever pivots should be lu-
bricated if necessary.
Recommended lubricant:
Lithium-soap-based grease
U26PE2E0.book Page 21 Thursday, May 13, 2010 5:38 PM
Page 63 of 86
PERIODIC MAINTENANCE AND ADJUSTMENT
6-22
6
EAU23202
Checking and lubricating the
sidestand The operation of the sidestand should
be checked before each ride, and the
sidestand pivot and metal-to-metal
contact surfaces should be lubricated if
necessary.
WARNING
EWA10731
If the sidestand does not move up
and down smoothly, have a Yamaha
dealer check or repair it. Otherwise,
the sidestand could contact the
ground and distract the operator, re-
sulting in a possible loss of control.
EAUM1651
Lubricating the swingarm piv-
ots The swingarm pivots must be lubricat-
ed by a Yamaha dealer at the intervals
specified in the periodic maintenance
and lubrication chart.
Recommended lubricants:
Brake lever:
Silicone grease
Clutch lever:
Lithium-soap-based grease
Recommended lubricant:
Lithium-soap-based grease
Recommended lubricant:
Lithium-soap-based grease
U26PE2E0.book Page 22 Thursday, May 13, 2010 5:38 PM
Page 64 of 86

PERIODIC MAINTENANCE AND ADJUSTMENT
6-23
6
EAU23251
Lubricating the rear suspen-
sion The pivoting points of the rear suspen-
sion must be lubricated by a Yamaha
dealer at the intervals specified in the
periodic maintenance and lubrication
chart.
EAU23272
Checking the front fork The condition and operation of the front
fork must be checked as follows at the
intervals specified in the periodic main-
tenance and lubrication chart.
To check the condition
Check the inner tubes for scratches,
damage and excessive oil leakage.
To check the operation
1. Place the vehicle on a level sur-
face and hold it in an upright posi-
tion. WARNING! To avoid injury,
securely support the vehicle so
there is no danger of it falling
over.
[EWA10751]
2. While applying the front brake,
push down hard on the handlebars
several times to check if the front
fork compresses and rebounds
smoothly.
NOTICE
ECA10590
If any damage is found or the front
fork does not operate smoothly,
have a Yamaha dealer check or re-
pair it.
Recommended lubricant:
Lithium-soap-based grease
U26PE2E0.book Page 23 Thursday, May 13, 2010 5:38 PM