Page 31 of 148
4-6
1
2
34
5
6
7
8
9
10
11
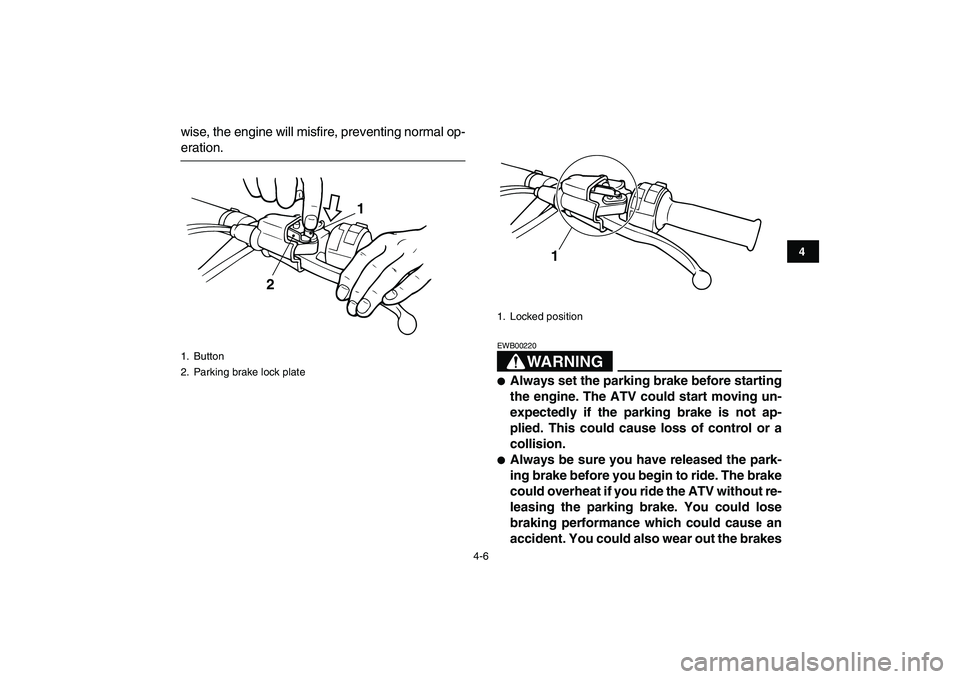
wise, the engine will misfire, preventing normal op-
eration.
WARNING
EWB00220
�
Always set the parking brake before starting
the engine. The ATV could start moving un-
expectedly if the parking brake is not ap-
plied. This could cause loss of control or a
collision.
�
Always be sure you have released the park-
ing brake before you begin to ride. The brake
could overheat if you ride the ATV without re-
leasing the parking brake. You could lose
braking performance which could cause an
accident. You could also wear out the brakes
1. Button
2. Parking brake lock plate
1
2
1. Locked position
1
Page 43 of 148

5-1
1
2
3
45
6
7
8
9
10
11
EBU19201
PRE-OPERATION CHECKS
EBU19224
Inspect your vehicle each time you use it to make sure the vehicle is in safe operating condition. Always
follow the inspection and maintenance procedures and schedules described in the Owner’s Manual.
WARNING
EWB00481
Failure to inspect or maintain the vehicle properly increases the possibility of an accident or equip-
ment damage. Do not operate the vehicle if you find any problem. If a problem cannot be corrected
by the procedures provided in this manual, have the vehicle inspected by a Yamaha dealer.
Before using this vehicle, check the following points:
ITEM ROUTINE PAGE
Fuel
�
Check fuel level in fuel tank, and add recommended fuel if neces-
sary.
�
Check fuel line for leakage. Correct if necessary.4-8, 5-3
Transmission oil
�
Check oil level in transmission case, and add recommended oil to
specified level if necessary.
�
Check ATV for oil leakage. Correct if necessary.5-3, 8-10
Coolant
�
Check coolant level in reservoir, and add recommended coolant to
specified level if necessary.
�
Check cooling system for leakage. Correct if necessary.5-3, 8-13
Front brake
�
Check operation. If soft or spongy, have Yamaha dealer bleed
hydraulic system.
�
Check brake pads for wear, and replace if necessary.
�
Check brake fluid level in reservoir, and add recommended brake
fluid to specified level if necessary.
�
Check hydraulic system for leakage. Correct if necessary.5-3, 8-35, 8-36, 8-38
Page 44 of 148

5-2
1
2
3
45
6
7
8
9
10
11
Rear brake
�
Check operation. If soft or spongy, have Yamaha dealer bleed
hydraulic system.
�
Check brake pads for wear, and replace if necessary.
�
Check brake fluid level in reservoir, and add recommended brake
fluid to specified level if necessary.
�
Check hydraulic system for leakage. Correct if necessary.5-3, 8-35, 8-36, 8-38
Clutch
�
Check operation, and correct if necessary.
�
Lubricate cable if necessary.
�
Check lever free play, and adjust if necessary.8-41
Throttle lever
�
Make sure that operation is smooth. Lubricate cable and lever hous-
ing if necessary.
�
Check lever free play, and adjust if necessary.5-4, 8-34
Control cables
�
Make sure that operation is smooth. Lubricate if necessary. 8-45
Drive chain
�
Check chain slack, and adjust if necessary.
�
Check chain condition. Lubricate if necessary.5-4, 8-43, 8-45
Wheels and tires
�
Check wheel condition, and replace if damaged.
�
Check tire condition and tread depth. Replace if necessary.
�
Check air pressure. Correct if necessary.5-4
Shift pedal
�
Make sure that operation is smooth.
�
Correct if necessary.8-46
Brake pedal
�
Make sure that operation is smooth. Lubricate pedal pivoting point if
necessary.8-46
Brake and clutch levers
�
Make sure that operation is smooth. Lubricate lever pivoting points
if necessary.8-46
Chassis fasteners
�
Make sure that all nuts, bolts and screws are properly tightened. 5-6
Instruments, lights and
switches
�
Check operation, and correct if necessary. 5-7
ITEM ROUTINE PAGE
Page 45 of 148

5-3
1
2
3
45
6
7
8
9
10
11
EBU19550
Fuel and 2-stroke engine oil mixing
ratio
If Yamalube “R” oil is not available, select an oil
from the following list.
NOTICE
ECB00140
Never mix two types of 2-stroke engine oil in
the same batch. Always use the same type of
oil to ensure maximum engine performance.
EBU19580
Transmission oil
Make sure that the transmission oil is at the speci-
fied level. Add oil as necessary. (See page 8-10.)
EBU19631
Coolant
Make sure that the coolant is at the specified level.
Add coolant as necessary. (See page 8-13.)
TIP
The coolant level must be checked on a cold en-
gine since the level varies with engine tempera-
ture.
EBU19711
Front and rear brakes
Brake lever and brake pedal
�
Check that there is no free play in the brake le-
ver. If there is free play, have a Yamaha dealer
check the brake system.
�
Check for correct brake pedal height. (See
page 8-38.) If the pedal height is incorrect, have
a Yamaha dealer adjust it.
�
Check the operation of the lever and pedal. They
should move smoothly and there should be a
firm feeling when the brakes are applied. If not,
have a Yamaha dealer check the brake system.
Brake fluid level
Check the brake fluid level. Add fluid if necessary. Recommended 2-stroke engine oil:
Yamalube “R” (Yamalube Racing 2-cycle oil)
Mixing ratio:
24:1
Recommended 2-stroke engine oil Mixing ratio
Castrol R30
20:1 Castrol A545
Castrol A747
Page 46 of 148

Brake fluid leakage
Check to see if any brake fluid is leaking out of the
pipe joints or brake fluid reservoirs. Apply the
brakes firmly for one minu")
5-4
1
2
3
45
6
7
8
9
10
11
(See page 8-36.)
Brake fluid leakage
Check to see if any brake fluid is leaking out of the
pipe joints or brake fluid reservoirs. Apply the
brakes firmly for one minute. If there is any leak-
age, have a Yamaha dealer check the brake sys-
tem.
Brake operation
Test the brakes at slow speed after starting out to
make sure they are working properly. If the brakes
do not provide proper braking performance, check
the brake pads for wear. (See page 8-35.)
EBU19761
Throttle lever
Check the operation of the throttle lever. It must
open smoothly and spring back to the idle position
when released. Have a Yamaha dealer correct if
necessary.
EBU19770
Drive chain
Check the condition of the drive chain and check
the drive chain slack. Lubricate and adjust the
drive chain as necessary. (See page 8-43.)
EBU19794
Tires
Check tire pressure regularly to make sure it is at
the recommended specifications. Also check for
wear and damage.
Tire pressure
Use the low-pressure tire gauge to check and ad-
just tire pressures when the tires are cold. Tire
pressures must be equal on both sides.
WARNING! Operation of this vehicle with im-
proper tire pressure may cause severe injury
or death from loss of control or rollover. Tire
pressure below the minimum specified could
also cause the tire to dislodge from the rim un-
der severe riding conditions.
[EWB02541]
Set tire pres-
sures to the following specifications: Recommended brake fluid:
DOT 4
Page 50 of 148
6-1
1
2
3
4
56
7
8
9
10
11
EBU19881
OPERATION
EBU19901
Read the Owner’s Manual carefully before riding
the ATV. If there is a control or function you do not
understand, ask your Yamaha dealer.
WARNING
EWB00631
Read the Owner’s Manual carefully to become
familiar with all controls in order to help pre-
vent any loss of control, which could cause an
accident or injury.
EBU29343
Starting a cold engine
NOTICE
ECB00150
See the “Engine break-in” section on page 6-4
prior to operating the engine for the first time.
1. Set the parking brake.
2. Turn the fuel cock to “ON”.
3. Turn the key to “ON” and the engine stop
switch to “”.
4. Shift the transmission into neutral.5. Use the starter (choke) in reference to the fig-
ure:
Position (1):
Cold engine start with ambient temperature below
5 °C (40 °F).
Position (2):
Cold engine start with ambient temperature be-
tween 0 °C (30 °F) and 30 °C (90 °F).
Position (3):
Cold engine start with ambient temperature above
25 °C (80 °F).
Page 51 of 148
 position
6. Completely close the throttle lever and start
the engine by kicking the kickstarter.
7. If the engine is started with the star")
6-2
1
2
3
4
56
7
8
9
10
11
Ambient temp./starter (choke) position
6. Completely close the throttle lever and start
the engine by kicking the kickstarter.
7. If the engine is started with the starter (choke)
in position (1), the starter (choke) should be
returned to position (2) to warm up the engine.
If the engine is started with the starter (choke)
in position (2), keep the starter (choke) in this
position to warm up the engine.
8. Continue warming up the engine until it idlessmoothly, then return the starter (choke) to
position (3) before riding.TIP
�
The engine is warm when it responds quickly to
the throttle with the starter (choke) turned off.
�
When the parking brake is applied, engine
speed is limited to 2300 r/min. Make sure the
parking brake is released before moving the
throttle lever; otherwise, the engine will misfire,
preventing normal operation.NOTICE
ECB00163
For maximum engine life, never accelerate
hard when the engine is cold!
EBU20291
Starting a warm engine
Follow the same procedure as for starting a cold
engine, with the exception that the starter (choke)
is not required when the engine is warm. Instead,
start the engine with the throttle slightly open.
EBU20522
Shifting
This ATV has a 6-speed forward transmission. The
1. Fully open
2. Half open
3. Closed
4. Starter (choke)
0°
30°10°20°30°
50°70°90°°F °C
123
1
234
Page 52 of 148

6-3
1
2
3
4
56
7
8
9
10
11
transmission allows you to control the amount of
power you have available at a given speed or for
starting, accelerating, climbing hills, etc.
To shift into neutral, release the throttle lever, ap-
ply the clutch, and then repeatedly depress the
shift pedal until it stops.
When it stops, it will be in first gear. Raise the pedal
slightly to reach the neutral position, and then re-
lease the clutch.
EBU20592
To start out and accelerate
1. Release the throttle lever, apply the front orrear brake, and then release the parking
brake.NOTICE
ECB00200
Always close the throttle before shifting gears,
otherwise damage to the engine and drive train
may result.
2. Pull the clutch lever to disengage the clutch.
3. Shift into first gear, and then release the
brake.
4. Open the throttle gradually and at the same
time, release the clutch lever slowly.
WARNING! Opening the throttle abruptly
or releasing the clutch lever too quickly
could make the ATV wheelie, which would
increase the chance of an accident, includ-
ing an overturn.
[EWB00731]
5. Once the ATV has attained adequate speed,
release the throttle, and at the same time,
quickly pull in the clutch lever.
6. Shift the transmission into second gear.
(Make sure not to shift the transmission into
neutral.)
7. Open the throttle part way and gradually re-
lease the clutch lever.
8. Follow the same procedure when shifting to
1. Shift pedal
2. Neutral position
6
5
4
1 2 3
1
2