2011 SUBARU IMPREZA WRX STI buttons
[x] Cancel search: buttonsPage 20 of 459
Black plate (18,1)
北米Model "A1110BE-C" EDITED: 2010/ 12/ 17
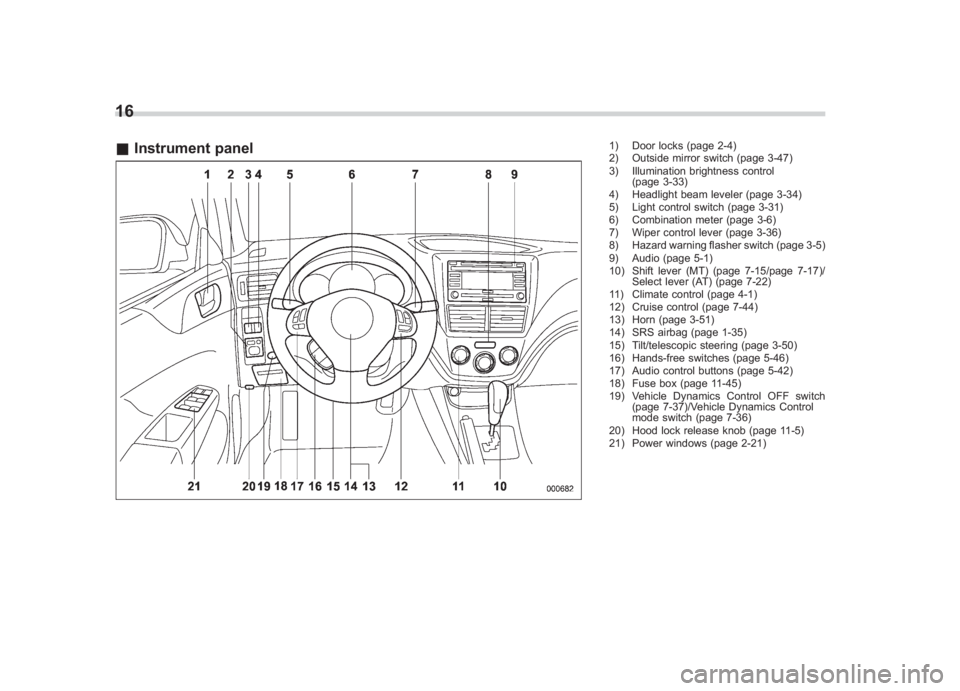
16& Instrument panel
1) Door locks (page 2-4)
2) Outside mirror switch (page 3-47)
3) Illumination brightness control
(page 3-33)
4) Headlight beam leveler (page 3-34)
5) Light control switch (page 3-31)
6) Combination meter (page 3-6)
7) Wiper control lever (page 3-36)
8) Hazard warning flasher switch (page 3-5)
9) Audio (page 5-1)
10) Shift lever (MT) (page 7-15/page 7-17)/ Select lever (AT) (page 7-22)
11) Climate control (page 4-1)
12) Cruise control (page 7-44)
13) Horn (page 3-51)
14) SRS airbag (page 1-35)
15) Tilt/telescopic steering (page 3-50)
16) Hands-free switches (page 5-46)
17) Audio control buttons (page 5-42)
18) Fuse box (page 11-45)
19) Vehicle Dynamics Control OFF switch (page 7-37)/Vehicle Dynamics Control
mode switch (page 7-36)
20) Hood lock release knob (page 11-5)
21) Power windows (page 2-21)
Page 98 of 459
Black plate (98,1)
北米Model "A1110BE-C" EDITED: 2010/ 12/ 17
2-8
Keys and doors
Remote keyless entry system
CAUTION
. Do not expose the remote trans-
mitter to severe shocks, such as
those experienced as a result of
dropping or throwing.
. Do not take the remote transmit-
ter apart except when replacing
the battery.
. Do not get the remote transmitter
wet. If it gets wet, wipe it dry with
a cloth immediately.
. When you carry the remote trans-
mitter on an airplane, do not
press the button of the remote
transmitter while in the airplane.
When any button of the remote
transmitter is pressed, radio
waves are sent and may affect
the operation of the airplane.
When you carry the remote trans-
mitter in a bag on an airplane,
take measures to prevent the
buttons of the remote transmitter
from being pressed.
. FCC WARNING
Changes or modifications not
expressly approved by the party responsible for compliance
could void the user
’s authority
to operate the equipment.
This device complies with Part 15 of
the FCC Rules and RSS-Gen of IC
Rules. Operation is subject to the
following two conditions: (1) this de-
vice may not cause harmful interfer-
ence, and (2) this device must accept
any interference received, including
interference that may cause undesired
operation.
Two transmitters are provided for your
vehicle.
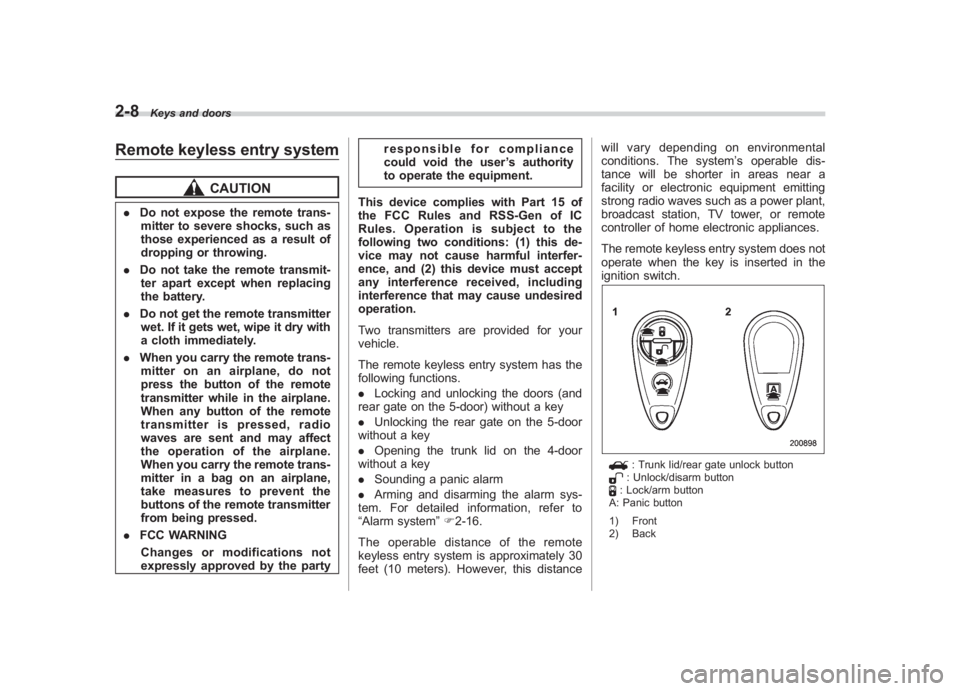
The remote keyless entry system has the
following functions.
. Locking and unlocking the doors (and
rear gate on the 5-door) without a key
. Unlocking the rear gate on the 5-door
without a key
. Opening the trunk lid on the 4-door
without a key
. Sounding a panic alarm
. Arming and disarming the alarm sys-
tem. For detailed information, refer to
“Alarm system ”F 2-16.
The operable distance of the remote
keyless entry system is approximately 30
feet (10 meters). However, this distance will vary depending on environmental
conditions. The system
’s operable dis-
tance will be shorter in areas near a
facility or electronic equipment emitting
strong radio waves such as a power plant,
broadcast station, TV tower, or remote
controller of home electronic appliances.
The remote keyless entry system does not
operate when the key is inserted in the
ignition switch.
: Trunk lid/rear gate unlock button: Unlock/disarm button: Lock/arm button
A: Panic button
1) Front
2) Back
Page 163 of 459
Black plate (165,1)
北米Model "A1110BE-C" EDITED: 2010/ 12/ 17
! Compass calibration
1. If a “C”is displayed in the compass
window, the compass needs to be cali-
brated.
2. Drive the vehicle in a circle at 5 mph (8
km/h) or less until the display reads a
direction.
3. You can also calibrate the compass by
driving your vehicle on your everyday
routine. The compass will be calibrated
once it has tracked a complete circle.
4. To recalibrate your compass, push and
hold the compass display button for 9
seconds until a “C ” appears in the
compass window.
5. Calibrate the compass according to
step 2 or step 3.
! HomeLink
®Wireless Control Sys-
tem
The HomeLink®Wireless Control System
can be used to activate remote control
devices such as gate operators, garage
door openers, door locks, home lighting
and security systems.
There are three HomeLink
®buttons on the
mirror, each of which can be programmed
for operation of one desired device. For
details on the device types which can be
operated by this system, consult the
HomeLink
®website at: www.homelink.com or call 1-800-355-
3515.
Note the following information about this
system.
Ifyourvehicleisequippedwiththe
HomeLink
®Wireless Control System, it
complies with Part 15 of the Federal
Communications Commission Rules in
the U.S. and the RSS-210 of Industry
Canada in Canada. Its operation is subject
to the following two conditions:
(1) this device may not cause harmful
interference, and (2) this device must
accept any interference received, includ-
ing interference that may cause undesired
operation.
Changes and modifications to this system
by anyone other than an authorized
service facility could void authorization to
use this equipment.
HomeLink®and the HomeLink
®house are
registered trademarks of Johnson Con-
trols, Inc.
WARNING
. When programming the
HomeLink
®Wireless Control Sys-
tem, you may be operating a
garage door opener or other
device. Make sure that people and objects are out of the way of
the garage door or other device
to prevent potential harm or
damage.
. Do not use the HomeLink
®Wire-
less Control System with a gar-
age door opener that lacks the
safety stop and reverse feature
as required by applicable safety
standards. A garage door opener
which cannot detect an object,
signaling the door to stop and
reverse, does not meet these
safety standards. Using a garage
door opener without these fea-
tures increases risk of serious
injury or death. For more infor-
mation, consult the HomeLink
®
website at www.homelink.com or
call 1-800-355-3515.
CAUTION
When programming the HomeLink
®
Wireless Control System to operate
a garage door opener or an entrance
gate, unplug the device’ s motor
from the outlet during programming
to prevent motor burnout.
Instruments and controls
3-43
– CONTINUED –
3
Page 164 of 459
Black plate (166,1)
北米Model "A1110BE-C" EDITED: 2010/ 12/ 17
3-44
Instruments and controls
NOTE. After programming your HomeLink
®
Wireless Control System for the de-
sired devices, retain the hand-held
transmitters for further programming
or device testing in the event of a
problem.
.It is recommended that you insert a
new battery in the hand-held transmit-
ter of a device to ensure correct
programming.
! Garage door opener programming in
the U.S.A.NOTEWhen programming the HomeLink
®
Wireless Control System for a garage
door opener, it is suggested that you
park the vehicle outside the garage.
1. Unplug the motor of the garage door
opener from the outlet.NOTEIf any of the HomeLink
®buttons are
already programmed for other devices,
skip step 2 because it clears the
memory of all three buttons.
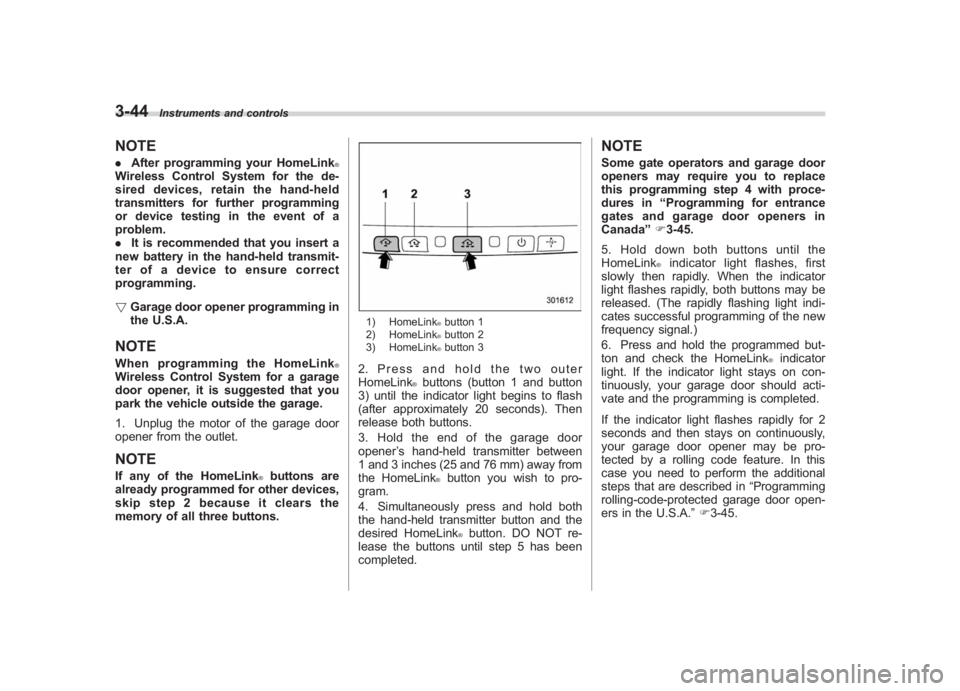
1) HomeLink
®button 1
2) HomeLink®button 2
3) HomeLink®button 3
2. Press and hold the two outer
HomeLink
®buttons (button 1 and button
3) until the indicator light begins to flash
(after approximately 20 seconds). Then
release both buttons.
3. Hold the end of the garage door
opener ’s hand-held transmitter between
1 and 3 inches (25 and 76 mm) away from
the HomeLink®button you wish to pro-
gram.
4. Simultaneously press and hold both
the hand-held transmitter button and the
desired HomeLink®button. DO NOT re-
lease the buttons until step 5 has been
completed.
NOTESome gate operators and garage door
openers may require you to replace
this programming step 4 with proce-
dures in “Programming for entrance
gates and garage door openers in
Canada ”F 3-45.
5. Hold down both buttons until the
HomeLink
®indicator light flashes, first
slowly then rapidly. When the indicator
light flashes rapidly, both buttons may be
released. (The rapidly flashing light indi-
cates successful programming of the new
frequency signal.)
6. Press and hold the programmed but-
ton and check the HomeLink
®indicator
light. If the indicator light stays on con-
tinuously, your garage door should acti-
vate and the programming is completed.
If the indicator light flashes rapidly for 2
seconds and then stays on continuously,
your garage door opener may be pro-
tected by a rolling code feature. In this
case you need to perform the additional
steps that are described in “Programming
rolling-code-protected garage door open-
ers in the U.S.A. ”F 3-45.
Page 165 of 459
Black plate (167,1)
北米Model "A1110BE-C" EDITED: 2010/ 12/ 17
! Programming rolling-code-protected
garage door openers in the U.S.A.
If your garage door opener has a rolling
code feature, program the HomeLink
®
Wireless Control System for it by following
steps 1 through 5 in “Garage door opener
programming in the U.S.A. ”F 3-44. Then
continue with the following steps.NOTEThe assistance of a second person
may make the programming quicker
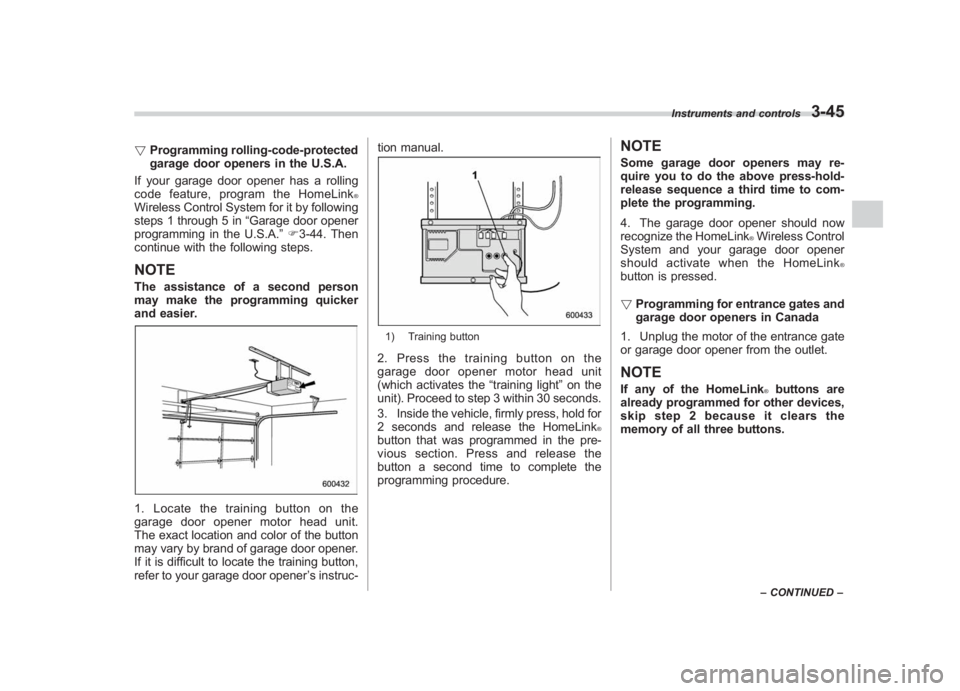
and easier.1. Locate the training button on the
garage door opener motor head unit.
The exact location and color of the button
may vary by brand of garage door opener.
If it is difficult to locate the training button,
refer to your garage door opener ’s instruc- tion manual.
1) Training button2. Press the training button on the
garage door opener motor head unit
(which activates the
“training light”on the
unit). Proceed to step 3 within 30 seconds.
3. Inside the vehicle, firmly press, hold for
2 seconds and release the HomeLink
®
button that was programmed in the pre-
vious section. Press and release the
button a second time to complete the
programming procedure.
NOTESome garage door openers may re-
quire you to do the above press-hold-
release sequence a third time to com-
plete the programming.
4. The garage door opener should now
recognize the HomeLink
®Wireless Control
System and your garage door opener
should activate when the HomeLink
®
button is pressed.
! Programming for entrance gates and
garage door openers in Canada
1. Unplug the motor of the entrance gate
or garage door opener from the outlet.NOTEIf any of the HomeLink
®buttons are
already programmed for other devices,
skip step 2 because it clears the
memory of all three buttons.
Instruments and controls
3-45
– CONTINUED –
3
Page 166 of 459
Black plate (168,1)
北米Model "A1110BE-C" EDITED: 2010/ 12/ 17
3-46
Instruments and controls
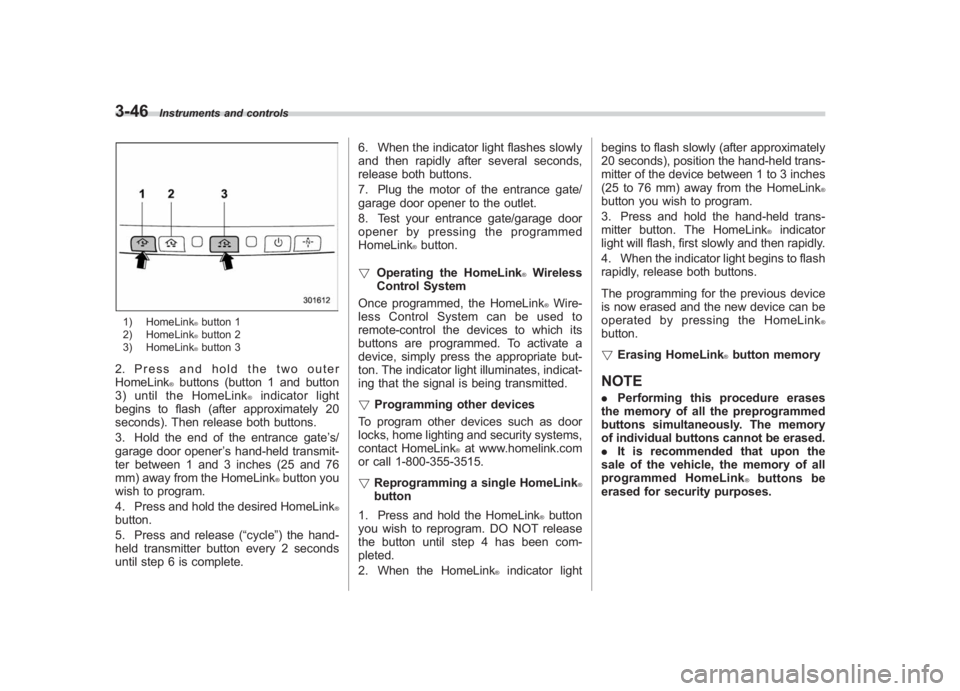
1) HomeLink
®button 1
2) HomeLink®button 2
3) HomeLink®button 3
2. Press and hold the two outer
HomeLink
®buttons (button 1 and button
3) until the HomeLink
®indicator light
begins to flash (after approximately 20
seconds). Then release both buttons.
3. Hold the end of the entrance gate ’s/
garage door opener ’s hand-held transmit-
ter between 1 and 3 inches (25 and 76
mm) away from the HomeLink
®button you
wish to program.
4. Press and hold the desired HomeLink
®
button.
5. Press and release ( “cycle”) the hand-
held transmitter button every 2 seconds
until step 6 is complete. 6. When the indicator light flashes slowly
and then rapidly after several seconds,
release both buttons.
7. Plug the motor of the entrance gate/
garage door opener to the outlet.
8. Test your entrance gate/garage door
opener by pressing the programmed
HomeLink
®button.
! Operating the HomeLink
®Wireless
Control System
Once programmed, the HomeLink®Wire-
less Control System can be used to
remote-control the devices to which its
buttons are programmed. To activate a
device, simply press the appropriate but-
ton. The indicator light illuminates, indicat-
ing that the signal is being transmitted.
! Programming other devices
To program other devices such as door
locks, home lighting and security systems,
contact HomeLink
®at www.homelink.com
or call 1-800-355-3515.
! Reprogramming a single HomeLink
®
button
1. Press and hold the HomeLink
®button
you wish to reprogram. DO NOT release
the button until step 4 has been com-
pleted.
2. When the HomeLink
®indicator light begins to flash slowly (after approximately
20 seconds), position the hand-held trans-
mitter of the device between 1 to 3 inches
(25 to 76 mm) away from the HomeLink
®
button you wish to program.
3. Press and hold the hand-held trans-
mitter button. The HomeLink
®indicator
light will flash, first slowly and then rapidly.
4. When the indicator light begins to flash
rapidly, release both buttons.
The programming for the previous device
is now erased and the new device can be
operated by pressing the HomeLink
®
button.
! Erasing HomeLink
®button memory
NOTE. Performing this procedure erases
the memory of all the preprogrammed
buttons simultaneously. The memory
of individual buttons cannot be erased.
. It is recommended that upon the
sale of the vehicle, the memory of all
programmed HomeLink
®buttons be
erased for security purposes.
Page 167 of 459
Black plate (169,1)
北米Model "A1110BE-C" EDITED: 2010/ 12/ 17
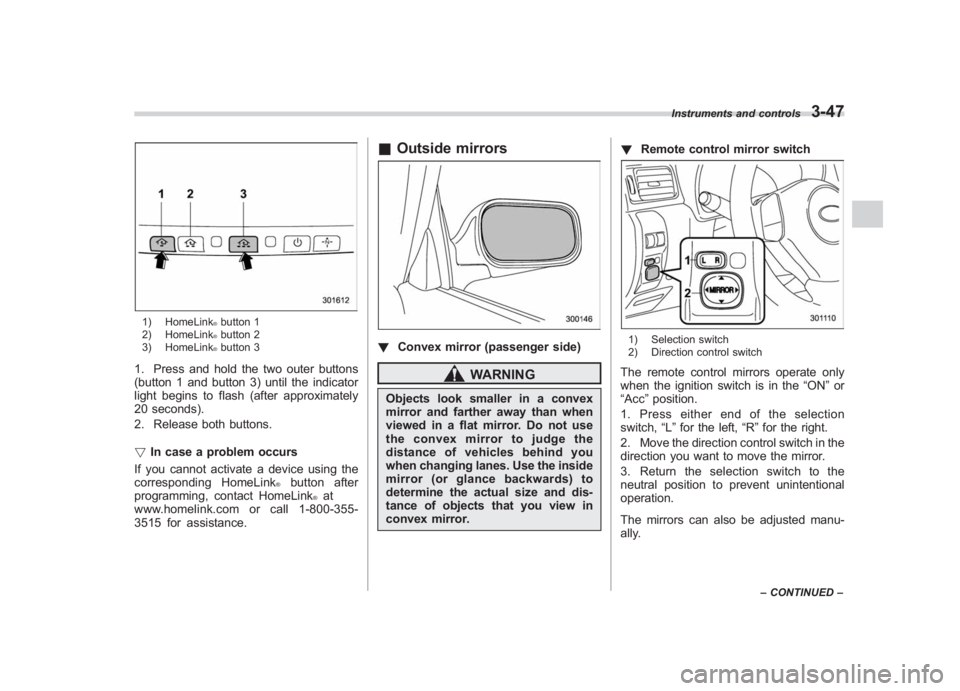
1) HomeLink
®button 1
2) HomeLink®button 2
3) HomeLink®button 3
1. Press and hold the two outer buttons
(button 1 and button 3) until the indicator
light begins to flash (after approximately
20 seconds).
2. Release both buttons.
! In case a problem occurs
If you cannot activate a device using the
corresponding HomeLink
®
button after
programming, contact HomeLink
®at
www.homelink.com or call 1-800-355-
3515 for assistance.
& Outside mirrors! Convex mirror (passenger side)
WARNING
Objects look smaller in a convex
mirror and farther away than when
viewed in a flat mirror. Do not use
the convex mirror to judge the
distance of vehicles behind you
when changing lanes. Use the inside
mirror (or glance backwards) to
determine the actual size and dis-
tance of objects that you view in
convex mirror. !
Remote control mirror switch
1) Selection switch
2) Direction control switchThe remote control mirrors operate only
when the ignition switch is in the “ON”or
“Acc ”position.
1. Press either end of the selection
switch, “L”for the left, “R”for the right.
2. Move the direction control switch in the
direction you want to move the mirror.
3. Return the selection switch to the
neutral position to prevent unintentional
operation.
The mirrors can also be adjusted manu-
ally.
Instruments and controls
3-47
– CONTINUED –
3
Page 180 of 459
Black plate (182,1)
北米Model "A1110BE-C" EDITED: 2010/ 12/ 17
4-8
Climate control
Automatic climate control
system (if equipped)Although this climate control system can
be used as a full-automatic climate control
system, it can also, if desired, be used as
a semi-automatic climate control system.
When it is used as a full-automatic climate
control system, the outlet air temperature,
fan speed, airflow distribution, air inlet
control, and air conditioner compressor
operation are all automatically controlled
to maintain a constant, comfortable tem-
perature inside the vehicle.NOTE. Operate the automatic climate con-
trol system when the engine is running.
. When the engine coolant is cold, the
blower does not run.
. In the “AUTO ”mode, when the air
temperature in the passenger compart-
ment is sufficiently cool, the air condi-
tioner compressor does not operate.
For efficient defogging or dehumidify-
ing in cold weather, press the “A/C ”
button to operate the air conditioner
compressor.
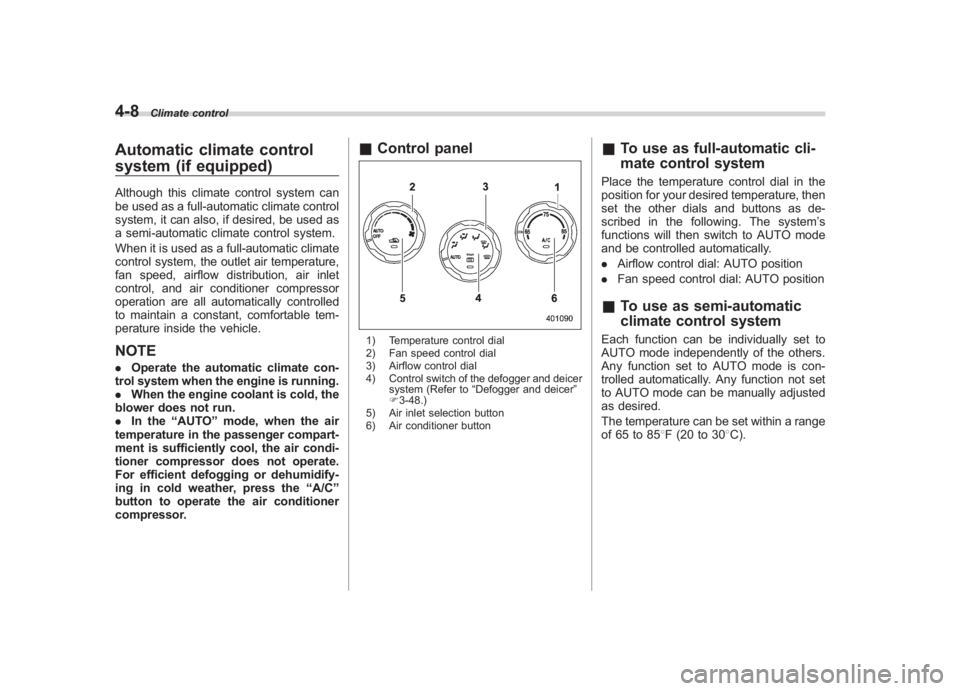
& Control panel1) Temperature control dial
2) Fan speed control dial
3) Airflow control dial
4) Control switch of the defogger and deicer
system (Refer to “Defogger and deicer ”
F 3-48.)
5) Air inlet selection button
6) Air conditioner button
& To use as full-automatic cli-
mate control systemPlace the temperature control dial in the
position for your desired temperature, then
set the other dials and buttons as de-
scribed in the following. The system ’s
functions will then switch to AUTO mode
and be controlled automatically.
. Airflow control dial: AUTO position
. Fan speed control dial: AUTO position&To use as semi-automatic
climate control systemEach function can be individually set to
AUTO mode independently of the others.
Any function set to AUTO mode is con-
trolled automatically. Any function not set
to AUTO mode can be manually adjusted
as desired.
The temperature can be set within a range
of 65 to 85 8F (20 to 30 8C).