Page 57 of 112

56Navigation
Selecting stored destinations
Fig. 52 List of the auto-
matically stored last des-
tinations.
Fig. 53 List of destina-
tions stored manually in
the destination memory.
You can start route guidance to the stored Home address
or to an automati-
cally or manually stored destination. Starting route guidance to the stored home address
●
Press the Home addr.
function button to start route guidance to a previ-
ously stored home address.
Save and edit home address ⇒ page 60.
Start route guidance to stored destination
Destinations for which route guidance has been started are automatically
stored in the Last destinations list ⇒ fig. 52.
Manually stored destinations are stored in the Destination memory
⇒ page 60.
● Open the Navigation main menu.
● Press the function button
Last destins.
or Destin. memory.
● Select a destination in the list by turning the setting knob ⇒ fig. 2 10
and press to start route guidance
⇒ page 13.
● Alternatively: Browse the list by dragging the scroll marker on the
screen and start route guidance by pressing on the destination ⇒ page 10.
To display a destination in the destination window, mark the destination in
the list view and press the Details
function button.
The destination displayed in the destination window can still be altered be-
fore route guidance is started ⇒ page 55, Destination window.
Page 58 of 112

57
Navigation
Selecting a petrol station or car park
Fig. 54 List of the near-
est car parks.
Fig. 55 Detailed view of
car park.
● Open the Navigation main menu.
● Press the function button
Petrol station
or P Car park to display a list
of petrol stations or car parks near to your current location ⇒ fig. 54. ●
During the search, the Cancel
function button is displayed on screen.
Press to stop the search.
● Select a destination in the list by turning the setting knob ⇒ fig. 2 10
and press to start route guidance
⇒ page 13.
● Alternatively: Browse the list by dragging the scroll marker on the
screen and select a destination to start route guidance ⇒ page 10.
● Press the Details
function button ⇒
fig. 55. Press the Start function but-
ton in the detailed view to start route guidance.
● In the list view or detailed view, press the Store
function button to store
the marked or displayed address in the Destination memory ⇒ page 61.
Note
The distances and directions for points of interest refer to the route as the
crow flies.
Page 59 of 112
.
Defining the search area")
58Navigation
Selecting a point of interest as a destination
Fig. 56 Setting a loca-
tion as the search area
centre.
Fig. 57 List of points of
interest found (keyword:
SEE).
Defining the search area
The search area covers a radius of roughly 75 km from the chosen “search
area centre”. ●
Open the Navigation main menu.
● Select the
Point of interest
function button.
● Press the City function button in the pop-up window, select a town as
the search area centre ⇒ page 54 and press the Find function button
⇒ fig. 56.
● ALTERNATIVELY: Press the Here
function button in the pop-up window to
set the current vehicle position as the search area centre.
The POI search input window opens.
POI search: Entering a keyword
A keyword is a word or a combination of digits and letters that occurs in the
name or the detailed information of the desired point of interest.
A keyword may be the known part of a name, e.g. “Lakeside”.
Starting from the search area centre, the unit searches for points of interest
which contain the keyword in their name or address. Possible results for the
keyword “Lakeside” would be, for example, “Lakeside Hotel” or points of in-
terest on “Lakeside” Avenue.
The POI search input window allows free text input ⇒ page 52. Correct spell-
ing is therefore important!
Starting the search
● When you have entered the keyword, press the Find
function button.
● The search radius is displayed and gradually enlarged. When several
matching points of interest are found, the display switches straight to the
list view.
The search ends automatically when it has covered a radius of roughly 100
kilometres from the defined search area centre.
A message appears to inform the user if no matching point of interest was
found.
To stop the search for a Point of Interest, press the Cancel
function button.
Page 60 of 112
59
Navigation
Selecting a point of interest from the list
● Select a destination in the list by turning the setting knob ⇒ fig. 2 10
and press to start route guidance
⇒ page 13.
● Alternatively: Browse the list by dragging the scroll marker on the
screen and select a destination to start route guidance ⇒ page 10.
● Press the Details
function button. Press the Start function button in the
detailed view to start route guidance.
● In the list view or detailed view, press the Store
function button to store
the marked or displayed address in the Destination memory ⇒ page 61.
Note
The distances and directions for points of interest refer to the route as the
crow flies.
Page 61 of 112

60Navigation
Destination memory
Introduction
The destination memory is used to store navigation destinations manually.
The function buttons for storing a destination are only enabled when the
destination has been sufficiently defined.
Destinations saved in the memory can be edited or used to navigate to the
destination.
Additional Information:
● Safety notes ⇒ page 6
● Unit overview ⇒ page 8
● Introduction to navigation ⇒ page 48
● Entering a destination ⇒ page 54 Automatically stored last destinations
Fig. 58 List of recent
destinations.
Up to 50 destinations for which route guidance has been started are auto-
matically stored in the Last destinations list ⇒ fig. 58.
Old last destinations are automatically overwritten by new destinations
when the list is full. To permanently retain one of the last destinations, it
must be stored in the Destination memory.
● In the list of last destinations, mark the destination you wish to store
⇒ fig. 58.
● Press the Store
function button and store the destination ⇒ page 61.
Page 62 of 112
61
Navigation
Storing destinations manually
Fig. 59 Input window for
assigning your own entry
name.
When the Store
function button is displayed, the destination currently
shown can be stored in the destination memory.
● Pressing the Store
function button opens an input window where you
can assign an entry name ⇒ fig. 59.
● If you wish to assign a name of your own, first press the Delete
function
button and then enter your own chosen name for the destination
⇒ page 52.
● Press OK
to store the destination under the currently displayed name in
the Destination memory. Editing or deleting destinations in the destination memory
Fig. 60 Destination
memory with manually
stored destinations.
Fig. 61 Destination win-
dow showing a destina-
tion from the destination
memory.
● Open the Navigation main menu.
● Press the
Destination memory function button to open the list of man-
ually stored destinations ⇒ fig. 60.
Page 63 of 112

62Navigation
● Select a destination by turning the setting knob ⇒ fig. 2 10
.
● Press the Details function button.
The destination is opened in the destination window ⇒ fig. 61.
● Pressing the Start
function button starts route guidance to the displayed
destination.
● Pressing the Delete
function button deletes the destination from the
Destination memory.
● Destination items ( Street, Town/PC etc.) can be opened and edited indi-
vidually in the destination window ⇒ page 55.
● Press the Name
function button to change the displayed entry name
⇒ page 52.
When destination data have been altered, the Delete
function button
changes to Store to allow you to store the changes.
If a flagged destination is displayed in the destination window ⇒ page 63.
Deleting the Destination memory ● Press the SETUP
unit button from any navigation menu to open the
Navi-
gation setup menu.
● Press the Delete destination memory
function button and select the destina-
tions to be deleted in the next menu.
● Press All destinations
to delete all destinations in the
destination memory
and Last destinations .
● ALTERNATIVELY: press Last destinations
to delete all destinations in the
list of Last destinations .
● Alternatively: press the unit button
to close the window without
making any changes. Displaying the information window and storing a flagged
destination
Fig. 62 Information win-
dow with detailed view of
the current position.
Opening the information window for the current vehicle position
● From any navigation menu (except the Navigation setup menu), press
the
unit button to open the
Details information window ⇒ fig. 62.
If no route guidance is active, the current vehicle position is displayed in
the information window ⇒ fig. 62.
During route guidance, the final destination is displayed in the information
window ⇒ page 65.
● Turn the setting knob ⇒ fig. 2 10
in the Details information window to
display all available information on the current vehicle position:
DisplayMeaningLocation:Vehicle position determined by means of GPS
data and navigation data
Latitude:LatitudeLongitude:Longitude
Page 64 of 112

63
Navigation
DisplayMeaningAltitude:Height above mean sea level.GPS status:Display of technical GPS informationUseable satellites:The number determines the GPS statusSatellites tracked:The number determines the GPS status
Storing a flagged destination
● Pressing the Flag dest. function button stores the displayed position as a
Flagged destination in the Destination memory ⇒ fig. 62.
To permanently retain the position stored as a Flagged destination, it must
be renamed in the Destination memory. Otherwise the stored position will be overwritten the next time a flagged destination is stored.
● Select the flagged destination in the Destination memory ⇒ fig. 60.
● Press the Details
function button.
The flagged destination can be renamed. Storing or editing the home addressFig. 63 Navigation main
menu.
Fig. 64 Destination win-
dow with the home ad-
dress.
Only one address or position can be stored as the home address at any one
time. The stored home address can be edited or overwritten.
 1
1 2
2 3
3 4
4 5
5 6
6 7
7 8
8 9
9 10
10 11
11 12
12 13
13 14
14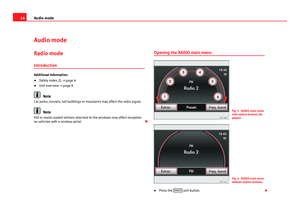 15
15 16
16 17
17 18
18 19
19 20
20 21
21 22
22 23
23 24
24 25
25 26
26 27
27 28
28 29
29 30
30 31
31 32
32 33
33 34
34 35
35 36
36 37
37 38
38 39
39 40
40 41
41 42
42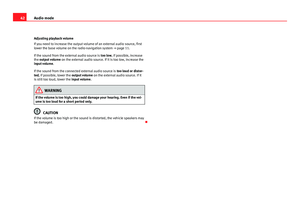 43
43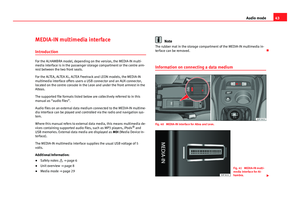 44
44 45
45 46
46 47
47 48
48 49
49 50
50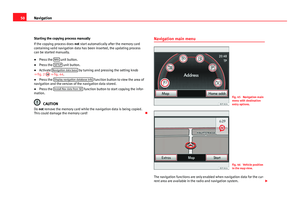 51
51 52
52 53
53 54
54 55
55 56
56 57
57 58
58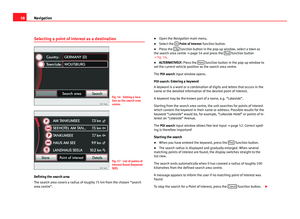 59
59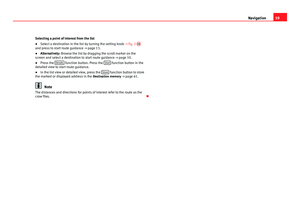 60
60 61
61 62
62 63
63 64
64 65
65 66
66 67
67 68
68 69
69 70
70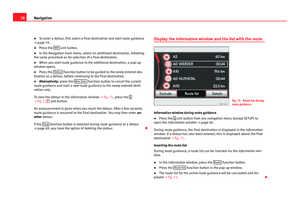 71
71 72
72 73
73 74
74 75
75 76
76 77
77 78
78 79
79 80
80 81
81 82
82 83
83 84
84 85
85 86
86 87
87 88
88 89
89 90
90 91
91 92
92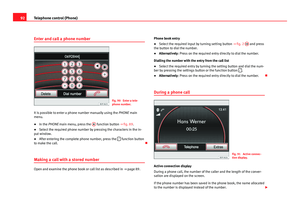 93
93 94
94 95
95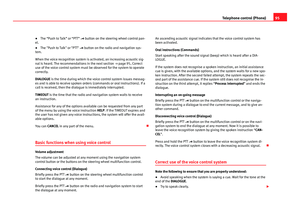 96
96 97
97 98
98 99
99 100
100 101
101 102
102 103
103 104
104 105
105 106
106 107
107 108
108 109
109 110
110 111
111
