2011 Seat Ibiza SC bonnet
[x] Cancel search: bonnetPage 53 of 278

51
Cockpit
Operating Instructions Cockpit
Overview Overview of the dash panel
This overview will help you to familiarise yourself with the
controls and displays. Door release lever
Light switch . . . . . . . . . . . . . . . . . . . . . . . . . . . . . . . . . . . . . . . . . . . . . . . 94
Light dimmer for instrument panel lighting* . . . . . . . . . . . . . . . .96
Headlight range control* . . . . . . . . . . . . . . . . . . . . . . . . . . . . . . . . . . 96
Air vents
Turn signal and dipped beam lever and cruise control sys-
tem* . . . . . . . . . . . . . . . . . . . . . . . . . . . . . . . . . . . . . . . . . . . . . . . . . . . . . 100, 157
Instrument panel and warning lamps:
– Instruments . . . . . . . . . . . . . . . . . . . . . . . . . . . . . . . . . . . . . . . . . . . . 53
– Indicator lamps . . . . . . . . . . . . . . . . . . . . . . . . . . . . . . . . . . . . . . . . . 61
Horn (only works when the ignition is on)/ and driver
front airbag* . . . . . . . . . . . . . . . . . . . . . . . . . . . . . . . . . . . . . . . . . . . . . . 29
Steering and starter lock . . . . . . . . . . . . . . . . . . . . . . . . . . . . . . . . . . 136
Windscreen wash-wipe / rear window wash-wipe lever* and
operation of the multifunction display* . . . . . . . . . . . . . . . . . . . . .103, 57
Radio
Glove compartment/Storage compartment . . . . . . . . . . . . . . . . .117
Passenger airbag* . . . . . . . . . . . . . . . . . . . . . . . . . . . . . . . . . . . . . . . . 33
1
23456
7
8
910
111213
Switches for:
–
Heating and ventilation . . . . . . . . . . . . . . . . . . . . . . . . . . . . . . . . . 125
– Air conditioning* . . . . . . . . . . . . . . . . . . . . . . . . . . . . . . . . . . . . . . . 128
– Climatronic* . . . . . . . . . . . . . . . . . . . . . . . . . . . . . . . . . . . . . . . . . . . . 131
Cigarette lighter / Power socket . . . . . . . . . . . . . . . . . . . . . . . . . . . . 120
Cup holder/Ashtray . . . . . . . . . . . . . . . . . . . . . . . . . . . . . . . . . . . . . . . 119
Controls on the centre console:
– Hazard warning lights . . . . . . . . . . . . . . . . . . . . . . . . . . . . . . . . . . 99
– Airbag disconnection warning light* . . . . . . . . . . . . . . . . . . . . .30
– ESP . . . . . . . . . . . . . . . . . . . . . . . . . . . . . . . . . . . . . . . . . . . . . . . . . . . . 163
– Tyre pressure monitoring* . . . . . . . . . . . . . . . . . . . . . . . . . . . . . . . 70
– Heated rear window . . . . . . . . . . . . . . . . . . . . . . . . . . . . . . . . . . . . 98
– Heated seats* . . . . . . . . . . . . . . . . . . . . . . . . . . . . . . . . . . . . . . . . . . 114
– Central locking* . . . . . . . . . . . . . . . . . . . . . . . . . . . . . . . . . . . . . . . . 80
– AUX connection . . . . . . . . . . . . . . . . . . . . . . . . . . . . . . . . . . . . . . . . 122
Handbrake lever . . . . . . . . . . . . . . . . . . . . . . . . . . . . . . . . . . . . . . . . . . 152
Automatic*/manual gear lever / . . . . . . . . . . . . . . . . . . . . . . . . . . .145, 144
Storage space
Pedals . . . . . . . . . . . . . . . . . . . . . . . . . . . . . . . . . . . . . . . . . . . . . . . . . . . . 16
Steering column control lever* . . . . . . . . . . . . . . . . . . . . . . . . . . . . . 135
Bonnet release lever . . . . . . . . . . . . . . . . . . . . . . . . . . . . . . . . . . . . . . 195
Steering column controls for audio and telephone* . . . . . . . . .74
Fuse housing . . . . . . . . . . . . . . . . . . . . . . . . . . . . . . . . . . . . . . . . . . . . . 223
14
151617
1819202122232425
Safety FirstOperating InstructionsPractical TipsTechnical Specifications
Page 65 of 278

63
Cockpit
ItemSymbolMeaning of warning and indicator
lampsFurther infor-mation
Turn signals in operation⇒ page 73
SAFEElectronic immobiliser⇒ page 73
⇒ page 77
WARNING
● Failure to observe warning lamps and warning messages can result in
serious personal injuries or damage to your vehicle.
● The risk of an accident increases if your vehicle breaks down. Use a
warning triangle to draw the attention of other road users in order to pre-
vent danger to third parties.
● The engine compartment is a dangerous area! Before you open the
bonnet to work on the engine or in the engine compartment, you must
switch the engine off and allow it to cool to reduce the risk of scalding or
other injuries. Read and observe the relevant warnings ⇒ page 193.
Note
● The appropriate warning lamp for a fault will light up in vehicles without
warning or information messages in the display.
● In vehicles with warning or information texts on the screen, the appro-
priate warning lamp for a fault will light up and a warning or information
message will also appear on the screen.
Safety FirstOperating InstructionsPractical TipsTechnical Specifications
Page 66 of 278
64Cockpit
Overview of indicator and warning lamps (vehicles with
LPG)
The warning lamps indicate a number of different functions
and possible faults.
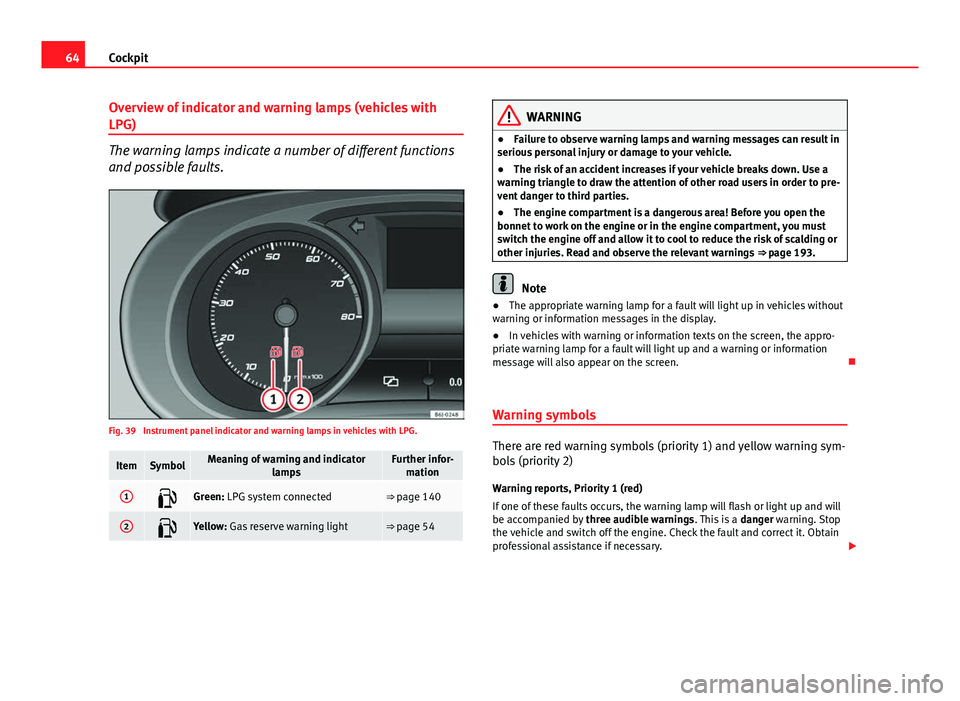
Fig. 39 Instrument panel indicator and warning lamps in vehicles with LPG.
ItemSymbolMeaning of warning and indicator
lampsFurther infor-mation
1Green: LPG system connected⇒ page 140
2Yellow: Gas reserve warning light⇒ page 54
WARNING
● Failure to observe warning lamps and warning messages can result in
serious personal injury or damage to your vehicle.
● The risk of an accident increases if your vehicle breaks down. Use a
warning triangle to draw the attention of other road users in order to pre-
vent danger to third parties.
● The engine compartment is a dangerous area! Before you open the
bonnet to work on the engine or in the engine compartment, you must
switch the engine off and allow it to cool to reduce the risk of scalding or
other injuries. Read and observe the relevant warnings ⇒ page 193.
Note
● The appropriate warning lamp for a fault will light up in vehicles without
warning or information messages in the display.
● In vehicles with warning or information texts on the screen, the appro-
priate warning lamp for a fault will light up and a warning or information
message will also appear on the screen.
Warning symbols
There are red warning symbols (priority 1) and yellow warning sym-
bols (priority 2) Warning reports, Priority 1 (red)
If one of these faults occurs, the warning lamp will flash or light up and will
be accompanied by three audible warnings. This is a danger warning. Stop
the vehicle and switch off the engine. Check the fault and correct it. Obtain
professional assistance if necessary.
Page 70 of 278
68Cockpit
There is a fault in the ABS if:
● The warning lamp does not light up when the ignition is switched on.
● The warning lamp does not go out again after a few seconds
● The warning lamp lights up when the vehicle is moving
The vehicle can still be braked in the normal way, without the ABS function.
Take the vehicle to a specialised workshop as soon as possible. For further
information on the ABS go to ⇒ page 162.
If there is a fault in the ABS, the ESP* and the tyre pressure warning lamp
will also light up.
Brake system fault
If the ABS warning lamp lights up together with the brake warning lamp
, this indicates not only a fault in the ABS function, but also a possible
fault in the brake system ⇒
.
WARNING
● Before opening the bonnet, read and observe the warnings on
⇒ page 193, Working in the engine compartment.
● If the brake warning lamp should light up together with the ABS
warning lamp , stop the vehicle immediately and check the brake fluid
level in the reservoir ⇒ page 205, Brake fluid. If the fluid level has drop-
ped below the “MIN” mark you must not drive on. Risk of accident. Ob-
tain technical assistance.
● If the brake fluid level is correct, the fault in the brake system may
have been caused by a failure of the ABS system. This could cause the
rear wheels to lock quickly when you brake. This could cause the rear to
break away. Risk of skidding. Stop the vehicle and seek technical assis-
tance.
Differential lock fault (EDL)*
EDL operates along with the ABS in vehicles equipped with
an Electronic Stability Programme (ESP)*
A malfunction in the EDL is indicated by the ABS warning lamp . Take the
vehicle to a specialised workshop as soon as possible. For further informa-
tion on the EDL see ⇒ page 164, Electronic differential lock (EDL)*.
Traction control system (TCS)* /
The traction control system prevents the driven wheels from
spinning when the vehicle is accelerating
There are two warning lamps for the traction control system: and . Both
warning lamps light up together when the ignition is switched on and
should turn off after approximately 2 seconds. This is the time taken for the
function check.
The lamp has the following function:
● It flashes when the TCS is on, and the vehicle is moving.
If the system is deactivated or if it has any fault, the warning lamp will re-
main lit. It will also come on if a fault should occur in the ABS because the
TCS operates in conjunction with the ABS. For further information, see
⇒ page 161, Brakes
The lamp provides information about the disconnection status of the
system:
● It stays lit when the TCS is disconnected after pressing the TCS OFF
switch.
By pressing again, TCS function is reactivated and the warning lamp switch-
ed off.
Page 74 of 278
72Cockpit
Emission control system*
This warning lamp monitors the exhaust system.
Warning lamp flashes:
When there is misfiring that can damage the catalytic converter. Reduce
speed and drive carefully to the nearest specialised workshop to have the
engine checked.
Warning lamp is lit:
If a fault has developed during driving which has reduced the quality of the
exhaust gas (e.g. lambda probe fault). Reduce speed and drive carefully to
the nearest specialised workshop to have the engine checked.
Coolant level* / temperature
The warning lamp lights up if the coolant temperature is too
high or if the coolant level is too low.
There is a fault if:
● The warning symbol does not go out again after a few seconds.
● The warning lamp lights up or flashes while the vehicle is moving, and
three acoustic warning signals ⇒
are emitted.
This means that either the coolant level is too low or the coolant tempera-
ture is too high.
Coolant temperature too high
If the warning light comes on, stop the vehicle, switch off the engine and
wait for it to cool down. Check the coolant level.
If the coolant level is correct, the overheating may be caused by a malfunc-
tion of the radiator fan. Check the radiator fan fuse and have it replaced if
necessary ⇒ page 223. If the warning lamp lights up again after driving on for a short distance,
stop the vehicle and switch the engine off
. Contact an Authorised Service
Centre or a specialised workshop.
Coolant level too low
If the warning light comes on, stop the vehicle, switch off the engine and
wait for it to cool down . First check the coolant level. If the level of the cool-
ant is below the “MIN” mark, top up with coolant liquid ⇒
.
WARNING
● If your vehicle is immobilised for technical reasons, move it to a safe
distance from traffic. Turn the engine off, turn the hazard lights on and
place the warning triangle.
● Never open the bonnet if you can see or hear steam or coolant escap-
ing from the engine compartment. Risk of scalding. Wait until you can no
longer see or hear escaping steam or coolant.
● The engine compartment is a dangerous area! Before carrying out any
work in the engine compartment, switch off the engine and allow it to
cool down. Always note the corresponding warnings ⇒ page 193.
Alternator
This warning lamp signals a fault in the alternator.
The warning lamp lights up when the ignition is switched on. It should
go out when the engine has started running.
If the warning lamp lights up while driving, the alternator is no longer
charging the battery. You should immediately drive to the nearest special-
ised workshop.
You should avoid using electrical equipment that is not absolutely necessa-
ry because this will drain the battery.
Page 86 of 278
84Unlocking and locking
Anti-theft alarm system*
Description of anti-theft alarm system*
The anti-theft alarm triggers if unauthorised movements are
detected around the vehicle.
The anti-theft alarm makes it more difficult to break into the vehicle or steal
it. The system will initiate acoustic and optical warning signals when your
vehicle is tried to be forced.
The anti-theft alarm system is automatically connected on locking the vehi-
cle. For this, either rotate the key in the locking position or press button
2 on the radio-frequency remote control*. The system is immediately acti-
vated and the turn signal light located on the driver door will flash along
with the turn signals, indicating that the alarm and the locking security sys-
tem (double lock) have been turned on.
If any of the doors or the bonnet are open, they will not be included in the
protection zones of the vehicle when the alarm is connected. If the door or
the bonnet are subsequently closed, they will be automatically included in
the protection areas of the vehicle and the turn signals will flash according-
ly when the doors close.
● The turn signal light will flash twice on opening and deactivating the
alarm..
● The turn signal light will flash once on closing and activating the alarm.
When does the system trigger an alarm?
The system triggers an alarm if the following unauthorised actions are car-
ried out when the car is locked: ●
Opening of vehicle with mechanical key without switching ignition on
within the next 15 seconds
● Opening a door
● Opening the bonnet
● Opening the tailgate
● Ignition switched on with a non-validated key.
● Movements in the driving compartment (vehicles with a volume sensor)
● Towing of the vehicle 1)
● Tilt angle (tow-away protection) 1)
● Undue manipulation of the alarm
● Battery handling
The acoustic signals sound and the turn signals flash for approx. 30 sec-
onds. This may be repeated up to 10 times depending on the country.
Opening all the doors in manual mode
In vehicles without alarm, when opening the driver door manually all the
doors are opened.
How to switch the alarm off
To deactivate the anti-theft alarm, turn the key to the opening direction,
open the door and switch the ignition on, or press the unlocking button
on the remote control.
In vehicles equipped with an anti-theft alarm system, you have 15 seconds
to insert the key in the ignition lock and activate the ignition if the vehicle is
opened using the driver door key.
Otherwise, the alarm will trigger for 30 sec. and the ignition will be blocked.
1)
With vehicles fitted with a tow-away protection
Page 106 of 278
104Lights and visibility
short intervals. Four wiper interval stages can be set using
switch A
.
Slow wipe
– Move the lever up to position 2
.
Continuous wipe
– Move the lever up to position 3
.
Short wipe
– Move the lever down to position 4
to give the windscreen a
short wipe.
Wash and wipe automatic system
– Pull the lever towards the steering wheel - Position 5
, the
windscreen washer is activated.
– Release the lever. The wipers-washers will keep running for ap-
proximately four seconds.
WARNING
● Worn and dirty wiper blades reduce visibility and safety levels while
driving.
● In cold conditions, you should not use the wash / wipe system unless
you have warmed the windscreen with the heating and ventilation sys-
tem. The washer fluid could otherwise freeze on the windscreen and ob-
scure your view of the road.
● Always note the corresponding warnings on ⇒ page 203.
CAUTION
In icy conditions, always check that the wiper blades are not frozen to the
glass before using the wipers for the first time. If you switch on the wipers
when the wiper blades are frozen to the windscreen, you could damage
both the wiper blades and the wiper motor.
Note
● The windscreen wipers will only work when the ignition is switched on.
● The heat output of the heated jets* is controlled automatically when the
ignition is switched on, depending upon the outside temperature.
● In certain versions of vehicles with alarms, the windscreen wiper will on-
ly work in interval/rain sensor mode when the ignition is on and the bonnet
closed.
● When the interval wipe function is on, the intervals are directly propor-
tional to the speed. This way, the higher the vehicle speed the shorter the
intervals.
● If you stop the vehicle with the windscreen wiper in position 1 or 2, it
will automatically change to a lower speed. The set speed will be resumed
when the vehicle pulls away.
Page 180 of 278
178Vehicle maintenance and cleaning
If possible, use a de-icing spray to remove ice. If you use an ice scraper,
push it in one direction only without swinging it.
Use window cleaner or a silicone remover to clean rubber, oil, grease and
silicone deposits off.
Wax deposits can be removed with a special cleaner available in your Au-
thorised Service Centre. Wax deposits on the windscreen could cause the
wiper blades to judder. Adding a window cleaner that dissolves wax to the
windscreen washer fluid prevents wiper blades from juddering, but wax de-
posits are not removed.
CAUTION
● Never use warm or hot water to remove snow and ice from windows and
mirrors. This could cause the glass to crack!
● The heating element for the rear window is located on the inner side of
the window. To prevent damage, do not put stickers over the heating ele-
ments on the inside of the window.
Cleaning windscreen wiper blades
Clean wiper blades improve visibility.
1. Use a soft cloth to remove dust and dirt from the windscreen wiper blades.
2. Use window cleaner to clean the windscreen wiper blades. Use a sponge or a cloth to remove stubborn dirt. Rubber seals maintenance
If rubber seals are well looked after, they will not freeze so
quickly.
1. Use a soft cloth to remove dust and dirt from the rubber seals.
2. Apply a specialist care product to the rubber seals.
The rubber strips on the doors, windows, bonnet and tailgate will remain
pliable and last longer if they are treated with a suitable care product (for
example silicone spray).
Caring for rubber seals will also prevent premature ageing and leaks. The
doors will be easier to open. If rubber seals are well looked after, they will
not freeze so quickly in winter.
Door lock cylinders
The door lock cylinders can freeze up in winter.
To de-ice the lock cylinders you should only use spray with lubricating and
anti-corrosive properties.
Cleaning chrome parts
1. Clean chrome parts with a damp cloth.
2. Polish chrome parts with a soft, dry cloth. If this does not provide satisfying results, use a specialist chrome cleaning
product. Chrome cleaning products will remove stains from the surface.