2011 Seat Exeo ESP
[x] Cancel search: ESPPage 7 of 124

Overview
6If the system was switched off manually, it will not be switched on again auto-
matically the next time the ignition is turned on.
Note
•Where the battery level does not reach a pre-established value and the
engine is not running, the navigation system will switch off automatically. You
should therefore start the engine if you wish to continue using the function.•Briefly press the ON/OFF button to activate or deactivate the MUTE func-
tion for the current audio source ⇒page 12.Switching the navigation system display screen on and offThe display switches on automatically when the navigation system is
switched on. It also switches off again automatically when the system is
switched off. The display can be switched on and off manually by pressing the button
⇒
fig. 3.
Notes on road safetyOnly use the system when the traffic conditions allow you to
do so safely.As well as offering full navigation functions, the SEAT navigation system with
its numerous extra features also provides a wealth of in-car entertainment
and a great deal of information about traffic and road conditions.
Carry out your settings in the navigation system only when the vehicle
⇒page 115 is stationary. If you operate the navigation system while driving,
you should always be aware of the current traffic situation and, if necessary,
give your full concentration to road safety. When driving, make use of the
multi-function steering wheel* whenever possible ⇒page 14.
WARNING
•Today's driving conditions require your full attention. As the driver, you
bear the responsibility for road safety. Therefore, only use the SEAT naviga-
tion system when traffic conditions so permit, always remaining in control
of the vehicle. If not, an accident may occur.•The volume of the sound system should be set at a level that enables
you to hear acoustic signals from outside, such as police and fire brigade
sirens. Failure to do so may cause an accident.•Always obey the laws concerning the use of telephones in vehicles!
Fig. 3 Navigation system:
Display control knob
Media System 1.0_EN.book Seite 6 Donnerstag, 10. September 2009 1:52 13
Page 9 of 124
Handling: General information
8Handling: General informationControl switchesBasic operating rules
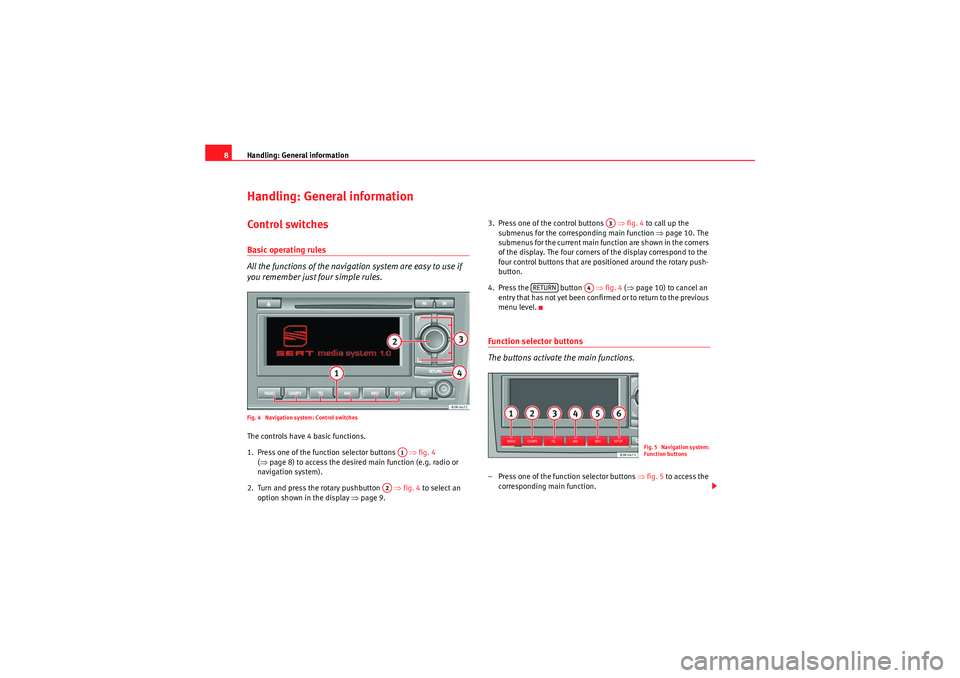
All the functions of the navigation system are easy to use if
you remember just four simple rules.Fig. 4 Navigation system: Control switchesThe controls have 4 basic functions.
1. Press one of the function selector buttons ⇒fig. 4
( ⇒ page 8) to access the desired main function (e.g. radio or
navigation system).
2. Turn and press the rotary pushbutton ⇒ fig. 4 to select an
option shown in the display ⇒page 9. 3. Press one of the control buttons
⇒fig. 4 to call up the
submenus for the corresp onding main function ⇒page 10. The
submenus for the current main function are shown in the corners
of the display. The four corners of the display correspond to the
four control buttons that are positioned around the rotary push-
button.
4. Press the button ⇒fig. 4 (⇒ page 10) to cancel an
entry that has not yet been confirmed or to return to the previous
menu level.
Function selector buttons
The buttons activate the main functions.– Press one of the function selector buttons ⇒fig. 5 to access the
corresponding main function.
A1
A2
A3
RETURN
A4
Fig. 5 Navigation system:
Function buttons
Media System 1.0_EN.book Seite 8 Donnerstag, 10. September 2009 1:52 13
Page 11 of 124
Handling: General information
10Control buttons
The control buttons are logically assigned to the menus in the
corners of the display.
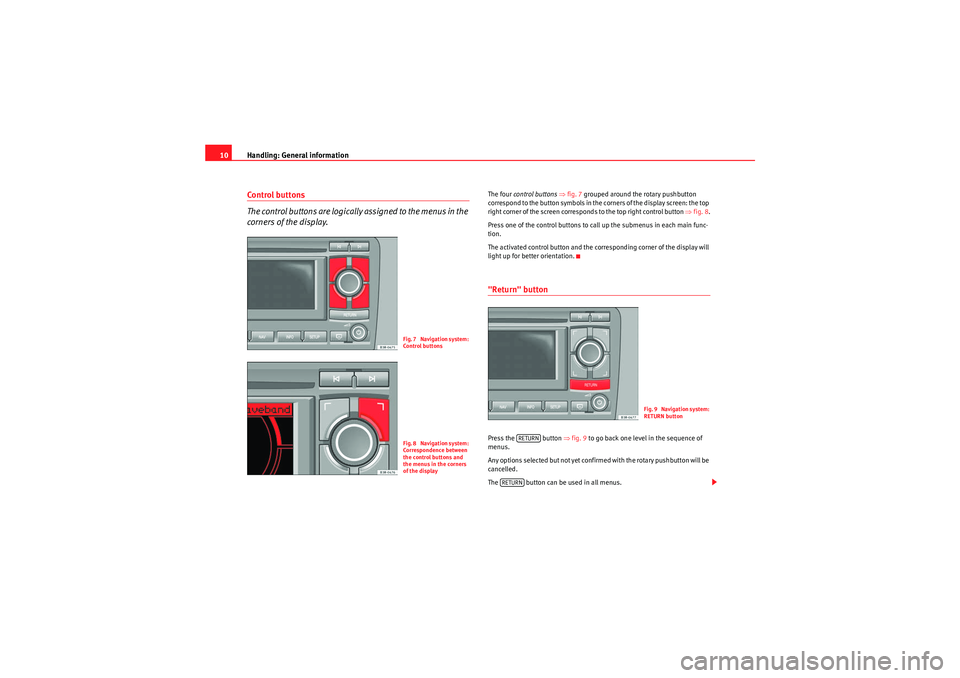
The four control buttons ⇒ fig. 7 grouped around the rotary pushbutton
correspond to the button symbols in the corners of the display screen: the top
right corner of the screen corresponds to the top right control button ⇒fig. 8 .
Press one of the control buttons to call up the submenus in each main func-
tion.
The activated control button and the corresponding corner of the display will
light up for better orientation."Return" buttonPress the button ⇒fig. 9 to go back one level in the sequence of
menus.
Any options selected but not yet confirmed with the rotary pushbutton will be
cancelled.
The button can be used in all menus.
Fig. 7 Navigation system:
Control buttonsFig. 8 Navigation system:
Correspondence between
the control buttons and
the menus in the corners
of the display
Fig. 9 Navigation system:
RETURN button
RETURN
RETURN
Media System 1.0_EN.book Seite 10 Donnerstag, 10. September 2009 1:52 13
Page 12 of 124
Handling: General information11
Operating
RADIO, CD/MP3
TEL (telephone)
NAV, INFO
SETUP
Note
Press the corresponding function selector button ⇒page 8 for the current
main function at any point in a submenu to return to the main menu for that
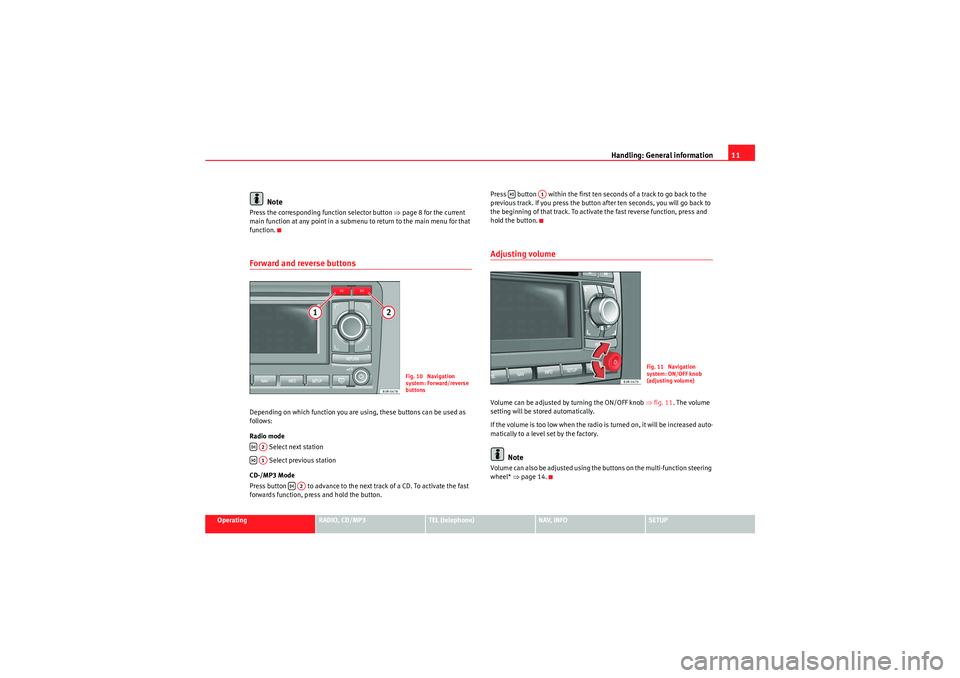
function.Forward and reverse buttonsDepending on which function you are using, these buttons can be used as
follows:
Radio mode
Select next station
Select previous station
CD-/MP3 Mode
Press button to advance to the next track of a CD. To activate the fast
forwards function, press and hold the button. Press button within the first ten seconds of a track to go back to the
previous track. If you press the button after ten seconds, you will go back to
the beginning of that track. To activate the fast reverse function, press and
hold the button.
Adjusting volumeVolume can be adjusted by turning the ON/OFF knob
⇒fig. 11. The volume
setting will be stored automatically.
If the volume is too low when the radio is turned on, it will be increased auto-
matically to a level set by the factory.
Note
Volume can also be adjusted using the buttons on the multi-function steering
wheel* ⇒page 14.
Fig. 10 Navigation
system: Forward/reverse
buttons
A2A1
A2
A1
Fig. 11 Navigation
system: ON/OFF knob
(adjusting volume)
Media System 1.0_EN.book Seite 11 Donnerstag, 10. September 2009 1:52 13
Page 13 of 124
Handling: General information
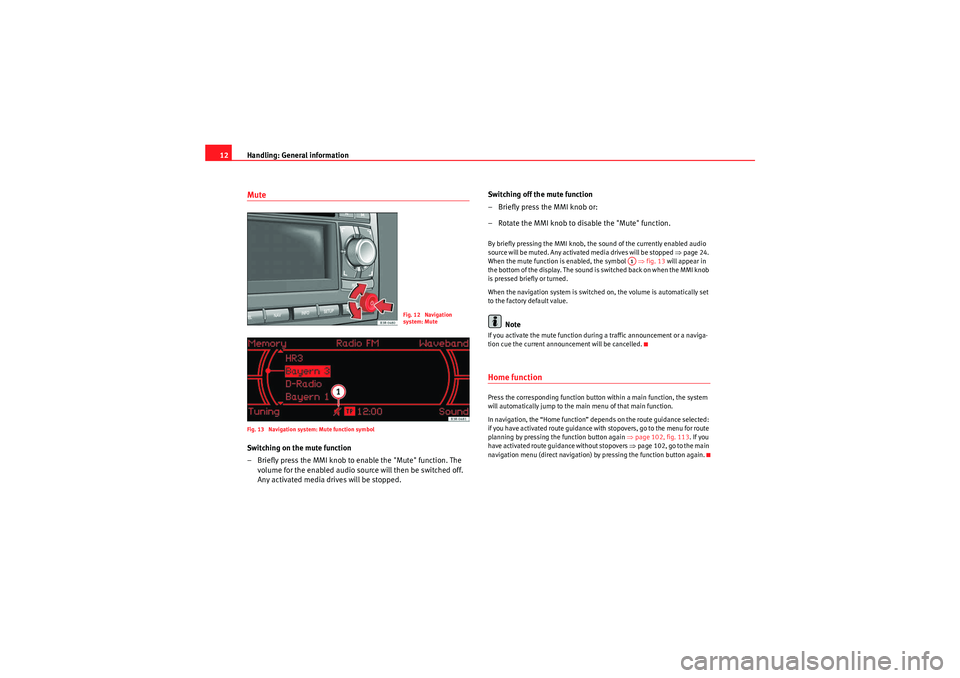
12MuteFig. 13 Navigation system: Mute function symbolSwitching on the mute function
– Briefly press the MMI knob to enable the "Mute" function. The
volume for the enabled audio source will then be switched off.
Any activated media drives will be stopped. Switching off the mute function
– Briefly press the MMI knob or:
– Rotate the MMI knob to disable the "Mute" function.
By briefly pressing the MMI knob, the sound of the currently enabled audio
source will be muted. Any activated media drives will be stopped
⇒page 24.
When the mute function is enabled, the symbol ⇒fig. 13 will appear in
the bottom of the display. The sound is switched back on when the MMI knob
is pressed briefly or turned.
When the navigation system is switched on, the volume is automatically set
to the factory default value.
Note
If you activate the mute function during a traffic announcement or a naviga-
tion cue the current announcement will be cancelled.Home functionPress the corresponding function button within a main function, the system
will automatically jump to the main menu of that main function.
In navigation, the “Home function” depends on the route guidance selected:
if you have activated route guidance with stopovers, go to the menu for route
planning by pressing the function button again ⇒page 102, fig. 113 . If you
have activated route guidance without stopovers ⇒page 102, go to the main
navigation menu (direct navigation) by pressing the function button again.
Fig. 12 Navigation
system: Mute
A1
Media System 1.0_EN.book Seite 12 Donnerstag, 10. September 2009 1:52 13
Page 27 of 124
Drives
26Requirements for good sound reproduction
It is possible that you may not be able to play CDs which are copy-protected
or CDs containing CD ROM format that do not correspond to the standard for
audio CDs in your player. Only CDs that comply with this standard have the
logo “Compact Disc Digital Audio” printed on the CD.
Please note the following in order to ensure perfect high-quality sound repro-
duction and avoid damage to media drives:•Do not use dirty CDs•Do not use damaged or scratched CDs•Do not use labels•Do not use protective rings•Do not use a CD cover or a stabiliser•Do not use non-circular CDs (shape CDs)•Do not use single CDs (8 cm / 3" in diameter)
Always store unused CDs in a suitable CD case and do not expose them to
direct sunlight.
Cleaning media drives and CDs
Never use a CD player cleaning disc to clean drives.
Clean CDs with a soft lint-free cloth. Wipe the disc in a straight line from the
centre outwards. If necessary, stubborn stains can be removed with a
commercially available CD cleaner or with isopropyl alcohol. Please never use
petrol, paint thinner or record cleaner, as these can damage the CDs.
Error messages
The following may be the reason for a read error on the display:
Note
•In the case of extreme hot or cold outside temperatures, it is possible that
the playback of a CD will temporarily not function. A thermostat switch is
installed to protect the CDs and the reading laser.•Never remove the cover of the equipment. The equipment has no compo-
nents that can be serviced by the owner.Problem
Solution
CD is dirty.
Clean the CD.
CD is scratched.
Check the CD for scratches.
CD was inserted upside down.
Insert the CD with the printed side
upwards.
Condensation has formed on the CD.
Wait until the equipment is dry.
The drive mechanism is malfunction-
ing.
Contact a Dealer or qualified work-
shop.
Media System 1.0_EN.book Seite 26 Donnerstag, 10. September 2009 1:52 13
Page 30 of 124
Drives29
Operating
RADIO, CD/MP3
TEL (telephone)
NAV, INFO
SETUP
Functions
The iPod is operated just like a CD changer using the controls
on your vehicle's navigation system.The following functions are available:•Play all tracks stored on the iPod•Select and play up to five playlists (just like selecting CD 1 to 5 on a CD
changer).•Change between playlists (just like “selecting a CD” on the CD changer)•Fast forward and rewind within a track•Change tracks within a playlist•Shuffle function (random selection of tracks)•SCAN function
For further information on operation, please refer to the “CD/MP3” chapter
⇒ page 44.TipsHere are some tips and points to remember when using the iPod in the
vehicle:•Track numbers appear with a maximum of two digits in the navigation
system display. The first digit is suppressed if you select a track with a three-
digit number, i.e. track 125 and track 25 are both displayed as track “25”. For
this reason we do not recommend allocating more than 99 tracks to each
playlist.•If you reach the end of a playlist when selecting a track directly
(forward/reverse), the count is resumed at track “1”.
•The track numbers are counted up sequentially in the navigation system
display when you play tracks in shuffle mode (MIX).•We recommend you do not use the “Name CD” function, as all the playl-
ists will then be allocated the same name.USB Interface*Introduction
You can connect a memory stick or an MP3 player to the
vehicle's on-board navigation system via the USB port.The USB port is located in your vehicle's glove box. It is compatible with all
memory sticks and MP3 players approved by SEAT. Problems can occur if you
use a memory stick or MP3 player not list ed in the table. Your memory device
must be USB-certified as a minimum requirement.
WARNING
•Today's driving conditions require your full attention. As the driver, you
bear the responsibility for road safety. Do not remove the memory stick or
MP3 player while driving. Failure to do so may cause an accident.•The volume of the sound system should be set at a level that enables
you to hear acoustic signals from outside, such as police and fire brigade
sirens. Failure to do so may cause an accident.Caution
Very high or very low temperatures (a common occurrence inside a vehicle)
may cause damage to the memory stick or MP3 player and/or impair its
performance.
Media System 1.0_EN.book Seite 29 Donnerstag, 10. September 2009 1:52 13
Page 33 of 124

Drives
32Aux-in connectionIntroduction
A portable player can be plugged into the AUX-IN connection
via a 3.5 mm jack plug.The Aux-in socket is located in the centre console. It is compatible with port-
able players with a 3.5 mm jack plug. It cannot be guaranteed that all port-
able players will function without any problems.
Caution
•Very high or very low temperatures (a common occurrence in the vehicle
interior) may cause damage to portable players and/or impair their perform-
ance. Please do not leave your portable player in the vehicle in case of
extreme temperatures.•Never store important data on portable players. SEAT is not liable in any
manner for any data or files that may be damaged or lost.Note
Please refer to the operating instructions of your portable player for important
information on its operation.Connecting portable player– Switch on your vehicle navigation system.
– Switch the audio source for the navigation system to radio. – Connect the portable player to
a 3.5 mm jack plug and plug the
extension cable into the Aux-in socket.
– Before you remove the memory device, switch the audio source for the navigation system back to radio.
Start the portable player by switching the audio source to AUX-IN mode
⇒page 45. After the player has been detected successfully, the display will
show External audio source is active .
You can select the audio files using the controls on the portable player. The
volume can be adjusted via the navigation system in your vehicle, the multi-
function steering wheel* and the portable player.
WARNING
Today's driving conditions require your full attention. As the driver, you
bear the responsibility for road safety. Never operate a portable player
while driving - this could result in an accident!
Note
•We recommend setting the output level of the portable player to about
70 percent of maximum. Before adjusting the volume via the navigation
system in your vehicle, you should first use the volume adjuster of the port-
able player.•Using a portable player with the engine switched off will drain the
battery.
Media System 1.0_EN.book Seite 32 Donnerstag, 10. September 2009 1:52 13