2011 Seat Exeo ESP
[x] Cancel search: ESPPage 89 of 124
NAV (navigation system)
88•For more information regarding TMC traffic messages, please refer to
⇒ page 110.Route guidance on the in strument panel display
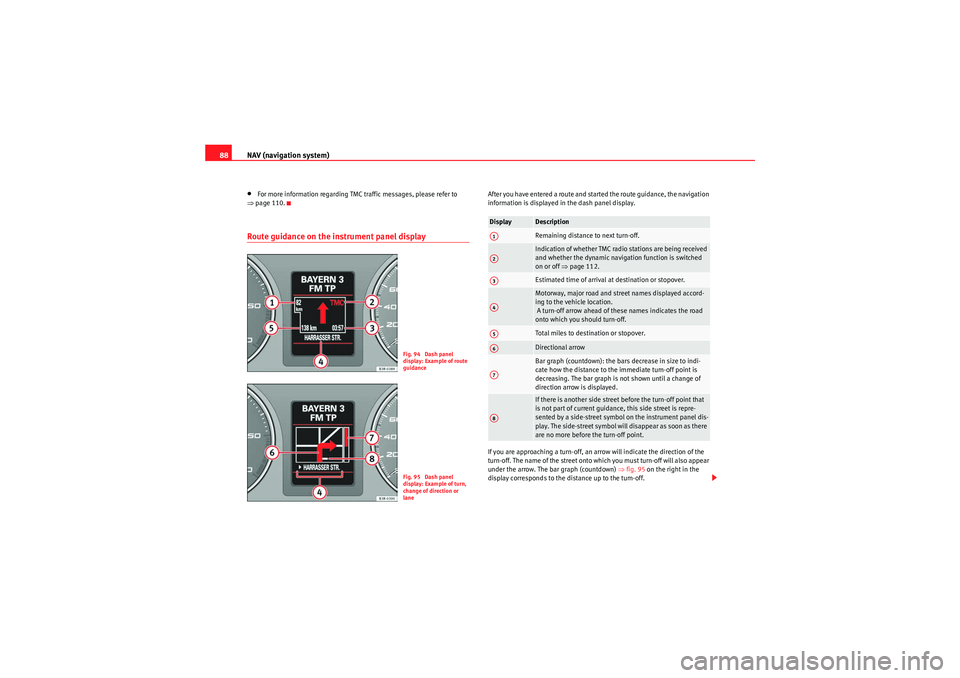
After you have entered a route and started the route guidance, the navigation
information is displayed in the dash panel display.
If you are approaching a turn-off, an arrow will indicate the direction of the
turn-off. The name of the street onto which you must turn-off will also appear
under the arrow. The bar graph (countdown) ⇒ fig. 95 on the right in the
display corresponds to the distance up to the turn-off.
Fig. 94 Dash panel
display: Example of route
guidanceFig. 95 Dash panel
display: Example of turn,
change of direction or
lane
Display
DescriptionRemaining distance to next turn-off.Indication of whether TMC radio stations are being received
and whether the dynamic navigation function is switched
on or off ⇒page 112.Estimated time of arrival at destination or stopover.Motorway, major road and street names displayed accord-
ing to the vehicle location.
A turn-off arrow ahead of these names indicates the road
onto which you should turn-off.Total miles to destination or stopover.Directional arrowBar graph (countdown): the bars decrease in size to indi-
cate how the distance to the immediate turn-off point is
decreasing. The bar graph is not shown until a change of
direction arrow is displayed.If there is another side street before the turn-off point that
is not part of current guidance, this side street is repre-
sented by a side-street symbol on the instrument panel dis-
play. The side-street symbol will disappear as soon as there
are no more before the turn-off point.
A1A2A3A4A5A6A7A8
Media System 1.0_EN.book Seite 88 Donnerstag, 10. September 2009 1:52 13
Page 92 of 124
NAV (navigation system)91
Operating
RADIO, CD/MP3
TEL (telephone)
NAV, INFO
SETUP
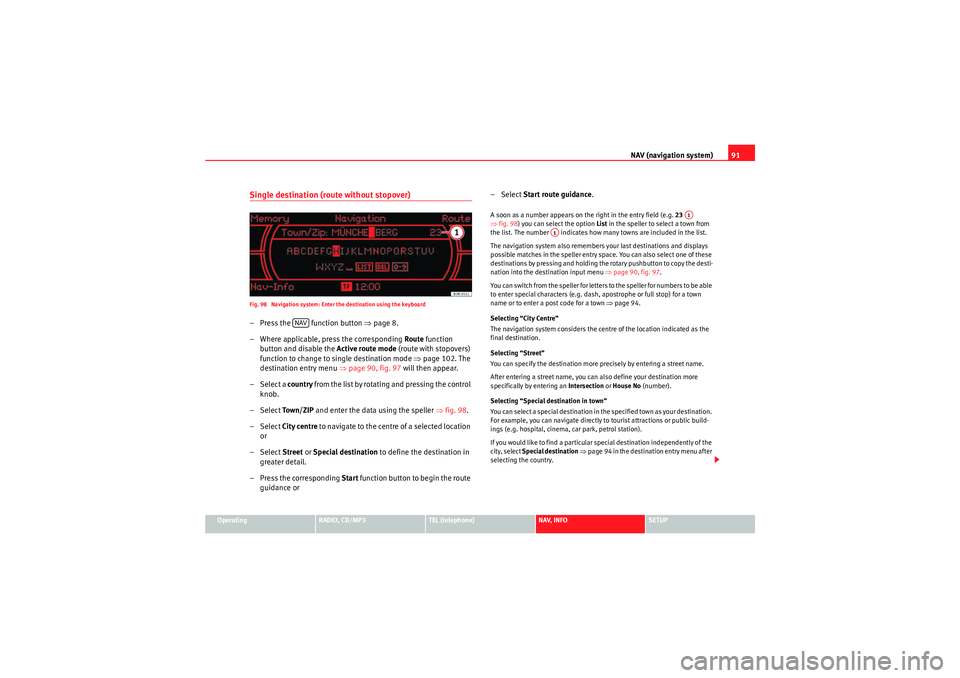
Single destination (route without stopover)Fig. 98 Navigation system: Enter the destination using the keyboard– Press the function button ⇒page 8.
– Where applicable, press the corresponding Route function
button and disable the Active route mode (route with stopovers)
function to change to single destination mode ⇒page 102. The
destination entry menu ⇒page 90, fig. 97 will then appear.
– Select a country f r o m t h e l ist b y r o ta t i n g a n d p r e ssi n g t h e co n t ro l
knob.
– Select To w n / Z I P and enter the data using the speller ⇒fig. 98 .
– Select City centre to navigate to the centre of a selected location
or
– Select Street or Special destination to define the destination in
greater detail.
– Press the corresponding Start function button to begin the route
guidance or – Select
Start route guidance .
A soon as a number appears on the right in the entry field (e.g. 23
⇒ fig. 98 ) you can select the option List in the speller to select a town from
the list. The number indicates how many towns are included in the list.
The navigation system also remembers your last destinations and displays
possible matches in the speller entry space. You can also select one of these
destinations by pressing and holding the rotary pushbutton to copy the desti-
nation into the destination input menu ⇒page 90, fig. 97.
You can switch from the speller for letters to the speller for numbers to be able
to enter special characters (e.g. dash, apostrophe or full stop) for a town
name or to enter a post code for a town ⇒page 94.
Selecting “City Centre”
The navigation system considers the centre of the location indicated as the
final destination.
Selecting “Street”
You can specify the destination more precisely by entering a street name.
After entering a street name, you can also define your destination more
specifically by entering an Intersection or House No (number).
Selecting “Special destination in town”
You can select a special destination in the specified town as your destination.
For example, you can navigate directly to tourist attractions or public build-
ings (e.g. hospital, cinema, car park, petrol station).
If you would like to find a particular special destination independently of the
city, select Special destination ⇒ page 94 in the destination entry menu after
selecting the country.
NAV
A1
A1
Media System 1.0_EN.book Seite 91 Donnerstag, 10. September 2009 1:52 13
Page 93 of 124
NAV (navigation system)
92
Note•Once you have entered a city in the keyboard, you can confirm the entry
by pressing and holding down the control knob. When you have entered the
first few letters of a place name and can already see the place you wish to
select listed in the speller display, you can press the rotary pushbutton (long
press) to switch to the list of places.•Once they have been entered, you can store destinations in the directory
⇒ page 98 and then navigate to them again later, using the “Load from direc-
tory” function ⇒page 99.•Navigation to the destination can be modified or cancelled ⇒page 95.Route plan (route with stopover)
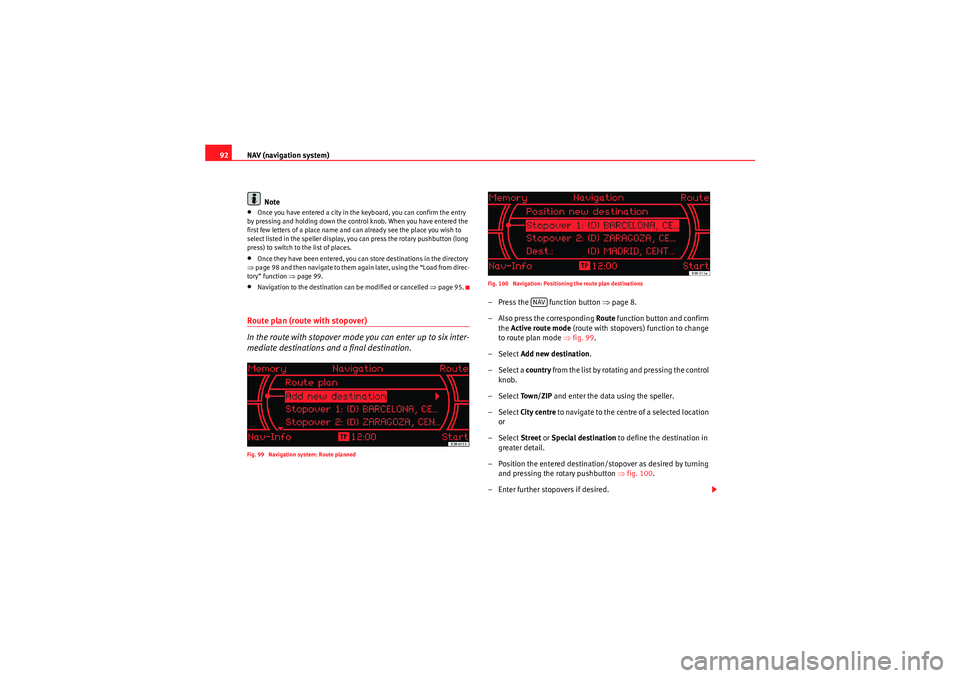
In the route with stopover mode you can enter up to six inter-
mediate destinations and a final destination.Fig. 99 Navigation system: Route planned Fig. 100 Navigation: Positioning the route plan destinations
– Press the function button
⇒page 8.
– Also press the corresponding Route function button and confirm
the Active route mode (route with stopovers) function to change
to route plan mode ⇒fig. 99 .
– Select Add new destination .
– Select a country from the list by rotating and pressing the control
knob.
– Select To w n / Z I P and enter the data using the speller.
– Select City centre to navigate to the centre of a selected location
or
– Select Street or Special destination to define the destination in
greater detail.
– Position the entered destination/ stopover as desired by turning
and pressing the rotary pushbutton ⇒fig. 100 .
– Enter further stopovers if desired.
NAV
Media System 1.0_EN.book Seite 92 Donnerstag, 10. September 2009 1:52 13
Page 96 of 124
NAV (navigation system)95
Operating
RADIO, CD/MP3
TEL (telephone)
NAV, INFO
SETUP
– In the destination entry menu ⇒page 90, fig. 97 , select a
country from the list by rotating and pressing the control knob.
– Select Special destination ⇒ page 90, fig. 97 .
– For the special destination required, select a category ( In
immediate vicinity, In vicinity of destination or Along the route)
⇒ page 94, fig. 103 .
– Select the special destination from the category list.
– Select Set as destination . The special destination is automati-
cally transferred to the route guidance.
– Press the control button for Start. The route will be calculated.In immediate vicinity
This special destination category refers to the immediate vicinity of the
vehicle in its current location. This function is especially useful when you are,
for example, trying to find the nearest restaurant.
The special destinations displayed in the list are sorted according to the
distance from your current position (in a straight line). The displayed distance
to the destination can differ considerably from the actual distance to be
driven by car.
In vicinity of destination
This special destination category refers to a previously calculated destination
and is useful when, for example, trying to find a car park or hotel at or near
your final destination.
Nationwide
This special destination is not connected with any previously selected desti-
nation. This refers to the country in question.
This function can be used for guidance to the nearest service area or airport.
Note
•Options that are not available due to your preset criteria cannot be
selected (these are greyed out in the display).•There are sometimes destination entries in the list that cannot be
displayed completely because they are too long (too many characters). If you
select one of these entries using the control knob, a second window will open
up after a few seconds. This screen will show more information about the
selected entry.Entering the destination via position coordinates
You can enter the longitude and latitude coordinates for a
destination using the “Position” option.– Select the option Position in the navigation menu.
– Turn and press the rotary pushbutton to enter the desired longi- tude and latitude coordinates.
– Press the control button for Start to begin the route guidance.Changing/Interrupting route guidanceChanging the route
– Press the button.
– Enter the new data for single destination (route without stopover)
or route plan (route with stopovers) guidance.
NAV
Media System 1.0_EN.book Seite 95 Donnerstag, 10. September 2009 1:52 13
Page 110 of 124
NAV (navigation system)109
Operating
RADIO, CD/MP3
TEL (telephone)
NAV, INFO
SETUP
– Activate the option Compass . The compass will be shown on the
instrument panel display if navigation is not switched on.Changing a wheel–Press the ⇒ page 8 function button in the navigation
menu.
– Select Wheel change and confirm with Ye s.The tyre size must be taken into account when calculating the route. If a wheel
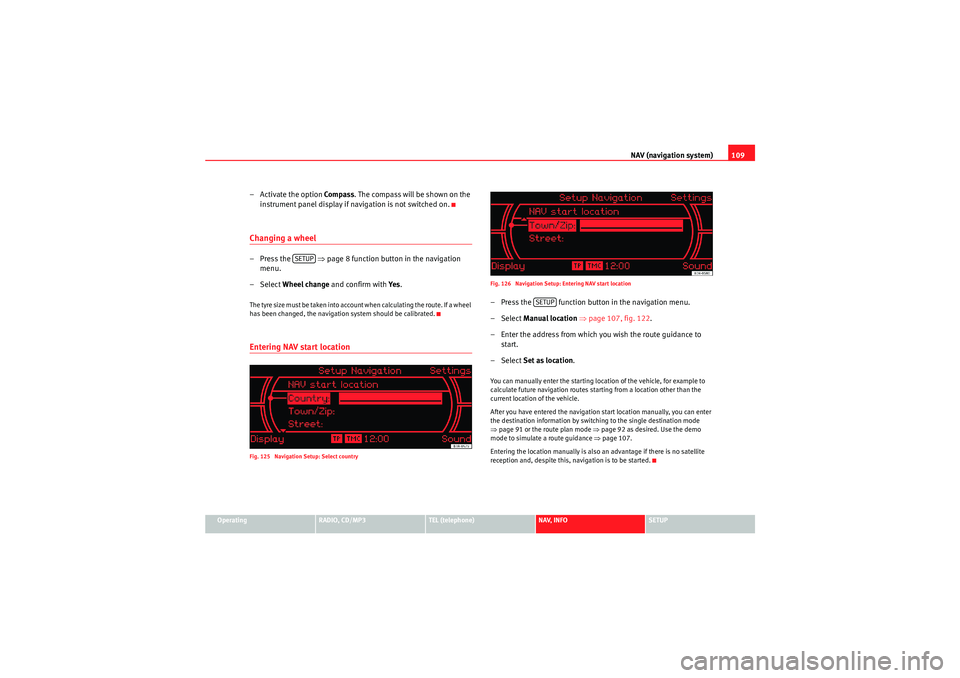
has been changed, the navigation system should be calibrated.Entering NAV start locationFig. 125 Navigation Setup: Select country Fig. 126 Navigation Setup: Entering NAV start location
– Press the function button in the navigation menu.
– Select
Manual location ⇒ page 107, fig. 122 .
– Enter the address from which you wish the route guidance to start.
– Select Set as location .You can manually enter the starting location of the vehicle, for example to
calculate future navigation routes starting from a location other than the
current location of the vehicle.
After you have entered the navigation start location manually, you can enter
the destination information by switching to the single destination mode
⇒page 91 or the route plan mode ⇒ page 92 as desired. Use the demo
mode to simulate a route guidance ⇒page 107.
Entering the location manually is also an advantage if there is no satellite
reception and, despite this, navigation is to be started.
SETUP
SETUP
Media System 1.0_EN.book Seite 109 Donnerstag, 10. September 2009 1:52 13
Page 116 of 124

SETUP115
Operating
RADIO, CD/MP3
TEL (telephone)
NAV, INFO
SETUP
SETUPSETUPIntroductionGeneral safety precautionsWe recommend that you only make adjustments to the system configuration
while the vehicle is stationary. In this way you can be sure that you will not
be unnecessarily distracted from the traffic when reading the messages on
the display. Please note ⇒page 6.Selecting system setup functionFig. 132 Display: Radio setup menu
– Press the button ⇒page 8 in addition to any other main
function button that is already activated. The Setup main menu
corresponding to that function (e.g. Radio) will appear on the
display ⇒fig. 132 .
– While in the Setup main menu, press any one of the control buttons to call up the corresponding submenu (e.g. Radio: to
⇒ fig. 132 ).The Setup menu only works in conjunction with one of the activated main
functions ⇒page 8; it provides access to further menu options. The Setup,
Sound and Display function menus are opened by pressing the corre-
sponding control button. These Setup submenus are always the same,
regardless of the setup menu of the main function you are in.
SETUP
A1
A3
Media System 1.0_EN.book Seite 115 Donnerstag, 10. September 2009 1:52 13