2011 Peugeot Partner Tepee light
[x] Cancel search: lightPage 48 of 232

Starting and stopping
Good practice when stopping
Good practice when starting
Diesel pre-heating warning
light
If the temperature is high
enough, the warning light
comes on for less than one
second, you can start without
waiting.
In cold weather, wait for this warning
light to switch off then operate the
starter (Starting position) until the
engine starts.
Door or bonnet open
warning light
If this comes on, a door or the bonnet
is not closed correctly, check!
Minimise engine and gearbox wear
When switching off the ignition, let the
engine run for a few seconds to allow
the turbocharger (Diesel engine) to
return to idle.
Do not press the accelerator when
switching off the ignition.
There is no need to engage a gear
after parking the vehicle.
STARTING AND STOPPING
Running and accessories position.
To unlock the steering, turn the
steering wheel gently while turning the
key, without forcing. In this position,
certain accessories can be used.
Starting position.
The starter is operated, the engine
turns over, release the key.
STOP position:
steering lock.
The ignition is off. Turn the steering
wheel until the steering locks. Remove
the key.
Page 50 of 232

48
Steering mounted controls
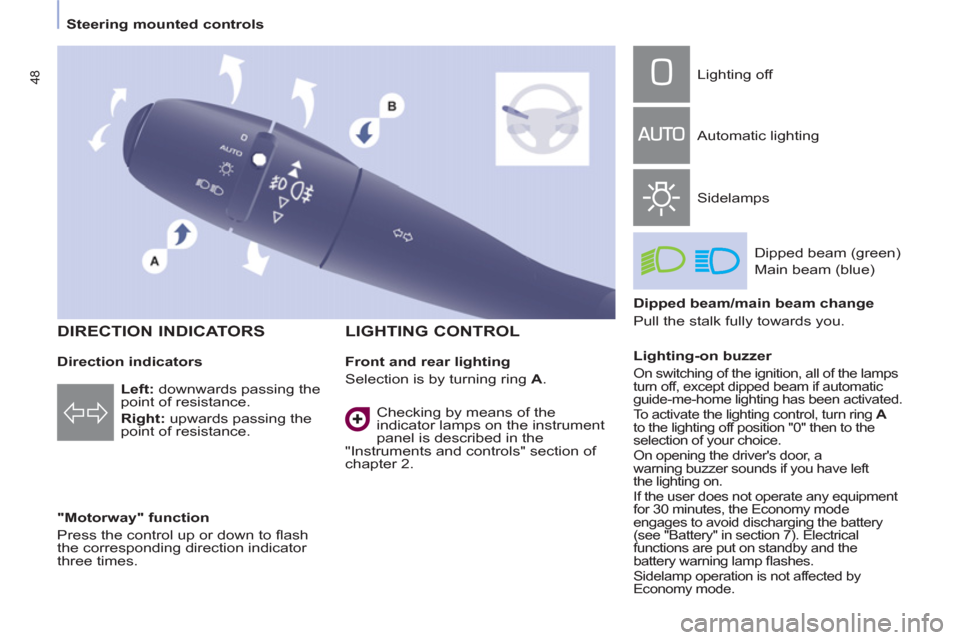
Direction indicators
"Motorway" function
Press the control up or down to fl ash
the corresponding direction indicator
three times.
LIGHTING CONTROL
Left
: downwards passing the
point of resistance.
Right
: upwards passing the
point of resistance.
Front and rear lighting
Selection is by turning ring A
. Lighting off
Automatic lighting
Sidelamps
Dipped beam (green)
Main beam (blue)
Dipped beam/main beam change
Pull the stalk fully towards you.
Lighting-on buzzer
On switching of the ignition, all of the lamps
turn off, except dipped beam if automatic
guide-me-home lighting has been activated.
To activate the lighting control, turn ring A
to the lighting off position "0" then to the
selection of your choice.
On opening the driver's door, a
warning buzzer sounds if you have left
the lighting on.
If the user does not operate any equipment
for 30 minutes, the Economy mode
engages to avoid discharging the battery
(see "Battery" in section 7). Electrical
functions are put on standby and the
battery warning lamp fl ashes.
Sidelamp operation is not affected by
Economy mode.
Checking by means of the
indicator lamps on the instrument
panel is described in the
"Instruments and controls" section of
chapter 2.
DIRECTION INDICATORS
Page 51 of 232

49
Steering mounted controls
EASE OF USE
andCOMFOR
T
3
Daytime lights
Depending on the country in which
the vehicle is sold, the vehicle may
be equipped with daytime lights. The
dipped headlamps come on when the
vehicle is started.
Rear foglamps (amber,
2nd rotation of the ring
forwards). Front foglamps (green,
1st rotation of the ring
forwards).
Front and rear foglamps
Rotate ring B
forwards to switch on
and rearwards to switch off. The
status is confi rmed by the lamp on the
instrument panel.
These operate with the sidelamps and
the dipped beam headlamps.
Do not forget to switch them off
when they are no longer needed.
Operation of the utomatic lighting
switches off the rear foglamps, but the
front foglamps remain on.
This warning light comes on
on the instrument panel.
The instruments and controls
(instrument panel, display, air
conditioning control panel, ...) are
only lit on switching to the automatic
switching on of the lights mode or
when the lights are switched on
manually.
To switch off the front and rear
foglamps, turn the ring rearwards twice
in succession.
In clear weather or in rain, both day
and night, rear foglamps dazzle and
their use is prohibited.
Automatic switching on of the lights
In foggy weather or in snow,
the brightness sensor can
detect suffi cient light. As a
consequence, the lights will not come
on automatically.
If necessary, you must switch on
the dipped headlamps manually.
Do not cover the brightness sensor
located on the windscreen, behind
the mirror. It is used for the automatic
switching on of the lights and for the
automatic wipers.
Activation
Turn the ring to the AUTO position.
The activation of this function is
accompanied by a message on the
display.
Deactivation
Turn the ring forwards or rearwards.
The deactivation of this function is
accompanied by a message on the
display.
The function is deactivated temporarily
when you use the manual lights stalk. The side lights
and dipped beam
headlamps switch
on automatically if
the light is poor, or
during operation of the windscreen
wipers. They switch off as soon as the
light becomes bright enough or the
windscreen wipers stop.
This function is not compatible with the
daytime lights.
Page 52 of 232

50
Steering mounted controls
If the brightness sensor
does not function
correctly, the lights come on
accompanied by the service
warning light, an audible
signal and a message on the display.
Consult a PEUGEOT dealer.
Guide-me-home lighting
The temporary maintaining of the
dipped headlamps lighting, with the
ignition off, makes the driver's exit
easier when the light is poor.
HEADLAMP BEAM
Depending on the load in your vehicle,
the beam setting must be adjusted.
0 - No load.
1 - Partial load.
2 - Average load.
3 - Maximum authorised load.
Manual operation
- With the ignition off, "fl ash" the
headlamps within one minute after
switching off the ignition.
The guide-me-home lighting switches
off automatically after a set time.
Automatic operation
Refer to the "Display fl ow chart"
section of chapter 9.
Initial setting is position 0. Activate the function via the
"Vehicle confi g" menu.
Page 66 of 232

64
Ventilation
DE-ICING AND DEMISTING GOOD PRACTICE
Vents
"Leave them open"
For optimum distribution and diffusion
of hot or cool air in the passenger
compartment, there are adjustable
central and side vents which can
be directed sideways (right or left)
or vertically (up or down). For your
comfort while driving, do not close
them and direct the fl ow of air towards
the windows instead.
Air vents in the footwells and directed
towards the windscreen complete
the equipment.
Do not block the vents located at the
windscreen or the air extractor located
in the boot.
Dust filter, odour filter (activated
carbon)
This fi lter traps certain dust and limits
odours.
Ensure that this fi lter is in good
condition and have all of the fi lter
elements replaced regularly.
Refer to the "Checks" section of
chapter 6.
Air conditioning
In all seasons, the air conditioning
should only be used with the windows
closed. However, if the interior
temperature remains high after a
prolonged period parked in the sun, do
not hesitate to ventilate the passenger
compartment for a few minutes.
Use the AUTO mode as much as
possible as it permits optimised
control of all of the functions: air fl ow,
passenger compartment comfort
temperature, air distribution, air
intake mode or air recirculation in the
passenger compartment.
Operate the air conditioning system for
5 to 10 minutes, once or twice a month,
to keep it in perfect working order.
It is normal that the condensation
created by the air conditioning system
results in a fl ow of water which may
form a puddle under the vehicle when
parked.
If the system does not produce cold air,
do not use it and contact a PEUGEOT
dealer.
Automatic mode: visibility
programme
The comfort programme (AUTO) may
not be suffi cient to quickly demist or
de-ice the windows (humidity, several
passengers, ice).
In this case, select the visibility
programme. The visibility programme
indicator light comes on.
It activates the air conditioning, the air
fl ow and provides optimum distribution
of the ventilation to the windscreen and
side windows.
It deactivates the air recirculation.
Page 81 of 232

79
EASE OF USE
andCOMFOR
T
3
Seats
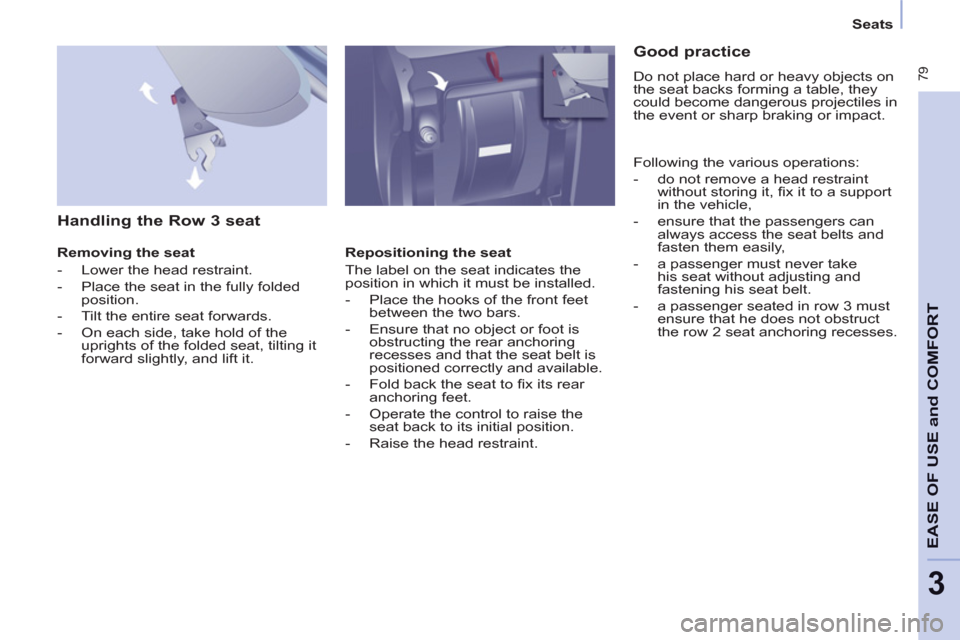
Handling the Row 3 seat
Removing the seat
- Lower the head restraint.
- Place the seat in the fully folded
position.
- Tilt the entire seat forwards.
- On each side, take hold of the
uprights of the folded seat, tilting it
forward slightly, and lift it.
Repositioning the seat
The label on the seat indicates the
position in which it must be installed.
- Place the hooks of the front feet
between the two bars.
- Ensure that no object or foot is
obstructing the rear anchoring
recesses and that the seat belt is
positioned correctly and available.
- Fold back the seat to fi x its rear
anchoring feet.
- Operate the control to raise the
seat back to its initial position.
- Raise the head restraint.
Good practice
Do not place hard or heavy objects on
the seat backs forming a table, they
could become dangerous projectiles in
the event or sharp braking or impact.
Following the various operations:
- do not remove a head restraint
without storing it, fi x it to a support
in the vehicle,
- ensure that the passengers can
always access the seat belts and
fasten them easily,
- a passenger must never take
his seat without adjusting and
fastening his seat belt.
- a passenger seated in row 3 must
ensure that he does not obstruct
the row 2 seat anchoring recesses.
Page 87 of 232

85
EASE OF USE
andCOMFOR
T
3
Practical information
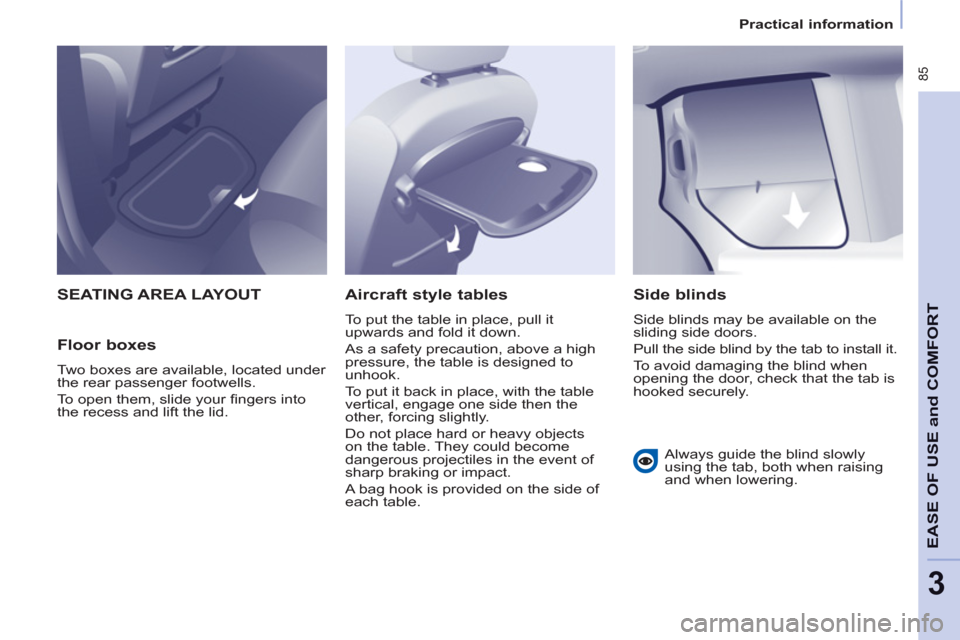
SEATING AREA LAYOUT
Floor boxes
Two boxes are available, located under
the rear passenger footwells.
To open them, slide your fi ngers into
the recess and lift the lid.
Aircraft style tables
To put the table in place, pull it
upwards and fold it down.
As a safety precaution, above a high
pressure, the table is designed to
unhook.
To put it back in place, with the table
vertical, engage one side then the
other, forcing slightly.
Do not place hard or heavy objects
on the table. They could become
dangerous projectiles in the event of
sharp braking or impact.
A bag hook is provided on the side of
each table.
Side blinds
Side blinds may be available on the
sliding side doors.
Pull the side blind by the tab to install it.
To avoid damaging the blind when
opening the door, check that the tab is
hooked securely.
Always guide the blind slowly
using the tab, both when raising
and when lowering.
Page 94 of 232

92
Practical information
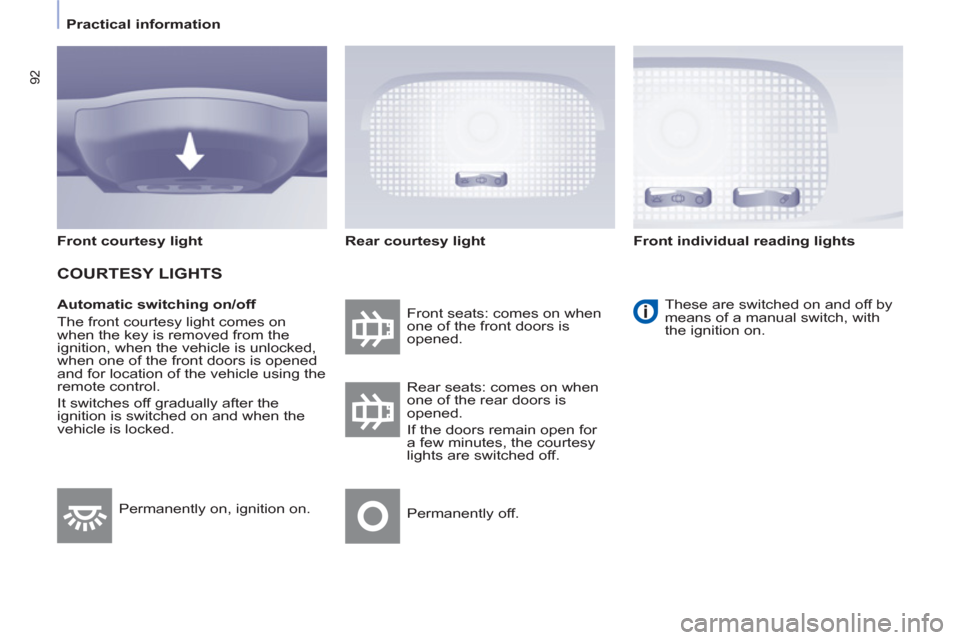
Automatic switching on/off
The front courtesy light comes on
when the key is removed from the
ignition, when the vehicle is unlocked,
when one of the front doors is opened
and for location of the vehicle using the
remote control.
It switches off gradually after the
ignition is switched on and when the
vehicle is locked. Front seats: comes on when
one of the front doors is
opened. These are switched on and off by
means of a manual switch, with
the ignition on.
Rear seats: comes on when
one of the rear doors is
opened.
If the doors remain open for
a few minutes, the courtesy
lights are switched off.
Permanently off. Permanently on, ignition on.
Front courtesy light
COURTESY LIGHTS
Rear courtesy light
Front individual reading lights