2011 Peugeot Partner Tepee air condition
[x] Cancel search: air conditionPage 4 of 232

2
Contents
Key 17
Doors 20
Tailgate 22
Rear roof fl ap 25
Central locking 26
Instrument panel 27
Adjusting the time 28
Warning lamps 29
Fuel gauge 35
Coolant 35
Tyre under-infl ation
detection 36
Service indicator 37
Lighting rheostat 38
Gearbox 39
Gear shift indicator 39
6-speed electronic
gearbox system 40
Steering wheel
adjustment 42
Stop & Start 43
Starting and stopping 46
Hill start assist 47Lighting control 48
wipers 51
Cruise control 53
Speed limiter 56
Heating/Manual air
conditioning 59
automatic 61
De-icing and demisting 63
Front seats 65
Rear bench seat 67
Rear seats
(5 seat version) 70
Rear seats
(7 seat version) 73
Adjustments 80
Front layout 82
Zenith roof 86
Roof bars 91
Courtesy lights 92
Torch 93
Load space cover
(5 seat version) 94
Load space cover
(7 seat version) 98
Interior rack 100
Mirrors 102
Electric windows 104
2. READY TO SET OFF
17-47
4. SAFETY
105-126
Presentation 4
Communication 4
Exterior 6
Instruments and controls 8
Centre console 9
Sitting comfortably 10
Visibility 11
Driving safely 12
Passenger compartment
space 13
Rear fi ttings 14
Child safety 15
Ventilation 16
1. FAMILIARISATION
4-16
Hazard warning lamps 105
Parking brake 105
Rear parking
assistance 106
Anti-lock braking system
(ABS) 108
Emergency braking
assistance 108
Traction control (ASR) and
stability control (ESP) 109
"Grip control" 110
Seat belts 113
Airbags 116
Disarming
the passenger airbag 119
Child seats 120
Recommended seats 121
Installing 122
Isofi x seats 125
Child lock 126
COMFORT 48-104
Page 18 of 232

3
3
3
3
16
Interior
VENTILATION
Recommended settings for Manual Air Conditioning
For optimum use of the system, we recommend:
If I require...
Air
distribution
Temperature
Air fl ow
Air
recirculation
AC
Heating
-
Cooling
Demisting
Defrosting
63
With Digital Air Conditioning, operation in AUTO mode is recommended at
all times.
Remember to switch the system off when the ambient air suits
your requirements.
61
Heating
Air conditioning
Automatic air conditioning 59 59
Page 51 of 232

49
Steering mounted controls
EASE OF USE
andCOMFOR
T
3
Daytime lights
Depending on the country in which
the vehicle is sold, the vehicle may
be equipped with daytime lights. The
dipped headlamps come on when the
vehicle is started.
Rear foglamps (amber,
2nd rotation of the ring
forwards). Front foglamps (green,
1st rotation of the ring
forwards).
Front and rear foglamps
Rotate ring B
forwards to switch on
and rearwards to switch off. The
status is confi rmed by the lamp on the
instrument panel.
These operate with the sidelamps and
the dipped beam headlamps.
Do not forget to switch them off
when they are no longer needed.
Operation of the utomatic lighting
switches off the rear foglamps, but the
front foglamps remain on.
This warning light comes on
on the instrument panel.
The instruments and controls
(instrument panel, display, air
conditioning control panel, ...) are
only lit on switching to the automatic
switching on of the lights mode or
when the lights are switched on
manually.
To switch off the front and rear
foglamps, turn the ring rearwards twice
in succession.
In clear weather or in rain, both day
and night, rear foglamps dazzle and
their use is prohibited.
Automatic switching on of the lights
In foggy weather or in snow,
the brightness sensor can
detect suffi cient light. As a
consequence, the lights will not come
on automatically.
If necessary, you must switch on
the dipped headlamps manually.
Do not cover the brightness sensor
located on the windscreen, behind
the mirror. It is used for the automatic
switching on of the lights and for the
automatic wipers.
Activation
Turn the ring to the AUTO position.
The activation of this function is
accompanied by a message on the
display.
Deactivation
Turn the ring forwards or rearwards.
The deactivation of this function is
accompanied by a message on the
display.
The function is deactivated temporarily
when you use the manual lights stalk. The side lights
and dipped beam
headlamps switch
on automatically if
the light is poor, or
during operation of the windscreen
wipers. They switch off as soon as the
light becomes bright enough or the
windscreen wipers stop.
This function is not compatible with the
daytime lights.
Page 61 of 232

59
EASE OF USE
andCOMFOR
T
3
Ventilation
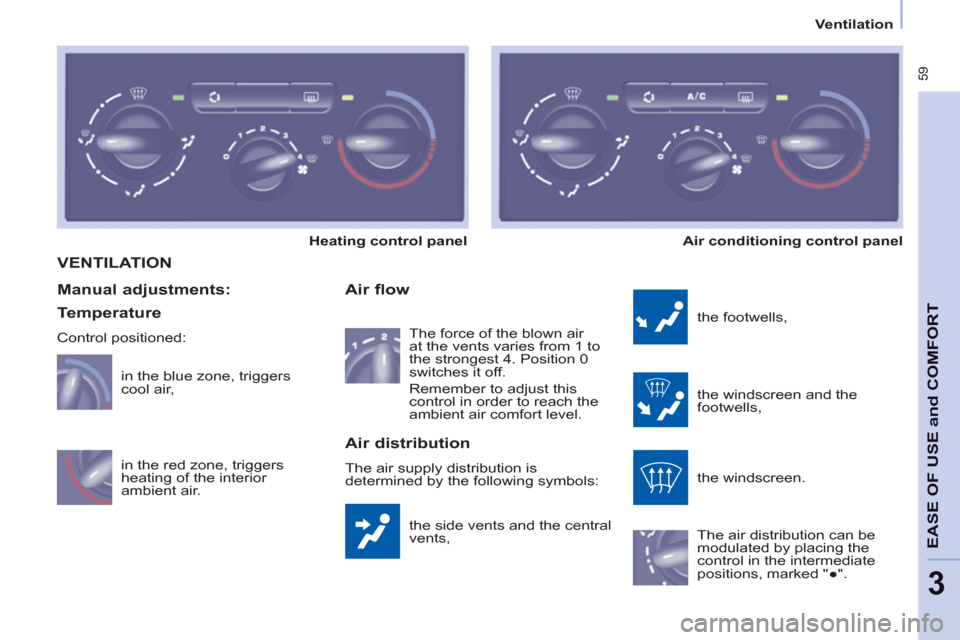
VENTILATION
the side vents and the central
vents,
Air flow
the footwells,
the windscreen and the
footwells,
the windscreen.
The air distribution can be
modulated by placing the
control in the intermediate
positions, marked "●".
Manual adjustments:
Air distribution
The air supply distribution is
determined by the following symbols: in the red zone, triggers
heating of the interior
ambient air. in the blue zone, triggers
cool air, The force of the blown air
at the vents varies from 1 to
the strongest 4. Position 0
switches it off.
Remember to adjust this
control in order to reach the
ambient air comfort level.
Heating control panel
Air conditioning control panel
Temperature
Control positioned:
Page 62 of 232

60
Ventilation
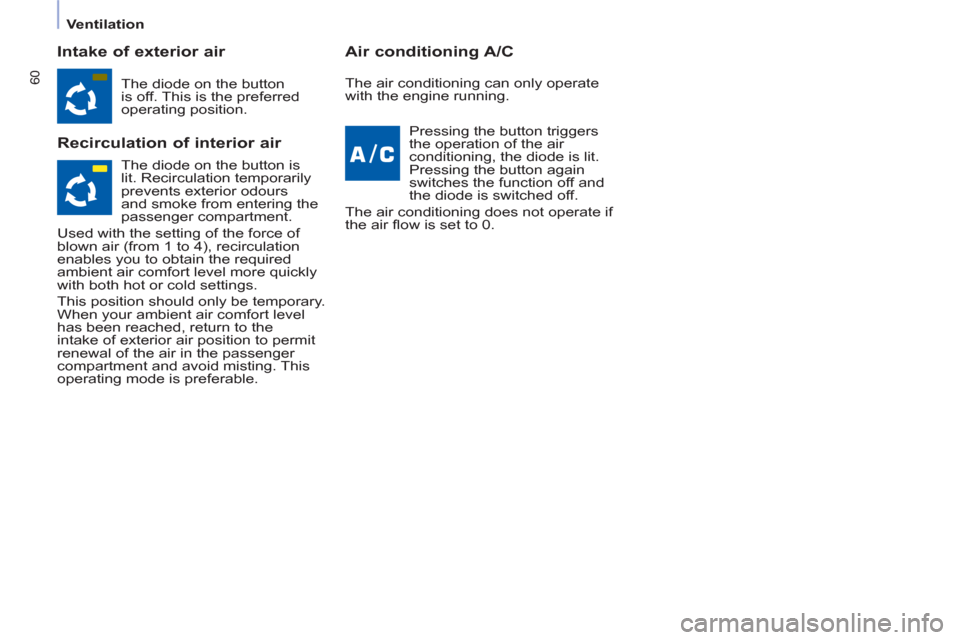
Intake of exterior air
Recirculation of interior air
Air conditioning A/C
The diode on the button
is off. This is the preferred
operating position.
Pressing the button triggers
the operation of the air
conditioning, the diode is lit.
Pressing the button again
switches the function off and
the diode is switched off.
The air conditioning does not operate if
the air fl ow is set to 0. The air conditioning can only operate
with the engine running.
The diode on the button is
lit. Recirculation temporarily
prevents exterior odours
and smoke from entering the
passenger compartment.
Used with the setting of the force of
blown air (from 1 to 4), recirculation
enables you to obtain the required
ambient air comfort level more quickly
with both hot or cold settings.
This position should only be temporary.
When your ambient air comfort level
has been reached, return to the
intake of exterior air position to permit
renewal of the air in the passenger
compartment and avoid misting. This
operating mode is preferable.
Page 63 of 232

61
EASE OF USE
andCOMFOR
T
3
Ventilation
Good practice
For maximum cooling or heating of the
passenger compartment, it is possible
to exceed the value 15 by turning until
LO is displayed or the value 27 by
turning until HI is displayed.
On entering the vehicle, the inside
temperature may be much colder (or
warmer) than is comfortable. There is
no advantage in changing the value
displayed in order to quickly reach the
level of comfort required. The system
will use its maximum performance to
reach the comfort value set.
DIGITAL AIR CONDITIONING WITH SEPARATE SETTINGS
Automatic operation
AUTO comfort programme
This is the normal air conditioning
system operating mode.
Driver or passenger side comfort
value
The value indicated in the screen
corresponds to a level of comfort and
not a temperature in degrees Celsius
or Fahrenheit.
Turn this control to the left
or to the right to decrease or
increase the value. A setting
around the value 21 provides
optimum comfort.However,
depending on your requirements, a
setting between 18 and 24 is usual.
Do not cover the sunshine sensor
located on the dashboard.
Press this button, the AUTO
symbol is displayed.
In accordance with the
comfort value selected,
the system controls the
distribution, the fl ow and the intake
of air to guarantee comfort and a
suffi cient circulation of air in the
passenger compartment. No further
action on your part is required. When the engine is cold, to prevent
an excessive diffusion of cold air, the
air diffuser will reach its optimum level
gradually.
For your comfort, the settings are
stored when the ignition is switched off
and are reinstated the next time the
vehicle is started.
The automatic function will no longer
be maintained if you change a setting
manually (AUTO is cleared).
FOR THE DRIVER AND PASSENGER
Page 64 of 232

62
Ventilation
Manual operation
You can, according to your
requirements, make a different selection
from that offered by the system by
changing a setting. The other functions
will still be controlled automatically.
Pressing the AUTO
button restores fully
automatic operation.
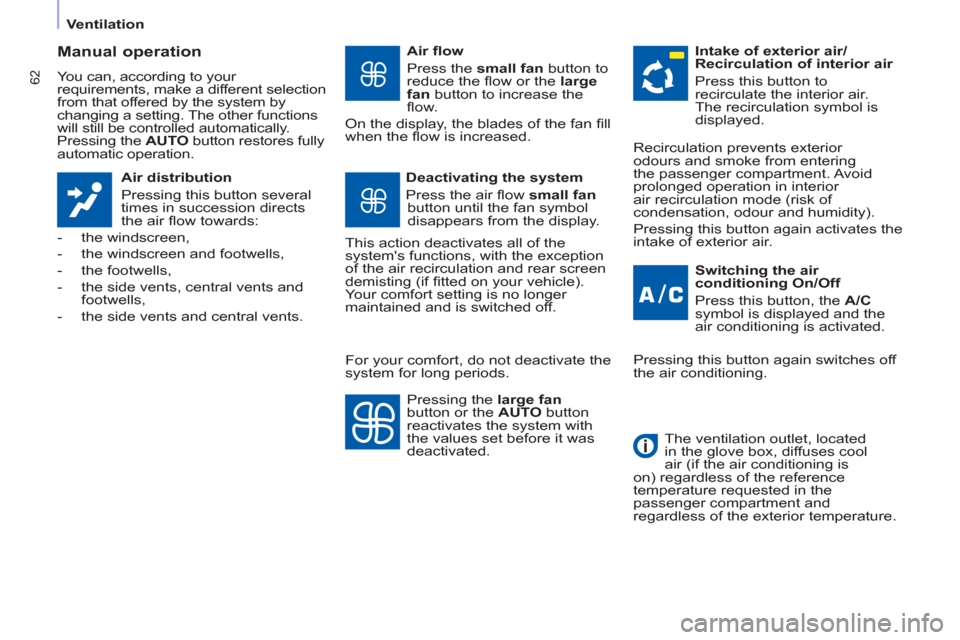
Air distribution
Pressing this button several
times in succession directs
the air fl ow towards:
- the windscreen,
- the windscreen and footwells,
- the footwells,
- the side vents, central vents and
footwells,
- the side vents and central vents.
Air fl ow
Press the small fan
button to
reduce the fl ow or the large
fan
button to increase the
fl ow.
On the display, the blades of the fan fi ll
when the fl ow is increased.
Switching the air
conditioning On/Off
Press this button, the A/C
symbol is displayed and the
air conditioning is activated.
Deactivating the system
Press the air fl ow small fan
button until the fan symbol
disappears from the display.
This action deactivates all of the
system's functions, with the exception
of the air recirculation and rear screen
demisting (if fi tted on your vehicle).
Your comfort setting is no longer
maintained and is switched off.
Intake of exterior air/
Recirculation of interior air
Press this button to
recirculate the interior air.
The recirculation symbol is
displayed.
Pressing the large fan
button or the AUTO
button
reactivates the system with
the values set before it was
deactivated. Recirculation prevents exterior
odours and smoke from entering
the passenger compartment. Avoid
prolonged operation in interior
air recirculation mode (risk of
condensation, odour and humidity).
Pressing this button again activates the
intake of exterior air.
Pressing this button again switches off
the air conditioning.
The ventilation outlet, located
in the glove box, diffuses cool
air (if the air conditioning is
on) regardless of the reference
temperature requested in the
passenger compartment and
regardless of the exterior temperature.
For your comfort, do not deactivate the
system for long periods.
Page 65 of 232

63
EASE OF USE
andCOMFOR
T
3
Ventilation
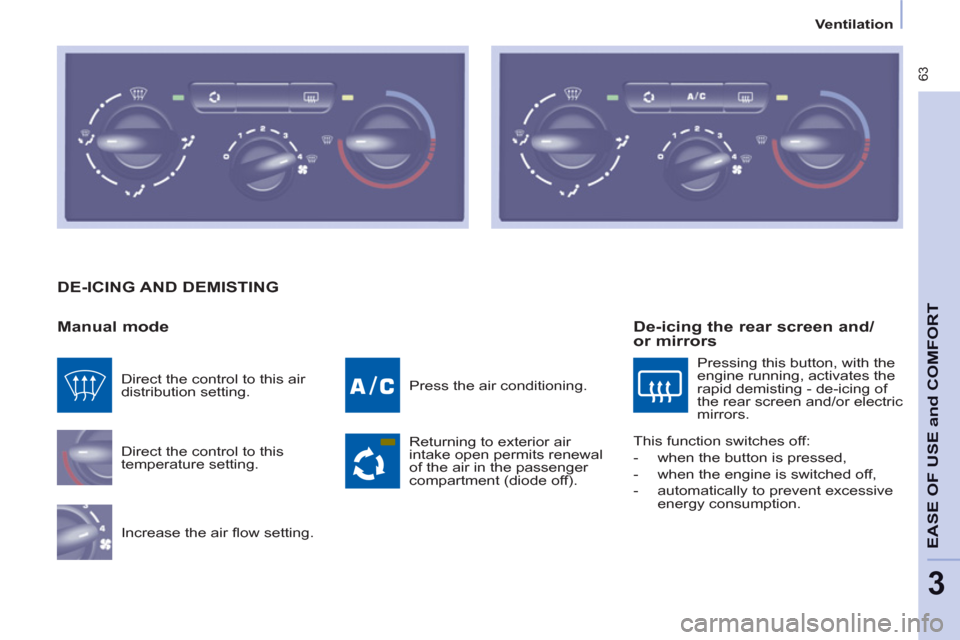
DE-ICING AND DEMISTING
Manual mode
Direct the control to this
temperature setting.
Increase the air fl ow setting. Press the air conditioning.
Returning to exterior air
intake open permits renewal
of the air in the passenger
compartment (diode off). Direct the control to this air
distribution setting.
De-icing the rear screen and/
or mirrors
Pressing this button, with the
engine running, activates the
rapid demisting - de-icing of
the rear screen and/or electric
mirrors.
This function switches off:
- when the button is pressed,
- when the engine is switched off,
- automatically to prevent excessive
energy consumption.