Page 254 of 292
252
09
4 3 2 1
65
CONFIGURATION
SETTING THE DATE AND TIME
The SETUP function gives access to the following options: System
language, Date & Time, Display (Brightness, Colour, Map colour), Vehicle,
Units, System.
Adjust the settings one by one using
the direction arrows and confi rm by
means of the dial.
Select the "Date format" function and
press the dial to confi rm.
Select the "Set date & time" function
and press the dial to confi rm.
Confi rm the format required using the dial.
Pressing the SETUP button for more than 2 seconds gives
access to:
These settings must be entered again if the battery has been
disconnected.
Press the SETUP button.
Confi rm the format required using
the dial.
Select the "Time format" function and
press the dial to confi rm.
Set date & time
Select the "Date & Time" function
and press the dial to confi rm.
Demo mode
GPS coverage
Description of the unit
Date & Time
Page 257 of 292
255
Avoid ferries
Recalculate
Settings
Navi volume
POI categories on Map
Set parameters for risk areas
Display on map
Visual alert
Sound alert
3
2
4
3
3
3
4
4
4
Dial number
Dial from address book
"Phone" Menu
Search phone
Call lists
Connect phone
Select ring tone
Phone/Ring tone volume
Phones connected
Enter mailbox number
Settings Disconnect phone
Rename phone
Delete pairing
Delete all pairings
Show details
"SETUP" menu
System language *
English
Español
Deutsch
Italiano
Français
Nederlands
Polski
Portuguese
Date & Time *
Set date & time
Date format
Time format
1
2
2
2
2
3
3
4
4
4
4
4
2
3
3
3
1
2
3
3
3
3
3
3
3
3
3
3
3
2
Avoid motorways
Route dynamics
Traffi c independent
Semi-dynamic
Avoidance criteria
Avoid toll roads Optimized route
3
3
4
4
4
4
4
*
Available according to model.
Page 258 of 292
256
* Available according to model. Dark blue
Map colour
Night mode for map
Units
Day mode for map
Vehicle *
Vehicle information
Alert log
Status of functions
Temperature
Celsius
Fahrenheit
Metric/Imperial
Kilometres (Consumption: l/100)
Kilometres (Consumption: km/l)
Miles (Consumption: MPG)
System
Auto. Day/Night for map
Factory reset
Software version
Automatic scrolling
3
4
4
2
4
3
4
4
2
3
4
4
3
4
4
4
2
4
3
3
3
Colour
Pop titanium
Toffee
Blue steel
Technogrey 3
4
4
4
4
Display
Brightness
2
3
Page 260 of 292

258
QUESTION
ANSWER
SOLUTION
The stored stations do
not function (no sound,
87.5 Mhz is displayed...). An incorrect waveband is selected. Press the BAND AST button to return to the
waveband (AM, FM1, FM2, FMAST) on which the
stations are stored.
The quality of reception
of the radio station
listened to gradually
deteriorates or the stored
stations do not function
(no sound, 87.5 Mhz is
displayed...). The vehicle is too far from the transmitter used by the station listened
to or there is no transmitter in the geographical area through which the
vehicle is travelling. Activate the RDS function to enable the system
to check whether there is a more powerful
transmitter in the geographical area.
The environment (hills, buildings, tunnels, basement car parks...) block
reception, including in RDS mode. This phenomenon is normal and does not indicate
a failure of the audio equipment.
The aerial is absent or has been damaged (for example when going
through a car wash or into an underground car park). Have the aerial checked by a PEUGEOT dealer.
Sound cut-outs of 1 to
2 seconds in radio mode. During this brief sound cut-out, the RDS searches for any frequency
permitting better reception of the station. Deactivate the RDS function if the phenomenon is
too frequent and always on the same route.
With the engine off,
the audio equipment
switches off after a few
minutes of use. When the engine is switched off, the audio equipment operating time
depends on the battery charge.
The switch-off is normal: the audio equipment switches to economy mode
and switches off to prevent discharging of the vehicle's battery. Start the vehicle's engine to increase the battery
charge.
Page 261 of 292

259
QUESTION
ANSWER
SOLUTION
TA is selected. However,
certain traffi c jams
along the route are not
indicated in real time. On starting, it is several minutes before the system begins to receive the
traffi c information. Wait until the traffi c information is being received
correctly (displaying of the traffi c information
symbols on the map).
In certain countries, only major routes (motorways...) are listed for the
traffi c information. This phenomenon is normal. The system is
dependent on the traffi c information available.
I receive a speed camera
alert for a camera which
is not on my route. The system announces all speed cameras located in a conical zone
forward of the vehicle. It may detect speed cameras on nearby or parallel
roads. Zoom the map to view the exact position of the
speed camera.
The audible speed
camera alert is not
working. Audible alerts are not active. Activate audible alerts in Navigation Menu,
Settings, Set parameters for risk areas.
The alert volume level is set to minimum. Increase the speed camera alert volume.
The altitude is not
displayed. On starting, the initialisation of the GPS may take up to 3 minutes to
receive more than 3 satellites correctly. Wait until the system has started up completely.
Check that there is a GPS coverage of at least
3 satellites (long press on the SETUP button, then
select GPS coverage).
Depending on the geographical environment (tunnel...) or the weather,
the conditions of reception of the GPS signal may vary. This phenomenon is normal. The system is
dependent on the conditions of reception of the
GPS signal.
The route is not
calculated successfully. The exclusion criteria may confl ict with the current location (exclusion of
toll roads on a motorway with tolls). Check the exclusion criteria.
Page 264 of 292

262
01
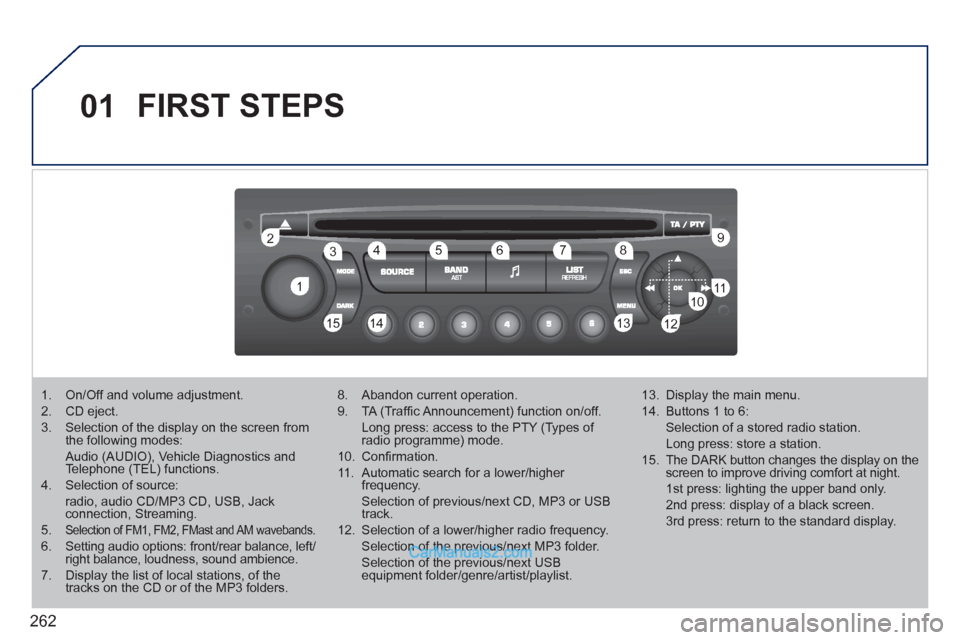
1 2
1011
13 14 153456 789
12
FIRST STEPS
1. On/Off and volume adjustment.
2. CD eject.
3. Selection of the display on the screen from
the following modes:
Audio (AUDIO), Vehicle Diagnostics and
Telephone (TEL) functions.
4. Selection of source:
radio, audio CD/MP3 CD, USB, Jack
connection, Streaming.
5.
Selection of FM1, FM2, FMast and AM wavebands.
6. Setting audio options: front/rear balance, left/
right balance, loudness, sound ambience.
7. Display the list of local stations, of the
tracks on the CD or of the MP3 folders.
8. Abandon current operation.
9. TA (Traffi c Announcement) function on/off.
Long press: access to the PTY (Types of
radio programme) mode.
10. Confi rmation.
11. Automatic search for a lower/higher
frequency.
Selection of previous/next CD, MP3 or USB
track.
12. Selection of a lower/higher radio frequency.
Selection of the previous/next MP3 folder.
Selection of the previous/next USB
equipment folder/genre/artist/playlist.
13. Display the main menu.
14. Buttons 1 to 6:
Selection of a stored radio station.
Long press: store a station.
15. The DARK button changes the display on the
screen to improve driving comfort at night.
1st press: lighting the upper band only.
2nd press: display of a black screen.
3rd press: return to the standard display.
Page 266 of 292
264
03 MAIN MENU
AUDIO FUNCTIONS
: radio,
CD, USB, options.
> MONOCHROME SCREEN C
For a detailed global view of the
menus available, refer to the
"Screen menu map" section of
this chapter.
TELEPHONE
: hands-free kit,
pairing, management of a call.
VEHICLE DIAGNOSTICS
: alerts log.
PERSONALISATION-
CONFIGURATION
: vehicle
parameters, display, languages.
Page 267 of 292

265
04
1
2
3
4
1
2
3
4
AUDIO
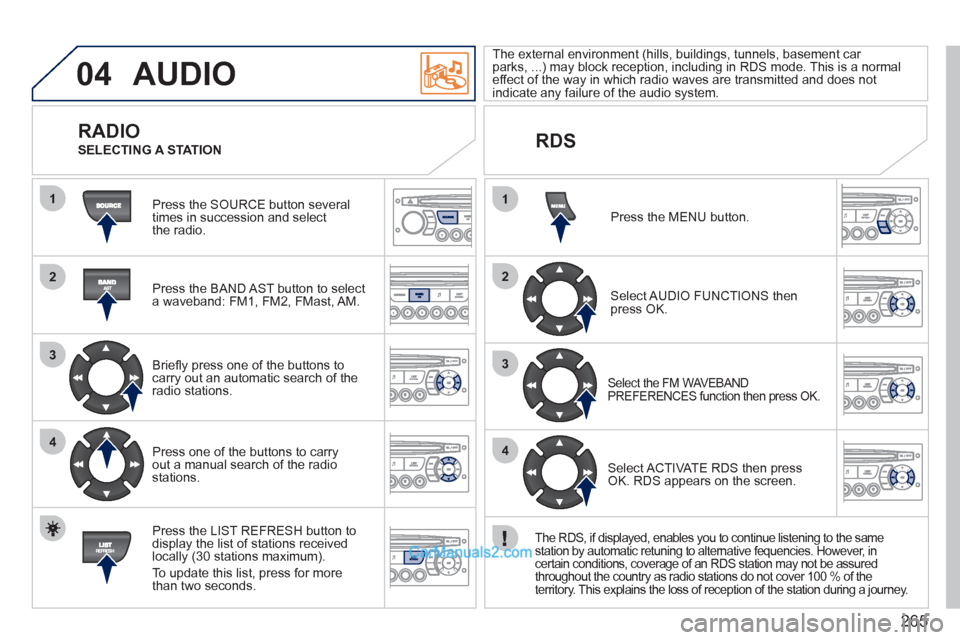
Press the SOURCE button several
times in succession and select
the radio.
Press the BAND AST button to select
a waveband: FM1, FM2, FMast, AM.
Briefl y press one of the buttons to
carry out an automatic search of the
radio stations.
Press one of the buttons to carry
out a manual search of the radio
stations.
Press the LIST REFRESH button to
display the list of stations received
locally (30 stations maximum).
To update this list, press for more
than two seconds.
The external environment (hills, buildings, tunnels, basement car
parks, ...) may block reception, including in RDS mode. This is a normal
effect of the way in which radio waves are transmitted and does not
indicate any failure of the audio system.
RDS
RADIO
SELECTING A STATION
Press the MENU button.
Select AUDIO FUNCTIONS then
press OK.
Select the FM WAVEBAND
PREFERENCES function then press OK.
Select ACTIVATE RDS then press
OK. RDS appears on the screen.
The RDS, if displayed, enables you to continue listening to the same
station by automatic retuning to alternative fequencies. However, in
certain conditions, coverage of an RDS station may not be assured
throughout the country as radio stations do not cover 100 % of the
territory. This explains the loss of reception of the station during a journey.