2011 Peugeot 3008 Hybrid 4 tow
[x] Cancel search: towPage 5 of 280

ALPHABETICAL INDEX 266-269
DRIVING 136-155
CHECKS 156-162
PRACTICAL INFORMATION 163-192
TECHNICAL DATA 193-198
AUDIO EQUIPMENT and TELEMATICS 199-265
Electric parking brake.....136Hill start assist................141Head-up display.............144Speed limiter..................r146
Cruise control .................1486-speed electronicgear control gearbox....150Parking sensors ..............154
Bonnet............................157Running out of fuel (Diesel).........................158Diesel engine..................159
Checking levels ..............160Checks............................161
Temporary puncture repair kit .......................163Changing a wheel...........169Changing a bulb.............172Changing a fuse .............17612 V Battery....................183Energy economy mode.............186
Changinga wiper blade ................187Recoveringthe vehicle....................188Towing a trailer...............r189Fitting roof bars ..............190Very cold climate screen..............190Accessories....................191
Electric drive ...................193Diesel engines................194Diesel weights................195
Dimensions .....................196Identification markings....197
VISUAL SEARCH 270-276
Emergency or assistance....199Peugeot Connect Media....203Peugeot Connect Sound ...........................247
Page 24 of 280

22
DRIVING SAFELY
Electric parkin
g brake
Manual application/release
The parking brake can be applied man-
ually
by pulling
the control lever A
.
When the ignition is on, the parking
brake can be released
manually by
pressing the brake pedal
and pulling
then releasing
the control lever A
.
Automatic application/release
Press the accelerator, the parking brake
is released automatically and progres-
sively on acceleration.
When the engine is switched off
, the
parking brake is applied
automatically.
If you get out of your vehicle
with the engine running, apply
the parking brake manually.
Never leave a child alone in the ve-
Before getting out of
the vehicle, check that
the braking warning
lamp ( red!
) and the
warning lamp P
in the control lever A
are on (not fl ashing).
hicle with the ignition on; they could
release the parking brake.
136 If this warning lamp is on in the
instrument panel, the automatic
application/release are deacti-
vated
.
If you are towing a trailer or if
the slope could alter (transport
by ship, lorry, recovery of the
vehicle, ...), make a manual
maximum application of the parking
brake (long pull on the control lever A
)
to immobilise the vehicle.
Page 44 of 280

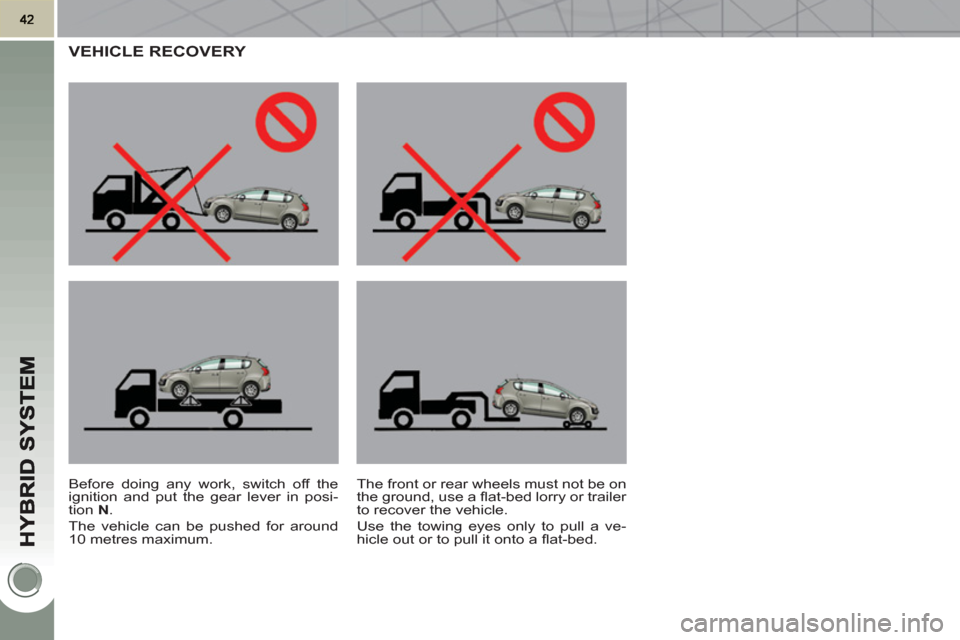
VEHICLE RECOVERY
Before doing any work, switch off the
ignition and put the gear lever in posi-
tion N
.
The vehicle can be pushed for around
10 metres maximum. The front or rear wheels must not be on
the ground, use a fl at-bed lorry or trailer
to recover the vehicle.
Use the towing eyes only to pull a ve-
hicle out or to pull it onto a fl at-bed.
Page 48 of 280

46
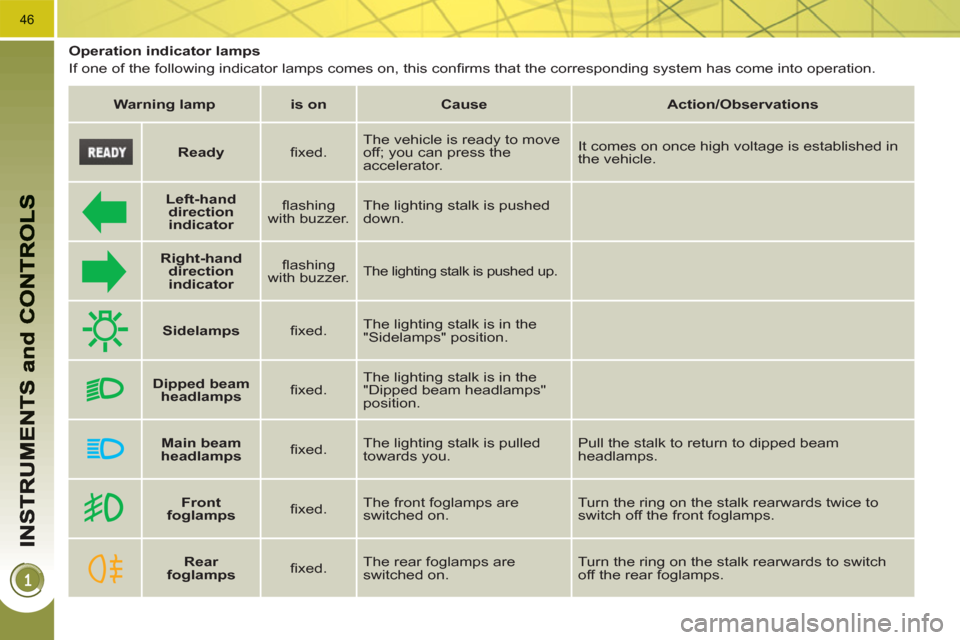
Operation indicator lamps
If one of the following indicator lamps comes on, this confi rms that the corresponding system has come into operation.
Warning lamp
is on
Cause
Action/Observations
Left-hand
direction
indicato
r
fl ashing
with buzzer. The lighting stalk is pushed
down.
Right-hand
direction
indicator
fl ashing
with buzzer.
The lighting stalk is pushed up.
Sidelamps
fi xed. The lighting stalk is in the
"Sidelamps" position.
Dipped beam
headlamps
fi xed. The lighting stalk is in the
"Dipped beam headlamps"
position.
Main beam
headlamps
fi xed. The lighting stalk is pulled
towards you. Pull the stalk to return to dipped beam
headlamps.
Ready
fi xed. The vehicle is ready to move
off; you can press the
accelerator. It comes on once high voltage is established in
the vehicle.
Front
foglamps
fi xed. The front foglamps are
switched on. Turn the ring on the stalk rearwards twice to
switch off the front foglamps.
Rear
foglamps
fi xed. The rear foglamps are
switched on. Turn the ring on the stalk rearwards to switch
off the rear foglamps.
Page 65 of 280

63
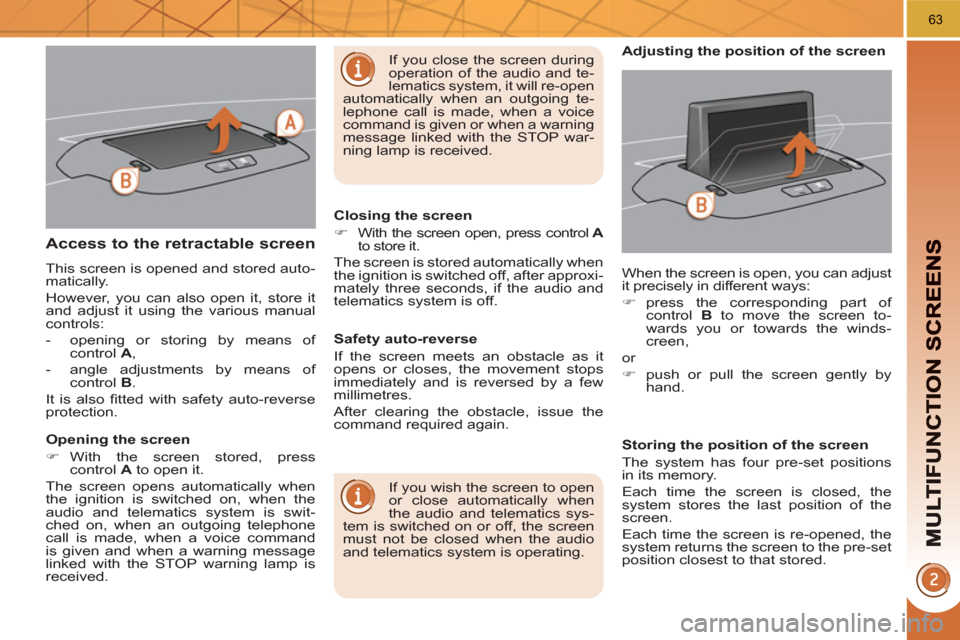
Access to the retractable screen
This screen is opened and stored auto-
matically.
However, you can also open it, store it
and adjust it using the various manual
controls:
- opening or storing by means of
control A
,
- angle adjustments by means of
control B
.
It is also fi tted with safety auto-reverse
protection.
Opening the screen
�)
With the screen stored, press
control A
to open it.
The screen opens automatically when
the ignition is switched on, when the
audio and telematics system is swit-
ched on, when an outgoing telephone
call is made, when a voice command
is given and when a warning message
linked with the STOP warning lamp is
received.
Closing the screen
�)
With the screen open, press control A
to store it.
The screen is stored automatically when
the ignition is switched off, after approxi-
mately three seconds, if the audio and
telematics system is off.
If you wish the screen to open
or close automatically when
the audio and telematics sys-
tem is switched on or off, the screen
must not be closed when the audio
and telematics system is operating. When the screen is open, you can adjust
it precisely in different ways:
�)
press the corresponding part of
control B
to move the screen to-
wards you or towards the winds-
creen,
or
�)
push or pull the screen gently by
hand.
Adjusting the position of the screen
Safety auto-reverse
If the screen meets an obstacle as it
opens or closes, the movement stops
immediately and is reversed by a few
millimetres.
After clearing the obstacle, issue the
command required again.
Storing the position of the screen
The system has four pre-set positions
in its memory.
Each time the screen is closed, the
system stores the last position of the
screen.
Each time the screen is re-opened, the
system returns the screen to the pre-set
position closest to that stored.
If you close the screen during
operation of the audio and te-
lematics system, it will re-open
automatically when an outgoing te-
lephone call is made, when a voice
command is given or when a warning
message linked with the STOP war-
ning lamp is received.
Page 70 of 280

68
The air conditioning system does not contain chlorine and does not
present any danger to the ozone layer.
Recommendations for ventilation and air conditioning
In order for these systems to be fully effective, follow the operation and mainte-
nance guidelines below:
�)
If the interior temperature remains very high after the vehicle has been parked
in the sun for a considerable time, fi rst ventilate the passenger compartment
for a few minutes.
Place the air fl ow control at a suffi cient level to provide an adequate renewal
of air in the passenger compartment.
�)
To obtain an even air distribution, take care not to obstruct the exterior air
intake grilles located at the base of the windscreen, the nozzles, the vents
and the air outlets, as well as the air extractor located in the boot.
�)
Use in preference the intake of exterior air as prolonged use of the air recir-
culation may cause misting of the windows and side windows.
�)
Do not cover the sunshine sensor, located on the dashboard; this is used for
regulation of the automatic air conditioning system.
�)
Operate the air conditioning system for 5 to 10 minutes, once or twice a
month to keep it in perfect working order.
�)
Ensure that the passenger compartment fi lter is in good condition and have
the fi lter elements replaced regularly (refer to the "Checks" section).
We recommend the use of a combined passenger compartment fi lter. Thanks
to its second special active fi lter, it contributes to the purifi cation of the air
breathed by the occupants and the cleanliness of the passenger compart-
ment (reduction of allergic symptoms, bad odours and greasy deposits).
�)
The air conditioning uses power from the engine while operating. This
results in an increase in the vehicle's fuel consumption.
When towing at or near maximum capacity or on steep slopes in high
ambient temperatures, switching off the air conditioning saves engine power
and so improves towing capacity.
Condensation created by the air conditioning results in a discharge of water
under the vehicle when stationary, which is perfectly normal.
�)
To ensure correct operation of the air conditioning system, you are also
advised to have it checked regularly.
�)
If the system does not produce cold air, do not use it and contact a PEUGEOT
dealer. The control button is located
on the air conditioning system
control panel.
REAR SCREEN DEMIST/DEFROST
�)
Switch off the demist/de-frost of the rear screen and door mirrors as soon as it
is no longer necessary as
lower current consump-
tion results in reduced fuel
consumption.
Switching on
The rear screen demist/defrost can only
operate when the engine is running.
�)
Press this button to demist/defrost
the rear screen and the door mir-
rors. The indicator lamp associated
with the button comes on.
Switching off
The demist/defrost switches off auto-
matically to prevent an excessive con-
sumption of current.
�)
It is possible to stop the demist/de-
frost operation before it is switched off
automatically by pressing the button
again. The indicator lamp associated
with the button switches off.
Page 95 of 280

93
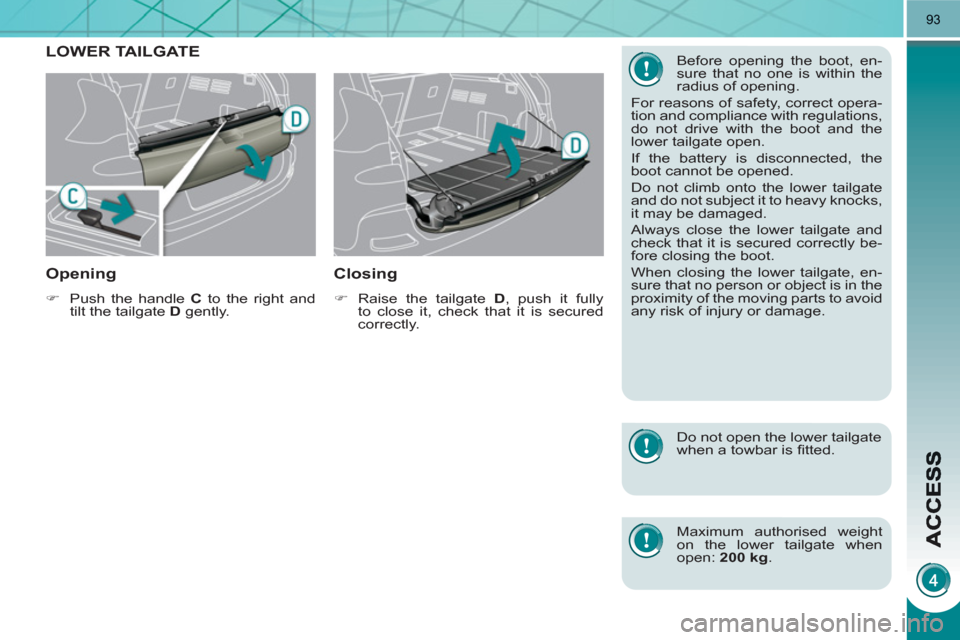
LOWER TAILGATE
Openin
g
�)
Push the handle C
to the right and
tilt the tailgate D
gently.
Closing
�)
Raise the tailgate D
, push it fully
to close it, check that it is secured
correctly.
Before opening the boot, en-
sure that no one is within the
radius of opening.
For reasons of safety, correct opera-
tion and compliance with regulations,
do not drive with the boot and the
lower tailgate open.
If the battery is disconnected, the
boot cannot be opened.
Do not climb onto the lower tailgate
and do not subject it to heavy knocks,
it may be damaged.
Always close the lower tailgate and
check that it is secured correctly be-
fore closing the boot.
When closing the lower tailgate, en-
sure that no person or object is in the
proximity of the moving parts to avoid
any risk of injury or damage.
Do not open the lower tailgate
when a towbar is fi tted.
Maximum authorised weight
on the lower tailgate when
open: 200 kg
.
Page 96 of 280

94
The key cannot be removed
from the lock until the cap is
put back on the tank.
Opening the cap may trigger an in-
rush of air. This vacuum, which is
completely normal, is caused by the
sealing of the fuel system.
FUEL TANK
Capacity of the tank: approximately
56.5 litres.
To fi ll the tank safely:
When refuelling is complete:
�)
put the cap back in place,
�)
turn the key to the right, then remove
it from the cap,
�)
close the fi ller fl ap.
�)
remove the cap and secure it on the
hook, located on the inside of the
fl ap,
�)
fi ll the tank, but do not continue
after the 3rd cut-off of the nozzle
;
this could cause malfunctions.
Low fuel level
Operatin
g fault
A malfunction of the fuel gauge is indi-
cated by the return to zero of the fuel
gauge needle.
Have it checked by a PEUGEOT dealer.
Refuelling
A label affi xed to the inside of the fi ller
fl ap reminds you of the type of fuel to be
used according to your engine.
More than 5 litres of fuel must be add-
ed in order to be registered by the fuel
gauge. When the low fuel level is
reached, this warning lamp
comes on in the instrument
panel, accompanied by an
audible signal and a message
in the multifunction screen. When the
lamp fi rst comes on, there is approxi-
mately
6 litres
of fuel remaining.
Until suffi cient fuel has been added, this
warning lamp appears every time the
ignition is switched on, accompanied by
an audible signal and a message. When
driving, this audible signal and message
are repeated with increasing frequency,
as the fuel level drops towards "0"
.
You must refuel to avoid run-
ning out of fuel.
If you run out of fuel (Diesel),
refer also to the "Checks"
section.
�)
the engine must
be turned off
at the ignition
switch
(the Ready
lamp must be off) to avoid an auto-
matic restart of the engine while re-
fuelling,
�)
open the fuel fi ller fl ap,
�)
insert the key in the cap, then turn it
to the left,